
Android 中语音和音频处理的初学者指南
4.73/5 (5投票s)
通过最简单的 Android 音频教程,学习文本转语音、语音识别、音频录制和音频播放
目录
1. 背景
2. 准备应用
3. 文本转语音
4. 语音识别
4.1 语音识别 Intent
4.2 使用 SpeechRecognizer 类
5. 使用 Audio Recorder
6. 音频信号处理
7. 结论
1. 背景
语音和音频是当今应用程序中最重要的方面。语音识别、文本转语音是一些让你的应用更具直观性的功能。此外,了解音频录制和播放也很有帮助!例如,你想通过简单的文本向用户呈现一个 Toast,想象一下也能将其读出来是多么直观?
或者想象一下将语音命令与应用的菜单选项关联起来是多么直观?我敢肯定你的用户会觉得更有趣,并且会喜欢具有这些创新功能的应用。
然而,我在 Google Play 上看到,很多应用都没有利用这些功能。同时,在互联网上搜索也找不到很多关于 Android 语音和音频处理的完整教程。因此,我决定写一篇非常基础的教程,帮助你理解 Android 中音频和语音处理的原理,并帮助你开始着手!
2. 准备应用
照例,我们将尽量保持 UI 简洁,专注于让功能正常工作。首先来看看 UI。

图 2.1 应用的最终 UI
所以,我们的 UI 主要有一个跨越整个表单的 EditText。它有一个带有三个选项的菜单:第一个用于语音识别,第二个用于语音合成或文本转语音,第三个用于音频录制。当我们选择“录制”菜单时,标题将变为“停止”。因此,用户现在可以选择同一个菜单来停止录制。
我们将首先在 Eclipse 中创建一个 Android 项目,最小 SDK 要求为 14,目标 SDK 要求为 14。我们将项目命名为 SpeechAndAudio,包名为 com.integratedideas。但我强烈建议你使用自己的包名。
这是我们的 res/layout/activity_main.xml
<?xml version="1.0" encoding="utf-8"?>
<LinearLayout xmlns:android="http://schemas.android.com/apk/res/android"
    android:layout_width="fill_parent"
    android:layout_height="fill_parent"
    android:orientation="vertical" >

    <TextView
        android:layout_width="fill_parent"
        android:layout_height="wrap_content"
        android:text="VoiceRecognition Demo!" />

    <EditText
        android:id="@+id/edWords"
        android:layout_width="match_parent"
        android:layout_height="wrap_content"
        android:layout_weight="0.38"
        android:gravity="top"
        android:ems="10" >

        <requestFocus />
    </EditText>

</LinearLayout>
注意 EditText 的 `android:gravity="top"` 用法。没有这一行,光标将位于控件的中间,输入也将从中间开始。
如图 2.1 所示,我们还必须有一个显示元素的菜单。我们已经通过我们关于“文章菜单、多个 Intent、资源管理”的 Android 教程 学会了如何处理菜单。
所以我们将编辑 res/menu/main.xml 并将其修改为如下所示的 main.xml。
<menu xmlns:android="http://schemas.android.com/apk/res/android"
    xmlns:tools="http://schemas.android.com/tools"
    tools:context="com.integratedideas.speechandaudio.MainActivity" >


     <item
        android:id="@+id/menuVoiceRecog"
        android:orderInCategory="100"
        android:showAsAction="never"
        android:title="Speech Recognition"/>
      <item
        android:id="@+id/menuTTS"
        android:orderInCategory="100"
        android:showAsAction="never"
        android:title="Text to Speech"/>
      <item
        android:id="@+id/menuRecord"
        android:orderInCategory="100"
        android:showAsAction="never"
        android:title="Record"/>

</menu>
我们有三个菜单项:menuVoiceRecog、menuTTS、menuRecord,分别用于语音识别、文本转语音和录制音频。让我们也在 MainActivity 中声明一个 edWords 实例,并使用 findViewById 将其初始化为 activity_main.xml 的 edWord。
我们还将更新我们的 MainActivity.java
public class MainActivity extends Activity {
EditText edWords;

    private void showToast(String message)
     {
            Toast.makeText(getApplicationContext(), message, Toast.LENGTH_SHORT)
                    .show();
     }
    @Override
    protected void onCreate(Bundle savedInstanceState)
    {
        super.onCreate(savedInstanceState);
        setContentView(R.layout.activity_main);
       edWords=(EditText)findViewById(R.id.edWords);

    }
    @Override
    protected void onActivityResult(int requestCode, int resultCode, Intent data)
    {

        super.onActivityResult(requestCode, resultCode, data);
    }

    @Override
    public boolean onCreateOptionsMenu(Menu menu) {

        // Inflate the menu; this adds items to the action bar if it is present.
        getMenuInflater().inflate(R.menu.main, menu);
        return true;
    }

    @Override
    public boolean onOptionsItemSelected(MenuItem item) {
        // Handle action bar item clicks here. The action bar will
        // automatically handle clicks on the Home/Up button, so long
        // as you specify a parent activity in AndroidManifest.xml.

        int id = item.getItemId();

        return super.onOptionsItemSelected(item);
    }


}
请注意,我们添加了 `onActivityResult` 方法,因为我们将使用 Intent。在准备好应用环境后,就可以直接着手进行语音合成或文本转语音部分了。
另外,请注意我们添加了一个简单的 `showToast()` 方法,它接受一个字符串并在 toast 中显示。Toast basically is a short lived dialog in Android which appears at the bottom of the form, remains visible for some period of time and then vanishes. It's a great way of letting user know the response of certain actions. (Toast basically is a short lived dialog in Android which appears at the bottom of the form, remains visible for some period of time and then vanishes. It's a great way of letting user know the response of certain actions.)
3. 文本转语音
文本转语音是一种系统可以为给定句子合成语音的概念。人工智能语音以自然的方式读出句子中的单词。
`android.speech.tts` 有一个 `TextToSpeech` 类,它能帮助我们实现 TTS。它需要与支持的 Locale 或你希望 TTS 引擎发音的语言进行初始化。一旦初始化,你就可以调用 `speak` 方法来朗读你传递给该方法的文本。
所以,让我们在类中声明一个 TextToSpeech 对象,并在 `onCreate` 方法中初始化其 `onClickListener`。
TextToSpeech tts;

@Override
    protected void onCreate(Bundle savedInstanceState)
    {
        super.onCreate(savedInstanceState);
        setContentView(R.layout.activity_main);

        edWords=(EditText)findViewById(R.id.edWords);
        tts=new TextToSpeech(getApplicationContext(), new TextToSpeech.OnInitListener() {
               @Override
               public void onInit(int status)
               {
                   tts.setLanguage(Locale.US);
               }
            });

}
我使用了 `Locale.US`,你可以查看其他的 Locale。只需删除 `Locale.US` 中的 `.US`,然后输入 `.`,它就会弹出其他 Locale。
tts 有两个变量可以改变语音的生成方式:**Pitch** 和 **SpeechRate**。Pitch 是生成语音的中心频率,SpeechRate 是说话的速度。两者的取值范围都是 (0-1.0f)。1.0f 的 SpeechRate 是最快的,0.0f 是最慢的。同样,高 pitch 意味着高频率,产生柔和的女声。
所以,现在让我们修改 `onOptionsItemSelected` 方法并集成语音合成。
public boolean onOptionsItemSelected(MenuItem item) {
        // Handle action bar item clicks here. The action bar will
        // automatically handle clicks on the Home/Up button, so long
        // as you specify a parent activity in AndroidManifest.xml.

        int id = item.getItemId();
        switch(id)
        {
        case R.id.menuVoiceRecog:


        break;
        case R.id.menuTTS:
            tts.setPitch(.8f);
            tts.setSpeechRate(.1f);
            tts.speak(edWords.getText().toString().trim(), TextToSpeech.QUEUE_FLUSH, null);
            break;
        case R.id.menuRecord:

            break;
        }
        return super.onOptionsItemSelected(item);
    }
如你所见,我们调用了 `speak` 方法,并将 `edWords` 中的文本作为第一个参数传递,引擎将根据指定的 pitch 和 rate 进行朗读。如果你不指定它们的值,TTS 将假定一个默认值。
现在构建并运行你的应用程序,并在你的设备上运行,就像我们 这里 学到的那样。我不会真的费心集成到模拟器中,因为归根结底,你会在设备上进行测试。
4. 语音识别
语音识别可以通过两种方式实现:第一种是使用 Intent,第二种是作为服务。基于 Intent 的方法是从菜单触发的。所以当你想要检测到语音时,你启动一个语音识别 Intent,它在你说话时保持活动状态,然后它会识别出你说的话。
4.1 语音识别 Intent
所以,让我们在 `onOptionSelection` 方法中准备 `menuVoiceRecog` 的 case。
case R.id.menuVoiceRecog:
            Intent intent = new Intent(RecognizerIntent.ACTION_RECOGNIZE_SPEECH);
            intent.putExtra(RecognizerIntent.EXTRA_LANGUAGE_MODEL,
                    RecognizerIntent.LANGUAGE_MODEL_FREE_FORM);
            intent.putExtra(RecognizerIntent.EXTRA_PROMPT, "Voice recognition Demo...");
            startActivityForResult(intent, REQUEST_CODE);

        break;
每当我们处理 Intent 时,都需要一个 REQUEST_CODE,以便在 `onActivityResult` 中可以找出是哪个 Intent 的结果到达了。所以,让我们在类中声明一个整数变量。
static final int REQUEST_CODE=1;
所以,当你选择这个菜单选项时,会出现一个新的 Intent,它会提示你说话。在你停止说话后,它的结果将通过 `onActivityResult` 提供。
@Override
    protected void onActivityResult(int requestCode, int resultCode, Intent data)
    {
        if (requestCode == REQUEST_CODE && resultCode == RESULT_OK)
        {
            // Populate the wordsList with the String values the recognition engine thought it heard
            ArrayList<String> matches = data.getStringArrayListExtra(
                    RecognizerIntent.EXTRA_RESULTS);

            showToast(matches.get(0));
            edWords.setText(edWords.getText().toString().trim()+" "+matches.get(0));
        }
        super.onActivityResult(requestCode, resultCode, data);
    }
Intent 返回的匹配结果是一个带有 EXTRA_RESULTS 标签的数组。其中 0 索引的元素是最佳匹配,第一个元素是第二佳匹配,依此类推。即使你说了几个词,整个识别结果也会作为第一个字符串提供。所以我们捕获这个字符串并将其追加到我们的 editText 中。

图 2.2:通过 Intent 进行语音识别的结果
你可以看到“all the citizens”被错误地识别为“i am in cities”。
在处理完 Intent(实际上用处不大)后,是时候创建一个持续监控语音并不断检测它的进程了。
4.2 使用 SpeechRecognizer 类
你可能已经注意到,当你触发语音识别过程时,它会启动一个 Intent,这有时非常烦人。为了在后台运行语音识别,你可以使用 SpeechRecognizer 类的对象,通过工厂方法 `SpeechRecognizer.createSpeechRecognizer(Context)` 进行初始化,并使用 `setRecognizationListener` 设置一个新的监听器。
此外,你还需要在一个处理与语音识别相关的事件的类中实现 `RecognitionListener`。
class listener implements RecognitionListener
       {
                public void onReadyForSpeech(Bundle params)
                {
                         Log.d(TAG, "onReadyForSpeech");
                }
                public void onBeginningOfSpeech()
                {
                         Log.d(TAG, "onBeginningOfSpeech");
                }
                public void onRmsChanged(float rmsdB)
                {
                         Log.d(TAG, "onRmsChanged");
                }
                public void onBufferReceived(byte[] buffer)
                {
                         Log.d(TAG, "onBufferReceived");
                }
                public void onEndOfSpeech()
                {
                         Log.d(TAG, "onEndofSpeech");
                }
                public void onError(int error)
                {
                         Log.d(TAG,  "error " +  error);

                }
                public void onResults(Bundle results)
                {
                         String str = new String();
                         Log.d(TAG, "onResults " + results);
                         ArrayList data = results.getStringArrayList(SpeechRecognizer.RESULTS_RECOGNITION);
                         str = data.get(0).toString();

                         edWords.setText(edWords.getText().toString()+" "+str);


                }
                public void onPartialResults(Bundle partialResults)
                {
                         Log.d(TAG, "onPartialResults");
                }
                public void onEvent(int eventType, Bundle params)
                {
                         Log.d(TAG, "onEvent " + eventType);
                }
       }
我们关心的处理器是 `onResult`,我们在其中获取识别出的单词(或单词),并将其追加到 `edWords` 控件中。
SpeechRecognizer 对象 sr 可以按以下方式初始化。
sr= SpeechRecognizer.createSpeechRecognizer(this);
sr.setRecognitionListener(new listener());
最后,在菜单点击事件监听器中,可以使 sr 开始监听。
            Intent intent = new Intent(RecognizerIntent.ACTION_RECOGNIZE_SPEECH);
            intent.putExtra(RecognizerIntent.EXTRA_LANGUAGE_MODEL,RecognizerIntent.LANGUAGE_MODEL_FREE_FORM);
            intent.putExtra(RecognizerIntent.EXTRA_CALLING_PACKAGE,"voice.recognition.test");

            intent.putExtra(RecognizerIntent.EXTRA_MAX_RESULTS,5);
            sr.startListening(intent);
这与 4.1 中讨论的唯一的显著区别是,我们在这里启动的是一个监听器,而不是启动一个 Activity。
引用注意
请记住,此解决方案从 Android 4.1 Jelly Beans 及更高版本开始不再完全可用。从那个版本开始,当你启动语音识别时,它会以一声哔声开始,并在大约 4 秒的暂停后自动分派对象。在这种情况下,你必须扩展 `RecognitionService`,检查是否存在静音期。在错误处理程序中,将声音静音半秒并重新启动服务。这个解决方法不适合初学者教程,超出了本文的范围。
5. 使用 Audio Recorder
你需要授予应用录制音频的权限。你还需要访问写入外部文件夹的权限,以便能够存储录制的音频。
所以,编辑你的 manifest 文件并添加以下行:
  <uses-permission android:name="android.permission.WRITE_EXTERNAL_STORAGE"/>
  <uses-permission android:name="android.permission.RECORD_AUDIO"/>
为了能够将音频文件存储在 SD 卡的某个文件夹中,我们将首先在 SD 卡的 Music 文件夹中创建一个文件夹。我们已经知道 如何设置外部文件夹中的应用目录。
//////////////// Preparing Directory////////
        try
        {
            Log.d("Starting", "Checking up directory");
             File mediaStorageDir = new File(Environment.getExternalStoragePublicDirectory(Environment.DIRECTORY_MUSIC), "SpeechAndAudio");
           // This location works best if you want the created images to be shared
           // between applications and persist after your app has been uninstalled.

           // Create the storage directory if it does not exist
           if (! mediaStorageDir.exists())
           {
               if (! mediaStorageDir.mkdir())
               {
                   Log.e("Directory Creation Failed",mediaStorageDir.toString());


               }
               else
               {
                   Log.i("Directory Creation","Success");
               }
        }
        }
           catch(Exception ex)
           {
           Log.e("Directory Creation",ex.getMessage());
           }
        filePath=Environment.getExternalStoragePublicDirectory(Environment.DIRECTORY_MUSIC).getPath()+"/"+"SpeechAndAudio/";
        /////////////////////////////////////////////
在设置好存储文件的目录后,我们将直接着手实现录制。这是我们的工作流程:
1) 点击“菜单-录制”后,菜单标题应更改为“停止”。
2) 在录制时,初始化一个 MediaRecorder 对象以在文件中录制音频流。我们将从当前时间戳生成文件名。
3) 录制完成后,使用 MediaPlayer 对象播放刚刚录制的文件。
这是 `onOptionItemSelected` 方法中 `menuRecord` 的代码。
case R.id.menuRecord:
             if(item.getTitle().equals("Record"))
             {// Record
                 fileName = new SimpleDateFormat("yyyyMMddhhmm'.3gp'").format(new Date());
                 fname=filePath+fileName;
                 item.setTitle("Stop");

                 recorder = new MediaRecorder();
                    recorder.setAudioSource(MediaRecorder.AudioSource.MIC);
                    recorder.setOutputFormat(MediaRecorder.OutputFormat.THREE_GPP);
                    recorder.setOutputFile(fname);
                    recorder.setAudioEncoder(MediaRecorder.AudioEncoder.AMR_NB);

                    try {
                        recorder.prepare();
                    } catch (Exception e) {
                        Log.e("In Recording", "prepare() failed");
                    }

                    recorder.start();


             }
             else
             {
                 item.setTitle("Record");
                 recorder.stop();
                 recorder.release();
                 recorder = null;
                 //Stop
                 ////////////// Now Play/////////////
                 player = new MediaPlayer();
                    try {
                        player.setDataSource(fname);
                        player.prepare();
                        player.start();
                    } catch (Exception e) {
                        Log.e("Player Exception", "prepare() failed");
                    }

             }
            break;
所以现在你所有录制的音频文件都将存储在 sdcard/Music/SpeechAndAudio 文件夹中,你也可以离线播放!
6. 音频信号处理
处理语音和音频是 Android 中一个重要的部分。有几种数字信号处理算法,从简单的音高检测到改变信号的基频。Google 最近发布了一个基于 NDK 的音频信号处理库,名为 patchfield。但是,还有一个优秀的音频信号处理库,它纯 Java 编写,名为 TarsosDsp。
你可以进入 `/latest` 文件夹并下载 TarsosDSP-Android-latest-bin.jar。将这个库复制到你的项目 `lib` 文件夹中。清理并构建你的项目,以便开始在 Android 中进行音频信号处理。
我展示了一个简单但非常有效的音高检测算法。首先,我们添加一个名为 menuAudioProcessing 的菜单项。在 `onOptionsItemSelected` 方法中,我们为这个菜单选项添加一个 case。
case R.id.menuAudioProcess:


            AudioDispatcher dispatcher = AudioDispatcherFactory.fromDefaultMicrophone(22050,1024,0);
            PitchDetectionHandler pdh = new PitchDetectionHandler() {
                @Override
                public void handlePitch(PitchDetectionResult result,AudioEvent e)
                {
                        final float pitchInHz = result.getPitch();
                        runOnUiThread(new Runnable() {
                            @Override
                            public void run()
                            {

                                TextView text = (TextView) findViewById(R.id.tvMessage);
                                text.setText("" + pitchInHz);

                            }
                        });
                }
        };
        AudioProcessor p = new PitchProcessor(PitchEstimationAlgorithm.FFT_YIN, 22050, 1024, pdh);
        dispatcher.addAudioProcessor(p);
        new Thread(dispatcher,"Audio Dispatcher").start();
一旦你选择这个选项,你需要说话,你会在文本视图中看到非常高的音高值,当你停止时,音高值会变成负数,如下图所示。
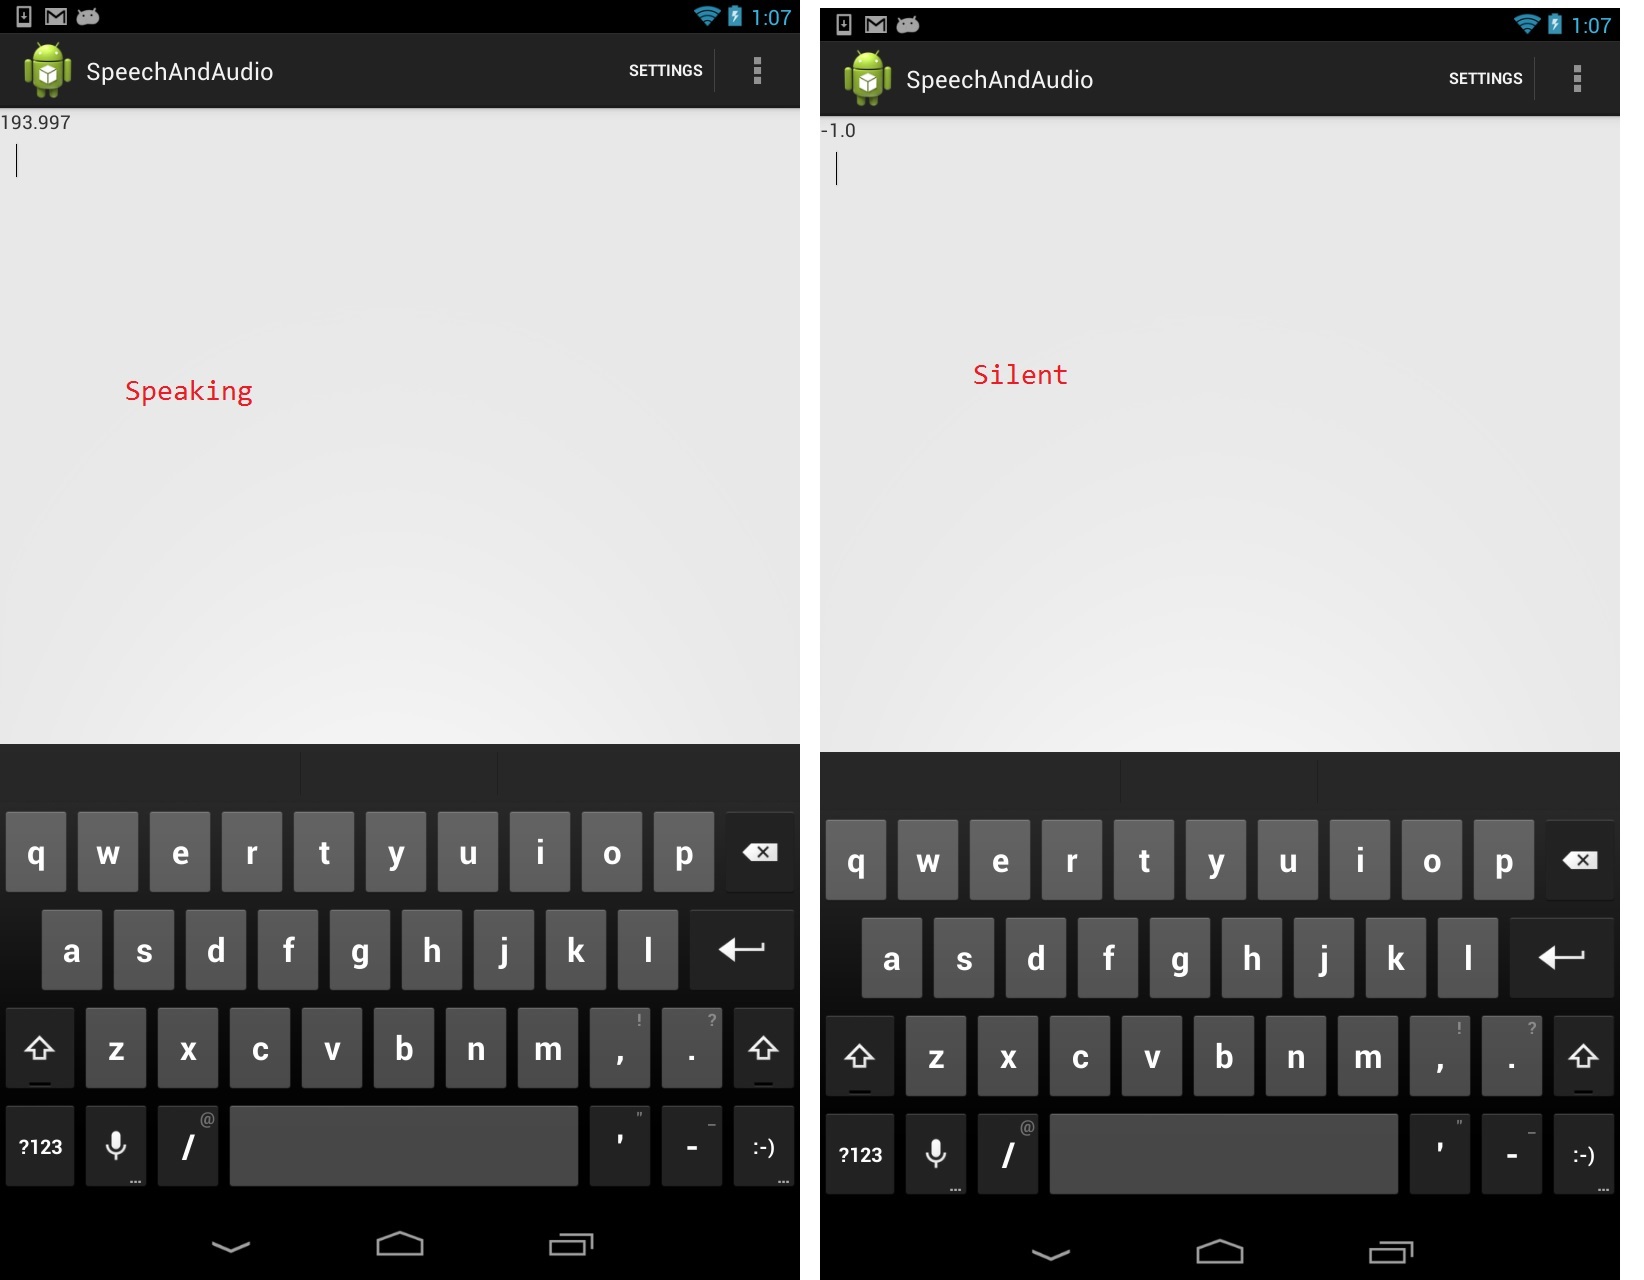
图 8.1:使用 TarsosDSP 在 Android 中进行音频信号处理的音高检测
以这个例子为起点,你可以尝试其他的信号处理功能。你只需要做的就是向 `dispatcher` 对象添加一个 `handler`,其中 `handler` 是不同的音频处理算法。使用 TarsosDSP 中任何实现 AudioProcessor 的类的一般方法是,首先从你的音频数据创建一个 AudioEvent,然后调用 AudioProcessor 的 `process` 方法。事件处理完毕后,你可以检查 AudioEvent 缓冲区的内容,或者在某些情况下,监听特定的事件/回调,例如 PercussionOnsetDetector 的 OnsetHandler 及其 handleOnset() 方法。
7. 结论
音频信号处理和音频处理是 Android 中多媒体相关应用的一个非常重要的方面。尽管 Android 提供了简单而有效的处理方法,但互联网上关于如何有效地在 Android 中执行音频和声音相关工作的教程并不多。
我想写一篇关于 Android 语音和音频信号处理的初学者教程,可以作为音频处理的起点。你可以通过集成文本转语音和音高检测来构建智能应用程序。语音识别可以由音高检测触发。所以你可以用音频做一些有趣的事情。希望本教程能鼓励你在你的应用中更多地使用音频功能。