
为机器人构建用户界面 - 第二部分。
5.00/5 (5投票s)
在本系列的第二篇文章中,我们将开始使用可视化工具包 (VTK) 构建机器人的 3D 环境。

第二部分 a - VTK 基础
现在我们正式开始,着手构建 3D 用户界面……本文还包含了首次上传的完整项目代码。这是第二部分 c 结束时 3D VTK UI 的快速预览截图。

学习 VTK 最快的方法是观看 KitWare VTK 概览视频。这将为你节省数天的调试时间(叹气……就像我一样……过度的自信总是会害了你)。
如果你有更多空闲时间,并且真心想深入研究 VTK,你需要熟悉 VTK 的数据结构。你可以在以下文章中阅读有关数据结构的内容(如果你想要更详细的信息,也可以购买 书籍)。
因此,从这一点开始,我们假设你已经熟悉了 reader、mapper、actor 等概念。你不必立即能够构建一个 VTK 应用程序,但应该熟悉这些概念。实际上,这意味着你理解 上一篇文章中的程序正在做什么。我们将在此基础上构建我们的 3D 环境。
我们将按以下方式进行:
-
此时,我们将创建一个 Eclipse PyDev 项目。这将成为整个系统的骨干。
-
将构建两个类:
-
一个用于程序入口点的主类。
-
一个 SceneObject 类,它是 3D 世界中对象的父类的开端。
-
-
本文将通过使用 SceneObject 模板将一个球体对象重新添加到世界中来结束。
-
下一篇文章(第二部分 b)将通过基本来说“我想绘制球体/创建第三人称相机/绘制复杂的模型……”来完成一些 VTK 场景,并讨论如何做到这一点,几乎是以围绕在 VTK 中执行特定任务的独立主题的形式。
-
第二部分 c 将总结构建一个 3D 环境,该环境是我们从机器人视角表示的世界。
-
其余的文章将使用此项目来添加 2D PyQt 和 LCM 组件。
最后,这就像是在“我正在构建一个游戏”的方式来完成 VTK。这是因为,与处理科学图形的一般 VTK 用户不同,我们认为我们实际上正在构建一个实时模拟环境,约等于一个游戏。过去(……赶紧戴上我的假牙……)当我们教授游戏设计时,我们会介绍一套你可以使用的精妙工具箱——例如,蒙皮模型、变形地形、像素着色器——然后学生们选择他们想要为自己的游戏使用的东西。这篇帖子遵循类似的思路。
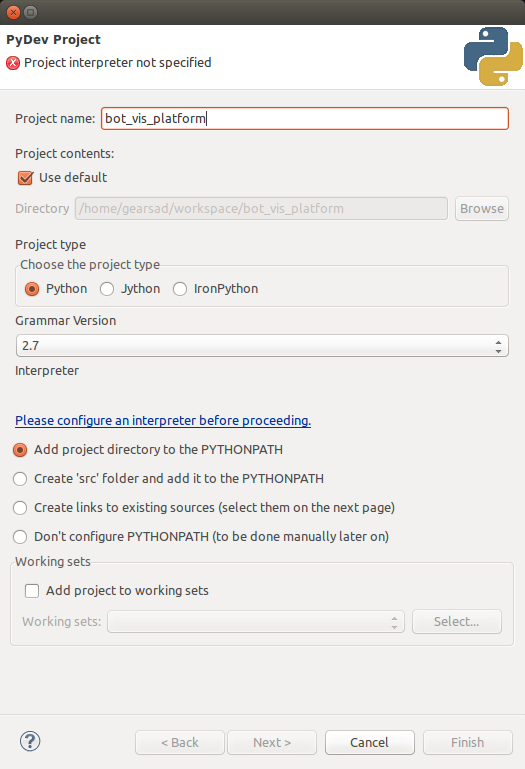
创建 PyDev 项目
要创建我们的基础项目,你需要:
-
在 Eclipse 中(设置好 PyDev 视角)单击“文件”->“新建”->“PyDev 项目”。
-
为你的项目命名,我使用了“bot_vis_platform”。
-
单击“完成”,然后跳到第三点。
-
如果由于“完成”按钮变灰而无法单击,如下所示,你可能需要配置一个解释器。
-
单击“请在继续之前配置解释器”。
-
单击“快速自动配置”。
-
之后,你应该能够单击“完成”并创建你的项目。
-
-
项目创建完成后,你需要创建一个主文件和几个用于未来组件的包文件夹。
-
在“PyDev 包浏览器”中,右键单击根节点“bot_vis_platform”,选择“新建”->“PyDev 包”,并将其命名为“bot_vis_platform”(这将是我们的根包,它将引用 VTK、LCM 和 PyQt 组件)。

-
在同一个根节点“bot_vis_platform”的包浏览器中,选择“新建”->“PyDev 包”,创建一个名为“scene”的包(我们将在该文件夹中构建所有 VTK 组件)。
-
最后,在“bot_vis_package”中,再次右键单击,选择“新建”->“PyDev 模块”,并创建一个名为“bot_vis_main”的模块。这将是我们的主程序,所以当它询问模板时,选择“模块:main”(这只会给你一些样板代码)。

-
你的最终项目设置应该类似于下面的截图,并且你应该能够运行程序(下一部分将开始构建你可以与之交互的内容)。

-
构建主渲染循环
目前,我们将使用“vtkRenderWindowInteractor”来处理渲染。它将负责主渲染循环以及与世界的交互。作为占位符,我们将放置一个球体源,并让相机自动对焦于它。用下面的代码替换“bot_vis_main”程序。
如果你运行该模块,点击顶部工具栏播放按钮右侧的下拉箭头,然后选择“bot_vis_platform bot_vis_main”,你应该能看到熟悉的球体。

在某些情况下,该选项不可用。如果你无法做到这一点,只需在包/项目浏览器中右键单击“bot_vis_main.py”,然后在那里使用“运行”菜单。
import vtk

if __name__ == '__main__':

    # Sphere
    sphereSource = vtk.vtkSphereSource()
    sphereSource.SetCenter(0.0, 0.0, 0.0)
    sphereSource.SetRadius(4.0)

    sphereMapper = vtk.vtkPolyDataMapper()
    sphereMapper.SetInputConnection(sphereSource.GetOutputPort())

    sphereActor = vtk.vtkActor()
    sphereActor.SetMapper(sphereMapper)
    # Change it to a red sphere
    sphereActor.GetProperty().SetColor(1.0, 0.0, 0.0);

    # A renderer and render window
    renderer = vtk.vtkRenderer()
    renderWindow = vtk.vtkRenderWindow()
    renderWindow.AddRenderer(renderer)
    # Make it a little bigger than default
    renderWindow.SetSize(800, 600)

    # An interactor
    renderWindowInteractor = vtk.vtkRenderWindowInteractor()
    renderWindowInteractor.SetRenderWindow(renderWindow)

    # Add the actors to the scene
    renderer.AddActor(sphereActor)

    # Render an image (lights and cameras are created automatically)
    renderWindow.Render()

    # Begin mouse interaction
    renderWindowInteractor.Start()
    renderWindowInteractor.Initialize()

    pass
代码快速概述
-
正如视频中所述,这会创建一个“vtkSphereSource”,它生成实际的网格数据结构。
-
数据被传递给一个 mapper,它解释数据结构中的数据(在这里我们连接到一个非常标准的源,因此我们可以使用“vtkPolyDataMapper”,它知道如何解释球体网格数据)。
-
mapper 又绑定到一个 actor,actor 封装了模型的纹理、位置和方向等内容。这三者协同工作绘制球体(源 -> mapper -> actor)。
-
然后我们创建一个 renderer 和一个 render window 来查看场景。
-
创建了一个“vtkRenderWindowInteractor”,并将其设置为控制渲染窗口。这允许你在不编写任何代码的情况下在场景中移动,并且还可以处理渲染循环。
-
然后将球体的 actor 添加到 renderer 中,并运行“vtkRenderWindowInteractor”(通过调用“.Start()”和“.Initialize()”)来阻塞主程序,进入交互式渲染循环。
这是此项目主循环的标准代码,因此除了球体本身(将在下一部分中删除)之外,直到我们添加自定义相机之前,这里不会有太大变化。
一个基础的“SceneObject”类
从这一点开始,我们可能只是继续在主循环中添加代码,就像处理球体一样。唯一的问题是,它很快就会变得难以管理。为了解决这个问题,我想引入一个父类,作为 3D 场景中任何对象的开端。它不会包含太多内容,只是模板的开端,但它应该:
-
拥有一个标准的 actor,封装 3D 世界中任何对象的位置和方向。
-
控制任何附加到它的子级,即按位置和方向绑定,这样如果父级移动,子级也会移动。
-
在某些情况下,我们希望通过位置或旋转来偏移子级,使其与父级的原点保持距离,因此它应该自动管理这一点。
-
目前我们只是移动它们或改变它们的朝向——它还应该具有标准的相应方法。
将 SceneObject 添加到 Scene 模块
“SceneObject”类将存在于“scene”包中,要添加它:
-
右键单击“scene”包,选择“新建”->“PyDev 模块”。
-
将其命名为“SceneObject”。
-
当它询问你想要哪个模板时,只需选择“模块:类”。
-
将突出显示的类名重命名为“SceneObject”。
你的“SceneObject”的代码应该看起来像下面的截图。

通用的 SceneObject 字段和初始化
我们希望任何派生自“SceneObject”(即它是它的子类)并在场景中存在的对象都具有通用字段。
目前,这只是一个通用 actor 以及可能的子级字段。子级字段允许我们构建一个“SceneObject”树,以便你可以构建一个复合类。
下一篇文章提供了一个很好的例子,我们有一个 Bot 类,它将可视化传感器数据作为子级(一个相机屏幕和一个 LIDAR 点云),它们随它一起移动。如果我们正确地构建“SceneObject”类,这几乎毫不费力。
需要注意的一点:我们希望能够通过位置或旋转来偏移子级,使其与父级保持距离。如果我们不这样做,所有的子级都会在父级的中心绘制(这有点糟糕),因此包含了额外的字段来允许你做到这一点……这不是一个完整的正向运动学系统,只是足够开始使用。这些是“childX”成员。
另外,我们希望在构造时将 actor 添加到场景中,这样我们以后就不必担心了(如果 actor 连接到一个有效的 mapper,它会自动绘制它)。因此,renderer 会被传递到“SceneObject”的构造函数中,当 actor 被实例化时,它会立即被添加到场景中。SceneObject”构造函数的代码片段是:
    def __init__(self, renderer):
        '''
        Constructor with the renderer passed in
        '''
        # Initialize all the variables so that they're unique to self
        self.childrenObjects = []
        self.childPositionOffset = [0, 0, 0]
        self.childRotationalOffset = [0, 0, 0]
        self.vtkActor = vtk.vtkActor()
        renderer.AddActor(self.vtkActor)
添加 Getters 和 Setters
最后要添加的是“SceneObject”的位置和方向的 getter 和 setter。这允许我们移动整个“SceneObject”而不必担心子级,并且应该使用这些方法而不是直接与“vtkActor”字段交互。我不会详细介绍这些方法,它们应该相对直接,但如果你有任何问题,请随时评论。一些小提示:
-
如果你调用一个 get 方法,你应该收到一个包含 3 个点的列表(XYZ 位置或旋转,取决于 getter),如果你使用相应的 setter,你只需要传递一个包含 3 个点的列表,例如:“myObject.SetOrientationVec3([90,180,270])”。
-
所有方向都以度为单位。
“SceneObject”的 getter 和 setter 的代码片段是:
    def SetPositionVec3(self, positionVec3):
        self.vtkActor.SetPosition(positionVec3[0], positionVec3[1], positionVec3[2])
        # Update all the children
        for sceneObject in self.childrenObjects:
            newLoc = [0, 0, 0]
            newLoc[0] = positionVec3[0] + sceneObject.childPositionOffset[0]
            newLoc[1] = positionVec3[1] + sceneObject.childPositionOffset[1]
            newLoc[2] = positionVec3[2] + sceneObject.childPositionOffset[2]
            sceneObject.SetPositionVec3(newLoc)

    def GetPositionVec3(self):
        return self.vtkActor.GetPosition

    def SetOrientationVec3(self, orientationVec3):
        self.vtkActor.SetOrientation(orientationVec3[0], orientationVec3[1], orientationVec3[2])
        # Update all the children
        for sceneObject in self.childrenObjects:
            newOr = [0, 0, 0]
            newOr[0] = orientationVec3[0] + sceneObject.childRotationalOffset[0]
            newOr[1] = orientationVec3[1] + sceneObject.childRotationalOffset[1]
            newOr[2] = orientationVec3[2] + sceneObject.childRotationalOffset[2]
            sceneObject.SetOrientationVec3(newOr)

    def GetOrientationVec3(self):
        return self.vtkActor.GetPosition()
太棒了!那些都是繁琐的工作,下一部分才是精彩的部分。搞定之后,这个类将用于构建场景中的一些简单对象。
创建简单模型
VTK 提供了大量的不同图元供你开始使用,所以你不必立刻去加载复杂的模型。本节将介绍一些常见的对象,但你可以在 Geometric Objects in vtk/Examples/Python 找到更多的文档和示例。首先,你应该从主循环中删除那个“硬编码”的球体……想到主循环中有那个代码就让我浑身不舒服。你的主循环应该如下所示:
if __name__ == '__main__':

    # A renderer and render window
    renderer = vtk.vtkRenderer()
    renderWindow = vtk.vtkRenderWindow()
    renderWindow.AddRenderer(renderer)
    # Make it a little bigger than default
    renderWindow.SetSize(1024, 768)

    # An interactor
    renderWindowInteractor = vtk.vtkRenderWindowInteractor()
    renderWindowInteractor.SetRenderWindow(renderWindow)

    # [INSERT COOL STUFF HERE]

    # Render an image (lights and cameras are created automatically)
    renderWindow.Render()

    # Begin mouse interaction
    renderWindowInteractor.Start()
    renderWindowInteractor.Initialize()

    pass
现在我们将使用“SceneObject”类构建一些图元。具体来说,我们将重新引入球体,添加一组圆柱体,并绘制一个坐标轴小部件。在这些部分中,我假设你很乐意添加新类和文件。只需在包浏览器中右键单击“scene”文件夹,然后选择“新建”->“PyDev 模块”。
添加球体图元
第一个是一个简单的球体,与我们之前部分中的完全相同。`sphere.py` 文件的完整代码是:
import vtk
from SceneObject import SceneObject

class Sphere(SceneObject):
    '''
    A template for drawing a sphere.
    '''

    def __init__(self, renderer):
        '''
        Initialize the sphere.
        '''
        # Call the parent constructor
        super(Sphere,self).__init__(renderer)

        sphereSource = vtk.vtkSphereSource()
        sphereSource.SetCenter(0.0, 0.0, 0.0)
        sphereSource.SetRadius(4.0)
        # Make it a little more defined
        sphereSource.SetThetaResolution(24)
        sphereSource.SetPhiResolution(24)

        sphereMapper = vtk.vtkPolyDataMapper()
        sphereMapper.SetInputConnection(sphereSource.GetOutputPort())

        self.vtkActor.SetMapper(sphereMapper)
        # Change it to a red sphere
        self.vtkActor.GetProperty().SetColor(1.0, 0.0, 0.0);
这段代码将创建一个半径为 4、位于原点的红色球体。让我们快速讨论一下这里的组件:
from SceneObject import SceneObject
-
这一行导入了我们将继承的“SceneObject”。
class Sphere(SceneObject):
-
这定义了一个继承自“SceneObject”的“Sphere”类,这意味着它继承了父类的所有字段和方法(例如我们的“vtkActor”)。
    def __init__(self, renderer):
        '''
        Initialize the sphere.
        '''
        # Call the parent constructor
        super(Sphere,self).__init__(renderer)
-
构造函数 `__init__(self, renderer)` 在创建时将接收到 vtk renderer(self 是一个特殊参数,会被忽略)。
-
创建时,它将使用 renderer 调用父构造函数,这将对象添加到 renderer 中(继承多么棒啊?)——这在 `super(Sphere, self).__init__(renderer)` 行中完成,读作“使用我(self)调用 Sphere 的超类构造函数,并给它一个 renderer”。
        sphereSource = vtk.vtkSphereSource()
        sphereSource.SetCenter(0.0, 0.0, 0.0)
        sphereSource.SetRadius(4.0)
        # Make it a little more defined
        sphereSource.SetThetaResolution(24)
        sphereSource.SetPhiResolution(24)
-
创建一个本地的“vtkSphereSource”,就像我们在主函数中所做的一样,并将其设置为半径为 4、位于原点。
-
将网格的分辨率设置为略高于正常值,使其看起来像一个球体,而不是 80 年代的音乐视频里的道具。
        sphereMapper = vtk.vtkPolyDataMapper()
        sphereMapper.SetInputConnection(sphereSource.GetOutputPort())
-
创建一个 mapper,就像我们在上一个示例中所做的一样,并将 `sphereSource` 作为输入分配给它。
self.vtkActor.SetMapper(sphereMapper)
-
actor 已经在父类中初始化了,所以将 actor 的 mapper 设置为球体。
-
注意:调用 `self.vtkActor` 非常重要,这样它才会被分配给 `vtkActor` 实例(self)。如果跳过这一步,它将被分配给共享的类字段,这将来可能会导致噩梦。
        # Change it to a red sphere
        self.vtkActor.GetProperty().SetColor(1.0, 0.0, 0.0)
-
最后,通过告诉 actor 使用红色(RGB = (1, 0, 0))将球体设置为红色。有很多很棒的 `vtkActor` 属性可以设置,更多信息可以在 `vtkActor` wiki 上找到。
要在主场景中绘制这个,我们只需要在主程序 `bot_vis_main.py` 中添加几行代码。我在这里添加了大量主循环代码,但在接下来的部分中,我们将只处理代码片段(这篇文章已经太长了,我能吃掉一只低飞的鸭子的腿)。然后主循环将是:
import vtk

from scene import Sphere

if __name__ == '__main__':
...
    # [INSERT COOL STUFF HERE]

    # Add in two spheres
    sphere1 = Sphere.Sphere(renderer)
    sphere1.SetPositionVec3([0, 6, 0])
    sphere2 = Sphere.Sphere(renderer)
    sphere2.SetPositionVec3([0, -6, 0])
...
关于添加的内容的一些说明:
-
从“scene”包中导入了“Sphere”类。
-
创建了两个球体,都传递了 renderer。
-
每个球体都使用新的 setter 进行了移动——一个在 Y 轴上移动 +6,另一个在 Y 轴上移动 -6。注意 XYZ 值是以列表形式传递的。
当你运行这段代码时,你应该能看到我们声明的两个球体。是不是很棒?

添加圆柱体图元
基于“Sphere”示例,圆柱体的代码如下,并在项目中命名为 `Cylinder.py`。
import vtk
from SceneObject import SceneObject

class Cylinder(SceneObject):
    '''
    A template for drawing a cylinder.
    '''

    def __init__(self, renderer):
        '''
        Initialize the cylinder.
        '''
        # Call the parent constructor
        super(Cylinder,self).__init__(renderer)

        cylinderSource = vtk.vtkCylinderSource()
        cylinderSource.SetCenter(0.0, 0.0, 0.0)
        cylinderSource.SetRadius(2.0)
        cylinderSource.SetHeight(8.0)
        # Make it a little more defined
        cylinderSource.SetResolution(24)

        cylinderMapper = vtk.vtkPolyDataMapper()
        cylinderMapper.SetInputConnection(cylinderSource.GetOutputPort())

        self.vtkActor.SetMapper(cylinderMapper)
        # Change it to a red sphere
        self.vtkActor.GetProperty().SetColor(0.8, 0.8, 0.3);
要在主类中使用它,你可以使用与“Sphere”类相同的代码。为了使其更有趣一点,让我们创建几个并使用圆周公式将它们分布在主球体的周围(在 XZ 平面上):
import vtk
from math import sin,cos

from scene import Cylinder
from scene import Sphere

if __name__ == '__main__':
...
    # [INSERT COOL STUFF HERE]
...
    # Add in 8 cylinders
    numCyls = 8
    for i in xrange(0,numCyls):
        cylinder = Cylinder.Cylinder(renderer)
        # Note that although VTK uses degrees, Python's math library uses radians, so these offsets are calculated in radians
        position = [10.0 * cos(float(i) / float(numCyls) * 3.141 * 2.0), 0, 10.0 * sin(float(i) / float(numCyls) * 3.141 * 2.0)]
        cylinder.SetPositionVec3(position)
关于这段代码的一些说明:
-
不要忘记在主类中导入“Cylinder”。
-
我们使用循环创建了 8 个独立的圆柱体。
-
每个圆柱体都使用圆周公式 x = cos(angle), z = sin(angle) 在球体周围分布。
当你运行这段代码时,你应该能看到以下图像:

一个坐标轴小部件
最后,我们将稍微修改一下结构,引入一个有用的可视化组件——一组坐标轴。这与我们正在处理的类略有不同(我们需要一个特殊的 actor 来使用这个小部件,一个 `vtkAxesActor`),所以我们将详细介绍代码。`Axes.py` 类的完整代码是:
import vtk
from SceneObject import SceneObject

class Axes(SceneObject):
    '''
    A template for drawing axes.
    Shouldn't really be in a class of it's own, but it's cleaner here and like this we can move it easily.
    Ref: http://vtk.org/gitweb?p=VTK.git;a=blob;f=Examples/GUI/Tcl/ProbeWithSplineWidget.tcl
    '''

    def __init__(self, renderer):
        '''
        Initialize the axes - not the parent version, we're going to assign a vtkAxesActor to it and add it ourselves.
        '''
        # Skip the parent constructor
        #super(Axes,self).__init__(renderer)

        # Ref: http://vtk.org/gitweb?p=VTK.git;a=blob;f=Examples/GUI/Tcl/ProbeWithSplineWidget.tcl
        self.vtkActor = vtk.vtkAxesActor()
        self.vtkActor.SetShaftTypeToCylinder()
        self.vtkActor.SetCylinderRadius(0.05)
        self.vtkActor.SetTotalLength(2.5, 2.5, 2.5)
        # Change the font size to something reasonable
        # Ref: http://vtk.1045678.n5.nabble.com/VtkAxesActor-Problem-td4311250.html
        self.vtkActor.GetXAxisCaptionActor2D().GetTextActor().SetTextScaleMode(vtk.vtkTextActor.TEXT_SCALE_MODE_NONE)
        self.vtkActor.GetXAxisCaptionActor2D().GetTextActor().GetTextProperty().SetFontSize(25);
        self.vtkActor.GetYAxisCaptionActor2D().GetTextActor().SetTextScaleMode(vtk.vtkTextActor.TEXT_SCALE_MODE_NONE)
        self.vtkActor.GetYAxisCaptionActor2D().GetTextActor().GetTextProperty().SetFontSize(25);
        self.vtkActor.GetZAxisCaptionActor2D().GetTextActor().SetTextScaleMode(vtk.vtkTextActor.TEXT_SCALE_MODE_NONE)
        self.vtkActor.GetZAxisCaptionActor2D().GetTextActor().GetTextProperty().SetFontSize(25);

        # Add the actor.
        renderer.AddActor(self.vtkActor)
关于这段代码的一些说明:
        # Skip the parent constructor
        #super(Axes,self).__init__(renderer)
-
我们需要使用 `vtkAxesActor` VTK 类来包含坐标轴小部件,因此我们必须跳过父类的初始化器。
        # Ref: http://vtk.org/gitweb?p=VTK.git;a=blob;f=Examples/GUI/Tcl/ProbeWithSplineWidget.tcl
        self.vtkActor = vtk.vtkAxesActor()
        self.vtkActor.SetShaftTypeToCylinder()
        self.vtkActor.SetCylinderRadius(0.05)
        self.vtkActor.SetTotalLength(2.5, 2.5, 2.5)
-
相反,创建特殊 actor 并更改一些使其更可见的属性。
        # Change the font size to something reasonable
        # Ref: http://vtk.1045678.n5.nabble.com/VtkAxesActor-Problem-td4311250.html
        self.vtkActor.GetXAxisCaptionActor2D().GetTextActor().SetTextScaleMode(vtk.vtkTextActor.TEXT_SCALE_MODE_NONE)
        self.vtkActor.GetXAxisCaptionActor2D().GetTextActor().GetTextProperty().SetFontSize(25);
...
-
将每个轴上的文本设置为比默认值稍小——这是从 参考链接复制的,我建议出于兴趣阅读一下。
        # Add the actor.
        renderer.AddActor(self.vtkActor)
-
与正常代码不同,我们现在需要将 actor 添加到 renderer 中,因为我们跳过了父构造函数,它为我们做了添加。
要在主函数中使用这段代码,没有任何变化。这里是更改的一个快速片段以及结果的图像。
from scene import Axes
from scene import Cylinder
from scene import Sphere

if __name__ == '__main__':
...
    # [INSERT COOL STUFF HERE]
...
    # Add in a set of axes
    axes = Axes.Axes(renderer)

下一篇 **文章**
完成!你可以在本文顶部下载完整项目。下一篇文章将介绍一些稍微复杂的主题,例如:
-
复杂模型
-
地形
-
使用纹理的相机图像
-
使用点云的 LIDAR 表示