
.NET Web API 2.0 服务和 Java 客户端
5.00/5 (9投票s)
Web API 被引入,最近被精简为 Web API 2.0。这个框架对 C#/.NET 服务开发人员来说是天堂。它允许您在一个小时内启动并运行 .NET 中的 RESTful API。正如您将看到的,在另一种编程语言中消耗该 API 也同样简单。
Web API RESTful 文件服务器和 Java 客户端。
编写跨平台和跨语言的 API 并不总是容易的,而且肯定也不是轻量级的。然而,由于 JavaScript 的普及,JSON 已经风靡全球,RESTful API 似乎正成为实现此类功能最佳方法之一。RESTful API 本身是资源驱动的,确实存在其局限性,例如在流式传输大量数据时,但对于大多数用例来说,这种类型的 API 绰绰有余。如果您不相信我,那就相信 Google,他们到处都在使用它们。
直到最近,在 .NET 中构建 RESTful API 都需要大量工作,而且一点也不轻松。它涉及到设置大量的配置端点、处理服务合同以及通过 WCF 设置接口。
这一切都已改变;Web API 被引入,最近被精简为 Web API 2.0。这个框架对 C#/.NET 服务开发人员来说是天堂。它允许您在一个小时内启动并运行托管在 IIS 中或作为 Windows 服务(有时称为通过 OWIN 自托管)的 .NET RESTful API。
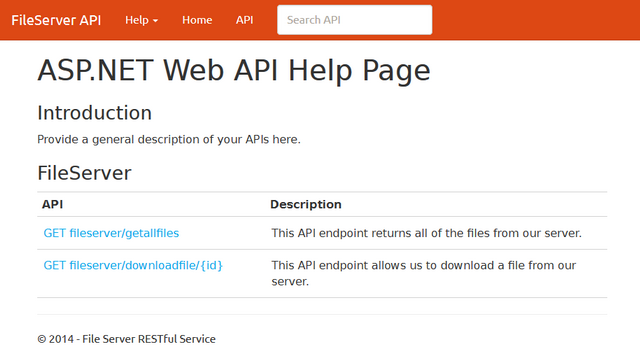
我将构建一个简单的 API,它使用 ASP.NET Web API 2.0 从文件系统中提供文件,并通过 Java 客户端消耗相同的 API。它看起来会有点像这样。
Web API 端点可以通过任何具有 HTTP Client 实现的语言来消耗,基本上几乎所有编程语言都有。
那么您可能会问:“为什么是 Java?” 答案很简单,这是一个非常常见的用例。Java 是一种非常流行的语言,在企业中被广泛使用。由于企业拥有大量服务;Java 将是消耗这些端点最常见的方式之一。尽管这并不难做,但实际显示如何做到这一点的例子非常少。显然,最常见的用例是通过 JavaScript 和 .NET 在客户端消耗 Web API,但 Microsoft 在如何做到这一点方面有很多很棒的教程。
现在,让我们开始工作吧!
我们将构建一个 Web API 服务,该服务将从服务器端的文件夹中提供文件。通常在实际场景中,这些文件将来自某个文档存储,有时是数据库,甚至是另一个 API。


我们还将添加一些单元测试!
现在我们应该拥有一个功能齐全的 Web API 服务。Visual Studio 为我们提供了一个免费的 ValuesController,我们不会使用它,但它是一个很好的存根,供您添加功能。
让我们将自动创建的 ValueController 重命名为 FileServerController,并删除其中为我们创建的所有存根函数,因为我们将编写自己的函数。我们还将声明将在服务器端存储文件的位置。
将任何外部对象注入到我们的控制器中而不是直接在内部实例化它们也是一个很好的实践。为此,我们将使用 Unity 依赖注入框架。创建一个控制器构造函数,它接受一个类型为 IFileServer 的对象,如下所示。
public class FileServerController : ApiController
{
    private readonly IFileServer _fileServer;

    public FileServerController(IFileServer fileServer)
    {
        _fileServer = fileServer
    }
}
接下来,让我们通过右键单击主项目并转到“添加新项”,然后在代码下添加接口,来创建 IFileServer 接口,如下所示。
public interface IFileServer
{
    IList<FileInformation> GetFiles();

    FileInformation GetFileInfo(int id);

    Stream GetFileData(int id);
}
我们的接口现在有一些非常简单的函数。Visual Studio 可能会抛出关于尚未存在的“FileInformation”对象的错误。
接下来,让我们转到我们的模型并创建它。在模型文件夹下,右键单击并添加一个新类,将其命名为 FileInformation,它应该如下所示。
public class FileInformation
{
    [Key]
    public int Id { get; set; }
    public string Name { get; set; }
    public string Extension { get; set; }
    public string FullFilePath { get; set; }
    public string Description { get; set; }
    public DateTime CreatedTimestamp { get; set; }
    public DateTime UpdatedTimestamp { get; set; }
    public string ContentType { get; set; }
}
现在,让我们通过向我们的项目添加一个名为 FileServer 的新类来实现我们之前创建的 IFileServer 接口。通常,如果我们正在与数据库或某个文档存储交互,我们可能希望在这里进行更多的抽象,拥有一个 Context Class 等,但我们将保持一切非常简单。
最初,我们的类看起来非常简单。
public class FileServer : IFileServer
{
    public IList<FileInformation> GetFiles()
    {
        throw new NotImplementedException();
    }

    public FileInformation GetFileInfo(int id)
    {
        throw new NotImplementedException();
    }

    public byte[] GetFileData(int id)
    {
        throw new NotImplementedException();
    }
}
现在让我们添加一些实际功能。例如,我们将查找文件的位置(同样,这通常不会是一个硬编码的值,而是“App.Config 或 Web.Config”中的文档存储或设置)。
private static readonly string ServerFolder = "C:\\Temp\\WebApi";

private Dictionary<int, FileInformation> _fileDescriptions;
一个将填充我们内部字典的构造函数。
public FileServer()
{
    _fileDesc = new Dictionary<int, FileInformation>();
    FillDictionary();
}
一个名为 FillDictionary() 的函数,用于填充我们的字典。
private void FillDictionary()
{
    //We are going directly to the file system
    //To fill our internal dictionary but
    //Ideally we would get these somewhere else.

    FileInfo fi;
    int id = 0;

    var files = Directory.GetFiles(ServerFolder).ToList();

    foreach (String file in files)
    {
        fi = new System.IO.FileInfo(file);
        _fileDesc.Add(id,
            new FileInformation
            {
                Id = id,
                Name = Path.GetFileName(file),
                Extension = fi.Extension,
                FullFilePath = fi.FullName,
                Description = "temp image",
                ContentType = "application/png",
                CreatedTimestamp = fi.CreationTime,
                UpdatedTimestamp = fi.LastWriteTime
                });
            id++;
        }
    }
接下来,让我们实现接口中的函数。
获取文件列表非常容易,因为当我们创建 FileServer 时,所有文件都将存储在我们的字典中。
public IList<FileInformation> GetFiles()
{
    return _fileDesc.Values.ToList();
}
GetFileInfo() 函数也实现起来非常容易。
public FileInformation GetFileInfo(int id)
{
    FileInformation fileInfo;
    if (_fileDesc.TryGetValue(id, out fileInfo))
        return fileInfo;
    else
        return null;
}
获取文件数据也相当直接,使用标准的 .NET API 可以很好地完成。
public Stream GetFileData(int id)
{
    FileInformation fileInfo;
    bool ok = _fileDesc.TryGetValue(id, out fileInfo);

    if (ok)
        return new FileStream(fileInfo.FullFilePath, FileMode.Open);
    else
        return null;
}
当我们构建或运行解决方案时,可能会收到有关控制器不可访问的错误。这是因为我们注入了 FileServer。我们需要创建一些样板代码,以便依赖注入能够与 Web API 一起使用。
同样,如果我们想简单地移除依赖注入,我们将把控制器构造函数更改为以下内容。
public FileServerController()
{
    _fileServer = new FileServer();
}
(如果您通过内联创建对象来跳过依赖注入,则可以跳过此部分,直接转到 Web API Controller Service)
Web API 依赖注入
如果您选择不跳过,那么我们将在这里以正确的方式进行,注入我们的 FileServer。我们需要通过 Nuget 添加 Unity。

接下来,我们将添加一个必需的类,该类基本上直接来自 Microsoft,允许您使用 Unity 作为您的 DI 框架。我将其添加到了一个名为 DI 的文件夹中,但您可以将其添加到主项目中,这样也可以正常工作。
public class UnityIoC : IDependencyResolver
{
    protected IUnityContainer container;

    public UnityIoC(IUnityContainer container)
    {
        if (container == null)
        {
            throw new ArgumentNullException("container");
        }
        this.container = container;
    }


    public object GetService(Type serviceType)
    {
        if (!container.IsRegistered(serviceType))
        {

            if (serviceType.IsAbstract || serviceType.IsInterface)
            {
                return null;
            }
        }
        return container.Resolve(serviceType);
    }

    public IEnumerable<object> GetServices(Type serviceType)
    {
        try
        {
            return container.ResolveAll(serviceType);
        }
        catch (ResolutionFailedException)
        {
            return new List<object>();
        }
    }

    public IDependencyScope BeginScope()
    {
        var child = container.CreateChildContainer();
    return new UnityIoC(child);
    }

    public void Dispose()
    {
        container.Dispose();
    }
}
添加该类后,我们需要转到我们的 App_Start 文件夹并找到 WebApiConfig 类。这个类是我们配置 Web API 路由的地方,也是我们的 API 起死回生的地方。
在这里,我们需要将我们的 DependencyResolver 添加到配置对象中,如下所示。
var container = new UnityContainer();

container.RegisterType<IFileServer, FileServer>(new HierarchicalLifetimeManager());

config.DependencyResolver = new UnityIoC(container);
整个 WebApiConfig 类如下所示。
public static class WebApiConfig
{
    public static void Register(HttpConfiguration config)
    {
        // Web API configuration and services

        // Web API routes
        config.MapHttpAttributeRoutes();

        var container = new UnityContainer();
        container.RegisterType<IFileServer, FileServer>(new HierarchicalLifetimeManager());
        config.DependencyResolver = new UnityIoC(container);

        config.Routes.MapHttpRoute(
            name: "DefaultApi",
            routeTemplate: "api/{controller}/{id}",
            defaults: new { id = RouteParameter.Optional }
        );
    }
}
要了解更多关于 Web API 依赖注入及其工作原理的信息,请访问 Microsoft 网站 Dependency Injection for Web API Controllers。
端点。
现在,让我们将应用程序逻辑与端点连接起来。我们回到 FileServerController 类并添加我们的端点函数。
[RoutePrefix("fileserver")]
public class FileServerController : ApiController
{
    private readonly IFileServer _fileServer;

    public FileServerController(IFileServer fileServer)
    {
        _fileServer = fileServer;
    }

    [Route("allfiles")]
    [HttpGet]
    public IEnumerable<FileInformation> GetAllFiles()
    {
        return null;
    }

    [Route("download/{id}")]
    [HttpGet]
    public HttpResponseMessage DownloadFile(int id)
    {
        return null;
    }
}
上面代码中有几点需要指出。来自 URL 的 API 路由可以通过 WebApiConfig 固定,也可以通过如上所示的数据注释硬编码。对于一个非常大的服务来说,上面通常不是一个好主意,但对于一个小型的服务来说,它有助于突出您将通过遵循路由到达的位置。
接下来,让我们将我们 FileServer 类中的应用程序逻辑连接到我们的端点。
我们可以看到,要从文件服务器获取所有文件将非常容易。
[Route("allfiles")]
[HttpGet]
public IEnumerable<FileInformation> GetAllFiles()
{
    return _fileServer.GetFiles();
}
通过我们的 API 下载文件也相当直接,如下所示。
[Route("downloadfile/{id}")]
[HttpGet]
public HttpResponseMessage DownloadFile(int id)
{
    var fileInformation = _fileServer.GetFileInfo(id);

    var path = fileInformation.Name;
    var result = new HttpResponseMessage(HttpStatusCode.OK);
    var stream = _fileServer.GetFileData(id);
    result.Content = new StreamContent(stream);
    result.Content.Headers.ContentType = new MediaTypeHeaderValue(fileInformation.ContentType);

    return result;
}
我们正在创建一个 HttpResponseMessage,并将文件系统中的数据流嵌入到其中。
我们现在正式完成了 Web API 服务!如果我们右键单击并在调试模式下运行它,应该就可以看到我们的 API 了。
Web API 服务的 Java 客户端。
接下来,让我们使用 Eclipse 或您喜欢的 Java IDE 创建我们的 Java 项目。我使用的是 Eclipse,但任何 Java IDE 都可以。


让我们添加一些 JAR 文件,它们将允许我们与 Web API RESTful 服务进行通信。这些 JAR 文件相当标准,一个来自 Google,名为 GSON,其他来自 Apache。由于我们构建了一个标准的 RESTful 服务,我们只需要一个 HTTP 客户端来消耗端点,并且我们使用 Google GSON 将返回的 JSON 映射到内部对象(或者在 Java 中称为 Bean)。

您可以通过搜索 Google GSON 和 Apache HTTP Client 来获取这些 JAR 的最新版本,或者遵循以下链接。
显然,您也可以使用 Maven 或任何其他机制来获取它们。
让我们添加一个将消耗 Web API 端点的新主类。

public class JavaWebApiApp {

    public static void main(String[] args) {
       // TODO Auto-generated method stub
    }
}
我们创建了一个 bean,它基本上与 C# 中的对象一对一映射。除了我将 DateTime 项目映射到 Java 中的 String。
public class FileInformation {

private int Id;
private String Name;
private String Extension;
private String FullFilePath;
private String Description;
private String CreatedTimestamp;
private String UpdatedTimestamp;
private String ContentType;

//Getters setters etc.
//...
}
接下来,让我们编写 Java 代码来消耗端点并从我们的 RESTful API 中获取对象。
public static ArrayList<FileInformation> httpGet(String url, String function) {

    ArrayList<FileInformation> dataFromService = new ArrayList<FileInformation>();
    try (CloseableHttpClient httpClient = HttpClientBuilder.create().build()) {
        HttpGet request = new HttpGet(url+function);
        request.addHeader("content-type", "application/json");
        HttpResponse result = httpClient.execute(request);
        String json = EntityUtils.toString(result.getEntity(), "UTF-8");

        com.google.gson.Gson gson = new com.google.gson.Gson();
        FileInformation[] response = gson.fromJson(json, FileInformation[].class);

        System.out.println(response.length);
        for(FileInformation file : response)
        {
            dataFromService.add(file);
             System.out.println(file.toString());
        }

    } catch (IOException ex) {
    }
    return dataFromService;
}
我们那里使用了一些基本的 Apache HTTP Client 用法。我们访问端点,消耗返回的 JSON,并使用 Google GSON 将其绑定到我们的 Bean。
如果从我们的主函数调用它。
public static void main(String[] args){

    String url = "https://:53667/fileserver/";

    httpGet(url, "getallfiles");
}
我们现在将得到以下内容。

接下来,让我们添加下载文件的功能。
将以下内容添加到我们的 main 函数中。
OutputStream downloadedDoc0 = httpDownloadFile(url,"downloadfile",0);
System.out.println(downloadedDoc0.toString());
然后是下载流的代码。
public static OutputStream httpDownloadFile(String url, String function, int fileId)
{

    ByteArrayOutputStream byteOutPutStream = new ByteArrayOutputStream();

    try (CloseableHttpClient httpClient = HttpClientBuilder.create().build())
    {
        HttpGet httpRequest = new HttpGet(url+function+"/"+fileId);
        HttpResponse result = httpClient.execute(httpRequest);
        HttpEntity resEntity = result.getEntity();
        resEntity.writeTo(byteOutPutStream);

        EntityUtils.consume(resEntity);
   }
   catch (Exception e)
   {
        System.out.println(e);
   }

    return byteOutPutStream;
}

如果您理解了这一切,那就意味着它奏效了,您的 Java 应用程序中已经有了数据!
就是这样!我们现在知道如何创建一个 Web API 服务,然后通过 Java 来消耗它!
让我们看看最终的 API 服务是什么样的。


如果您喜欢这些教程,欢迎随时访问我的博客 http://louiebacaj.com。