一个端到端的 AngularJS SharePoint 模块,使用 LightSwitch OData 作为后端
4.67/5 (9投票s)
您可以使用 AngularJS 和 Visual Studio LightSwitch 创建 SharePoint 提供商托管的应用程序。这将使您能够更快、更轻松地创建应用程序。

您可以使用 AngularJS 和 Visual Studio LightSwitch 创建 SharePoint 提供商托管的应用程序。这将使您能够更快、更轻松地创建应用程序。

我们将在本文中创建的应用程序将显示一个 任务列表,以及创建 任务的用户。要编辑现有 任务,我们点击 任务。要创建新 任务,我们点击 添加新项 按钮。

要保存新 任务或编辑现有 任务,我们输入数据并点击 保存 按钮。如果我们要删除现有 任务,我们会点击 删除 按钮。

该应用程序还演示了如何实现业务规则和安全性。
为什么要将 AngularJS 与 LightSwitch 结合使用?
- 您需要 100% 控制 UI – LightSwitch HTML Client 的一个缺点是它依赖于 JQuery Mobile。在大多数情况下,这没问题,但使用它很难完全匹配像素级的 UI 设计规范。
- 您需要实现安全性 – 安全性必须在服务器端实现。您不能在 AngularJS 内部实现安全性,因为它是一项客户端技术。LightSwitch 使安全性变得容易,我们将在本示例中进行演示。
- 您想将 LightSwitch 用于管理屏幕 – 创建 AngularJS 屏幕比标准 LightSwitch 屏幕花费的时间要长得多。但是,不必用 AngularJS 编写应用程序中的所有屏幕。正如本示例将演示的那样,您可以在同一个应用程序中混合使用 AngularJS 和 LightSwitch 屏幕。
- 您想构建 OData 服务层供其他应用程序使用 – LightSwitch 是创建 OData 服务的最简单、最健壮的方法。
- 您想加快开发速度 – 当您使用 LightSwitch 作为后端时,需要实现的代码要少得多。这意味着更快的开发速度和更少的 bug。
使用 Web API 与直接调用 OData
您可以使用 LightSwitch 作为 AngularJS 的后端,使用 Web API,如文章 Creating an AngularJS CRUD Application Using Visual Studio LightSwitch 中所述。结构如下:

但是,您也可以在 AngularJS 中直接使用 JayData 来消费您的后端 OData Visual Studio LightSwitch 服务(如文章 Using JayData to Consume the Visual Studio LightSwitch OData Business Layer in a AngularJS CRUD Application 中所示)。这将为您节省大量开发时间并减少您需要编写的代码。结构如下:

在本示例中,我们将直接调用 LightSwitch OData 服务层。
创建项目

在 Visual Studio 2013 中,我们创建一个 新项目。

我们创建一个 云业务应用程序。

系统会提示我们输入一个 SharePoint 开发站点。

点击**完成**。

项目将被创建。

将显示 解决方案。
添加数据源和业务逻辑

在 Server 项目中,右键单击 Data Sources 文件夹并选择 添加表。

创建 ToDo 表。

在 编写代码菜单中,选择 Validate 方法。
为该方法使用以下代码
        partial void ToDoes_Validate(ToDo entity, EntitySetValidationResultsBuilder results)
        {
            if (entity.Details.EntityState == EntityState.Modified)
            {
                if (entity.CreatedByInfo.Id != this.Application.User.Id)
                {
                    results.AddEntityError(
                    "Task can only be modified by " + entity.CreatedByInfo.Identity.Name
                    );
                }
            }

            // Do not allow a task to be called {New Task]
            if (entity.TaskName == "[New Task]")
            {
                results.AddEntityError(
                    "Task cannot be named [New Task]"
                    );
            }

            // Do not allow more than 1 incomplete Task
            if (entity.IsComplete == false)
            {
                int intCountOfIncomplete =
                    this.DataWorkspace.ApplicationData.ToDoes
                    .Where(x => x.IsComplete == false).Count();

                if (intCountOfIncomplete > 0)
                {
                    results.AddEntityError(
                        "Cannot have more than 1 incomplete Task"
                        );
                }
            }

返回到表设计器,然后在 编写代码菜单中,选择 Deleting 方法。
为该方法使用以下代码
        partial void ToDoes_Deleting(ToDo entity)
        {
            if (entity.CreatedByInfo.Id != this.Application.User.Id)
            {
                throw new ValidationException("Task can only be deleted by "
                    + entity.CreatedByInfo.Identity.Name);
            }
        }
创建 LightSwitch HTML Client 屏幕

在 HTMLClient 项目中,右键单击 Screens 文件夹并选择 添加屏幕。

使用 通用屏幕集模板为 ToDo 实体创建屏幕。

屏幕将被创建。

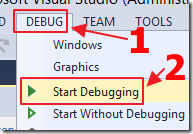
运行项目。

您需要登录您的 SharePoint 开发站点。

该应用程序将被 侧载到您的 SharePoint 开发站点。

您的网页浏览器将打开,您需要登录您的 SharePoint 开发站点。

您需要 信任此应用程序。

应用程序将加载,您将能够添加和编辑 待办事项。
您会注意到验证和业务规则得到了执行。
关闭网页浏览器,返回 Visual Studio。
创建 AngularJS 应用程序

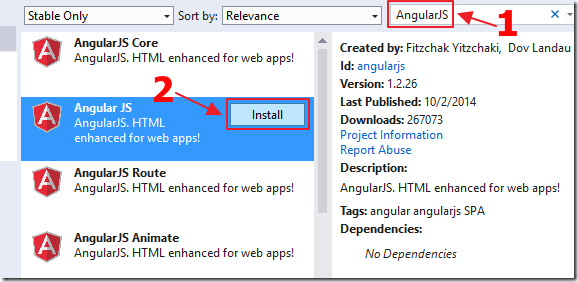
右键单击 Server 项目并选择 管理 NuGet 程序包。

安装 AngularJS。

安装 JayData。

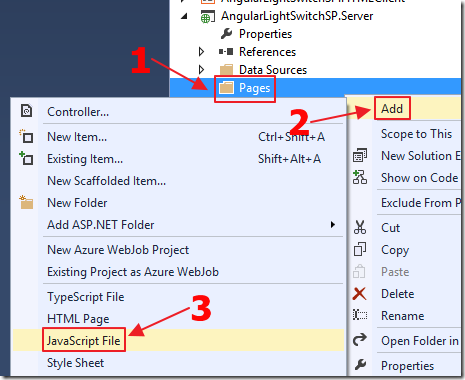
在 Server 项目中创建一个名为 Pages 的文件夹。
右键单击 Pages 文件夹并添加一个新的 JavaScript 文件。

将文件命名为 JayDataCRUD。
将以下代码添加到文件中以创建 Angular App
(function () {
    "use strict";
    // Create a app and inject jaydata
    var app = angular.module('app', ['jaydata']);
})();
将控制器代码添加到文件中
(function () {
    // Create a ToDoEditorController injecting $scope and $data (for JayData)
    angular.module('app')
        .controller('ToDoEditorController', ['$scope', '$data',
            function ToDoEditorController($scope, $data) {
                // Create an empty ToDoes collection
                $scope.ToDoes = [];
                // Set the selectedToDo to nothing for now
                $scope.selectedToDo = null;

                // Call the /ApplicationData.svc LightSwitch OData service
                $data.initService('/ApplicationData.svc').then(function (ApplicationData) {
                    $scope.ApplicationData = ApplicationData;
                    $scope.ToDoes = ApplicationData.ToDoes.toLiveArray();
                });

                // This will be called when the collection changes
                Object.defineProperty($scope, "colToDoes", {
                    get: function () {
                        return $scope.ApplicationData
                          .ToDoes
                          .toLiveArray();
                    }
                });

                $scope.save = function () {
                    if ($scope.selectedToDo.Id) {
                        // Save an existing ToDo item
                        $scope.ApplicationData.ToDoes.attach($scope.selectedToDo, true);
                        $scope.selectedToDo.entityState = $data.EntityState.Modified;
                    }
                    else {
                        // Save a new ToDo item
                        $scope.ApplicationData.ToDoes.add($scope.selectedToDo, true);
                    }
                    $scope.saveChanges();
                };

                // Save any changes
                $scope.saveChanges = function () {
                    $scope.ApplicationData.saveChanges()
                    .then(function () {
                        $scope.selectedToDo = null;
                    }, function (error) {
                        // Get the validation error messages from LightSwitch
                        var xml = error.message,
                        xmlDoc = $.parseXML(xml),
                        $xml = $(xmlDoc),
                        $ValidationResults = $xml.find("ValidationResults");

                        if ($ValidationResults[0].childNodes.length == 0) {
                            // This is a simple error
                            $MessageError = $xml.find("Message")[0].childNodes['0'].data;
                            alert($MessageError);
                        } else {
                            // This is a entity validation error
                            angular.forEach($ValidationResults, function (ValidationResult) {
                                angular.forEach
                                    (ValidationResult.childNodes, function (childNode) {
                                    alert(childNode.childNodes[0].textContent);
                                });
                            });
                        }

                        $scope.ApplicationData.stateManager.reset();
                    });
                };

                $scope.remove = function () {
                    // Remove the ToDo item
                    $scope.ApplicationData.ToDoes.remove($scope.selectedToDo);
                    $scope.saveChanges();
                };

                $scope.newToDo = function () {
                    var ctx = $scope.ApplicationData;
                    // Add a new ToDo item
                    $scope.selectedToDo = new ctx.ToDoes.elementType({
                        // Set the default value for the Task Name
                        TaskName: "[New Task]"
                    });
                };
            }]);
})();

右键单击 Pages 文件夹并添加一个新的 Web Form 文件。
(您可以使用普通的 .html 页面,但可能需要配置您的本地 IIS Express 以在该上下文中运行页面,因此我们通过使用 Web Form 页面来避免此问题。您也可以使用 MVC 页面,但同样,我们正在避免采取额外步骤来 在项目中启用 MVC。)

将文件命名为 JayDataCRUD。

文件将被创建。
将标记中的代码更改为以下内容
<%@ Page Language="C#"
    AutoEventWireup="true"
    CodeBehind="JayDataCRUD.aspx.cs"
    Inherits="LightSwitchApplication.Pages.JayDataCRUD" %>

<!DOCTYPE html>

<html>
<head>
    <meta charset="utf-8" />
    <meta http-equiv="X-UA-Compatible" content="IE-8" />
    <script src="../Scripts/jquery-1.8.0.js"></script>
    <script src="../Scripts/angular.js"></script>
    <script src="../Scripts/datajs-1.0.3.js"></script>
    <script src="../Scripts/jaydata.js"></script>
    <script src="../Scripts/jaydatamodules/angular.js"></script>
    <script src="https://ajax.aspnetcdn.com/ajax/4.0/1/MicrosoftAjax.js"
        type="text/javascript"></script>
    <script src="JayDataCRUD.js"></script>
    <title>JayDataCRUD</title>
</head>
<body ng-cloak class="ng-cloak" data-ng-app="app">
    <!-- Chrome control placeholder -->
    <div id="chrome_ctrl_placeholder"></div>
    <div id="MainContent" data-ng-controller="ToDoEditorController">
        <table>
            <tr data-ng-repeat="ToDo in colToDoes">
                <td>
                    <input id="checkbox" type="checkbox"
                        data-ng-model="ToDo.IsComplete" disabled="disabled"></td>
                <td>
                    <a href="#"
                        data-ng-click="$parent.selectedToDo = ToDo">{{ToDo.TaskName}}</a>
                </td>
                <td>[{{ToDo.CreatedBy}}]</td>
            </tr>
        </table>
        <p>
            <button class="button normaltext" data-ng-click="newToDo()">add new</button></p>
        <form data-ng-if="selectedToDo">
            <fieldset style="width: 300px;">
                <legend>{{selectedToDo.TaskName}}</legend>
                <br />
                <label>
                    <span><strong>Id:</strong></span>
                    <span>{{selectedToDo.Id}}</span>
                    <span>
                        <br />
                        <strong>Task Name:</strong>
                    </span>
                    <input data-ng-model="selectedToDo.TaskName" size="20" />
                    <span>
                        <br />
                        <strong>Is Complete:</strong>
                    </span>
                    <input type="checkbox" data-ng-model="selectedToDo.IsComplete" />
                    <br />
                    <br />
                </label>
                <button data-ng-click="save()">Save</button>
                <button data-ng-click="remove()">Remove</button>
            </fieldset>
        </form>
    </div>
</body>
</html>
配置 AngularJS 页面加载

在 SharePoint 项目中,双击 AppManifest.xml 文件将其打开。

选择 JayDataCRUD.aspx 页面作为 启动页。
运行 AngularJS 应用程序

运行应用程序时,我们将需要再次 信任它(因为我们修改了应用程序的 SharePoint 配置)。

AngularJS 应用程序将加载。

安全性将和业务规则将得到执行。
匹配 SharePoint 站点的样式
要将应用程序的样式设置为与 SharePoint 站点匹配,我们在 JayDataCRUD.aspx 文件中添加以下内容
    <script type="text/javascript">
        // Set the style of the client web part page
        // to be consistent with the host web.
        (function () {
            'use strict';

            var hostUrl = '';
            if (document.URL.indexOf('?') != -1) {
                var params = document.URL.split('?')[1].split('&');
                for (var i = 0; i < params.length; i++) {
                    var p = decodeURIComponent(params[i]);
                    if (/^SPHostUrl=/i.test(p)) {
                        hostUrl = p.split('=')[1];
                        document.write('<link rel="stylesheet" href="'
                            + hostUrl + '/_layouts/15/defaultcss.ashx" />');
                        break;
                    }
                }
            }
            if (hostUrl == '') {
                document.write('<link rel="stylesheet"'
                    + 'href="/_layouts/15/1033/styles/themable/corev15.css" />');
            }
        })();
    </script>

现在运行应用程序时,样式将匹配。
添加 SharePoint Chrome(Logo 和工具栏)
要创建 SharePoint Chrome(标题栏、logo、帮助图标和一个包含指向应用程序中其他页面链接的“齿轮”图标),我们将一个名为 ChromeLoader.js 的 JavaScript 文件添加到 Scripts 目录(并在 JayDataCRUD.aspx 文件中添加对其的引用)。
我们为此文件使用以下代码
var hostweburl;

//load the SharePoint resources
$(document).ready(function () {
    //Get the URI decoded URL.
    hostweburl =
        decodeURIComponent(
            getQueryStringParameter("SPHostUrl")
    );

    // The SharePoint js files URL are in the form:
    // web_url/_layouts/15/resource
    var scriptbase = hostweburl + "/_layouts/15/";

    // Load the js file and continue to the
    //   success handler
    $.getScript(scriptbase + "SP.UI.Controls.js", renderChrome)
});

//Function to prepare the options and render the control
function renderChrome() {

    // The Help, Account and Contact pages receive the
    //   same query string parameters as the main page
    var options = {
        "appIconUrl": hostweburl + "/_layouts/15/images/siteicon.png",
        "appTitle": "AngularJS CRUD App",
        "appHelpPageUrl": "JayDataCRUD.aspx?"
            + document.URL.split("?")[1],
        "settingsLinks": [
            {
                "linkUrl": "../HTMLClient/default.htm?"
                    + document.URL.split("?")[1],
                "displayName": "LightSwitch Application"
            }
        ]
    };

    var nav = new SP.UI.Controls.Navigation(
                            "chrome_ctrl_placeholder",
                            options
                        );
    nav.setVisible(true);
}

// Function to retrieve a query string value.
function getQueryStringParameter(paramToRetrieve) {
    var params =
        document.URL.split("?")[1].split("&");
    var strParams = "";
    for (var i = 0; i < params.length; i = i + 1) {
        var singleParam = params[i].split("=");
        if (singleParam[0] == paramToRetrieve)
            return singleParam[1];
    }
}

应用程序现在已完成。

点击“齿轮”图标将显示一个链接,带我们到我们之前创建的 LightSwitch 页面。
发布和部署

即使我们已将 AngularJS 添加到项目中,它仍然是一个 LightSwitch 项目。因此,要进行部署,请遵循此处提供的说明
