
如何使用 C#.NET 创建 ONVIF IP 摄像机快照为 JPG 图像文件
4.75/5 (15投票s)
我将简要介绍如何使用 C# 拍摄 ONVIF IP 摄像机的快照并将其保存为 JPG 文件,以便能够保存/分享视频监控中最重要的时刻。
目录
2. 在 Visual Studio 中创建 Windows Forms 应用程序
引言
在测试我之前的一个 IP 摄像机项目(如何为 ONVIF IP 摄像机创建视频录制应用程序 NVR/DVR 软件,使用 C#.NET)时,我意识到事件的存档不仅可以通过视频录制进行,而且快照在安全系统中也很有用。
也许存储视频监控区域所有事件的最佳方法是录制音频和视频流到一个视频文件。在这种情况下,您可以追溯每个时刻。然而,在许多情况下,一张图片胜过任何冗长的视频。让我们举一个简单但极端的例子,它很好地说明了快照的重要性。
假设发生了一起盗窃案,并且安全摄像机记录了整个犯罪过程,包括罪犯的脸。为了抓住罪犯,有必要在不同的地方发布他的/她的脸。视频不能粘贴在树上,冗长的视频文件也不能在电视上的警察新闻中发布。因此,绝对需要一张显示罪犯脸部的快照。
尽管之前的例子展示了使用预录制视频拍摄快照的情况,但实时拍摄快照的需求也一直存在。因此,在本教程中,我打算向您展示如何用 C# 构建一个应用程序,该应用程序允许您实时拍摄 ONVIF IP 摄像机的快照并自动将其保存在您的 PC 上。假设您或您的安保人员持续监控安全摄像头。由于这项功能,您的任何安保人员都可以有效地拍摄任何异常事件的快照。此图片(作为证据)可以轻松地通过电子邮件等方式发送给主管,以便立即采取必要的干预措施。
该项目也基于 ONVIF IP 基础安全标准化。在本技巧中,我不想再次详细介绍 ONVIF。您可以在我之前的文章中阅读更多关于 ONVIF 技术的信息

C# IP 摄像机快照采集器应用程序 – 来源:自制
入门
在研究了快照在监控系统中的重要性之后,现在是时候开始实施您的 IP 摄像机项目了。要创建快照采集器应用程序,您需要 (1) 一个 ONVIF SDK 和 (2) 一个 C# 编程 IDE。让我们看看需要做哪些准备工作。
1. ONVIF SDK 安装
在我之前的教程(在 C# 中将实时 IP 摄像机流广播到网站和为 C# 中的摄像机创建视频录制软件)中,您可以更详细地阅读,如果您想构建任何 IP 摄像机软件,都需要一个 IP 摄像机 SDK。为此,这次我也使用了 Ozeki 的 Camera SDK。您可以从其官方网站下载 SDK。
2. 在 Visual Studio 中创建 Windows Forms 应用程序
与我之前的项目类似,我也在此项目中使用 Microsoft Visual Studio 作为 IDE。如果您需要此软件,可以从 Microsoft 官方网站下载。 (据我所知,.NET Framework 会随着 Visual Studio 自动安装,但请确保您的 PC 上已安装 4.0 版本。)
安装完所有必要的软件后,让我们开始编程,创建一个新的 Windows Forms 应用程序。之后,您需要将 DLL 文件(由 Camera SDK 提供)添加为项目的引用。并且您需要做的唯一一个设置是:确保您的“目标框架”为“.NET Framework 4.0”。
完成所有必要的初步步骤后,让我们来解读代码。
后端开发
为了更好地理解,我想从简要的源代码分析开始我的代码解释。本技巧将介绍以下三个类
- Program.cs
- Form1.cs
- Form1.Designer.cs
让我们更仔细地看一下 `Program.cs` 类(**参见以下代码示例**)。此类包含 `Main()` 方法,该方法是应用程序的入口点。窗体的运行将在该类中调用。
using System;
using System.Collections.Generic;
using System.Linq;
using System.Windows.Forms;

namespace Network_Video_Recorder02
{
    static class Program
    {
        /// <summary>
        /// The main entry point for the application.
        /// </summary>
        [STAThread]
        static void Main()
        {
            Application.EnableVisualStyles();
            Application.SetCompatibleTextRenderingDefault(false);
            Application.Run(new Form1());
        }
    }
}
在摄像机视频录制应用程序的情况下,还需要将您的应用程序连接到您的摄像机才能查看其图像。这是一个非常重要的步骤,因为如果您想拍摄快照,显示摄像机图像是必不可少的。**下面您可以看到**可用于建立应用程序和摄像机之间连接的**那些方法**
_camera = IPCameraFactory.GetCamera("192.168.115.198:8080", "admin", "admin") // It initializes the camera that has been declared as a private member of the class. Three arguments are used: the IP address of the camera, username and password.
_connector.Connect(_camera.VideoChannel, _imageProvider) // Using this method you can create connection between the camera image and the image provider object (that is used to display the camera image on the GUI).
_camera.Start() // It can be used to receive the camera image.
_videoViewerWF1.Start(): // It can be used to display the camera image on the GUI.
除了属于摄像机-应用程序连接的方法之外,您还需要一些进一步的语句和方法来拍摄快照。**您可以在下面看到它们**
button_SaveTo_Click() // This method allows the user to define a path and save the result into the TextBox GUI element.
Btn_Snapshot_Click() // It initializes the path variable that is used to determine the destination folder of the taken image. After this it calls the CreateSnapShot() method.
CreateSnapShot() // This method creates a string that contains the actual date and time then uses these parameters to complete the path. Finally, takes a snapshot about the current camera image and saves it into the destination folder.
默认情况下,如果 `TextBox` GUI 元素为空(即,未指定程序的快照保存路径),则捕获的摄像机图像将保存在应用程序启动的源文件夹中。
好的,现在让我们看一下包含应用程序所有必要功能的完整 `Form1.cs` 类,用于拍摄 IP 摄像机快照(**参见以下代码示例**)。
using System;
using System.Drawing;
using System.Windows.Forms;
using Ozeki.Media.IPCamera;
using Ozeki.Media.MediaHandlers.Video;
using Ozeki.Media.Video.Controls;
using Ozeki.Media.MediaHandlers;

namespace Network_Video_Recorder02
{
    public partial class Form1 : Form
    {
        private IIPCamera _camera;
        private DrawingImageProvider _imageProvider;
        private MediaConnector _connector;
        private VideoViewerWF _videoViewerWf;
        private SnapshotHandler _snapshotHandler;

        public Form1()
        {
            InitializeComponent();
            _imageProvider = new DrawingImageProvider();
            _connector = new MediaConnector();
            _snapshotHandler = new SnapshotHandler();
            _videoViewerWf = new VideoViewerWF();
            SetVideoViewer();
        }

        private void SetVideoViewer()
        {
            CameraBox.Controls.Add(_videoViewerWf);
            _videoViewerWf.Size = new Size(260, 180);
            _videoViewerWf.BackColor = Color.Black;
            _videoViewerWf.TabStop = false;
            _videoViewerWf.Location = new Point(14, 19);
            _videoViewerWf.Name = "_videoViewerWf";
        }

        private void button_Connect_Click(object sender, EventArgs e)
        {
            _camera = IPCameraFactory.GetCamera("192.168.115.98:8080", "admin", "admin");
            _connector.Connect(_camera.VideoChannel, _imageProvider);
            _connector.Connect(_camera.VideoChannel, _snapshotHandler);
            _videoViewerWf.SetImageProvider(_imageProvider);
            _videoViewerWf.Start();
            _camera.Start();
        }

        private void button_SaveTo_Click(object sender, EventArgs e)
        {
            var result = folderBrowserDialog1.ShowDialog();
            if (result == DialogResult.OK)
                TextBox_SaveTo.Text = folderBrowserDialog1.SelectedPath;
        }

        private void Btn_Snapshot_Click(object sender, EventArgs e)
        {
            var path = TextBox_SaveTo.Text;
            CreateSnapShot(path);
        }

        private void CreateSnapShot(string path)
        {
            var date = DateTime.Now.Year + "y-" + DateTime.Now.Month + "m-" + DateTime.Now.Day + "d-" +
                       DateTime.Now.Hour + "h-" + DateTime.Now.Minute + "m-" + DateTime.Now.Second + "s";
            string currentpath;
            if (String.IsNullOrEmpty(path))
                currentpath = date + ".jpg";
            else
                currentpath = path + "\\" + date + ".jpg";

            var snapShotImage = _snapshotHandler.TakeSnapshot().ToImage();
            snapShotImage.Save(currentpath, System.Drawing.Imaging.ImageFormat.Jpeg);
        }
    }
}
前端开发 (GUI)
在完成后端开发后,让我们进入图形用户界面。**以下代码**展示了完整的 `Form1.Designer.cs` 类,该类包含了 GUI 所需的所有元素。此代码可用于为您的快照采集器应用程序创建 简单 GUI
namespace Network_Video_Recorder02
{
    partial class Form1
    {
        private System.ComponentModel.IContainer components = null;

        protected override void Dispose(bool disposing)
        {
            if (disposing && (components != null))
            {
                components.Dispose();
            }
            base.Dispose(disposing);
        }

        private void InitializeComponent()
        {
            this.folderBrowserDialog1 = new System.Windows.Forms.FolderBrowserDialog();
            this.groupBox1 = new System.Windows.Forms.GroupBox();
            this.button_Connect = new System.Windows.Forms.Button();
            this.CameraBox = new System.Windows.Forms.GroupBox();
            this.groupBox2 = new System.Windows.Forms.GroupBox();
            this.TextBox_SaveTo = new System.Windows.Forms.TextBox();
            this.Btn_Snapshot = new System.Windows.Forms.Button();
            this.button_SaveTo1 = new System.Windows.Forms.Button();
            this.groupBox1.SuspendLayout();
            this.groupBox2.SuspendLayout();
            this.SuspendLayout();
            //
            // groupBox1
            //
            this.groupBox1.Controls.Add(this.button_Connect);
            this.groupBox1.Location = new System.Drawing.Point(10, 10);
            this.groupBox1.Name = "groupBox1";
            this.groupBox1.Size = new System.Drawing.Size(120, 60);
            this.groupBox1.TabIndex = 0;
            this.groupBox1.TabStop = false;
            this.groupBox1.Text = "Connect";
            //
            // button_Connect
            //
            this.button_Connect.Font = new System.Drawing.Font("Microsoft Sans Serif", 8.5F, System.Drawing.FontStyle.Regular, System.Drawing.GraphicsUnit.Point, ((byte)(238)));
            this.button_Connect.ForeColor = System.Drawing.Color.Black;
            this.button_Connect.Location = new System.Drawing.Point(10, 20);
            this.button_Connect.Name = "button_Connect";
            this.button_Connect.Size = new System.Drawing.Size(100, 25);
            this.button_Connect.TabIndex = 6;
            this.button_Connect.Text = "Connect";
            this.button_Connect.UseVisualStyleBackColor = true;
            this.button_Connect.Click += new System.EventHandler(this.button_Connect_Click);
            //
            // CameraBox
            //
            this.CameraBox.Location = new System.Drawing.Point(10, 80);
            this.CameraBox.Name = "CameraBox";
            this.CameraBox.Size = new System.Drawing.Size(285, 210);
            this.CameraBox.TabIndex = 3;
            this.CameraBox.TabStop = false;
            this.CameraBox.Text = "Live camera ";
            //
            // groupBox2
            //
            this.groupBox2.Controls.Add(this.TextBox_SaveTo);
            this.groupBox2.Controls.Add(this.Btn_Snapshot);
            this.groupBox2.Controls.Add(this.button_SaveTo1);
            this.groupBox2.Location = new System.Drawing.Point(10, 300);
            this.groupBox2.Name = "groupBox2";
            this.groupBox2.Size = new System.Drawing.Size(285, 100);
            this.groupBox2.TabIndex = 37;
            this.groupBox2.TabStop = false;
            this.groupBox2.Text = "Snapshot";
            //
            // TextBox_SaveTo
            //
            this.TextBox_SaveTo.Location = new System.Drawing.Point(119, 63);
            this.TextBox_SaveTo.Name = "TextBox_SaveTo";
            this.TextBox_SaveTo.Size = new System.Drawing.Size(160, 20);
            this.TextBox_SaveTo.TabIndex = 35;
            this.TextBox_SaveTo.Text = "C:\\Users\\user\\Documents\\Visual Studio 2012\\Projects\\03_Onvif_Network_Video_Record" +
                "er\\03_Onvif_Network_Video_Recorder\\bin\\Debug";
            //
            // Btn_Snapshot
            //
            this.Btn_Snapshot.Location = new System.Drawing.Point(10, 20);
            this.Btn_Snapshot.Name = "Btn_Snapshot";
            this.Btn_Snapshot.Size = new System.Drawing.Size(100, 25);
            this.Btn_Snapshot.TabIndex = 36;
            this.Btn_Snapshot.Text = "Take a snapshot";
            this.Btn_Snapshot.UseVisualStyleBackColor = true;
            this.Btn_Snapshot.Click += new System.EventHandler(this.Btn_Snapshot_Click);
            //
            // button_SaveTo1
            //
            this.button_SaveTo1.Location = new System.Drawing.Point(10, 60);
            this.button_SaveTo1.Name = "button_SaveTo1";
            this.button_SaveTo1.Size = new System.Drawing.Size(100, 25);
            this.button_SaveTo1.TabIndex = 34;
            this.button_SaveTo1.Text = "Save to:";
            this.button_SaveTo1.UseVisualStyleBackColor = true;
            this.button_SaveTo1.Click += new System.EventHandler(this.button_SaveTo_Click);
            //
            // Form1
            //
            this.AutoScaleDimensions = new System.Drawing.SizeF(6F, 13F);
            this.AutoScaleMode = System.Windows.Forms.AutoScaleMode.Font;
            this.ClientSize = new System.Drawing.Size(309, 414);
            this.Controls.Add(this.groupBox2);
            this.Controls.Add(this.CameraBox);
            this.Controls.Add(this.groupBox1);
            this.FormBorderStyle = System.Windows.Forms.FormBorderStyle.FixedDialog;
            this.MaximizeBox = false;
            this.Name = "Form1";
            this.StartPosition = System.Windows.Forms.FormStartPosition.CenterScreen;
            this.Text = "Network Video Recorder Snapshot";
            this.groupBox1.ResumeLayout(false);
            this.groupBox2.ResumeLayout(false);
            this.groupBox2.PerformLayout();
            this.ResumeLayout(false);
        }

        private System.Windows.Forms.GroupBox groupBox1;
        private System.Windows.Forms.Button button_Connect;
        private System.Windows.Forms.GroupBox CameraBox;
        private System.Windows.Forms.TextBox TextBox_SaveTo;
        private System.Windows.Forms.Button button_SaveTo1;
        private System.Windows.Forms.FolderBrowserDialog folderBrowserDialog1;
        private System.Windows.Forms.Button Btn_Snapshot;
        private System.Windows.Forms.GroupBox groupBox2;
    }
}
下图显示了我的 GUI 和我的摄像机图像 – 如果您不更改上述代码中的任何内容,您也应该看到这样的 GUI。要查看摄像机图像,首先需要单击“连接”按钮连接到摄像机。摄像机图像将在“实时摄像机”部分显示。
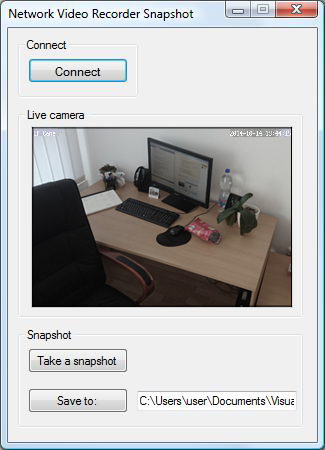
用 C# 编写的 IP 摄像机快照采集器应用程序的 GUI - 来源:自制
要拍摄快照,首先,单击“另存为”按钮并定义一个您想要保存图像文件的目标文件夹。在此之后,您需要单击“拍摄快照”按钮,图像将自动保存到指定的文件夹中。
通过这个 C# 应用程序,我现在可以在我不在的时候捕捉我桌子和 PC 周围最重要的时刻。只是为了好玩,看看下面的图。我离开了房间,在我笔记本电脑上启动了这个快照采集器应用程序。我刚离开房间,就注意到我的室友 Fred 正在品尝我的零食。我想着和他开个玩笑,我迅速拍了一张快照,并通过 Skype 发给了他。
正如您在下面看到的,我已经指定我的快照将保存在桌面的“快照”文件夹中。打开此文件夹后,您还可以看到捕获的静态摄像机图像存在于那里,为 .jpg 图像文件。(还可以看到文件名包含日期和时间参数。)

如何使用您的 C# 应用程序拍摄快照 - 来源:自制
最后,我通过 Skype 将快照发送给了我的朋友(**下图**)。他非常惊讶。(别担心 Fred,这只是个玩笑。我的零食就是你的零食!)

摄像机快照可以成为很好的证据 - 来源:自制
结论
在对我的先前 IP 摄像机项目(如何为 ONVIF IP 摄像机创建视频录制应用程序 NVR/DVR 软件,使用 C#.NET)进行了一些测试后,我意识到事件的存档不仅可以通过视频录制进行,而且快照在安全系统中也很有用。因此,我提出了一个新的指南,解释如何使用 C#.NET 创建 ONVIF IP 摄像机快照为 JPG 图像文件。该软件允许您实时捕获摄像机图像并将其保存为图像文件。它可用于安全目的、保存和共享重要时刻或只是为了好玩。要使用我的源代码,需要满足以下先决条件:一个 ONVIF 兼容的摄像机 SDK(如 Ozeki Camera SDK)和一个 C# 编程 IDE(如 Microsoft Visual Studio)。
参考文献
在本节中,我列出了撰写本文使用的所有网页。下面您还可以找到所需软件的直接下载链接
1. https://codeproject.org.cn/Articles/825074/How-to-broadcast-live-IP-camera-stream-as-Flash-vi
2. https://codeproject.org.cn/Tips/826531/How-to-Create-a-Video-Recording-Application-NVR-DV
3. http://www.onvif.org/specs/core/ONVIF-Core-Spec-v210.pdf
4. http://www.camera-sdk.com/p_13-download-onvif.html
5. http://www.microsoft.com/en-US/download/details.aspx?id=17851
6. http://www.microsoft.com/en-us/download/details.aspx?id=43721