
ASP.NET C# 教程 - 面向初学者的 Nido 框架开发
本教程专为需要了解“Nido”框架及其应用的 .NET 程序员设计。
你需要什么?
-
Visual Studio 2012
-
MS SQL 2008
-
NuGet 包管理器 (NuGet Package Manager)
什么是 Nido?
Nido 框架是一个使用 Microsoft .NET/ C# 开发的可重用、高度通用的代码库,旨在为所有 .NET 系统提供一个通用平台。它提供了一个用于快速交付软件的平台,并能在不破坏系统已开发部分的情况下轻松定制和扩展软件。
Nido 框架是基于微软 .NET 实体框架 (MSFT .NET Entity Framework) 开发的,并且深受代码优先 (Code First) 开发技术的影响。该框架为编写业务逻辑层和数据访问层提供了一种标准方法。通过这种方式,无论开发人员的专业水平如何,都能产出可预测、标准且性能最佳的代码。此外,一旦您开始在整个开发中心使用 Nido,您将能够轻松地在不同项目之间切换,而无需花费大量时间进行知识交接。不妨一试,亲身体验……
检查“NuGet”
Nido 框架需要 NuGet 包管理器来进行安装。因此,让我们检查一下您是否已经安装了它,如果没有,我们将进行安装。如果您已经安装了,可以跳过此步骤。
第 1 步:前往工具 (Tools) -> 扩展和更新 (Extensions and Updates)... 并搜索“NuGet”。如果您看到已安装了正确版本的“NuGet”,则可以继续配置“NidoFramework”。如果您没有“NuGet”,则必须安装/更新“NuGet”。
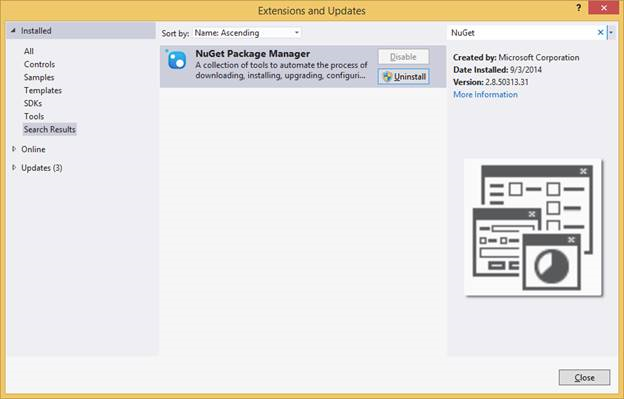
注意:NuGet 是微软开发平台(包括 .NET)的包管理器。NuGet 客户端工具提供了生产和使用包的能力。NuGet 库是所有包作者和使用者使用的中央包存储库。您可以从这里安装 NuGet:https://nuget.net.cn/
创建业务逻辑层
Nido 框架适用于中小型系统。我们允许 Nido 用于商业产品,您可以参考 Nido 许可证了解更多细节。
为中小型项目找到合适的架构组合非常重要。我们既不希望设计过于复杂,也不希望它对于任务来说过于简单。从这个意义上说,我们建议任何中型项目都包含两个主要层。后端层由业务逻辑层和数据访问层共同组成,而系统的前端部分则由 UI 层组成。
因此,下一步,我们将创建 Nido 后端层。
如果您经验不多,只需遵守这些说明并遵循指南,我保证您将来会看到它的好处。
第 1 步:让我们先创建一个库项目。打开 Visual Studio 2012 并创建一个新的类库项目。非常重要的一点是,请确保您的项目目标 .NET 框架是 4.0、4.5 或 4.5.1 版本。

第 2 步:将项目命名为“myTest.Bll”,将解决方案命名为“myTestSolution”。
注意:目前 Nido 需要 .Net Framework 4.0 或更高版本。但我们正在努力为其他 .NET 版本提供一个精简版本。
第 3 步:现在,让我们使用 NuGet 包管理器控制台来格式化您的后端库项目。这将为您的后端层引入一些标准和编码模式。您必须使用 Nido 安装来创建/格式化您的业务逻辑层。前往视图 (View) -> 其他窗口 (Other Windows) -> 程序包管理器控制台 (Package Manager Console)。这将打开如下所示的控制台。
第 4 步:在包管理器控制台中输入 PM> install-package NidoFramework 并按 Enter 键。同时,您需要确保包管理器控制台的“默认项目”已选择为“myTest.bll”。您需要在此等待,让包管理器安装 NidoFramework 及其所有依赖库。这可能需要几分钟时间,具体取决于您的网络连接和机器速度。

第 5 步:随着安装的进行,您将看到多个目录被创建,引用被添加。一旦它完成所有工作,您可能会遇到一个编译错误,在极少数情况下,这甚至可能导致您的 Visual Studio 停止响应。您可以忽略所有这些,因为这仅仅是由于“DbContext.tt”文件试图使用其默认连接字符串连接一个在您机器上不存在的数据库。所以请耐心等待,给它一点时间稳定下来。
第 6 步:一旦 Visual Studio 开始响应,您可能还需要做另一件事……您需要回到“程序包管理器控制台”,查看它是否请求您允许覆盖“App.Config”文件。如果您没有“App.Config”,它将不会提示。您必须输入“Y”并允许它覆盖现有的配置文件。这将包含 Nido 工作所需的所有默认配置。您稍后会用到这个文件。

第 7 步:安装完成后,您需要验证所有引用的“dlls”是否已正确安装。首先要确认的是您是否有一个对“Nido.Common.dll”的引用。有许多人向我报告一个问题,说即使所有其他库都安装了,他们也没有安装“Nido.Framework.dll”。这可能是由于您项目的 .NET 版本(必须是 v 4.0 或更高)造成的。所以如果您也遇到了同样的问题但未能解决,请在下方提问。
此外,您可以检查以下引用。
来自 .NET Framework 库堆栈…
- Microsoft.CSharp
- System.Configuration
- System.Data.Entity
- System.Data.Entity.Design
- System.Data.Linq
- System.Security
- System.Runtime.Serialization
- System.Web.Extensions
- System.ComponentModel.DataAnnotations
注意:如果它们不存在,您可以手动添加它们,或者卸载并重新安装“Nido”。
来自第三方库
- EntityFramework.Extended.dll
- EntityFramework.BulkInsert.dll
- EntityFramework.MappingAPI.dll
- EntityFramework.dll
- CompareNETObjects.dll
- log4net.dll
- RefactorThis.GraphDiff.dll
注意:如果它们不存在,您必须手动安装它们。您可以通过包管理器控制台手动发出安装命令。例如,要安装 log4net,您需要输入 PM> Install-package log4net。您可以对其他库遵循相同的模式。
第 8 步:检查所有目录、文件和 T4 模板是否已正确创建。检查下图并对照它来验证您的项目。

创建一个示例数据库
第 1 步:在您的 MS SQL 数据库中创建一个新的示例数据库。向其中添加几个表,并为每个表创建几个字段,并定义它们的关系,以便与 Nido 框架进行测试。
如果您想轻松使用 Nido,需要遵守一些数据库准则。
- 为表起有意义的名称
- 为所有表使用主键。主键应遵循命名约定。主键应为表名后跟后缀“Id”(例如,主键 = TableNameId)。这适用于所有表,包括复合表。
- 如果您要在下拉框中显示表记录,“Name”列会很方便,并使编码更容易。
- 表的外键名称也可以使用相应表的名称后跟后缀“Id”
- 表和字段的创建方式与在 EF 中创建它们的方式完全相同。
- 尽可能多地使用存储过程,以避免不必要的数据库往返。
- 使用视图来组合多个表,并以合并形式加载数据。
第 1.1 步:Nido 安装时带有一个示例数据库。您也可以使用“Sample_Db_Bak.Sql”(在 DB 文件夹内)文件来创建一个包含几个表和示例数据的新数据库。打开“SQL Server Management Studio”并使用 SQL Server 帐户登录。然后打开一个新的查询窗口,并复制粘贴该文件的内容。然后点击“执行 (Execute)”为您创建一个名为“School_N”的新数据库。
使用 T4 模板生成代码
T4(文件扩展名为“.tt”)是一个通用的模板引擎,您可以用它来生成 C# 代码、Visual Basic 代码、XML、HTML 或任何类型的文本。T4 模板处理器通过执行代码和处理内部指令,将此文件转换为一个 .cs 文件。我们使用这项技术来创建我们大部分的后端代码。
第 1 步:打开您的“myTest.Bll”项目的 Templates 文件夹,然后双击(打开)“DbContext.tt”文件。找到指定“connectionString”的位置,并根据您的机器/数据库配置更改该变量。

第 2 步:保存更新后的文件。这将自动触发“运行自定义工具”命令。如果没有触发,您可以通过右键单击“DbContext.tt”文件并在弹出的上下文菜单中选择“运行自定义工具 (Run Custom Tool)”来手动调用它。这将在“tt”文件旁边生成一个“.cs”文件。打开它并验证其内容与上面显示的图像大致相似。
第 3 步:右键单击“Templates”文件夹并选择“在文件资源管理器中打开文件夹 (Open Folder in File Explorer)”。这将导航到实际创建“DbContext.cs”文件的位置。复制该文件并将其粘贴到您项目的“DB”文件夹中(重要提示:通过 Visual Studio 而不是通过文件夹浏览器将它们复制到项目中)。然后在解决方案资源管理器中,右键单击“DbContext.tt”下的“DbContext.cs”并将其删除。
第 4 步:对“Hanlders.tt”和“Models.tt”重复上述步骤。但在这些情况下,您需要将新创建的文件分别复制到“Handlers”和“Models”文件夹中。
注意:我们正在以特定的顺序创建项目结构和开发类,以便您可以在所有项目中保持相同的模式。因此,您现在只需遵守这些指南,它们保证会在以后给您带来好处。
完成所有这些操作后,您的项目将如下所示。为确保一切正常,编译项目,看它是否能零错误地编译通过。

创建一个 UI 项目
第 1 步:右键单击名为“myTestSolution”的解决方案。从弹出的菜单中选择添加 (Add) -> 新建项目 (New Project)。为您的新“APS.NET Web Forms 应用程序”命名。我决定将其命名为“myTestWeb”。现在点击确定 (OK) 将此项目添加到您的解决方案中。
正如您可能注意到的,这两个项目都是在 .Net Framework 4.5 上创建的。

第 2 步:现在您需要添加对先前创建的后端项目的引用。因此,右键单击“myTestWeb”的引用节点,并按如下方式添加对“myTest.Bll”项目的引用。

第 3 步:您需要添加对 Nido.Framework.dll 和 Nido 框架引用的其他第三方库的引用。
- 在 Release 模式下编译“myTest.Bll”项目。
- 在“myTestWeb”项目中创建一个名为“Libraries”的新文件夹。
- 导航到 'myTest.Bll\Bin\Release' 文件夹,复制除“myTest.Bll.dll”之外的所有 DLL 文件,并将它们粘贴到“Libraries”文件夹中。
- 添加对这些 dll 的引用。
注意:在大多数情况下,您的 UI 项目中已经添加了一个“EntityFramework.dll”。在这种情况下,请务必在添加来自库文件夹的 dll 引用之前将其删除。正如您可能注意到的,您项目中的实体框架版本比我们与 Nido 一起使用的版本要旧。
现在您将看到您的 Libraries 文件夹如下所示。

编译项目,确保一切正常。
修改“Web.Config”文件
第 1 步:您会在“myTest.Bll”中找到一个“App.Config”文件,您可以使用该文件作为参考配置文件来配置“Web.Config”。
第 2 步:让我们来配置连接字符串和实体框架 (Entity Framework)。实体框架需要在 Web.Config 的“ConfigSection”中添加以下行。很可能您的 web.config 文件中已经有类似的一行。您要么用这一行替换它,要么修改它使其与此类似。我们注意到的主要区别大多是实体框架版本不同。如果您没有这个标签,那么在添加之后,您需要添加在安装时附带的示例 App.Config 文件底部找到的“<entityFramework>”标签。
<section name="entityFramework" type="System.Data.Entity.Internal.ConfigFile.EntityFrameworkSection, EntityFramework, Version=6.0.0.0, Culture=neutral, PublicKeyToken=b77a5c561934e089" requirePermission="false" />
完成之后,您需要在“App.Config”文件中找到“ConnectionString”元素。
  <connectionStrings>
    <add name="your_dbContextClassName"
	connectionString="data source=your_server;
	initial catalog=your_database;user id=your_username;
	password=your_password;
	multipleactiveresultsets=True;
	timeout=500"
	providerName="System.Data.SqlClient" />
  </connectionStrings>
您需要根据您环境中的配置填写信息。由于这些都是相当直接的设置,我在这里不作详细说明。但是,我要强调一点。连接字符串的名称必须是您“mytes.Bll”项目“DB”文件夹中“DbContext.cs”文件的类名。因此,在我们的例子中,它是“SchoolDBContext”。
第 2 步:接下来配置应用程序设置。您可以在“myTest.Bll”的“App.Config”文件中找到所有默认配置。我在这里为您粘贴出来。
  <appSettings>
    <add key="SmtpHost" value="yoursmtphost" />
    <add key="SmtpClientUser" value="yourmail user" />
    <add key="SmtpClientPassword" value="your password" />
    <add key="FromEmailAddress" value="your from mail address" />

    <!--Just ignore this, but don't delete this-->
    <add key="FactoryId" value="2" />

    <!--Just ignore this, but don't delete this-->
    <add key="MaxModelRecordCount" value="100" />

    <!--This setting will enable auditing of all auditable models,
    so that it will create an entry to the AuditTrail table
    when the record is changed. In order to activate this
    you need to follow guidelines given in 'Models\AuditTrails.txt'-->
    <add key="EnableAuditTrail" value="false" />

    <!--This feature will stop updating records to the database and
    allow you to work/ test on a database. This is specially develop
    to debug errors occur in production environment without modifying the records.
    As an example if you configure the system to connect to production DB then you will have a special session created for you
    with a in memory DB where the change will commit and display back to you only in the virtual DB.
    The actaul DB will not touch and it is gurateed-->
    <add key="EnableTesting" value="false" />

    <!--This feature will write operational infomtion to exception log given that the INFO thresold is set in log4net section.
    This will give you a detail log with the parameters passed and the operation called and its status.-->
    <add key="EnableOptTracking" value="true" />
  </appSettings>
第 3 步:最后,让我们为异常日志记录配置 log4net。您需要按如下方式修改“configSections”。
  <configSections>
    <section name="log4net" type="log4net.Config.Log4NetConfigurationSectionHandler, log4net" />
  </configSections>
然后,您需要将实际的配置元素添加到配置文件的最后部分。这些元素已在随 Nido 框架下载的示例配置文件中添加。
  <log4net>
    <appender name="RollingFile" type="log4net.Appender.RollingFileAppender">
      <file value=".\\Errors\\Exception.log" />
      <appendToFile value="true" />
      <maximumFileSize value="256KB" />
      <maxSizeRollBackups value="10" />
      <!--DEBUG < INFO < WARN < ERROR < FATAL-->
      <param name="Threshold" value="WARN" />
      <layout type="log4net.Layout.PatternLayout">
        <conversionPattern value="%d [%t] %-5p %c - %m%n" />
      </layout>
    </appender>
    <root>
      <level value="ALL" />
      <appender-ref ref="RollingFile" />
    </root>
  </log4net>
完成所有操作后,您会看到您的配置文件如下所示。
<?xml version="1.0"?>
<!--
For more information on how to configure your ASP.NET application, please visit
http://go.microsoft.com/fwlink/?LinkId=169433
-->
<configuration>
<configSections>
<section name="log4net" type="log4net.Config.Log4NetConfigurationSectionHandler, log4net" />
<!-- For more information on Entity Framework configuration, visit http://go.microsoft.com/fwlink/?LinkID=237468 -->
<section name="entityFramework" type="System.Data.Entity.Internal.ConfigFile.EntityFrameworkSection, EntityFramework, Version=6.0.0.0, Culture=neutral, PublicKeyToken=b77a5c561934e089" requirePermission="false"/>
</configSections>

<connectionStrings>
<add name="SchoolDBContext" connectionString="data source=MTS-LT-ICT005;initial catalog=School;user id=smstest;password=welcome@123;multipleactiveresultsets=True; timeout=500" providerName="System.Data.SqlClient" />
<add name="DefaultConnection" providerName="System.Data.SqlClient" connectionString="Data Source=(LocalDb)\v11.0;Initial Catalog=aspnet-myTestWeb-20141016123151;Integrated Security=SSPI;AttachDBFilename=|DataDirectory|\aspnet-myTestWeb-20141016123151.mdf"/>
</connectionStrings>

<!--
For a description of web.config changes for .NET 4.5 see http://go.microsoft.com/fwlink/?LinkId=235367.
The following attributes can be set on the <httpRuntime> tag.

<system.Web>
<httpRuntime targetFramework="4.5" />
</system.Web>
-->
<system.web>
<compilation debug="true" targetFramework="4.5"/>
<httpRuntime/>
<pages controlRenderingCompatibilityVersion="4.0">
<namespaces>
<add namespace="System.Web.Optimization"/>
</namespaces>
<controls>
<add assembly="Microsoft.AspNet.Web.Optimization.WebForms" namespace="Microsoft.AspNet.Web.Optimization.WebForms" tagPrefix="webopt"/>
</controls>
</pages>

<authentication mode="Forms">
<forms loginUrl="~/Account/Login.aspx" timeout="2880"/>
</authentication>

<profile defaultProvider="DefaultProfileProvider">
<providers>
<add name="DefaultProfileProvider" type="System.Web.Providers.DefaultProfileProvider, System.Web.Providers, Version=1.0.0.0, Culture=neutral, PublicKeyToken=31bf3856ad364e35" connectionStringName="DefaultConnection" applicationName="/"/>
</providers>
</profile>

<membership defaultProvider="DefaultMembershipProvider">
<providers>
<add name="DefaultMembershipProvider" type="System.Web.Providers.DefaultMembershipProvider, System.Web.Providers, Version=1.0.0.0, Culture=neutral, PublicKeyToken=31bf3856ad364e35" connectionStringName="DefaultConnection" enablePasswordRetrieval="false" enablePasswordReset="true" requiresQuestionAndAnswer="false" requiresUniqueEmail="false" maxInvalidPasswordAttempts="5" minRequiredPasswordLength="6" minRequiredNonalphanumericCharacters="0" passwordAttemptWindow="10" applicationName="/"/>
</providers>

</membership>

<roleManager defaultProvider="DefaultRoleProvider">
<providers>
<add name="DefaultRoleProvider" type="System.Web.Providers.DefaultRoleProvider, System.Web.Providers, Version=1.0.0.0, Culture=neutral, PublicKeyToken=31bf3856ad364e35" connectionStringName="DefaultConnection" applicationName="/"/>
</providers>

</roleManager>

<!--

If you are deploying to a cloud environment that has multiple web server instances,
you should change session state mode from "InProc" to "Custom". In addition,
change the connection string named "DefaultConnection" to connect to an instance
of SQL Server (including SQL Azure and SQL Compact) instead of to SQL Server Express.

-->

<sessionState mode="InProc" customProvider="DefaultSessionProvider">
<providers>
<add name="DefaultSessionProvider" type="System.Web.Providers.DefaultSessionStateProvider, System.Web.Providers, Version=1.0.0.0, Culture=neutral, PublicKeyToken=31bf3856ad364e35" connectionStringName="DefaultConnection"/>
</providers>

</sessionState>

</system.web>

<appSettings>
<add key="SmtpHost" value="yoursmtphost" />
<add key="SmtpClientUser" value="yourmail user" />
<add key="SmtpClientPassword" value="your password" />
<add key="FromEmailAddress" value="your from mail address" />
<!--Just ignore this, but don't delete this-->
<add key="FactoryId" value="2" />
<!--Just ignore this, but don't delete this-->
<add key="MaxModelRecordCount" value="100" />
<!--This setting will enable auditing of all auditable models,
so that it will create an entry to the AuditTrail table
when the record is changed. In order to activate this
you need to follow guidelines given in 'Models\AuditTrails.txt'-->
<add key="EnableAuditTrail" value="false" />
<!--This feature will stop updating records to the database and
allow you to work/ test on a database. This is specially develop
to debug errors occur in production environment without modifying the records.
As an example if you configure the system to connect to production DB then you will have a special session created for you
with a in memory DB where the change will commit and display back to you only in the virtual DB.
The actaul DB will not touch and it is gurateed-->
<add key="EnableTesting" value="false" />
<!--This feature will write operational infomtion to exception log given that the INFO thresold is set in log4net section.
This will give you a detail log with the parameters passed and the operation called and its status.-->
<add key="EnableOptTracking" value="true" />
</appSettings>

<log4net>
<appender name="RollingFile" type="log4net.Appender.RollingFileAppender">
<file value=".\\Errors\\Exception.log" />
<appendToFile value="true" />
<maximumFileSize value="256KB" />
<maxSizeRollBackups value="10" />
<!--DEBUG < INFO < WARN < ERROR < FATAL-->
<param name="Threshold" value="WARN" />
<layout type="log4net.Layout.PatternLayout">
<conversionPattern value="%d [%t] %-5p %c - %m%n" />
</layout>
</appender>

<root>
<level value="ALL" />
<appender-ref ref="RollingFile" />
</root>

</log4net>
<entityFramework>
<defaultConnectionFactory type="System.Data.Entity.Infrastructure.SqlConnectionFactory, EntityFramework"/>
</entityFramework>
<runtime>
<assemblyBinding xmlns="urn:schemas-microsoft-com:asm.v1">
<dependentAssembly>
<assemblyIdentity name="EntityFramework" publicKeyToken="b77a5c561934e089" culture="neutral"/>
<bindingRedirect oldVersion="0.0.0.0-6.0.0.0" newVersion="6.0.0.0"/>
</dependentAssembly>
</assemblyBinding>
</runtime>
</configuration>
第 3 步:作为最后一步,您需要在存放“Content”和“Images”文件夹的位置创建一个名为“Errors”的文件夹。这将使系统自动记录异常。“Nido”有一个内置代码,可以将所有错误记录到这个文件中。错误在创建时会带有一个引用 ID。相同的错误引用 ID 会作为消息返回到 UI 层。您可以将其显示给用户。调试您的代码,看看出现错误时会得到什么。
其他异常日志配置可以参考 log4Net 项目网站获取。
加载数据的代码
第 1 步:从工具栏拖动一个 Data Grid View 到您的“Default.aspx”页面,并在 Page_Load 方法中编写以下代码。您需要为 StudentHandler、GenericResponse 和 Student 对象解析引用。
using Nido.Common;
using Nido.Common.BackEnd;
using myTest.Bll.Models;
StudentHandler studentHandler = new StudentHandler();
GenericResponse<IEnumerable<Student>> response = studentHandler.GetAllGeneric();

if (response.Successful)
{
this.GridView1.DataSource = response.Result.ToArray();
this.GridView1.DataBind();
}
else
// Handle Loading Failure
为确保本教程的完整性,让我向您展示如何使用 Nido 框架添加、编辑和删除记录。有关更复杂操作的帮助,请参考下面给出的其他参考资料。
更新
StudentHandler studentHandler = new StudentHandler();
GenericResponse<IEnumerable<Student>> response = handlerStudent
.GetFirstGeneric(x => x.IsActive);
// You just retrieve a object just to test the update function

// Now let's proceed to update the record
if (response.Successful)
{
        Student myStudent = response.Result;
 	myStudent.Age = 1000;
 	GenericResponse<Student> updateResponse = handlerStudent.UpdateGeneric(myStudent);
 	if (updateResponse.Successful)
 	{
  		// Handle Update
 	} else
  		// Handle Update Failure
}
else
	// Handle Update Failure
删除
GenericResponse<Student> response = handlerStudent.DeleteGeneric(x => x.StudentId == id);
Add
Student myStudent = new Student();
// assign properties for this new myStudent
GenericResponse<Student> response = handlerStudent.AddGeneric(myStudent);
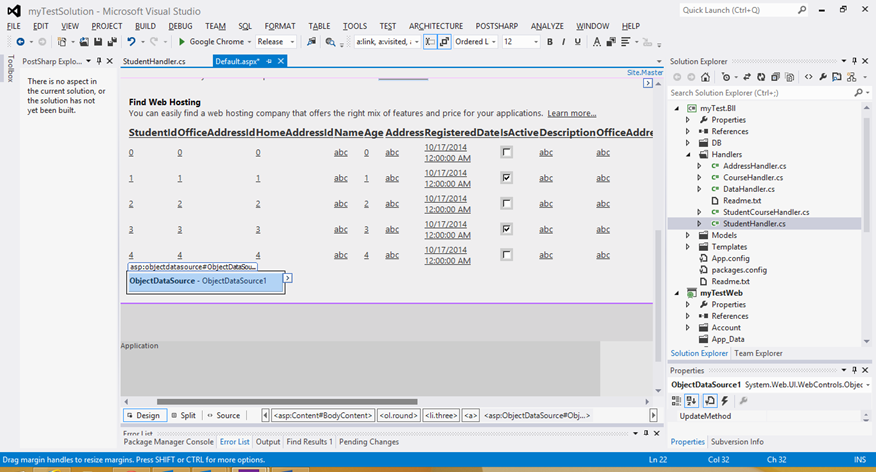
完成编码部分后,调试解决方案以确保一切编译正常。右键单击“myTestWeb”项目并选择“设为启动项目 (Set as Start Project)”来运行解决方案。您会看到数据正在加载,但您也会发现网格视图的格式一团糟。接下来让我们把它整理得更有条理一些……
格式化 Grid View
您将在这里使用一些内置功能。所以这部分也会很有趣。
第 1 步:您需要仔细遵循这个变通步骤。进入“Default.aspx”的设计视图。点击网格视图旁边出现的小箭头标记,进入下面的屏幕。点击“选择数据源 (Choose Data Source)”并选择“新建数据源 (New Data Source)”。选择“对象 (Object)”并在下一个屏幕点击“确定 (OK)”。

第 2 步:选择您的业务对象。由于我们试图显示从“Student”表中提取的记录,我们需要选择“myTest.Bll.Handlers.StudentHandler”处理程序作为我们数据源的绑定对象。这是我们为了让网格视图按我们想要的方式创建而使用的一个技巧。
第 3 步:在接下来的屏幕中,在 SELECT 选项卡下选择“GetAll()”方法,不用理会其他选项卡,直接点击“完成 (Finish)”。这将创建我们的网格视图,其中包含“Student”对象的所有列。

第 3 步:现在删除您的对象数据源,并转到页面的 HTML 源代码,从“gridview”元素中删除“DataSourceID="ObjectDataSource1"”。
第 4 步:每当模型的属性名称以“popup”后缀结尾时,这表示它是一个弹出窗口,基本上允许您在弹出框中显示相关表的记录。例如,如果您有“Student”表和“Address”表,其中每个学生都有一个地址。那么 T4 模板会自动为您创建一个 popup 属性。Nido 总是假设您需要将这些相关记录与父记录一起显示,因此为您提供了一个默认解决方案。要在网格上显示 popup 属性,您需要执行以下操作。
-
将样式添加到您的主样式表。您的设计师会为您做得更好,但我们开发了一个基本样式来演示此功能。将以下样式复制到您的主 css 文件中。在我的例子中,它是 Content 文件夹下的“Site.css”。
a.info { text-decoration: none; position: relative; /*this is the key*/ color: #000; border-bottom-style: dotted; border-bottom-width: thin; margin-right: 10px; } a.info:hover { z-index: 25; background-color: #ff0; } a.info span { display: none; } a.info:hover span { /*the span will display just on :hover state*/ display: block; position: absolute; top: 2em; left: 2em; border: 1px solid #0cf; background: rgb(252, 252, 252); color: #000; text-align: left; z-index: 525; } -
转到“Default.aspx”的 HTML 代码,并从新形成的网格中删除所有不需要的列。在我的例子中,我按如下方式修改了网格。请注意,所有弹出列都设置了“HtmlEncode="false"”和“ReadOnly="True"”。此外,每个模型类都有一个名为“CanDelete”的属性,它基本上告诉您是否可以删除特定对象。如果您有依赖记录,则此属性会自动设置为 false。因此,我使用该属性来启用/禁用删除按钮,并在删除按钮被禁用时向您显示一个工具提示,如下所示。
<asp:GridView ID="GridView1" runat="server" AutoGenerateColumns="False">
                <Columns>
                    <asp:BoundField DataField="StudentId" HeaderText="StudentId" SortExpression="StudentId" />
                    <asp:BoundField DataField="OfficeAddressId" HeaderText="OfficeAddressId" SortExpression="OfficeAddressId" />
                    <asp:BoundField DataField="HomeAddressId" HeaderText="HomeAddressId" SortExpression="HomeAddressId" />
                    <asp:BoundField DataField="Name" HeaderText="Name" SortExpression="Name" />
                    <asp:BoundField DataField="RegisteredDate" HeaderText="RegisteredDate" SortExpression="RegisteredDate" />
                    <asp:CheckBoxField DataField="IsActive" HeaderText="IsActive" SortExpression="IsActive" />
                    <asp:BoundField DataField="Description" HeaderText="Description" SortExpression="Description" />
                    <asp:BoundField DataField="HomeAddressPopup" HeaderText="HomeAddressPopup" ReadOnly="True"
                        HtmlEncode="false" SortExpression="HomeAddressPopup" />
                    <asp:BoundField DataField="OfficeAddressPopup" HeaderText="OfficeAddressPopup" ReadOnly="True"
                        HtmlEncode="false" SortExpression="OfficeAddressPopup" />
                    <asp:CheckBoxField DataField="CanDelete" HeaderText="CanDelete" SortExpression="CanDelete" />
                    <asp:TemplateField>
                        <ItemTemplate>
                            <asp:Button runat="server" ID="Btn_Delete" CommandName="Delete" Text="delete" Enabled='<%# Eval("CanDelete") %>'
                                ToolTip='<%# Eval("DeleteErrorText") %>' CommandArgument='<%# Eval("StudentId") %>' CausesValidation="True" UseSubmitBehavior="False" />
                        </ItemTemplate>
                    </asp:TemplateField>
                </Columns>
            </asp:GridView>
由于我们这里有多个弹出窗口,我们也需要修改数据检索部分。我们需要增强数据对象,使其不仅检索“Student”,还要检索每个学生及其家庭和办公室地址。请看下面的更新代码。
StudentHandler studentHandler = new StudentHandler();
GenericResponse<IEnumerable<Student>> response = studentHandler
    .Include(x => x.HomeAddress)
    .Include(y => y.OfficeAddress)
    .GetAllGeneric();

this.GridView1.DataSource = response.Result.ToArray();
this.GridView1.DataBind();
第 5 步:编译项目,看看是否一切都按计划进行,然后运行应用程序,查看它是否能显示带有所有弹出窗口的记录。您可以选择从弹出窗口中删除不需要的字段。查看“非映射属性”部分,看看它是如何创建弹出窗口的,您很快就会明白如何从弹出窗口中删除一个不需要的属性。

我希望我写的内容足够让初学者开始使用“Nido”框架,并且您在学习过程中会有更多问题。因此,您可以在这里或 Nido @ Codeplex 上发布这些问题,以便我能随时回答。