
Gigabit File uploads Over HTTP
4.80/5 (5投票s)
Gigabit 文件上传,我如此爱你?让我来数数方式。如今,在 IT 环境中处理大文件上传已相当普遍,我说的大文件上传是指大小超过 500MB 的文件。 当然,我们有复制技术
Gigabit File uploads Over HTTP
Gigabit 文件上传,我如此爱你?让我来数数方式。如今,在 IT 环境中处理大文件上传已相当普遍,我说的大文件上传是指大小超过 500MB 的文件。当然,我们有复制技术可以帮助我们同步数据,但仍然有定期传输大量数据的需求。
大多数时候,当我需要传输任何大于 500MB 的文件时,我通常会使用文件压缩实用程序将文件分割成几个小文件,然后通过 ftp 或安全 shell (ssh) 上传这些小文件。一旦所有小文件都已上传,我就会使用文件压缩来重新创建原始文件。然而,这需要设置 FTP 服务器或安全 Shell 服务器,并使用第三方文件压缩实用程序。
因此,我问道:“鉴于 IT 环境中广泛使用的网络浏览器和网络服务器,我能否使用 HTTP 协议完成同样的事情?”
在互联网上快速搜索后发现,网络服务器通常会将可上传的最大文件大小限制在 2GB 到 4GB 之间,此外,大多数网络浏览器允许您上传大约 2GB。我猜原因可能是 Content-Length 报头在网络浏览器中被视为一个有符号的 32 位整数,而有符号 32 位整数的最大值是 2,147,483,647。
随着我继续搜索,我开始研究 HTML 5 规范以及该规范的一部分 API,因为有迹象表明,这些新 API 将允许我通过 HTTP 协议上传大于 2GB 的文件。我还偶然发现了互联网上的一些代码示例,这些示例说明了可以做什么,但没有一个完整的示例说明如何做到。
一个可能的解决方案?
HTML 5 API 规范包括许多在现代网络浏览器中已实现的有趣技术,其中包括:
- 文件 API 规范 - 此规范提供了一种标准的方法来与我计算机上的本地文件进行交互。该规范允许我将多台计算机上的文件放入一个数组中,还允许我将文件分割成字节范围。
- Web Worker API 规范 - 此规范允许我生成与主页面并行运行的后台脚本。可以将其视为 JavaScript 中的多线程。这样做的好处是可以将一个长时间运行的任务交给 Web Worker,而不会阻塞主页面或其他脚本上的 UI。
- XMLHttpRequest Level 2 规范 - 此规范提供了在浏览器和 Web 服务器之间传输数据的新功能。我最感兴趣的功能是能够以各种格式将数据发送到服务器。这将允许我使用 FormData 对象将数据上传到服务器。
通过将这些技术结合在一起,我将能够通过以下方式将大于 2GB 的文件上传到 Web 服务器:
- 使用文件 API 规范在浏览器中选择一个或多个文件。
- 将选定的文件或文件传递给一个或多个专门用于处理文件的 Web Worker。
- 在专门用于处理文件的 Web Worker 中,我们将使用文件 API 规范将文件分割成块。这类似于使用文件压缩实用程序将大文件分割成小文件。我们将使用 SparkMD5 库为文件生成 MD5 校验和,然后将块发送回主页面(从现在开始是父页面)。请注意,为文件生成 MD5 校验和和上传文件应该并行进行。
- 在父页面中,我们将把块发送到一个专门负责将文件块发送到 Web 服务器的 Web Worker。
- 在负责将文件块发送到 Web 服务器的 Web Worker 中,我们将创建一个 XMLHttpRequest Level 2 对象池,这些对象将使用 FormData 对象将文件块以 multipart/form-data 的形式 POST 到 Web 服务器。如果 Web 浏览器不支持 FormData 对象,我们将手动创建 multipart/form-data 请求,并将文件块转换为 base64 字符串。
- 在 Web 服务器上,我们将接收来自客户端的每个块,并将每个块保存为单个文件。Web 服务器将继续这样做,直到收到合并所有单个块以形成一个文件的命令。一旦文件在 Web 服务器上创建,它将向 Web 浏览器发送一条成功消息,其中包含已保存文件的 MD5 校验和。
开始吧
既然我们已经确定了如何实现通过 HTTP 协议进行大文件上传,让我们开始工作吧。但是,在我们编写任何代码之前,我们需要从 https://code.jqueryjs.cn/jquery-2.1.1.min.js 下载 jQuery 2.x 库,并从 https://github.com/satazor/SparkMD5/archive/master.zip 下载 SparkMD5。
jQuery 2.x 库将用于提供客户端 JavaScript 功能,而 SparkMD5 库提供了一个用 JavaScript 编写的 MD5 算法,用于生成客户端本地文件的 MD5 校验和。
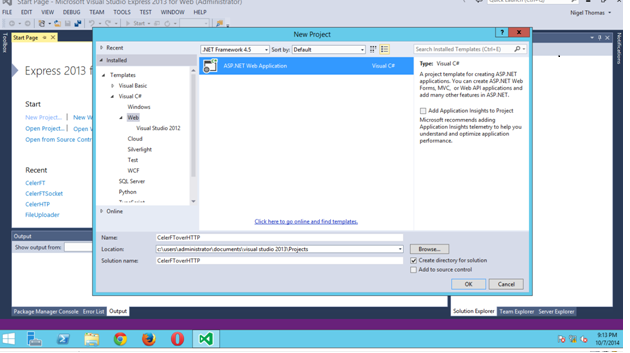
我们将使用 Visual Studio Express 2013 for Web 作为开发环境,首先创建一个新项目,然后选择一个 ASP.NET Web 应用程序。
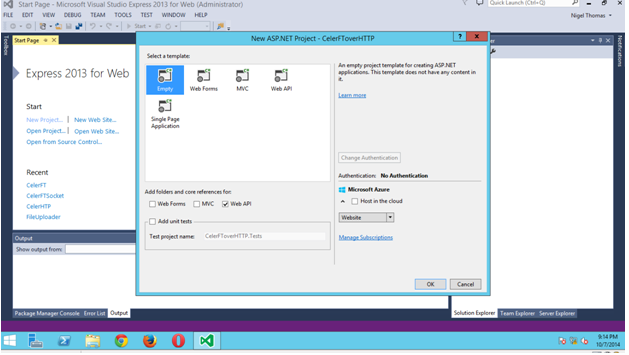
在下一个屏幕中,我们将选择一个空项目模板,并选择添加 Web API 项目的文件夹和核心引用的选项。
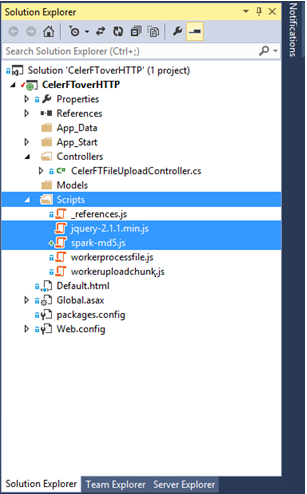
创建项目后,转到解决方案资源管理器,添加一个新文件夹并命名为 Scripts。我们将把 jQuery 2.x 和 SparkMD5 库放在 Scripts 文件夹中。
客户端
下一阶段是实际开始创建文件上传应用程序,由于这是一个基于 Web 的应用程序,我们需要有一个客户端应用程序和一个服务器端应用程序。客户端应用程序将是一个基于浏览器的应用程序,应该在所有主要 Web 浏览器的最新版本中运行。
我们将向我们的项目添加一个新的 HTML 文件,并将其命名为 "Defaul.html"。我们将把 "Default.html" 设置为项目中的启动页。我们将使用 "Default.html" 页面来实现几个目标,这些目标是:
- "Default.html" 页面将托管 HTML 表单,该表单提供标准的
<input type="file">元素,用于从本地文件系统选择文件。 - "Default.html" 页面将使用 XMLHttpRequest 对象上传事件提供文件上传进度的状态信息。
- "Default.html" 页面将显示一个表格,其中包含要上传到本地文件系统的文件的校验和,以及上传到远程系统后的文件的校验和。
- "Default.html" 页面将显示在客户端或服务器端发生的任何错误消息。

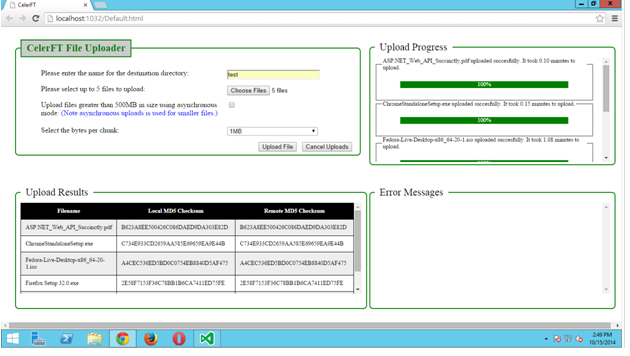
下图显示了 Default.html 页面在 Chrome 浏览器中的显示效果。请注意,我使用了 <div> 和 <fieldset> 标签来创建页面上显示的布局。我不认为我对 <fieldset> 标签的使用是标准的用法,但它达到了我想要的结果。

HTML 代码显示,我们只有一个简单的 HTML 表单,其中包含一个文件输入元素,该元素具有 multiple 选项,允许我们从本地文件系统选择任意数量的文件进行上传。
<formname="CelerFTFileUpload">
     <fieldsetclass="top">
       <legendid="legend_uploadfileform">CelerFT File Uploader</legend>
        <ol style="list-style:none">
         <liclass="form">
           <labelfor="select_directory" style="float:left;width:410px">
            Please enter the name for the destination directory:
           </label>
           <inputtype="text" id="select_directory" name="directoryname" style="width:200px" />
           <li />
           <li class="form">
             <labelfor="select_file" style="float:left;width:410px">
                Please select up to 5 files to upload:
             </label>
             <inputtype="file" id="select_file" name="files[]" multiple style="width:200px" />
           </li>
           <liclass="form">
            <labelfor="select_asyncstate" style="float:left;width:410px">
                Upload files greater than 500MB in size using asynchronous mode:
               <fontcolor="blue">(Note asynchronous uploads is used for smaller files.)</font>
             </label>
             <inputtype="checkbox" id="select_asyncstate" name="asyncstate" />
           </li>
           <liclass="form">
             <p></p>
           </li>
           <liclass="form">
            <labelfor="select_bytesperchunk" style="float:left;width:410px">
                Select the bytes per chunk:
                </label>
             <selectid="select_bytesperchunk" name="bytesperchunk" style="width:200px">
               <optionvalue="1">50MB</option>
               <optionvalue="2">20MB</option>
               <optionvalue="3">10MB</option>
               <optionvalue="4">5MB</option>
               <optionvalue="5">2MB</option>
               <optionselected="selected" value="6">1MB</option>
               <optionvalue="7">500K</option>
               <optionvalue="8">256K</option>
               <optionvalue="9">128K</option>
               <optionvalue="10">64K</option>
             </select>
           </li>
           <liclass="form">
             <inputtype="button" id="cancel_workers" value="Cancel Uploads" style="float:right;margin-left: 10px" />
             <inputtype="submit" id="upload_file" value="Upload File" style="float:right" />
           </li>
       </ol>
     </fieldset>
   </form>
作为一项附加措施,我们将使用 jQuery 的 $(document).ready(function (){}); 来检查浏览器是否支持我们需要在文件上传工具中使用的所有 HTML 5 API 规范。
<!-- Check browser compatability -->
      <script type="text/javascript">
          $(document).ready(function() {
              if(!(window.File && window.Blob && window.FormData)) {
                  alert("Please upgrade your browser to one that supports
                 the HTML5 file api.");
                  return;
              }

              if(typeof Worker == "undefined") {
                  alert("Please upgrade your browser to one that supports
                 the HTML5 Webworker api.");
                  return;
              }
          });
      </script>
将一个点击事件绑定到 "Upload File" 按钮,当该事件触发时,将执行一些基本检查,以确保我们提供了表单必需的输入。完成所有验证检查后,将创建两组 Web Worker。
创建的第一组 Web Worker 将用于将文件块上传到 Web 服务器。上传 Worker 是通过调用 Worker() 构造函数并提供要在此 Worker 线程中执行的脚本的 URI 来创建的。在这种情况下,URI 是 "Scripts/workeruploadchunk.js"。
此外,上传 Worker 的 onmessage 属性被设置为允许父页面接收来自上传 Worker 的通知。父页面和 Web Worker 通过传递消息进行通信。可以在上传 Worker 和父页面之间发送的消息类型有 "checksum"、"status"、"progress" 和 "error" 消息,当父页面收到任何这些消息类型时,它将更新父页面上的相应元素。这是因为上传 Worker 无法访问父页面的 DOM。
上传 Worker 的 onerror 属性被设置为将所有错误写入 Default.html 页面的错误消息区域。所有上传 Worker 在创建后都会被推入一个数组。
// Create the upload workers
for(var i = 0; i < files.length; i++) {

        var uploadworker = newWorker("Scripts/workeruploadchunk.js");

             uploadworker.onmessage = function(e) {
                  var data= e.data;
                  switch (data.type) {

                   // Update the checksum value in the table
                   case 'checksum':
                         $("#remote" + data.id).text(data.message);
                         break;

                  // Update legend of the progressbar
                  case 'status':
                        $("#file_name" +
                        data.id).children('legend:first').text
                       (data.message);
                        break;

                   // Update the progressbar itself
                   case 'progress':
                         progress(data.percentage, data.id);
                         break;

                  // Show error messages and stop the worker
                  case 'error':
                       $("#errormessage").append('<p>' + data.message +
                       '</p>');
                       for (var j = 0; j < workers.length; j++) {
                           workers[j].terminate();
                       }

                       for (var i = 0; i < uploadworkers.length; i++) {
                                uploadworkers[i].terminate();
                          }
                          break;
                  }

      }
     uploadworker.onerror = function (e) { $("#errormessage").append(e.message); }
     uploadworkers.push(uploadworker);
}
创建将文件分割成块并创建文件本地 MD5 校验和的 Web Worker 的过程与创建上传 Worker 非常相似。唯一的区别是 Web Worker 的 URI 是 "Scripts/workerprocessfile.js"。
此外,Web Worker 还向父页面传递了额外的消息类型,这些类型是 "upload" 和 "merge" 消息。因此,当父页面收到来自文件处理 Worker 的上传消息时,它不会更改 DOM 中的任何元素,而是将消息中发送的数据传递给上传 Worker。
上传 Worker 将然后将文件块发送到 Web 服务器。同样,当文件处理 Worker 创建最后一个文件块时,它会将一个合并消息发送到父页面,父页面将此消息发送给上传 Worker。
文件处理 Worker 和上传 Worker 之间的这种消息传递系统基于这样一个事实:当 Worker 创建时,它被分配一个从 0 到 4 的 ID。此 ID 用于将文件处理 Worker 与上传 Worker 相关联。因此,ID 为 0 的文件处理 Worker 将与 ID 为 0 的上传 Worker 相关联。此外,页面上要由从 Web Worker 收到的消息更新的每个元素都有一个以数字结尾的 ID。因此,"progressbar0" 指的是将由 ID 为 0 的上传 Worker 更新的进度条。
// Create the file processing web worker
for(var j = 0; j < files.length; j++) {
    var file = files[j];

    // Update the table with the file name
    $("#file" + j).text(file.name);

    // Create the file processing web worker
    var worker = newWorker("Scripts/workerprocessfile.js");

     worker.onmessage = function(e) {
            vardata = e.data;
            switch (data.type) {

            // Update the checksum value in the table
            case'checksum':
                  $("#local" + data.id).text(data.message);
                  break;

             // Update legend of the progressbar
             case 'status':
                   $("#file_name" + data.id).children('legend:first').text(data.message);
                   break;

             // Update the progressbar itself
             case'progress':
                   progress(data.percentage, data.id);
                   break;

             // Send and uplaod message to the web worker
             case'upload':
                   uploadworkers[data.id].postMessage({ 'chunk': data.blob, 'filename': data.filename,
                   'directory': $("#select_directory").val(), 'chunkCount': data.chunkCount,
                   'asyncstate': data.asyncstate, 'id': data.id });
                    break;

              // Send a merge message to the web worker
              case 'merge':
                    uploadworkers[data.id].postMessage({ 'filename': data.filename, 'directory':
                    $("#select_directory").val(), 'chunkCount': data.chunkCount, 'id': data.id });
                    break;

              // Show error messages and stop the web worker
              case 'error':
                    $("#errormessage").append('<p>' + data.message + '</p>');
                    for (var j = 0; j < workers.length; j++) {
                          workers[j].terminate();
                    }

                    for (var i = 0; i < uploadworkers.length; i++) {
                          uploadworkers[i].terminate();
                    }

                    break;
     }

  }

  worker.onerror = function (e) { $("#errormessage").append(e.message); }

  // Check if we are going to do an async upload of a large file
  varuploadlargfileasync = false;

   if($('#select_asyncstate').prop('checked')) {
         uploadlargfileasync = true;
   }

  // Start the file upload by sending a postMessage to the file processing web worker
   worker.postMessage({ 'cmd': 'start', 'files': file, 'directory': $("#select_directory").val(),
   'bytesperchunk': $("#select_bytesperchunk option:selected").text(), 'uploadlargfileasync':
    uploadlargfileasync, 'id': j });

    workers.push(worker);
}
父页面通过向文件处理 Web Worker 发送 "postMessage" 来启动文件上传。
Web Workers
在 "Scripts/workerprocessfile.js" 文件中,当文件处理 Web Worker 从父页面收到消息时,会触发 "self.onmessage" 事件。在 "self.onmessge" 函数中,父页面发送的消息负载可以在 Event.data 中访问。父页面和 Web Worker 之间有几种传递数据的方法,在文件上传工具中将使用的方法是将数据复制到父页面和 Web Worker 之间。
在文件处理 Web Worker 中,文件块是通过使用文件 API 规范的 "slice" 方法创建的。"slice" 方法用于创建一个 Blob,其中包含源文件中指定字节范围的数据。一旦创建了文件块,该块就会通过 "upload" 消息传回父页面。
在文件处理 Worker 中,我们使用 "chunkCount" JSON 数组来跟踪创建和上传的文件块数量。"chunkCount" 数组跟踪将要创建的文件块总数、当前文件块、已上传的文件块数量以及我们开始处理文件的时间。当已上传的文件块数量等于总块数时,文件处理 Web Worker 会向父页面发送一个 "merge" 消息。
// This worker is used to split the file into chunks,
// and calculate the file checksum.
// Each chunk is sent back to the parent page to be
// uploaded by another worker

// Import additional scripts
// MD5 checksum libraray https://github.com/satazor/SparkMD5
importScripts('/Scripts/spark-md5.js');

// Global variables
// Note IE 10 does not recognize the const declaration so we have to use var
varLARGE_FILE = 500 * 1024 * 1024;
varworkerdata = '';
varasyncstate = true;

// 1MB chunk sizes. The default
varBYTES_PER_CHUNK = 1 * 1024 * 1024;

// This function is used to read the file, calculate the checksum,
// and send the file chunk to the web worker that uploads the file chunk
functionprocessFile(blob) {

      // Size of the file
      var SIZE = blob.size;

      // The total number of file chunks
      varTotal_Number_of_Chunks = Math.ceil(blob.size / BYTES_PER_CHUNK);

      // Array used to hold the total number of chunks, the number of chunks that have been uploaded,
      // and the current chunk. This information is sent to the web worker that uploads the file chunks
      var chunkCount = {

          currentNumber: 1,
          numberOfChunks: Total_Number_of_Chunks,
          numberOfUploadedChunks: 0,
          starttime: newDate()
      };

      var start = 0;
      var end = BYTES_PER_CHUNK;

      var fileReader = newFileReaderSync();
      var spark = newSparkMD5.ArrayBuffer();

      while (start < SIZE) {

          var chunk = blob.slice(start, end);

          // Read the chunk into another variable to calculate the checksum
          var chunk1 = fileReader.readAsArrayBuffer(chunk);
          spark.append(chunk1);

          // Send the chunk back to the parent
          self.postMessage({ 'type': 'upload', 'filename': blob.name, 'blob': chunk, 'chunkCount':
          chunkCount, 'asyncstate': asyncstate,'id': workerdata.id });

          chunkCount.currentNumber++;
          chunkCount.numberOfUploadedChunks++;

          start = end;
          end = start + BYTES_PER_CHUNK;

          if(chunkCount.numberOfUploadedChunks == chunkCount.numberOfChunks) {

              // All done calculate the checksum
              varmd5hash = spark.end();
              self.postMessage({ 'type': 'checksum', 'message': md5hash.toUpperCase(), 'id': workerdata.id
              });

              // Merge the file on the remote server
              self.postMessage({ 'type': 'merge', 'filename': blob.name, 'chunkCount': chunkCount, 'id':
              workerdata.id });
          }
      }

  }


  // This is where we start.
  // The parent sends us the file as a part of the data
  self.onmessage = function (e) {

      workerdata = e.data;

      // If we have an id greater than 5 then we abort. We upload five files at a time.
      if (workerdata.id > 5) {
          self.postMessage({ 'type': 'error', 'message': "We can only upload five files at a time.", 'id':
          workerdata.id });
          return;
      }

      // If we have a large file we will use a synchronous upload by default.
      // Large file is greater than 500GB
      if(workerdata.files.size > LARGE_FILE && workerdata.uploadlargfileasync == false) {
          asyncstate = false;
      }


      // Configure the bytes per chunk.
      // The default is 1MB
      switch (workerdata.bytesperchunk) {

          case'50MB':
              BYTES_PER_CHUNK = 50 * 1024 * 1024;
              break;
          case'20MB':
              BYTES_PER_CHUNK = 20 * 1024 * 1024;
              break;
          case'10MB':
              BYTES_PER_CHUNK = 10 * 1024 * 1024;
              break;
          case'5MB':
              BYTES_PER_CHUNK = 5 * 1024 * 1024;
              break;
          case'2MB':
              BYTES_PER_CHUNK = 2 * 1024 * 1024;
              break;
          case'1MB':
              BYTES_PER_CHUNK = 1 * 1024 * 1024;
              break;
          case'500K':
              BYTES_PER_CHUNK = 500 * 1024;
              break;
          case'256K':
              BYTES_PER_CHUNK = 256 * 1024;
          case'128K':
              BYTES_PER_CHUNK = 128 * 1024;
              break;
          case'64K':
              BYTES_PER_CHUNK = 64 * 1024;
              break;
          default:
              BYTES_PER_CHUNK = 1024 * 1024;
      }


      // Process the file for uploading
     //  Send a status message to the parent page
      self.postMessage({ 'type': 'status', 'message': "Uploading file " + workerdata.files.name, 'id':
       workerdata.id });

      // Start processing the file
      processFile(workerdata.files);

  }
当 Default.html 页面收到来自文件处理 Worker 的上传消息时,上传 Worker 就会启动。
case 'upload':
uploadworkers[data.id].postMessage({ 'chunk': data.blob, 'filename': data.filename, 'directory': $("#select_directory").val(), 'chunkCount': data.chunkCount, 'asyncstate': data.asyncstate, 'id': data.id });
上传 Worker 在 "self.onmessage" 事件中接收此消息。收到消息后,上传 Worker 在 XMLHttpRequest Worker 池中创建六个 XMLHttpRequest 对象。然后,它将文件块 POST 到 Web 服务器上的每个 UploadChunk URL。UploadChunk URL 是基于 REST 的 URL。
upload 函数是上传 Worker 脚本的核心。在此函数中,我们从 Worker 池中获取一个 XMLHttpRequest 对象,并为 XMLHttpRequest 对象的 "upload.onprogress" 和 "onreadystatechange" 事件分配事件。
"upload.onprogress" 事件允许我们将文件上传进度消息发送回父页面。这就是进度条更新的方式。
"onreadystatechange" 事件在与 Web 服务器通信期间触发。我们最感兴趣的状态是状态 4,当请求完成且响应就绪时触发。这允许我们获取从 Web 服务器返回的 HTTP 状态码。
文件块使用 multipart/form-data 编码上传到 Web 服务器,FormData 对象支持这一点。但是,如果浏览器不支持 FormData 对象,我们将使用 "buildFormData" 函数通过 base64 编码文件块来手动创建 multipart/form-data 编码的数据。这是通过创建一个 FileReader 对象并使用 FileReader 对象的 "readAsDataURL" 方法将文件块转换为 base64 编码的字符串来完成的。base64 字符串使用正则表达式从 "data:URL" 中提取。需要注意的是,某些 Web 浏览器不支持 Web Worker 中 FileReader 对象的异步版本,因此我们必须使用由 FileReaderSync 构造函数创建的 FileReader 对象的同步版本。
// This worker is used to upload the file chunks to the backend server.
// The file chunks is sent to the worker by the parent page

// Url for WebAPI functions
varwebapiUrl = "/api/CelerFTFileUpload/UploadChunk";
varwebapiGetMergeAllUrl = "/api/CelerFTFileUpload/MergeAll";

// Global variables
// Note IE 10 does not recognize the const declaration so we have to use var
var LARGE_FILE = 500 * 1024 * 1024;
var workerdata = '';
var blocks = [];
var xhrworkerspool = '';
var totalnumberofchunks = 0;
var uploadedchunk = 0;
var urlcount = 0;


// Functionused to create the XMLHttpRequest worker pool
function XHRWorkerPool(numberofxhr) {
      this.xhrworkerpool = [];
     for(var i = 0; i < numberofxhr; i++) {
       var xhr = new XMLHttpRequest();
          this.xhrworkerpool.push(xhr);
      }
}
 XHRWorkerPool.prototype.getWorker = function () {
      varxhr;
      if(this.xhrworkerpool.length > 0) {
          xhr = this.xhrworkerpool.pop();
     }
      else{
          xhr = new XMLHttpRequest();
      }

      returnxhr;
 }

  XHRWorkerPool.prototype.releaseWorker = function (xhr) {

      this.xhrworkerpool.push(xhr);

  }

  XHRWorkerPool.prototype.terminateWorkers = function () {
      for(var i = 0; i < this.workerpool.length; i++) {
          this.xhrworkerpool[i].abort();
      }
  }

  // Function used to creae the multipart/form-data in browsers
  // that don't support Formdata
  functionbuildFormData(chunk) {

      // Transform the data into a base64 string
      varreader = new FileReaderSync();
      vardataUrl = reader.readAsDataURL(chunk);
      varchunkdata = dataUrl.match(/,(.*)$/)[1];

      // Create the form request

      // Hard code the boundary
      varboundary = '----12345678wertysdfg';

      // We start a new part in our body's request
      vardata = '';
      data += '--' + boundary+ '\r\n' + 'Content-Disposition: form-data; name="Slice"; filename="blob"';
      data += '\r\n';

      // We provide the mime type of the file. In this case it is text for base64 encoded file
      data += 'Content-Type: text/html; charset=UTF-8'
      data += '\r\n';

      // There is always a blank line between the meta-data and the data
      data += '\r\n';

      // We append the binary data to our body's request
      data += chunkdata + '\r\n';

      // Once we are done, we "close" the body's request
      data += '--' + boundary + '--';

      reader = null;

      returndata;

  }

  // Function used to send the request to the server to merge the file chunks
  // into one file
  functionmergeall(filename, chunkCount) {

      varxhr = new XMLHttpRequest();

      xhr.onreadystatechange = function (e) {

          if (this.readyState == 4 && this.status == 200) {

              // Update the UI with the information that we have finished the file upload, and indicate
                 the time taken
              // Update the UI with the remote file checksum
              if (chunkCount.numberOfUploadedChunks == chunkCount.numberOfChunks) {
                  var endtime = newDate();
                  var timetaken = newDate();
                  var timetaken = (((endtime.getTime() - chunkCount.starttime.getTime()) / 1000) / 60);
                  var md5hash = this.responseText.split(",");
                  self.postMessage({ 'type': 'status', 'message': filename + " uploaded succesfully. It
                  took " + timetaken.toFixed(2) + " minutes to upload.", 'id': workerdata.id });
                  self.postMessage({ 'type': 'checksum', 'message': md5hash[1], 'id': workerdata.id });

              }
          }

          // A 400 message indicates that we can't merge all of the files as yet.
          // So queue up the mergerequest to run in 5 seconds
          if (this.readyState == 4 && this.status == 400) {

              setTimeout(function () { mergeall(filename, chunkCount); }, 5000);
          }

      };

      // Send the request to merge the file
      xhr.open('GET', webapiGetMergeAllUrl + '/?filename=' + filename + '&directoryname=' +
      workerdata.directory + '&numberOfChunks=' + chunkCount.numberOfChunks, false);
      xhr.send(null);
      xhr = null;


  }

  // Function used to upload the file chunks
  functionupload(chunk, filename, chunkCount, uploadurl, asyncstate) {

      // Grab a worker from the pool
      varxhr = xhrworkerspool.getWorker();

      // xhr.upload causes an error in IE. Use the try catch block to
      // catch the failure in IE, and then upload the progress block in
      // the catch routine.
      try{
          if (asyncstate == true) {
              xhr.upload.onprogress = function (e) {

                  //var progress = parseInt((e.loaded * 100 / e.total), 10);
                  var progress = parseInt((chunkCount.currentNumber * 100 / chunkCount.numberOfChunks),
                  10);
                  self.postMessage({ 'type': 'progress', 'percentage': progress, 'id': workerdata.id });
              }(chunkCount);
          }
      }
      catch(e) {

          xhr.onprogress = function (e) {

              //var progress = parseInt((e.loaded * 100 / e.total), 10);
              var progress = parseInt((chunkCount.currentNumber * 100 / chunkCount.numberOfChunks), 10);
              self.postMessage({ 'type': 'progress', 'percentage': progress, 'id': workerdata.id });
          }(chunkCount);

      }


      xhr.onreadystatechange = function (e) {

          if (this.readyState == 4 && this.status == 200) {

              // Send back progess information for synchronous uploads
              // The upload.onprogress method only fires on asynchornous uploads
              // and we are doing synchronous uploads
              if (asyncstate == false) {
                  var progress = parseInt((chunkCount.currentNumber * 100 / chunkCount.numberOfChunks),
                  10);
                  self.postMessage({ 'type': 'progress', 'percentage': progress, 'id': workerdata.id });
              }

          }

          if (this.readyState == 4 && this.status == 415) {

              // Tried to upload file that is not multipart/form-data.
              // End the upload
              self.postMessage({ 'type': 'error', 'message': "Upload Error: " + this.responseText, 'id':
              workerdata.id });

          }

          if (this.readyState == 4 && this.status == 413) {

              // Tried to upload file that is greater than the maximum file size.
              // End the upload
              self.postMessage({ 'type': 'error', 'message': "Upload Error: " + this.responseText, 'id':
              workerdata.id });

          }


          if (this.readyState == 4 && this.status == 500) {

              // Fatal error occured on the server side
              // Send the error message and end the webworker
              self.postMessage({ 'type': 'error', 'message': "Server Error: " + this.responseText, 'id':
              workerdata.id });

          }

      };


      // Open the url and upload the file chunk
      xhr.open('POST', uploadurl + '?filename=' + filename + '&directoryname=' + workerdata.directory +
      '&chunkNumber=' + chunkCount.currentNumber + '&numberOfChunks=' + chunkCount.numberOfChunks,
      asyncstate);

      varformData = '';

      if(typeof FormData == "undefined") {

          // The browser does not support the FormData object.
          // We will manually create the from

          formData = buildFormData(chunk);

          // Create the form with appropriate header
          xhr.setRequestHeader("Content-Type", "multipart/form-data; boundary=----12345678wertysdfg");
          xhr.setRequestHeader("Content-Length", formData.length);
          xhr.setRequestHeader("CelerFT-Encoded", "base64");

      }
      else{
          // Browser supports the Formdata object
          // Create the form
          formData = new FormData();
          formData.append("Slice", chunk);

      }


      // Send the form
      xhr.send(formData);

      formData = null;

      xhrworkerspool.releaseWorker(xhr);

  }


  // This is where we start
  // The upload information is sent as the message payload
  // in e.data
  self.onmessage = function(e) {

      workerdata = e.data;

      // Create the xhr upload workers.
      // We will upload to multiple urls
      xhrworkerspool = new XHRWorkerPool(6);

      if(workerdata.chunk != null) {

          if (urlcount >= 6) {

              urlcount = 0;
          }

          if (urlcount == 0) {
              uploadurl = webapiUrl;
          }
          else {
              uploadurl = webapiUrl + urlcount;
          }

          upload(workerdata.chunk, workerdata.filename, workerdata.chunkCount, uploadurl,
          workerdata.asyncstate);
          urlcount++;
      }

      else{
          mergeall(workerdata.filename, workerdata.chunkCount);
      }


  }
服务器端
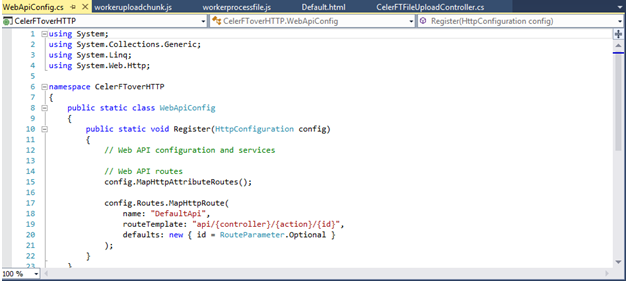
文件上传工具的 Web 服务器端基于 ASP.NET Web API 2.x 版本。ASP.NET Web API 2.x 是一个基于 RESTFUL 的 API,我们将使用基于操作的路由来调用后端 Web 服务器公开的方法。这要求我们编辑 "WebApiConfig.cs" 文件并在路由模板中添加一个 {action}。
在解决方案资源管理器中,我们将添加一个接受文件上传的 Controller。Controller 被命名为 CelerFTFileUploadController。

CelerFTFileUploadController 公开多个方法。"UploadChunk" 是 POST 方法,接受文件上传。使用多个 "UploadChunk" POST 方法的原因是为了能够并行写入所有方法。
[System.Web.Http.HttpPost]
public async Task<HttpResponseMessage> UploadChunk(stringfilename, string directoryname, int chunknumber, intnumberofChunks)

{
   HttpResponseMessage returnmessage = await ProcessChunk(filename, directoryname,
   chunknumber, numberofChunks);

  return returnmessage;
}
"UploadChunk" POST 方法实现相同的功能,这在 "ProcessChunk" 方法中定义。"ProcessChunk" 方法检查我们是否正在上传 multipart/form-data 编码的数据,并且我们没有尝试上传大于 50MB 的文件块。
通过这些检查后,接下来的检查是查找 "CelerFT-Encoded" 报头。如果此报头存在,则表示我们正在将文件块作为 base64 编码字符串上传。这意味着我们必须从 multipart/from-data 编码的数据中提取 base64 编码的字符串,并使用 "Convert.FromBase64String" 方法将其转换为字节数组。
如果 "CelerFT-Encoded" 报头不存在,则我们将上传的数据读取到字节数组中。一旦我们将文件块读取到字节数组中,我们就将字节数组保存到临时目录中的文件中。创建的临时目录基于文件名。
每个文件块都保存为单独的文件,我们对文件名进行填充,以便为每个文件提供一个顺序号。这很重要,因为当我们尝试将文件块合并到一个文件中时,如果文件名顺序不正确,则存在创建损坏文件的风险。通过将 "chunknumber" 传递给 "UploadChunk" 方法并将 "chunknumber" 追加到文件名来创建顺序号。
private asyncTask<HttpResponseMessage> ProcessChunk(string filename, stringdirectoryname, int chunknumber, int numberofChunks)
          {
              // Check if the request contains multipart/form-data.
              if(!Request.Content.IsMimeMultipartContent())
              {
                  throw newHttpResponseException(HttpStatusCode.UnsupportedMediaType);
              }

              // Check that we are not trying to upload a file greater than 50MB
              Int32 maxinputlength = 51 * 1024 * 1024;

              if (Convert.ToInt32(HttpContext.Current.Request.InputStream.Length) > maxinputlength)
              {
                  returnRequest.CreateErrorResponse(HttpStatusCode.RequestEntityTooLarge, "Maximum upload
                  chunk size exceeded");
              }

              try
              {

                  byte[] filedata = null;

                  // If we have the custom header then we are processing hand made multipart/form-data
                  if(HttpContext.Current.Request.Headers["CelerFT-Encoded"] != null)
                  {

                      // Read in the request
                      HttpPostedFileBase base64file = new
                      HttpPostedFileWrapper(HttpContext.Current.Request.Files["Slice"]);

                      if (base64file == null)
                      {
                          returnRequest.CreateErrorResponse(HttpStatusCode.BadRequest, "No file chunk
                          uploaded");
                      }

                      // Convert the base64 string into a byte array
                      byte[] base64filedata = new byte[base64file.InputStream.Length];
                      await base64file.InputStream.ReadAsync(base64filedata, 0,
                      Convert.ToInt32(HttpContext.Current.Request.InputStream.Length));

                      var base64string = System.Text.UTF8Encoding.UTF8.GetString(base64filedata);

                      filedata = Convert.FromBase64String(base64string);

                  }
                  else
                  {

                      HttpPostedFileBase file = new
                      HttpPostedFileWrapper(HttpContext.Current.Request.Files["Slice"]);

                      if (file == null)
                      {
                          returnRequest.CreateErrorResponse(HttpStatusCode.BadRequest, "No file chunk
                          uploaded");
                      }

                      filedata = new byte[file.InputStream.Length];
                       await file.InputStream.ReadAsync(filedata, 0,
                       Convert.ToInt32(HttpContext.Current.Request.InputStream.Length));

                  }

                  if (filedata == null)
                  {

                      returnRequest.CreateErrorResponse(HttpStatusCode.BadRequest, "No file chunk
                      uploaded");
                  }

                  // Write the byte array to a file
                  var newfilename = filename.Split('.');
                  string baseFilename = Path.GetFileNameWithoutExtension(filename);
                  string extension= Path.GetExtension(filename);

                  string tempdirectoryname = Path.GetFileNameWithoutExtension(filename);
                  var localFilePath = getFileFolder(directoryname + "\\" + tempdirectoryname) + "\\" +
                  baseFilename + "." + chunknumber.ToString().PadLeft(16, Convert.ToChar("0")) + "." +
                  extension + ".tmp";


                  var input = newMemoryStream(filedata);
                  var outputFile = File.Open(localFilePath, FileMode.OpenOrCreate, FileAccess.Write,
                  FileShare.Read);

                  await input.CopyToAsync(outputFile);
                  input.Close();
                  outputFile.Close();


                  filedata = null;

                  return newHttpResponseMessage()
                  {
                      Content = newStringContent(localFilePath),
                      StatusCode = HttpStatusCode.OK
                  };
              }
              catch (Exception ex)
              {
                  returnRequest.CreateErrorResponse(HttpStatusCode.InternalServerError, ex);
              }
          }
"MergeAll" 是一个 GET 方法,用于将保存在临时文件夹中的所有文件块合并到文件中。
[System.Web.Http.HttpGet]
 publicHttpResponseMessage MergeAll(string filename, stringdirectoryname, int numberofChunks)
 {

              string tempdirectoryname = Path.GetFileNameWithoutExtension(filename);
              var localFilePath = getFileFolder(directoryname + "\\" + tempdirectoryname) + "\\";
              DirectoryInfo diSource = newDirectoryInfo(localFilePath);
              string baseFilename = Path.GetFileNameWithoutExtension(filename);
              string extension = Path.GetExtension(filename);

             // If the number of uploaded files is less than the total number of files then
             // return an error. This will happen in asynchronous file uploads where the final
             // chunk arrives before other chunks
              if (diSource.GetFiles("*.tmp").Length != numberofChunks)
              {
                  returnRequest.CreateErrorResponse(HttpStatusCode.BadRequest, "Numberof file chunks
                  less than total count");
              }

              FileStream outputFile = newFileStream(localFilePath + baseFilename + extension,
              FileMode.OpenOrCreate, FileAccess.Write);

              try
              {
                  // Get all of the file chunks in the directory and use them to create the final file.
                  // All of the file chunks are named in sequential order.
                  foreach (FileInfo fiPart indiSource.GetFiles("*.tmp")) {

                      byte[] filedata = System.IO.File.ReadAllBytes(fiPart.FullName);
                      outputFile.Write(filedata, 0, filedata.Length);
                      File.Delete(fiPart.FullName);

                  }

                  outputFile.Flush();
                  outputFile.Close();

                  // Move the file to the top level directory
                  string oldfilelocation = localFilePath + baseFilename + extension;
                  string newfilelocation = getFileFolder(directoryname + "\\") + baseFilename + extension;

                  // Check if the file exists. If it does delete it then move the file
                  if(System.IO.File.Exists(newfilelocation)) {
                      System.IO.File.Delete(newfilelocation);
                  }
                  System.IO.File.Move(oldfilelocation, newfilelocation);

                  // Delete the temporary directory
                  System.IO.Directory.Delete(localFilePath);

                  // Get the MD5 hash for the file and send it back to the client
                  HashAlgorithm MD5 = newMD5CryptoServiceProvider();
                  //string checksumMd5 = GetHashFromFile(localFilePath + baseFilename + extension, MD5);
                  string checksumMd5 = GetHashFromFile(newfilelocation, MD5);


                  return newHttpResponseMessage()
                  {
                      Content = newStringContent("Sucessfully merged file " + filename + "," +
                      checksumMd5),
                      StatusCode = HttpStatusCode.OK
                  };


              }
              catch (Exception ex)
              {
                  return Request.CreateErrorResponse(HttpStatusCode.InternalServerError, ex);
              }

          }
Web.Config
必须编辑 Web 服务器的 web.config 文件以支持大文件上传。
<httpRuntime maxRequestLength="2147483647" requestLengthDiskThreshold="10240" targetFramework="4.5" />

  <asp enableChunkedEncoding="true"/>
  <security>
    <requestFiltering>
      <requestLimits maxAllowedContentLength="2147483648" />
    </requestFiltering>
  </security>
  </system.webServer>
测试结果
我对文件上传工具进行了几次测试。在 100MB WAN 链路上向远程服务器发送一个 900MB 的文件大约花了 3 分钟。我还能够在 135 分钟内通过 100MB WAN 链路上并行上传五个 9GB 的文件。
请进行测试并告知您的结果。CelerFT 工具的完整源代码可以在此 GitHub 仓库中找到 https://github.com/adminastoolsmith/CelerFToverHTTP。