
推送模型 (回调,WSDualHttpBinding) 概述
4.31/5 (9投票s)
WCF 服务示例,
先决条件:
阅读本文的读者应该对 WCF、端点、Visual Studio 和绑定有基本的了解。
背景
在我们的日常操作中,我们经常会遇到需要在服务器端发生更改时,在客户端反映更改的情况。一种方法是实现轮询模型,即客户端不断轮询服务器以检查更改,但这种方法效率很低,更好的方法是实现一种机制,让服务器可以在服务器端发生相应更改时将客户端推送到更新。 WCF 提供 WSDualHttpBinding 或 (Duplex) 来非常有效地实现相同的功能。下面我将通过逐步的例子来解释实现方法。
介绍
在下面描述的示例中,客户端应用程序向服务器发送注册名称的请求。 在注册时,服务器向客户端发送注册成功的通知。 为了使通知更及时,我使用定时器以一定的时间间隔发送通知。
此示例包含三个组件
- 服务库 - 带有 DuplexServiceLibrary (WCF 服务库) 的服务器,其中包含服务和服务契约的实现。
- 服务宿主 – 一个控制台应用程序,用于托管服务。
- 客户端 – 一个控制台应用程序,充当客户端(服务使用者)
实现服务器
在 Visual Studio 中添加新项目,添加 WCF 服务库。 这里使用 VS 2012,但也可以使用 VS 2008

下面是服务契约 IDuplexService,其中包含注册方法。 为了简单起见,只在其中添加了一个方法。 我们需要添加 CallbackContract 属性来定义回调服务接口
 [ServiceContract(SessionMode = SessionMode.Required,
                 CallbackContract = typeof(IDuplexServiceCallback))]
  public interface IDuplexService {

    [OperationContract(IsOneWay = true)]
    void Registration(string Name);

  }
下面是回调接口定义 ,它包含 NotifyRegistration 方法,该方法将导致向客户端发送通知。 OperationContract 消息交换模式是单向 (IsOneWay = true),因为 在这种情况下,只传输一条消息。 接收方不发送回复消息,发送方也不期望回复。
[ServiceContract]
  public interface IDuplexServiceCallback {

    [OperationContract(IsOneWay = true)]
    void NotifyRegistration(string Name);
  }
实现 DuplexService 用于注册。 这里使用定时器以固定的时间间隔调用回调方法,可以分别更新客户端。
[ServiceBehavior(InstanceContextMode = InstanceContextMode.PerSession)]
    public class DuplexService : IDuplexService
    {

        #region IDuplexService Members

        string result = "Your request has been regitered by Application ";
        public static Timer Timer;
        public static IDuplexServiceCallback Callback;

        public DuplexService()
        {
        }

        public void Registration(string Name)
        {
            Callback = OperationContext.Current.GetCallbackChannel<IDuplexServiceCallback>();
            result = Name + " :: " + result;
            Timer = new Timer(1000);
            Timer.Elapsed += OnTimerElapsed;
            Timer.Enabled = true;
        }

        void OnTimerElapsed(object sender, ElapsedEventArgs e)
        {
            string notification = result + " @ " + DateTime.Now.ToString();
            Callback.NotifyRegistration(notification);
        }
现在我们需要在服务器上定义端点。 对于回调服务(推送模型),我们需要 wsDualHttpBinding。 下面是服务的完整的 app.config 代码。
<?xml version="1.0" encoding="utf-8" ?>
<configuration>

  <appSettings>
    <add key="aspnet:UseTaskFriendlySynchronizationContext" value="true" />
  </appSettings>
  <system.web>
    <compilation debug="true" />
  </system.web>
  <!-- When deploying the service library project, the content of the config file must be added to the host's
  app.config file. System.Configuration does not support config files for libraries. -->
  <system.serviceModel>
    <services>
      <service name="DuplexServiceLibrary.DuplexService">
        <host>
          <baseAddresses>
            <add baseAddress = "https://:8090/DuplexService/" />
          </baseAddresses>
        </host>
        <!-- Service Endpoints -->
        <!-- Unless fully qualified, address is relative to base address supplied above -->
        <endpoint address="" binding="wsDualHttpBinding" contract="DuplexServiceLibrary.IDuplexService">
          <!--
              Upon deployment, the following identity element should be removed or replaced to reflect the
              identity under which the deployed service runs.  If removed, WCF will infer an appropriate identity
              automatically.
          -->
          <identity>
            <dns value="localhost"/>
          </identity>
        </endpoint>
        <!-- Metadata Endpoints -->
        <!-- The Metadata Exchange endpoint is used by the service to describe itself to clients. -->
        <!-- This endpoint does not use a secure binding and should be secured or removed before deployment -->
        <endpoint address="mex" binding="mexHttpBinding" contract="IMetadataExchange"/>
      </service>
    </services>
    <behaviors>
      <serviceBehaviors>
        <behavior>
          <!-- To avoid disclosing metadata information,
          set the values below to false before deployment -->
          <serviceMetadata httpGetEnabled="True" httpsGetEnabled="True"/>
          <!-- To receive exception details in faults for debugging purposes,
          set the value below to true.  Set to false before deployment
          to avoid disclosing exception information -->
          <serviceDebug includeExceptionDetailInFaults="False" />
        </behavior>
      </serviceBehaviors>
    </behaviors>
  </system.serviceModel>

</configuration>
实现服务宿主
现在,服务已准备就绪,我们现在必须实现服务宿主。 我们可以使用新的命令行应用程序来创建一个宿主名称 DuplexServiceHost。 添加对 DuplexServiceLibrary 的引用并初始化服务宿主

 static void Main(string[] args) {

      ServiceHost host = new ServiceHost(typeof(DuplexService));

      ConsoleColor oldColour = Console.ForegroundColor;
      Console.ForegroundColor = ConsoleColor.Yellow;

      Console.WriteLine("DuplexService is up and running with the following endpoints:");
      foreach (ServiceEndpoint se in host.Description.Endpoints)
        Console.WriteLine(se.Address.ToString());
      Console.ReadLine();

      host.Open();

      host.Close();
    }
现在为此控制台应用程序添加新的 App.config 文件,并复制 DuplexService 的 app.config。
实现客户端。
向解决方案添加新的控制台应用程序(名称为 DuplexClient ),并将类 program 重命名为 client(只是为了与服务宿主不同)。 现在向客户端添加服务引用,命名空间为 DuplexServiceReference

添加服务引用将为客户端添加新的 app.config,其中包含所需的端点。
<?xml version="1.0" encoding="utf-8" ?>
<configuration>
  <system.serviceModel>
    <bindings>
      <wsDualHttpBinding>
        <binding name="WSDualHttpBinding_IDuplexService" clientBaseAddress="https://:8091/" />
      </wsDualHttpBinding>
    </bindings>
    <client>
      <endpoint address="https://:8090/DuplexService/" binding="wsDualHttpBinding"
        bindingConfiguration="WSDualHttpBinding_IDuplexService" contract="DuplexServiceReference.IDuplexService"
        name="WSDualHttpBinding_IDuplexService">
        <identity>
          <dns value="localhost" />
        </identity>
      </endpoint>
    </client>
  </system.serviceModel>
</configuration>
现在实现客户端。 如下所示为该服务定义 duplexClient。
private static DuplexServiceReference.DuplexServiceClient duplexClient;
定义一个新类来实现 IDuplexServiceCallback 契约的 NotifyRegistration 方法,如下所示
public class DuplexServiceCallBackHandler : DuplexServiceReference.IDuplexServiceCallback{

        public void NotifyRegistration(string Name){
            ConsoleColor oldColour = Console.ForegroundColor;
            Console.ForegroundColor = ConsoleColor.Yellow;
            Console.WriteLine("Notification : ({0})", Name);
        }

    }
在 Main 方法中实例化服务的上下文。
InstanceContext context = new InstanceContext(new DuplexServiceCallBackHandler());
            duplexClient = new DuplexServiceReference.DuplexServiceClient(context, "WSDualHttpBinding_IDuplexService");
调用服务的注册方法
duplexClient.Registration(name);
Console.ReadLine();
客户端的完整实现如下所示。
   class Client{
        private static DuplexServiceReference.DuplexServiceClient duplexClient;
        static void Main(string[] args){

            InstanceContext context = new InstanceContext(new DuplexServiceCallBackHandler());
            duplexClient = new DuplexServiceReference.DuplexServiceClient(context, "WSDualHttpBinding_IDuplexService");
            try{

                Console.WriteLine("This is a client, press enter initiate request to server");
                Console.ReadLine();
                string name = "Sudhir";
                duplexClient.Registration(name);
                Console.ReadLine();
            }

            catch (TimeoutException timeProblem){
                Console.WriteLine("The service operation timed out. " + timeProblem.Message);
                duplexClient.Abort();
                Console.Read();
            }
            catch (CommunicationException commProblem){
                Console.WriteLine("There was a communication problem. " + commProblem.Message);
                duplexClient.Abort();
                Console.Read();
            }
        }
    }

    public class DuplexServiceCallBackHandler : DuplexServiceReference.IDuplexServiceCallback
    {
        public void NotifyRegistration(string Name){
            ConsoleColor oldColour = Console.ForegroundColor;
            Console.ForegroundColor = ConsoleColor.Yellow;
            Console.WriteLine("Notification : ({0})", Name);
        }
    }
现在客户端和服务端都准备好了,进入解决方案属性并设置多个启动项目

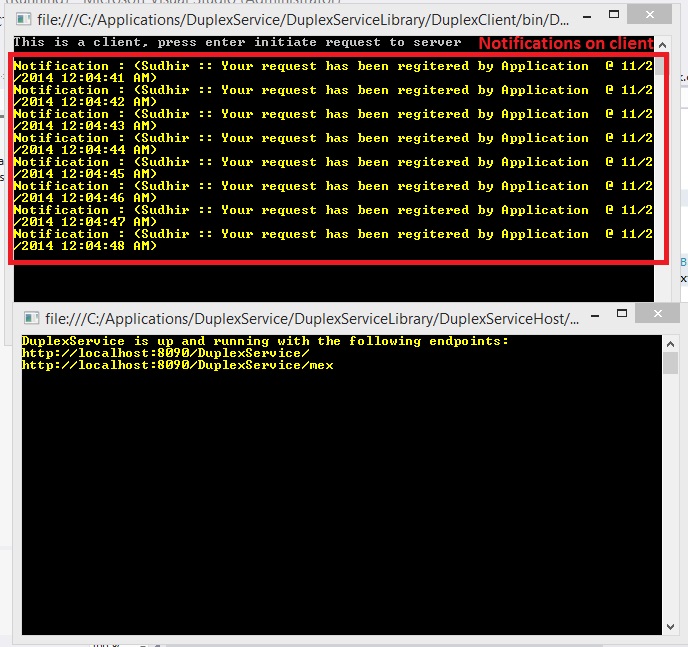
现在构建解决方案并运行。 它将显示两个命令提示符。 一个用于服务宿主,它显示了定义的服务端点。 另一个是客户端。 按照客户端中编写的逻辑,按 Enter 键在服务器上注册,并按照服务器上定义的时间间隔更新客户端,其中包含通知。 请确保在管理员模式下运行 Visual Studio。
可以下载完整的解决方案以查看实现。