
使用基于 Roslyn 的 VS 扩展生成器在 C# 中实现适配器模式和模拟多重继承
4.68/5 (21投票s)
使用单个文件包装器生成器来简化适配器模式和多重继承的创建
源代码
由于某些原因,Codeproject 网站不允许我上传源代码。因此,您可以在我的个人网站上下载源代码:WrapperGenerationCode.zip。
重要提示
如果您能留下评论,分享您对本文的看法以及如何改进,我将不胜感激。谢谢。
引言
我开始编程的第一门语言是 C++。后来我转而先用 Java,然后又转为 C#。有一件事,也许是唯一一件事,我怀念 C++ 的是多重类继承。我知道很多人认为多重类继承过于复杂且容易出错。然而,我的观点不同。我认为首先,多重类继承从未以其应有的方式在 C++ 中实现。其次,即使是它的 C++ 实现,如果应用得当,也非常有价值,可以提高代码重用性和关注点分离。希望阅读本文能让您也信服。
文章《C# 中的模拟多重继承模式》讨论了通过使用组合而不是继承来模拟 C# 中的多重继承,并在包含的对象的方法周围创建包装器。这也是我们在这里采用的方法,不同之处在于,在我们的情况下,包装器的生成将是自动的——开发人员几乎不需要付出额外的努力。更多内容将在后面讨论。
VS 2015 随附的全新Roslyn功能为分析现有代码和构建各种 VS 扩展创造了巨大的潜力。我们使用基于 Roslyn 的单文件生成器来生成包装器属性、方法和事件。
如上所述,我们的多重继承实现基于在类中包含的对象的包装器。创建包装器还可以用于实现其他模式,例如适配器模式,如下所示。
本文中的结果和代码存在一些局限性。例如,我们没有提供共享相似超类(或用 C++ 术语实现虚拟继承)的解决方案。此外,目前,代码无法处理泛型“超类”或泛型方法,并且几乎不存在错误诊断。我计划在本文的第二部分解决这些限制。
本文组织结构如下:
- 我们回顾了包装器的定义,并展示了它们如何促进各种模式的实现。
- 我们提供了使用包装器生成 VS 扩展的示例。
- 我们解释了 VS 扩展的代码。
所有示例都可以使用 VS 2015 预览版运行。一旦发布了新版本的 VS,我计划将这些示例移植到新版本。
在后续的两篇文章中,我将更详细地讨论多重继承模拟,包括多态和菱形继承:《基于 Roslyn 的模拟多重继承用法模式(第一部分)》和《基于 Roslyn 的模拟多重继承用法模式(第二部分)》。
包装器与模式
在本节中,我将回顾包装器的定义和示例,以及它们在实现各种模式中的用法。
包装器示例
一个非常简单的包装器示例位于 WrapperSample 项目下。Person 类被包装在 PersonWrapper 类中。创建包装器的原因将在稍后文章中进一步演示;此项目的目的只是为了演示包装器是什么。
Person 是一个非常简单的类,包含:
- 一个事件 -
NameChangedEvent - 一个属性 -
Name - 和一个方法 -
PrintInfoToConsole()
public class Person
{
    // event to be wrapped
    public event Action<string> NameChangedEvent = null;

    string _name;
    // Property to be wrapped
    public string Name
    {
        get
        {
            return _name;
        }
        set
        {
            if (_name == value)
                return;

            _name = value;

            if (NameChangedEvent != null)
            {
                NameChangedEvent(_name);
            }
        }
    }

    public void PrintInfoToConsole()
    {
        Console.WriteLine("Name = " + Name);
    }
}
PersonWrapper 类演示了这些类成员(事件、属性和方法)中的每一个应该如何被包装。
public class PersonWrapper
{
    // wrapped object
    Person _person;
    public Person ThePerson
    {
        set
        {
            _person = value;
        }
    }

    // event wrapper
    public event Action<string> NameChangedEvent
    {
        add
        {
            _person.NameChangedEvent += value;
        }

        remove
        {
            _person.NameChangedEvent -= value;
        }
    }

    //property wrapper
    public string Name
    {
        get
        {
            return _person.Name;
        }
        set
        {
            _person.Name = value;
        }
    }

    // method wrapper
    public void PrintInfoToConsole()
    {
        _person.PrintInfoToConsole();
    }

    // implicit conversion operator converting
    // the wrapper object in the wrapped object
    public static implicit operator Person(PersonWrapper personWrapper)
    {
        return personWrapper._person;
    }
}
如上所示,除了事件、属性和方法的包装器之外,PersonWrapper 类还包含 _person 对象、Person 设置器属性和一个隐式转换运算符。
Person 属性和 _person 对象代表被包装的对象,其成员实际上被调用。转换运算符将包装器对象转换为被包装的对象。
请注意,包装器可以更改被包装的事件、属性或方法的名称:例如,我们可以将包装器属性命名为 PersonName 而不是 Name。另请注意,包装器还可以更改封装级别,例如,同一个属性 Name 可以在包装器内设为 protected。
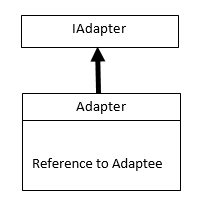
使用包装器创建适配器
著名的“四人帮”书籍《设计模式》中描述的一种模式是适配器模式,也称为包装器。
适配器的目的是将现有实现适配到现有接口。
假设您有上面介绍的 Person 类的实现。假设您有许多方法是针对 IHumanBeing 接口编写的,该接口拥有与 Person 相同但名称不同的成员。
public interface IHumanBeing
{
    event Action<string> HumanBeingNameChangedEvent;
    string HumanBeingName { get; set; }
    void PrintHumanBeingInfoToConsole();
}
您的大多数类和方法都知道如何处理 IHumanBeing 接口,但对 Person 类一无所知。还假设您不想或无法修改 Person 代码,即您无法更改它以实现 IHumanBeing 接口。这可能是因为您的许多其他代码依赖于 Person 类,或者因为您没有 Person 类的代码——只有编译后的 DLL,或者由于其他任何原因。
在这种情况下,您可以将 Person 类适配到 IHumanBeing 接口。Adapter 类将通过包装 Person 的事件、属性和方法来实现 IHumanBeing 接口。
public class PersonAdapter : IHumanBeing
{
    Person _person;
    public Person ThePerson
    {
        set
        {
            _person = value;
        }
    }

    public string HumanBeingsName
    {
        get
        {
            return _person.Name;
        }

        set
        {
            _person.Name = value;
        }
    }

    public event Action<string> HumanBeingsNameChangedEvent
    {
        add
        {
            _person.NameChangedEvent += value;
        }
        remove
        {
            _person.NameChangedEvent -= value;
        }
    }

    public void PrintHumanBeingsInfoToConsole()
    {
        _person.PrintInfoToConsole();
    }
}
AdapterSample 项目展示了这种适配器是如何工作的。
上面已经描述了 Person、IHumanBeing 和 PersonAdapter。
主类 Program 包含方法 DetectNameChange(IHumanBeing humanBeing),该方法接受 IHumanBeing 参数,为它的 HumanBeingNameChangedEvent 设置处理程序,然后设置 HumanBeingName,最后调用 PrintHumanBeingsInfoToConsole() 方法。
static void DetectNameChange(IHumanBeing humanBeing)
{
    humanBeing.HumanBeingsNameChangedEvent += HumanBeing_HumanBeingsNameChangedEvent;
    humanBeing.HumanBeingsName = "Nick";

    humanBeing.PrintHumanBeingsInfoToConsole();
}

private static void HumanBeing_HumanBeingsNameChangedEvent(string name)
{
    Console.WriteLine("New name is " + name + "\n");
}
DetectNameChange 方法是从 Main 方法中对 PersonAdapter 对象调用的。
static void Main(string[] args)
{
    Person person = new Person();

    PersonAdapter personAdapter = new PersonAdapter { ThePerson = person };

    DetectNameChange(personAdapter);
}
运行示例后,您可以看到 Person 类的一切功能在通过适配器访问时都能正常工作——Name 正在被赋值,NameChangeEvent 被触发,PrintInfoToConsole() 方法打印一些信息到控制台。
总的来说,适配器模式会改变被适配类以满足某个接口。
正如您所见,我们的包装器范例(带有重命名)在实现适配器模式方面被证明是有用的。
另一种非常相似的模式是代理模式(来自同一本书),可以使用相同的范例来实现。只是在这种情况下,Adaptee 对象可能为 null,并且需要进行 null 检查)。
借助包装器模拟多重类继承
C++ 类继承允许子类继承其超类的 public 和 protected 字段和方法。最重要的是,从子类型到每个超类型的隐式转换是存在的。总的来说,这可以通过包装器轻松模仿,正如我们的示例所示。
多重类继承示例位于 MultipleClassInheritanceSample 项目中。
在示例中,我们从两个类“派生”出 SelectablePerson 类:Person 和 Selectable。
Person 与前面示例中的 Person 基本相同,只是为了简化,我从中移除了事件。
Selectable 类也非常简单——它包含 IsSelected 布尔属性,在 IsSelected 更改时触发的 IsSelectedChangedEvent,以及一个名称解释其功能的 ToggleIsSelected() 方法。
public class Selectable
{
    public event Action<bool> IsSelectedChangedEvent = null;

    bool _isSelected = false;
    public bool IsSelected
    {
        get
        {
            return _isSelected;
        }

        set
        {
            if (_isSelected == value)
                return;

            _isSelected = value;

            if (IsSelectedChangedEvent != null)
                IsSelectedChangedEvent(_isSelected);
        }
    }

    public void ToggleIsSelected()
    {
        IsSelected = !IsSelected;
    }
}
SelectablePerson 类包含 Person 和 Selectable 类的成员的包装器以及相应的隐式转换运算符。
public class SelectablePerson
{
    Selectable _selectable = null;
    public Selectable TheSelectable
    {
        set
        {
            _selectable = value;
        }
    }

    Person _person = null;
    public Person ThePerson
    {
        set
        {
            _person = value;
        }
    }

    public event Action<bool> IsSelectedChangedEvent
    {
        add
        {
            _selectable.IsSelectedChangedEvent += value;
        }
        remove
        {
            _selectable.IsSelectedChangedEvent -= value;
        }
    }

    public bool IsSelected
    {
        get
        {
            return _selectable.IsSelected;
        }
        set
        {
            _selectable.IsSelected = value;
        }
    }

    public void ToggleIsSelected()
    {
        _selectable.ToggleIsSelected();
    }

    // implicit conversion operator converting
    // the wrapper object in the wrapped object
    public static implicit operator Selectable(SelectablePerson selectablePerson)
    {
        return selectablePerson._selectable;
    }
    //property wrapper
    public string Name
    {
        get
        {
            return _person.Name;
        }
        set
        {
            _person.Name = value;
        }
    }

    // method wrapper
    public void PrintInfoToConsole()
    {
        _person.PrintInfoToConsole();
    }

    // implicit conversion operator converting
    // the wrapper object in the wrapped object
    public static implicit operator Person(SelectablePerson selectablePerson)
    {
        return selectablePerson._person;
    }
}
SelectablePerson 类在 Program 类中进行了测试。
static void Main(string[] args)
{
    // create SelectablePerson
    SelectablePerson selectablePerson =
        new SelectablePerson
        {
            ThePerson = new Person(),
            TheSelectable = new Selectable()
        };

    // set name
    selectablePerson.Name = "Nick";

    // add a handler to IsSelectedChangedEvent
    selectablePerson.IsSelectedChangedEvent += SelectablePerson_IsSelectedChangedEvent;

    // toggle IsSelected
    selectablePerson.ToggleIsSelected();

    // print the person's name
    selectablePerson.PrintInfoToConsole();
}

private static void SelectablePerson_IsSelectedChangedEvent(bool isSelected)
{
    Console.WriteLine("IsSelected changed to " + isSelected);
}
我们创建一个 SelectablePerson 对象,设置其名称、事件处理程序,然后切换 IsSelected 属性,并确保事件处理程序被触发。最后,我们将对象的 Name 属性打印到控制台。
基于包装器的多重类继承的局限性
上面考虑的多重类继承实现的主要局限性是,超类中的 this 引用不指向整个对象——它指向被包装的对象。每个使用此模式的人都需要非常清楚地理解这一点。
上述实现的另一个局限性是,您不能在子类中覆盖 virtual 方法,同时在超类中使用该方法。这又与 this 引用在超类中指向被包装的超类对象而不是包装器子类的事实有关。
尽管存在上述限制,但上面描述的多重类继承仍然非常有用,特别是当与接口适配器结合使用时。
VS 扩展及其用法
我们展示了如何使用包装器创建适配器并模拟多重类继承。然而,编写包装器是一个繁琐、易出错的机械过程。使用 Roslyn,我构建了一个 VS 2015 预览版扩展,该扩展可以根据指定包装器参数的类属性动态生成包装器代码。
要使用此 VS 扩展,请双击 VSIX 文件夹中的 NP.WrapperGenerator.vsix 文件。使用此 VS 扩展的项目还必须引用位于 DLLs 文件夹下的 NP.WrapperAttrs.dll。NP.WrapperAttrs.dll 包含定义指定包装器参数的类属性。
AdapterGeneratedSample 和 MultipleClassInheritanceGeneratedSample 包含生成的包装器示例。
适配器生成示例
让我们看一下 AdapterGeneratedSample 项目。该项目的所有类都与 AdapterSample 中的类相同,除了 PersonAdapter 类。这是该类的代码:
[WrapsAndChanges(typeof(Person), WrappedItemsKind.Event,
 "NameChangedEvent", "HumanBeingsNameChangedEvent")]
[WrapsAndChanges(typeof(Person), WrappedItemsKind.Property, "Name", "HumanBeingsName")]
[WrapsAndChanges(typeof(Person), WrappedItemsKind.Method,
 "PrintInfoToConsole", "PrintHumanBeingsInfoToConsole")]
public partial class PersonAdapter : IHumanBeing
{

}
您可以看到该类被声明为“partial”。顶部的类属性指定了包装器——它们包装了哪个类中的什么内容以及包装器的名称。为了进行代码生成,我们需要将类的“Custom Tool”属性设置为“WrapperFileCodeGenerator”。

每次保存文件时(例如,通过按 Ctrl-S),都会生成 PersonAdapter.wrapper.cs 文件。该文件包含类的包装器。

这是生成包装器文件的内容:
namespace AdapterGeneratedSample
{
    public partial class PersonAdapter
    {
        private Person _person;

        public static implicit operator Person (PersonAdapter objectToConvert)
                                   {
                                       return objectToConvert._person;
                                   }

        public event Action<string> HumanBeingsNameChangedEvent
            {
                add { _person.NameChangedEvent += value; }
                remove { _person.NameChangedEvent -= value; }
            }

        public Person ThePerson
        {
            get
            {
                return _person;
            }
            set
            {
                _person = value;
            }
        }

        public String HumanBeingsName
        {
            get
            {
                return _person.Name;
            }
            set
            {
                _person.Name = value;
            }
        }

        public void PrintHumanBeingsInfoToConsole()
        {
            _person.PrintInfoToConsole();
        }
    }
}
运行此项目会产生与运行 AdapterSample 项目完全相同的结果。
此示例演示了如何使用 WrapsAndChangesAttribute。以下是对属性构造函数参数的解释:
- 第一个参数是我们想要包装的类型。
- 第二个参数是我们想要包装的类成员的种类(可以是
WrappedItemsKind.Event、WrappedItemsKind.Property或WrappedItemsKind.Method)。 - 第三个参数是要包装的类成员的名称。
- 第四个参数是包装器类成员的名称。如果未提供此参数,则假定包装器和被包装的成员具有相同的名称。
- 第五个参数(在上面的示例中未演示)允许更改包装器的封装级别。它属于
enum类型EncapsulationLevel。public enum EncapsulationLevel { Unknown = 0, Public = 1, Internal = 2, Protected = 3, ProtectedInternal = 4, Private = 5 }Unknown表示包装器的封装级别与被包装的类成员保持相同。
还有一个属性——WrapsAttribute——也可以使用。它的功能较弱,但更紧凑:功能较弱是因为它不允许更改被包装类成员的名称或封装方法。更紧凑是因为您可以在同一个属性中指定要包装的多个对象。它的前两个构造函数参数与 WrapsAndChangesAttribute 相同。它们可以后跟任意数量的 string,指定要包装的类成员的名称,例如:
[Wraps(typeof(Person), WrappedItemsKind.Property, "Property1", "Property2", "Property3")]
多重类继承生成示例
现在让我们看看 MultipleClassInheritanceGeneratedSample 项目。该项目内的代码几乎与 MultipleClassInheritanceSample 项目相同,但有一个重要的例外是 SelectablePerson 类。下面是新的 SelectablePerson 代码的外观:
[Wraps(typeof(Selectable), WrappedItemsKind.Event, "IsSelectedChangedEvent")]
[Wraps(typeof(Selectable), WrappedItemsKind.Property, "IsSelected")]
[Wraps(typeof(Selectable), WrappedItemsKind.Method, "ToggleIsSelected")]
[Wraps(typeof(Person), WrappedItemsKind.Property, "Name")]
[Wraps(typeof(Person), WrappedItemsKind.Method, "PrintInfoToConsole")]
public partial class SelectablePerson
{

}
15 行而不是 87 行。
与 AdapterGeneratedSample 项目中的 PersonAdapter.cs 文件一样,SelectablePerson.cs 文件的“Custom Tool”属性应设置为“WrapperFileCodeGenerator”。这将导致生成 SelectablePerson.wrapper.cs 文件,该文件将吸收大部分复杂性。
解释包装器生成器代码
包装器生成器代码位于 NP.WrapperGenerator 解决方案下。它由三个项目组成:
NP.WrapperGenerator- 创建 NP.WrapperGenerator.vsix VS 扩展文件的主要项目。NP.WrapperAttrs- 定义包装器属性及其使用的某些枚举的项目。此项目创建的 DLL 同时被包装器代码和使用包装器生成器的用户项目使用,如上所示。NP.DOMGenerator- 包含主要NP.WrapperGenerator项目使用的大部分包装器生成代码的项目。
请注意,我们使用 Roslyn 分析代码——获取有关要生成的包装器的信息,而对于代码生成,我们使用 CodeDOM。原因在于,尽管 Roslyn 代码生成功能更强大,但它非常混乱且冗长——您必须编写大量代码才能获得非常简单的结果,而 CodeDOM 被证明非常适合这项任务。
VS 2015(预览版)与早期版本的 Visual Studio 的区别在于,Roslyn 现在是代码分析和编译的主要引擎,并且 Roslyn 工作空间对象现在可以直接作为 IVsSingleFileGenerator 实现之一的服务访问。
然而,Microsoft 很好地(当然是无意的)隐藏了这一事实(即可以从单文件生成器访问 Roslyn 工作空间),所以我在此向 StackOverflow 贡献者 Slaks 和 JoshVarty 致敬,感谢他们帮助我弄清楚如何做到这一点:如何使用 Roslyn 创建 VS 单文件生成器。
为了开始使用单文件生成器,我必须按照 Roslyn 上的步骤安装 Roslyn、VS 2015 预览版 SDK 和 SDK 模板 VSIX 包。
然后我将 NP.WrapperGenerator 解决方案和项目创建为“Visual Studio Package”——出于某种原因,我尝试使用“VSIX Project”模板的尝试未能成功。
然后我必须通过进入 VS 2015 预览版中的“Package Manager Console”窗口并键入“Install-Package Microsoft.CodeAnalysis -Pre”(如 Roslyn 所述)来添加 Roslyn DLL。
我删除了默认创建的所有文件(除了 source.extension.vsixmanifest 文件),并将 WrapperFileCodeGenerator 类添加到同名文件中。
[ComVisible(true)]
[Guid("52B316AA-1997-4c81-9969-83604C09EEB4")]
[
   CodeGeneratorRegistration
   (
       typeof(WrapperFileCodeGenerator),
       "C# Wrapper File Code Class Generator",
       "{FAE04EC1-301F-11D3-BF4B-00C04F79EFBC}",
       GeneratesDesignTimeSource = true
   )
]
[ProvideObject(typeof(WrapperFileCodeGenerator))]
public class WrapperFileCodeGenerator : IVsSingleFileGenerator
{
   ...
}
之后,我添加和删除了对几个 DLL 的引用。最重要的是,我添加了对 Microsoft.VisualStudio.LanguageServices.dll 文件的引用,没有它我将无法访问 Roslyn Workspace。这可能是最棘手的部分,因为此 DLL 未在程序集中列出——您必须浏览到此引用——它位于“C:\Program Files\Microsoft Visual Studio 14.0\Common7\IDE\PrivateAssemblies\”文件夹下。再次感谢 Slaks 指出这一点。
之后,可以通过以下代码获取对 Roslyn 工作空间的引用:
public VisualStudioWorkspace TheWorkspace { get; set; }

public WrapperFileCodeGenerator()
{
    IComponentModel componentModel =
        (IComponentModel)Microsoft.VisualStudio.Shell.Package.GetGlobalService
        (typeof(SComponentModel));

    TheWorkspace = componentModel.GetService<visualstudioworkspace>();
}
</visualstudioworkspace>
VS 2015 扩展功能与 Roslyn 结合将确保在项目代码更改时 Workspace 对象保持最新。
我们类实现的 IVsSingleFileGenerator 接口需要两个方法:DefaultExtension(out string pbstrDefaultExtension) 和 Generate(...)。
DefaultExtensions 方法指定生成文件的扩展名(在本例中为“.wrapper.cs”)
public int DefaultExtension(out string pbstrDefaultExtension)
{
    pbstrDefaultExtension = ".wrapper.cs";

    return VSConstants.S_OK;
}
Generate 方法允许指定生成文件的字节内容。
// the main method that sets the
// wrapper's code
public int Generate
(
    string wszInputFilePath,
    string bstrInputFileContents,
    string wszDefaultNamespace,
    IntPtr[] rgbOutputFileContents,
    out uint pcbOutput,
    IVsGeneratorProgress pGenerateProgress
)
{
    byte[] codeBytes =
        GenerateCodeBytes(wszInputFilePath, bstrInputFileContents, wszDefaultNamespace);

    int outputLength = codeBytes.Length;
    rgbOutputFileContents[0] = Marshal.AllocCoTaskMem(outputLength);
    Marshal.Copy(codeBytes, 0, rgbOutputFileContents[0], outputLength);
    pcbOutput = (uint)outputLength;

    return VSConstants.S_OK;
}
如您所见,形成生成文件内容的所有工作都在由 Generate(...) 方法调用的 GenerateCodeBytes(...) 方法内完成。
protected byte[] GenerateCodeBytes
(string filePath, string inputFileContent, string namespaceName)
{
    // set generatedCode to empty string
    string generatedCode = "";

    // get the id of the .cs file for which we are
    // trying to generate wrappers based on the class'es Wrapper Attributes
    DocumentId docId =
        TheWorkspace
            .CurrentSolution
            .GetDocumentIdsWithFilePath(filePath).FirstOrDefault();

    if (docId == null)
        goto returnLabel;

    // get the project that contains the file for which
    // we are generating the wrappers.
    Project project = TheWorkspace.CurrentSolution.GetProject(docId.ProjectId);
    if (project == null)
        goto returnLabel;

    // get the compilation of the project.
    Compilation compilation = project.GetCompilationAsync().Result;

    if (compilation == null)
        goto returnLabel;

    // get the document corresponding
    // to the wrapper class
    Document doc = project.GetDocument(docId);

    if (doc == null)
        goto returnLabel;

    // get the Roslyn syntax tree of the document
    SyntaxTree docSyntaxTree = doc.GetSyntaxTreeAsync().Result;
    if (docSyntaxTree == null)
        goto returnLabel;

    // get the Roslyn semantic model for the document
    SemanticModel semanticModel = compilation.GetSemanticModel(docSyntaxTree);
    if (semanticModel == null)
        goto returnLabel;

    // get the document's class node
    // Note that we assume that the top class within the
    // file is the one that we want to generate the wrappers for
    // It is better to make it the only class within the file.
    ClassDeclarationSyntax classNode =
        docSyntaxTree.GetRoot()
            .DescendantNodes()
            .Where((node) => (node.CSharpKind() ==
             SyntaxKind.ClassDeclaration)).FirstOrDefault() as ClassDeclarationSyntax;

    if (classNode == null)
        goto returnLabel;

    // get the class type.
    INamedTypeSymbol classType =
                     semanticModel.GetDeclaredSymbol(classNode) as INamedTypeSymbol;
    if (classType == null)
        goto returnLabel;

    // create and set the code build.
    DOMClassBuilder codeBuilder = new DOMClassBuilder();

    codeBuilder.TheCompilation = compilation;
    codeBuilder.TheTypeToExtend = classType;

    // based on the compilation and the classType
    // objects, the codeBuild will figure out the
    // wrapper attributes and based on them it
    // will generate the wrapper code.
    codeBuilder.BuildAll();

    generatedCode = codeBuilder.GetCode();

 returnLabel:
    byte[] bytes = Encoding.UTF8.GetBytes(generatedCode);

    return bytes;
}
请注意,从 Project 对象中提取的 Roslyn 的 Compilation 对象包含使用 System.Reflection 功能可以获得的所有项目信息,而无需实际引用项目的 DLL。
从 Compilation 对象中,我们提取 INamedTypeSymbol classType,对应于我们想要为其生成包装器部分的类。编译和类型都分配给一个 DOMClassBuild 对象,该对象解析类的包装器属性并生成代码。
codeBuilder.TheCompilation = compilation;
codeBuilder.TheTypeToExtend = classType;

// based on the compilation and the classType
// objects, the codeBuild will figure out the
// wrapper attributes and based on them it
// will generate the wrapper code.
codeBuilder.BuildAll();

generatedCode = codeBuilder.GetCode();
DOMClassBuilding 位于 NP.DOMGenerator 项目下。该类解析包装器属性,并基于它们创建 WrapsAttrView 对象——它们包含与包装器属性完全相同的信息,而无需重新创建属性对象本身。基于 WrapsAttrView 对象,DOMClassBuilder 调用 static DOMCodeGenerator 类的扩展方法来生成实际代码。
结论
本文介绍了如何使用 Roslyn VS 2015 扩展 API 创建单文件代码生成器,以生成类成员的包装器。这可用于创建适配器或模拟多重类继承。
此处提供的代码存在几处不足:
- 它对具有泛型类型的类处理不佳。
- 它没有诊断。
- 它没有展示如何处理虚拟继承(当两个超类继承自同一个超超类时的继承)。
我计划在本文的第二部分解决这些不足。
历史
- 2014 年 12 月 7 日:初始版本