
具有 Entity Framework 和 WCF 服务的 MVVM Silverlight 应用程序
4.76/5 (9投票s)
具有 EF 和 WCF 服务的 MVVM Silverlight 应用
引言
本文是我关于使用 Expression Blend 和 Silverlight 构建前端应用程序的系列文章中的第二篇,该应用程序从 WCF 服务和 SQL Server 后端获取数据。这第二篇文章侧重于创建一个与我之前文章中演示的应用程序类似的应用程序,但它使用了 Model-View-ViewModel (MVVM) 设计模式。MVVM 是 Martin Fowler 的 Presentation Model 的特例。ViewModel 包含特定类型的数据和命令。VM 不知道数据来自何处或如何显示。而 Model-View-Controller 模式中的 Controller 则发布和监听事件。它们控制显示什么数据以及在 UI 中的什么位置。
此外,在本文中,我将讨论服务、命令、行为、接口、ViewModel 定位器和控制反转等相关概念。为了解释这些概念,我最初将主要使用代码隐藏。
目录
- 创建新项目和服务
- 添加 Silverlight 页面
- 简单的 MVVM 实现
- 分离我们的服务调用
- 使用命令将更多代码与 UI 分离
- IoC 和 ViewModel 定位器
- 添加异常处理功能
1. 创建新项目和服务
在 Visual Studio 中创建一个新项目,然后选择 Silverlight 导航应用程序

接下来,选择在新的网站中托管应用程序。请勿选择启用 WCF RIA Services,因为在撰写本文时,Microsoft 已停止支持此技术。如果您仍希望实现 RIA Services,请考虑此开源实现:Open RIA Services。

然后,如果您尚未这样做,请按照我上一篇文章的第 3 部分中所述的设置 AdventureWorks 数据库和 vProductProductInventory 视图。同时,获取 WcfEntitiesSample.Model.Silverlight、WcfEntitiesSample.Model.Net 和 WcfEntitiesSample.Data 项目,并将它们添加到此新解决方案中,如文章中所述。
您的 Silverlight 用户界面通过基于 SOAP 的 WCF Web 服务访问和更新数据库中的数据。右键单击您的 MvvmSample.Web 项目,然后选择添加 WCF 服务

现在,在 WcfEntitiesSample.Model.Net 的 ProductManager.cs 类中添加一个新方法,以一次获取多个产品
        public IList<Product> GetProducts()
        {
            IEnumerable<Product> products = null;

            var db = new AdventureWorks2008R2Entities();
            products = db.vProductProductInventories
                .Select(p => new Product
                {
                    ProductID = p.ProductID,
                    Name = p.Name,
                    InventoryCount = p.InventoryCount,
                    Description = p.Description
                });

            return products.ToList();
        }
现在返回到您的 MvvmSample.Web 项目,并添加对 WcfEntitiesSample.Model.Net 项目的引用

然后打开 IProductService.cs 和 ProductService.svc.cs 文件,并添加以下代码。请注意,AspCompatibilityRequirements 需要 System.ServiceModel.Activation 命名空间。
    [ServiceContract]
    public interface IProductsService
    {
        [OperationContract]
        Product GetProductByID(int id);

        [OperationContract]
        IEnumerable<Product> GetProducts();
    }

    [AspNetCompatibilityRequirements(RequirementsMode =
                        AspNetCompatibilityRequirementsMode.Allowed)]
    public class ProductsService : IProductsService
    {
        public Product GetProductByID(int id)
        {
            var mgr = new ProductManager();
            return mgr.GetProductById(id);
        }

        public IList<Product> GetProducts()
        {
            var mgr = new ProductManager();
            return mgr.GetProducts();
        }
    }
如果 Product 类名下有红线,则右键单击其中一个项,然后选择“**解决**”

Web 服务从数据库返回产品列表。您可以在 ProductManager.cs 类中使用 LINQ 进一步筛选结果。
现在进行构建,并从新服务向 Silverlight 应用程序添加服务引用。
此外,向数据库添加一个存储过程,以便稍后在本文中演示 ICommand 接口的使用
CREATE PROCEDURE [dbo].[prProductUpdate]
    @ProductID int,
    @Name varchar(30)
AS
BEGIN
    UPDATE [AdventureWorks2008R2].[Production].[Product]
        SET    [Name] = @Name
        WHERE [ProductID] = @ProductID
END
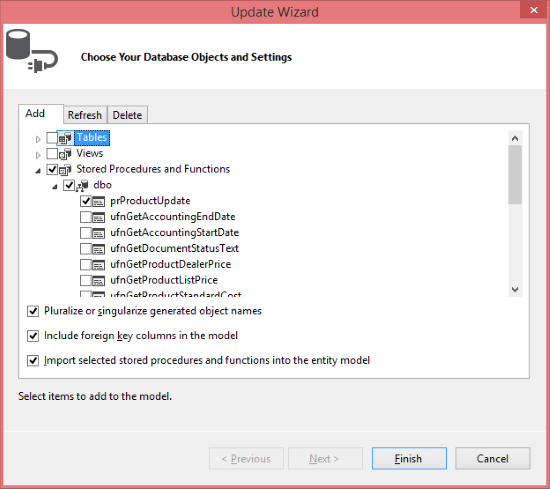
接下来双击 AdventureWorksEntites.edmx 文件,然后右键单击并选择“**从数据库更新模型…**”,然后选择您刚刚创建的过程
现在转到您的 ProductManager.cs 类,并添加以下函数
        public void UpdateProductName(int productID, string name)
        {
            var db = new AdventureWorks2008R2Entities();
            db.prProductUpdate(productID, name);
        }
现在向您的 Web 服务接口和 svc 文件添加一个新函数
      // Add to interface
      [OperationContract]
        void UpdateProductName(int id, string name);

      // Add to *.svc.cs file:
      public void UpdateProductName(int id, string name)
        {
            var mgr = new ProductManager();
            mgr.UpdateProductName(id, name);
        }
接下来,转到您的 MvvmSample Silverlight 应用程序并更新服务引用。
2. 添加 Silverlight 页面
在表示层 MvvmSample Silverlight 项目中,将以下 Silverlight 页面文件添加到 Views 文件夹。另外,添加对 System.Windows.Controls.Data 的引用。

以下是创建控件所需的 XAML 代码,以及一个半透明的加载进度条

现在您需要将此新产品列表页面添加到 MainPage.xaml 中的 Divider1 正下方

接下来,使用以下 XAML 代码添加一个带有“**确定**”按钮和“**取消**”按钮的 ChildWindow 产品详细信息页面

另外,将此添加到代码隐藏文件,并使用 MvvmSample.Services
        private Product _product;
        public Product Product
        {
            get { return _product; }
            set { _product = value; DataContext = _product; }
        }
既然您现在拥有 ProductDetail ChildWindow,请返回 ProductList.xaml.cs 以添加此代码
    public partial class ProductList : Page
    {
        public ProductList()
        {
            InitializeComponent();

            NavigationCacheMode = NavigationCacheMode.Enabled;

            EditProduct.Click += new RoutedEventHandler(EditProduct_Click);
        }

        protected override void OnNavigatedTo(NavigationEventArgs e)
        {
            if (ProductsGrid.ItemsSource == null)
            {
                LoadingProgress.Visibility = Visibility.Visible;

                var client = new ProductsServiceClient();

                client.GetProductsCompleted += (s, ea) =>
                {
                    LoadingProgress.Visibility = Visibility.Collapsed;

                    ProductsGrid.ItemsSource = ea.Result;
                };

                client.GetProductsAsync();
            }
        }

        private ProductDetail _productDetail = new ProductDetail();
        void EditProduct_Click(object sender, RoutedEventArgs e)
        {
            _productDetail.Product = ProductsGrid.SelectedItem as Product;
            _productDetail.Show();
        }
    }
上面的代码中有一个检查 ProductsGrid.ItemsSource == null,因为页面会被缓存,所以我们不想进行不必要的 Web 服务调用。
此外,它有一个用于编辑产品的事件处理程序——稍后,当我们更多地深入研究 MVVM 模式时,我将展示实现相同功能的不同方法。
另外,请注意,在进行 Web 服务调用时,有必要明确将 LoadingProgress 条设置为 Visible,并在返回结果后将其设置为 Collapsed。
接下来,添加 ProductDetails 的代码隐藏,其中重要的是添加 Product 数据成员并设置 DataContext。Product 数据成员对于绑定到 UI 是必需的
    public partial class ProductDetail : ChildWindow
    {
        public ProductDetail()
        {
            InitializeComponent();
        }

        private Product _product;
        public Product Product
        {
            get { return _product; }
            set { _product = value; DataContext = _product; }
        }

        private void OKButton_Click(object sender, RoutedEventArgs e)
        {
            this.DialogResult = true;
        }

        private void CancelButton_Click(object sender, RoutedEventArgs e)
        {
            this.DialogResult = false;
        }
    }
将太多内容放在代码隐藏中的主要问题是它无法在此处轻松进行测试或重用。另外,如果您将业务逻辑与 UI 分开,则更容易设计 UI。如果将它们分开,那么 UI 设计师可以处理 UI,开发人员可以处理业务逻辑。即便如此,只要代码隐藏中的代码专注于视图逻辑,就没有任何问题。
最好让 XAML 文件的代码隐藏仅专注于与用户的交互,并将其他业务逻辑放在 ViewModel 中。请注意,ViewModel 对 View 的结构一无所知。您可能听说过其他模式,如控制反转、依赖注入、命令模式、定位器模式、存储库模式,这些模式很有用,但了解这些模式对于 MVVM 来说不是必需的。
3. 简单的 MVVM 实现
现在,让我们通过创建一个提供 INotifyPropertyChanged 实现的基类,将一些代码从代码隐藏文件移到 ViewModel 中。每当其他类可能绑定到您的类时,都需要 INotifyPropertyChanged。
向您的 Silverlight 应用程序添加一个 ViewModel 文件夹,其中包含此代码
using System.ComponentModel;

namespace MvvmSample.ViewModels
{
    public abstract class ViewModel : INotifyPropertyChanged
    {
        public event PropertyChangedEventHandler PropertyChanged;

        protected void NotifyPropertyChanged(string propertyName)
        {
            PropertyChangedEventHandler handler = this.PropertyChanged;
            if (handler != null)
            {
                var e = new PropertyChangedEventArgs(propertyName);
                handler(this, e);
            }
        }
    }
}
请注意,此实现对于线程安全和调度程序来说不是最佳的。此时,我正尝试尽可能简单。有关更多详细信息,请参阅此处。
现在创建一个派生类 ViewModel 以显式处理产品
    public class ProductListViewModel : ViewModel
    {
        ProductsServiceClient _client = new ProductsServiceClient();

        private Product _selectedProduct;
        public Product SelectedProduct
        {
            get { return _selectedProduct; }
            set
            {
                _selectedProduct = value;
                NotifyPropertyChanged("SelectedProduct");
            }
        }

        private ObservableCollection<Product> _products;
        public ObservableCollection<Product> Products
        {
            get { return _products; }
            private set
            {
                _products = value;
                NotifyPropertyChanged("Products");
            }
        }

        public event EventHandler ProductsLoaded;
        public void LoadProducts()
        {
            _client.GetProductsCompleted += client_GetProductsCompleted;
            _client.GetProductsAsync();
        }

        void client_GetProductsCompleted(object sender, GetProductsCompletedEventArgs ea)
        {
            Products = ea.Result;
            OnProductsLoaded();
        }

        protected void OnProductsLoaded()
        {
            if (ProductsLoaded != null)
                ProductsLoaded(this, EventArgs.Empty);
        }

        public void SaveProduct()
        {
            _client.UpdateProduct(SelectedProduct.ProductID, SelectedProduct.Name);
        }
    }
您也可以在上面的 ViewModel 中执行过滤或排序产品集合等任务,这会将这些活动与 UI 分开。
然后,您需要更新 ProductList.xaml.cs 中的 XAML 代码,该代码将数据网格绑定到 Products 集合。请注意,SelectedProduct 的绑定模式设置为 TwoWay,以便 DataGrid 和代码隐藏可以更新此值

现在,您还需要更新 ProductList 的代码隐藏以使用新的 ViewModel
    public partial class ProductList : Page
    {
        private ProductListViewModel _viewModel = null;

        public ProductList()
        {
            InitializeComponent();

            NavigationCacheMode = NavigationCacheMode.Enabled;

            EditProduct.Click += new RoutedEventHandler(EditProduct_Click);
        }

        protected override void OnNavigatedTo(NavigationEventArgs e)
        {
            if (_viewModel == null)
            {
                _viewModel = new ProductListViewModel();
                _viewModel.ProductsLoaded += (s, ea) =>
                {
                    LoadingProgress.Visibility = Visibility.Collapsed;
                };

                DataContext = _viewModel;

                LoadingProgress.Visibility = Visibility.Visible;

                _viewModel.LoadProducts();
            }
        }

        private ProductDetail _productDetail = new ProductDetail();
        void EditProduct_Click(object sender, RoutedEventArgs e)
        {
            _productDetail.Product = ProductsGrid.SelectedItem as Product;
            _productDetail.Show();
        }

        private void SaveProduct_Click(object sender, RoutedEventArgs e)
        {
            if (_viewModel == null)
            {
                _viewModel = new ProductListViewModel();
            }
            _viewModel.SaveProduct();
        }
    }
现在构建并运行您的项目——您应该会在数据网格中看到产品列表。另外,如果您编辑产品名称并单击“**保存**”,您应该会注意到更改在重新启动应用程序后仍然保留。
分离我们的服务调用
您现在已经实现的优势之一是 DataGrid 不再与 UI 绑定,因此您可以轻松地将其替换为 ListView,而无需更改任何 UI 代码隐藏。
如果您的 Silverlight 应用程序不再使用 Web 服务获取数据,而是使用本地文件或隔离存储中的数据,那么您将需要更改所有 ViewModel 类,因此让我们将 Web 服务调用移出 ViewModel。
向您的 Silverlight 应用程序添加一个新的 Services 文件夹,并添加以下类
using System;
using System.Collections.ObjectModel;

namespace MvvmSample.Services
{
    public class ProductDataService
    {
        ProductsServiceClient _client = new ProductsServiceClient();
        private ObservableCollection<Product> _products;
        public ObservableCollection<Product> Products
        {
            get { return _products; }
            private set { _products = value; }
        }

        private bool _areProductsLoaded;
        public bool AreProductsLoaded
        {
            get { return _areProductsLoaded; }
            private set { _areProductsLoaded = value; }
        }

        public void LoadProducts()
        {
            AreProductsLoaded = false;
            _client.GetProductsCompleted += client_GetProductsCompleted;
            _client.GetProductsAsync();
        }

        void client_GetProductsCompleted
             (object sender, GetProductsCompletedEventArgs ea)
        {
            Products = ea.Result;
            AreProductsLoaded = true;
            OnProductsLoaded();
        }

        public event EventHandler ProductsLoaded;
        protected void OnProductsLoaded()
        {
            if (ProductsLoaded != null)
                ProductsLoaded(null, EventArgs.Empty);
        }

        public void UpdateProduct(int id, string name)
        {
            _client.UpdateProductNameAsync(id, name);
        }
    }
}
如果您的数据已缓存到客户端,则使用 AreProductsLoaded。现在对您的 ViewModel 类进行以下更改
using System.Collections.ObjectModel;
using System.ComponentModel;
using MvvmSample.Services;
using System;

namespace MvvmSample.ViewModels
{
    public class ProductListViewModel : ViewModel
    {
        private Product _selectedProduct;
        public Product SelectedProduct
        {
            get { return _selectedProduct; }
            set
            {
                _selectedProduct = value;
                NotifyPropertyChanged("SelectedProduct");
            }
        }

        private ObservableCollection<Product> _products;
        public ObservableCollection<Product> Products
        {
            get { return _products; }
            private set
            {
                _products = value;
                NotifyPropertyChanged("Products");
            }
        }

        private ProductDataService _dataService = new ProductDataService();
        public event EventHandler ProductsLoaded;
        public void LoadProducts()
        {
            if (_client.AreProductsLoaded)
            {
                Products = _client.Products;
                OnProductsLoaded();
            }
            else
            {
                _dataService.ProductsLoaded += (s, e) =>
                {
                    Products = _client.Products;
                    OnProductsLoaded();
                };

                _dataService.LoadProducts();
            }
        }

        protected void OnProductsLoaded()
        {
            if (ProductsLoaded != null)
                ProductsLoaded(this, EventArgs.Empty);
        }

        public void SaveProduct()
        {
            _dataService.UpdateProduct(SelectedProduct.ProductID, SelectedProduct.Name);
        }
    }
}
现在您的 ViewModel 只需处理与视图相关的数据和功能。
使用命令将更多代码与 UI 分离
事件和事件处理程序会导致 UI 与代码隐藏之间的耦合,因此一种替代方法是实现 ICommand。
通过命令,您不必响应按钮单击事件,而是将命令绑定到按钮,并允许按钮直接执行该命令。
向您的 ViewModel 文件夹添加一个名为 RelayCommand 的新类
using System;
using System.Diagnostics;
using System.Windows.Input;

namespace MvvmSample.ViewModels
{
    public class RelayCommand : ICommand
    {
        #region Fields

        readonly Action<object> _execute;
        readonly Predicate<object> _canExecute;

        #endregion

        #region Constructors

        public RelayCommand(Action<object> execute)
            : this(execute, null)
        {
        }

        public RelayCommand(Action<object> execute, Predicate<object> canExecute)
        {
            if (execute == null)
                throw new ArgumentNullException("execute");

            _execute = execute;
            _canExecute = canExecute;
        }

        #endregion

        #region ICommand Members

        [DebuggerStepThrough]
        public bool CanExecute(object parameter)
        {
            return _canExecute == null ? true : _canExecute(parameter);
        }

        public event EventHandler CanExecuteChanged;
        public void OnCanExecuteChanged()
        {
            if (CanExecuteChanged != null)
            {
                CanExecuteChanged(this, EventArgs.Empty);
            }
        }

        public void Execute(object parameter)
        {
            _execute(parameter);
        }

        #endregion
    }
}
然后,将与命令相关的源代码添加到 ProductListViewModel.cs
        public bool CanUpdateProductName
        {
            get { return SelectedProduct != null; }
        }

        private RelayCommand _updateProductNameCommand = null;
        public RelayCommand UpdateProductNameCommand
        {
            get
            {
                if (_updateProductNameCommand == null)
                {
                    _updateProductNameCommand = new RelayCommand
                    (
                        p => SaveProduct(),
                        p => CanUpdateProductName
                    );
                }

                return _updateProductNameCommand;
            }
        }
在上面的代码中,p => 表示这是一个匿名委托,其中委托接受一个参数 p。
现在,添加此代码以包含对 OnCanExecuteChanged 的调用
        private Product _selectedProduct;
        public Product SelectedProduct
        {
            get { return _selectedProduct; }
            set
            {
                _selectedProduct = value;
                NotifyPropertyChanged("SelectedProduct");
                UpdateProductNameCommand.OnCanExecuteChanged();
            }
        }
然后,在 ProductList.xaml 文件中将 Save 按钮添加 Command="{Binding UpdateProductNameCommand}"

现在可以从代码隐藏中删除事件处理程序了。
构建并运行应用程序,以验证您可以更新产品名称并且该名称已保留。
依赖注入
依赖注入是控制反转 (IoC) 的一种特定形式。依赖注入是一种软件模式,其中特定功能的控制不取决于函数内的算法,而是取决于传入的对象。例如,当您希望软件在生产模式下表现一种方式,而在测试时表现另一种方式时,它很有用。
假设您有一个接口 INotificationService 和 NotificationService 的两个具体实现
   // 1. Production ProductionNotificationService:
    ShowMessage(string message)
    {
        MessageBox.Show(message);
    }

   // 2. Test MockNotificationService:
    ShowMessage(string message)
    {
        // Do nothing
    }

    MyViewModel(INotificationService service)
    {
        service.ShowMessage("foo");
    }
IoC 允许您根据是要运行单元测试还是运行应用程序的生产版本来传递给上面的构造函数。有关详细信息,请参阅依赖注入和控制反转。
IoC 和 ViewModel 定位器
到目前为止,您已经消除了 UI 和数据库之间的耦合;但是,每个类仍然紧密耦合在一起,例如 View 与 ViewModel 耦合,因为您需要在代码隐藏中创建 ViewModel。另外,ProductListViewModel 与 ProductDataService 耦合。
当 ViewModel 和服务实现为接口时,您可以轻松地用不同的实现替换它们。考虑这种情况:您正在开发,还没有数据库,或者您正在设计 UI,并且不想强迫设计人员编写代码隐藏。
控制反转 (IoC) 允许开发人员设计他们的系统,这样他们就不必在代码中直接创建任何重要的对象,而是由 IoC 容器解析特定类型的对象。然后,IoC 容器会根据请求生成测试版本或生产版本。
将以下类添加到 ViewModel 目录
using System.Collections.Generic;

namespace MvvmSample.ViewModels
{
    public class ViewModelLocator
    {
        private Dictionary<string, ViewModel> _viewModels =
                           new Dictionary<string, ViewModel>();

        public ViewModelLocator()
        {
            _viewModels.Add("ProductList", new ProductListViewModel());
        }

        public ViewModel this[string viewName]
        {
            get { return _viewModels[viewName]; }
        }
    }
}
向 App.xaml 添加 "ResourceDictionary Source="Assets/Resources.xaml"" 和这个新文件 Resources.xaml,以便它可用于绑定

现在将此代码添加到 Product List XAML
DataContext="{Binding [ProductList],Source={StaticResource ViewModelLocator}}"
现在将此代码添加到 Product List 代码隐藏
        protected override void OnNavigatedTo(NavigationEventArgs e)
        {
            _viewModel = DataContext as ProductListViewModel;

            _viewModel.ProductsLoaded += (s, ea) =>
            {
                LoadingProgress.Visibility = Visibility.Collapsed;
            };

            DataContext = _viewModel;

            LoadingProgress.Visibility = Visibility.Visible;

            _viewModel.LoadProducts();
        }
现在我们已经完成了更多的实体类型 ViewModel,前端与后端的分离程度更高,因此更容易更改前端或后端而不会影响程序的其他部分,更不用说更容易进行测试了。
4. 添加异常处理功能
在 Silverlight 中,您可以启用 WCF SOAP 故障编程模型,以便后端服务可以将消息发送到客户端,而不仅仅是显示 HTTP 500 响应代码。
要启用这些 SOAP 故障,请将以下类添加到您 *.Web 项目中与 WCF 服务相同的位置
// This is an auto-generated file to enable WCF faults to reach Silverlight clients.

using System;
using System.Collections.Generic;
using System.Collections.ObjectModel;
using System.Linq;
using System.Runtime.Serialization;
using System.Net;
using System.ServiceModel;
using System.ServiceModel.Channels;
using System.ServiceModel.Description;
using System.ServiceModel.Dispatcher;

namespace WcfEntitiesSample.Web.Services
{
    public class SilverlightFaultBehavior : Attribute, IServiceBehavior
    {
        private class SilverlightFaultEndpointBehavior : IEndpointBehavior
        {
            public void AddBindingParameters
            (ServiceEndpoint endpoint, BindingParameterCollection bindingParameters)
            {
            }

            public void ApplyClientBehavior
            (ServiceEndpoint endpoint, ClientRuntime clientRuntime)
            {
            }

            public void ApplyDispatchBehavior
            (ServiceEndpoint endpoint, EndpointDispatcher endpointDispatcher)
            {
                endpointDispatcher.DispatchRuntime.MessageInspectors.Add
                            (new SilverlightFaultMessageInspector());
            }

            public void Validate(ServiceEndpoint endpoint)
            {
            }

            private class SilverlightFaultMessageInspector : IDispatchMessageInspector
            {
                public object AfterReceiveRequest
                (ref Message request, IClientChannel channel,
                                      InstanceContext instanceContext)
                {
                    return null;
                }

                public void BeforeSendReply(ref Message reply, object correlationState)
                {
                    if ((reply != null) && reply.IsFault)
                    {
                        HttpResponseMessageProperty property =
                                           new HttpResponseMessageProperty();
                        property.StatusCode = HttpStatusCode.OK;
                        reply.Properties[HttpResponseMessageProperty.Name] = property;
                    }
                }
            }
        }

        public void AddBindingParameters(ServiceDescription serviceDescription,
        ServiceHostBase serviceHostBase, Collection<ServiceEndpoint> endpoints,
        BindingParameterCollection bindingParameters)
        {
        }

        public void ApplyDispatchBehavior
            (ServiceDescription serviceDescription, ServiceHostBase serviceHostBase)
        {
            foreach (ServiceEndpoint endpoint in serviceDescription.Endpoints)
            {
                endpoint.Behaviors.Add(new SilverlightFaultEndpointBehavior());
            }
        }

        public void Validate(ServiceDescription serviceDescription,
                             ServiceHostBase serviceHostBase)
        {
        }
    }
}
接下来,将以下类添加到您的 WcfEntitiesSample.Model.Silverlight 并将其链接到 WcfEntitiesSample.Model.Net 项目
namespace WcfEntitiesSample.Model
{
    public class WcfError
    {
        public string Message { get; set; }
    }
}
要在添加新项时链接文件,请单击箭头下拉列表,然后选择“**添加为链接**”

然后在您的 svc 文件中,添加 SilverlightFaultBehavior 和 FaultContract 属性
    [SilverlightFaultBehavior]
    [ServiceContract(Namespace = "")]
    [AspNetCompatibilityRequirements(RequirementsMode =
                        AspNetCompatibilityRequirementsMode.Allowed)]
    public class AdventureWorksService : IAdventureWorksService
    {
        [OperationContract]
        [SilverlightFaultBehavior]
        [FaultContract(typeof(WcfError))]
        public Product GetProductByID(int id)
        {
            var mgr = new ProductManager();
            return mgr.GetProductById(id);
        }
    }
现在,要在 Silverlight 项目中实际查看错误,请更新您的 MainPage.xaml.cs 源代码,以包含 FaultException 详细信息并使用 WcfEntitiesSample.Model
using System;
using System.Diagnostics;
using System.ServiceModel;
using System.Windows;
using System.Windows.Controls;
using WcfEntitiesSample.Model;
using WcfEntitiesSample.ServiceRefs;

namespace WcfEntitiesSample
{
    public partial class MainPage : UserControl
    {
        public MainPage()
        {
            // Required to initialize variables
            InitializeComponent();
        }

        private void btnSearch_Click(object sender, RoutedEventArgs e)
        {
            int searchId;

            if (int.TryParse(txtID.Text, out searchId))
            {
                var client = new AdventureWorksServiceClient();

                client.GetProductByIDCompleted += (s, ea) =>
                {
                    if (ea.Error != null)
                    {
                        FaultException<WcfError> fault =
                             ea.Error as FaultException<WcfError>;

                        if (fault != null)
                        {
                            MessageBox.Show(fault.Detail.Message);
                        }
                        else
                        {
                            MessageBox.Show(ea.Error.Message);
                        }
                    }
                    DataContext = ea.Result;
                    Debug.WriteLine("ea.Result.ToString() = ", ea.Result.ToString());
                };

                client.GetProductByIDAsync(searchId);
                Debug.WriteLine("client.ToString() = ", client.ToString());
            }
            else
            {
                MessageBox.Show("Invalid customer ID. Please enter a number.");
            }
        }
    }
}
5. 测试
需要最新的 Silverlight 工具包,可从 Codeplex 获取,但最好的获取方式可能是使用 NuGet,命令如下
PM> Install-Package SilverlightToolkit-Testing
如果您遇到任何困难,则只需手动将 Microsoft.Silverlight.Testing.dll 和 Microsoft.VisualStudio.QualityTools.UnitTesting.Silverlight.dll 文件添加到您的项目中,这些文件包含在示例项目 zip 文件中。
安装此软件后,您将拥有一个新的 Silverlight 单元测试项目模板。
在您的单元测试项目中添加对 ServiceReferences.ClientConfig 文件的链接。
创建一个名为 ProductListViewModelTests 的新类,并添加以下代码
using Microsoft.VisualStudio.TestTools.UnitTesting;
using MvvmSample.ViewModels;
namespace MvvmApplication.SilverlightTests
{
    [TestClass]
    public class ProductListViewModelTests
    {
        [TestMethod]
        public void SelectedProductCanBeSetAndRetrieved()
        {
            ProductListViewModel vm = new ProductListViewModel();
            MvvmSample.Services.Product product = new MvvmSample.Services.Product();
            vm.SelectedProduct = product;
            Assert.ReferenceEquals(product, vm.SelectedProduct);
        }
    }
}
您还需要将启动页设置为 *.Web 项目中的 MvvmSample.TestsTestPage.aspx。运行 Silverlight 测试时,您应该会看到类似以下内容

此外,要测试您的 ProductManager 类,请添加一个标准的 .NET 单元测试库并添加以下代码
using System;
using Microsoft.VisualStudio.TestTools.UnitTesting;
using WcfEntitiesSample.Model;
namespace UnitTests
{
    [TestClass]
    public class TestProductManager
    { [TestMethod]
        public void TestGetProducts()
        {
            var mgr = new ProductManager();
            var products = mgr.GetProducts();
            Assert.IsTrue(products.Count > 0);
        }
    }
}
如果您的应用程序的架构设计良好,那么您的 ViewModel 和 Manager 类的测试应该涵盖大部分应用程序逻辑。
历史
- 2015年1月15日:添加了关于测试的部分
- 2015年2月5日:添加了关于控制反转的进一步解释和示例