
如何在 ASP.NET(.NET Framework 1.x)中不使用自定义控件开发级联母版页
3.68/5 (29投票s)
2004年10月24日
9分钟阅读
216384
1094
本文展示了一种非常简单但功能强大的方法,可以在 .NET 中使用级联母版页设计模式,而无需使用自定义控件。
目录
引言

母版页机制允许定义网站的“皮肤”——在每个访问页面上都会出现的通用用户界面元素。母版页架构的主要思想是分离母版页和上下文页面的开发过程,使其能够在母版页中包含样式定义和常见的基本功能,并让上下文页面处理主要功能。
背景
啊,母版页……
我们现在多么频繁地使用这些词语,期待着 Microsoft Visual Studio Whidbey 发布,它将原生支持这种有用的架构。但是 .NET Framework 1.1 甚至 1.0 呢?我敢肯定,每个阅读本文的人都花费了太多时间设计复杂的母版-上下文页面框架,这些框架涉及自定义控件、冒泡事件,甚至在代码隐藏类中硬编码常见的 HTML 文本。在重新审视我以前使用过的现有模式以及其他人迄今为止提出的建议后,我得出的结论是,我们在创建那些复杂的架构时,不应该遭受那么多痛苦,顺便说一句,这些架构几乎不可能迁移到即将到来的 Whidbey 母版页。
所有这些都导致了以下框架……
基本思想
该框架的基本思想是定义和实现两种 Web 页面的基类:母版页和上下文页。在解释实现之前,我想指出这两种类型是使用一个通用类 (MasterContextPage) 定义的——通过特殊的类属性实现区分:[MasterPage] 和 [ContextPage]。这种方法背后的解释很简单:如果开发人员想在母版页框架之上创建自己的应用程序核心页面类,他们不必为母版页和上下文页重复实现。
主框架类派生自 Page 类,以便拦截页面控件的初始化并从母版页加载控件集合。机制很简单:
- 在上下文页面加载期间,执行分配的母版页
- 用母版页中的控件替换上下文页面的
Page控件集合 - 将上下文页面控件插入母版页中的特殊占位符
这在 .NET 中听起来不是一件难事,不是吗?
实现
MasterContextPage 类
让我们回顾一下 MasterContextPage 的上下文页面部分:我们重载 TrackViewState 方法,以便在加载视图状态之前“处理”表单控件。
protected override void TrackViewState()
{
    base.TrackViewState ();
    bool isMasterPage = this.IsMasterPage;
    bool isContextPage = this.IsContextPage;
    if( isMasterPage || isContextPage)
    {
       // First, we check if current page is context page

       if( isContextPage)
       {
          OnContextPageLoad();
       }
       // Then, if its a master page also,

       //   we save combined controls into context

       if( isMasterPage)
       {
          OnMasterPageLoad();
       }
    }
}
这是 OnContextPageLoad() 方法的实现。
private void OnContextPageLoad()
{
   // Execute master page

   Server.Execute( AppContextPath + this.MasterPage);
   // Retrieve master page controls from the Http Context

   ControlCollection masterControls =
         (ControlCollection)Context.Items[ MASTER_CONTROLS_KEY];
   if( masterControls == null)
   {
      throw new Exception( "Failed to locate Master Page in the context");
   }

  ...
如您所见,在执行母版页之后,我们从当前的 HttpContext 加载其控件。谁将它们存储在那里——我们!……通过从我们的类派生母版页类。当页面执行时,我们将加载的控件集合存储到 HttpContext 中,并阻止页面将任何内容呈现到 HTTP 响应流中。下面是它的实现方式:
private void OnMasterPageLoad()
{
   Context.Items[ MASTER_CONTROLS_KEY] = this.Controls;
}

protected override void Render(HtmlTextWriter writer)
{
   if( !this.IsMasterPage)
   {
      base.Render (writer);
   }
}
现在,让我们回到加载上下文页面。是时候定位上下文页面中的控件了。我们想“粘”到母版页中,将该控件集合保存到变量中,并清除上下文页面中的所有控件。
// locate the context root control in the context page

Control contextRoot = this.ContextHtmlForm;
if( contextRoot == null)
{
   contextRoot = this.FindControl( CONTEXT_ROOT_CONTROL_ID);
}
if( contextRoot == null)
{
   throw new Exception( "Context Page must contain  " +
    "HtmlForm or control with id = " +  CONTEXT_ROOT_CONTROL_ID);
}
// save its controls and clear all form controls

ControlCollection contextCollection = contextRoot.Controls;
this.Controls.Clear();
之后,我们将母版页中的控件复制到上下文页。当上下文占位符控件被复制时,我们将所有上下文页控件作为占位符的子控件移动。请注意,此占位符控件必须具有框架预定义的 ID "masterContextContainer"
Control control = null;
for( int i = 0; i < masterControls.Count;)
{
   control = masterControls[i];
   if( control == null) continue;
   // Add master page controls into context page

   this.Controls.Add( control);
   if( control is HtmlForm)
   {
      // When master page form is located, find the container control

      Control contextContainer = control.
          FindControl( CONTEXT_CONTAINER_CONTROL_ID);
      if( contextContainer == null)
      {
         throw new Exception( "Master Page must contain the control " +
                   "with id = " + CONTEXT_CONTAINER_CONTROL_ID);
      }
      // Assign a context container new ID

      // to avoid control name duplication

      // in the cascading master pages case

      contextContainer.ID = Guid.NewGuid().ToString();
      Control subControl = null;
      // Copy all control from context root control collection

      //    to the context container control from the master page

      for( int j = 0; j < contextCollection.Count;)
      {
         subControl = contextCollection[j];
         if( subControl == null) continue;
         contextCollection.Remove(subControl);
         contextContainer.Controls.Add( subControl);
      }
   }
}
[MasterPage] 和 [ContextPage] 属性
如前所述,该框架使用属性将上下文页面和/或母版页功能分配给页面。母版页属性的实现非常简单——它只是一个声明属性。
[AttributeUsage(AttributeTargets.Class)]
public class MasterPageAttribute : Attribute
{
   public MasterPageAttribute()
   {

   }
}
上下文页属性更为复杂,因为它可以指定包含此页的母版页别名。使用别名分配母版页允许解耦上下文和母版页的实现。开发人员应使用 <appSettings> 配置部分将特定的母版页分配给别名。
[AttributeUsage(AttributeTargets.Class)]
public class ContextPageAttribute : Attribute
{
  public ContextPageAttribute()
  {
  }
  public ContextPageAttribute( String masterPageAlias)
  {
    _MasterPageAlias = masterPageAlias;
  }

  private String _MasterPageAlias = "";
  public String MasterPageAlias
  {
    get
    {
      return _MasterPageAlias;
    }
    set
    {
      _MasterPageAlias = value;
    }
  }
}
使用框架
让我们创建一个使用母版页框架的项目。
简单的母版-上下文页面
首先,该框架允许开发人员每个项目拥有多个母版页:web 项目应包含一个默认母版页,并且可以通过使用 web.config 配置来支持某些 ASPX 页面的个人母版页,或者开发人员可以通过覆盖 MasterContextPage 类中的 MasterPage 属性来实施自己的选择母版页的机制。
现在,我们需要网站的默认母版页。它将是一个使用 HTML 表格完成的标准页眉-菜单-页脚布局。
  <table width="100%" ID="Table1">
      <tr>
      <td colspan=2 align=center bgcolor=navy>
          <span style="COLOR:white">SITE HEADER</span>
      </td>
      </tr>
      <tr>
        <td bgcolor=silver width=200>
           LEFT MENU
        </td>
        <td id="masterContextContainer" runat="server">
        </td>
      </tr>
      <tr>
        <td colspan=2 align=center bgcolor=lightskyblue>
           SITE FOOTER
        </td>
      </tr>
   </table>
我们希望上下文页面出现的位置用 ID 为“masterContextContainer”的服务端控件“标记”。然后我们打开母版页的代码隐藏,从 MasterContextPage 类继承该类,并将 [MasterPage] 属性应用于该类。
[DPDTeam.Web.MasterPages.MasterPage]
public class DefaultMasterPage :
      DPDTeam.Web.MasterPages.MasterContextPage
母版页构建完成。让我们创建 ViewOrders 上下文页——它将只是一个简单的列表框,包含订单号列和页面底部的刷新按钮。当页面第一次显示时,我们显示默认数据集,当按下刷新按钮时,我们更改数据源并重新绑定列表。我们不需要在 ASPX 代码或代码隐藏类中添加任何与我们的框架相关的内容,除了从 MasterContextPage 类继承并添加 [ContextPage] 属性。
[DPDTeam.Web.MasterPages.ContextPage]
public class ViewOrders :
   DPDTeam.Web.MasterPages.MasterContextPage
唯一需要做的是在 web.config 文件中创建一个配置项,该项定义网站的默认母版页。我们在 <appSettings> 部分创建此项。
<appSettings>
   <add key="MasterPages.DefaultMasterPage" value="DefaultMasterPage.aspx" />
</appSettings>
就这样——现在当我们运行“查看订单”页面时,它将被包裹在我们的母版页中。最重要的是,所有代码隐藏代码在母版页和上下文页中都像以前一样工作。唯一的改变是继承和属性的应用!

下一页——订单项页面——将有它自己的母版页,与网站的默认母版页不同。为此,我们以与创建默认母版页完全相同的方式创建 OrderItemMasterPage.aspx 母版页——新母版页的上下文区域左侧将没有菜单。我们再次使用 <appSettings> 部分来为我们的 ViewOrderItems.aspx 指定一个个人母版页。
   <appSettings>
 <add key="MasterPages.DefaultMasterPage" value="DefaultMasterPage.aspx" />
<add key="MasterPages.PersonalMasterPage.ViewOrderItems.aspx"
value="OrderItemMasterPage.aspx" />
   </appSettings>
现在是时候让 ViewOrderItems 类继承自 MasterContextPage 类并应用 [ContextPage] 属性了,瞧——订单项被包裹在它们自己的母版页中。

母版页别名
现在,如果我们的 Web 应用程序中的一部分页面必须出现在某个母版页下,而另一部分必须由另一个母版页“美化”怎么办?如果项目包含(比如)200 个页面,那么在配置文件中为每个上下文页面定义一个个人母版页将是一项非常困难的任务。为了帮助解决这种情况,ContextPageAttribute 包含一个名为 MasterPageAlias 的 String 字段。使用此字段,开发人员可以将上下文分配给母版页“类型”,而无需指定母版页的实现,并可以在以后在配置文件中进行。在演示项目中,打开 ViewOrderItems 代码并查看类定义。
[ContextPage( MasterPageAlias = "ViewOrderItemsMaster")]
public class ViewOrderItems :
   DPDTeam.Web.MasterPages.MasterContextPage
然后,在 Web 应用程序配置文件中,我们只需创建一个特殊项,该项会将所有对别名 "ViewOrderItemsMaster" 的调用转发到 "OrderItemMasterPage.aspx" 页面。
<appSettings>
 <add key="MasterPages.Alias.ViewOrderItemsMaster"
                      value="OrderItemMasterPage.aspx" />
</appSettings>
级联母版页
在此之前,我们使用了一个简单的母版-上下文页面模式场景:我们所有的上下文页面都只有一个母版页。现在,让我们看看如何使用这个框架将上下文页面“包装”在多个母版页层中。
假设我们正在开发一个大型网站,并且我们有四个团队:
- 上下文页面开发人员
- 开发主横幅的美工
- 左侧菜单开发人员
- 右侧新闻部分开发人员
所有团队只能独立工作(例如,不同的时区),我们必须组织他们的工作。首先,让我们为我们的上下文页面团队编写一个骨架页面。
[ContextPage( MasterPageAlias = "ContextPage1Master")]
public class CasadingContextPage1 : MasterContextPage
...
这是他们的页面,没有我们的框架:

我们的工作到此为止——他们可以在项目中创建一个虚拟母版页,并为其分配“ContextPage1Master”别名。
现在,是时候帮助左侧菜单开发人员了。我们为他们的页面创建了几乎相同的骨架,但我们给他们的母版页提供了另一个别名。当他们的开发和测试完成时,他们将在类定义中添加 [MasterPage] 属性,并在页面上插入占位符控件以存储上下文页面控件。
[MasterPage]
[ContextPage( MasterPageAlias = "ContextPage2Master")]
public class CascadingLeftMasterPage : MasterContextPage
...
查看他们在禁用框架的情况下完成的工作:

我们为新闻团队执行了与左侧菜单开发人员相同的步骤,从而得到以下类定义:
[MasterPage]
[ContextPage( MasterPageAlias = "ContextPage2Master")]
public class CascadingRightMasterPage : MasterContextPage
...
团队得出了这些结果:

我们的主横幅团队将创建这样的东西:
[MasterPage]
public class CascadingTopMasterPage : MasterContextPage
...
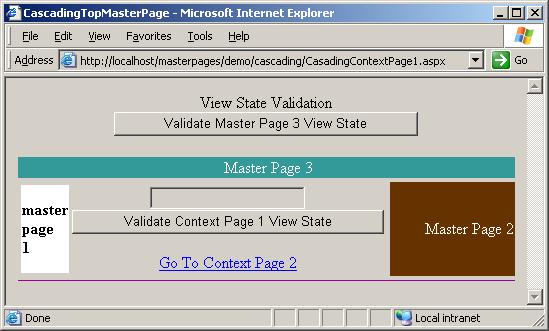
产生此页面:

现在开发已经完成,是时候将所有页面组装到一个项目中,并将页面中使用的别名连接到实际的实现。为此,我们使用 web.config 文件中的 <appSettings> 部分。
<appSettings>
  <add key="MasterPages.Alias.ContextGroup1Master"
value="cascading/CascadingLeftMasterPage.aspx" />
  <add key="MasterPages.Alias.ContextGroup2Master"
value="cascading/CascadingRightMasterPage.aspx" />
  <add key="MasterPages.Alias.ContextGroup3Master"
value="cascading/CascadingTopMasterPage.aspx" />
</appSettings>
此配置表示以下内容:
- 我们将上下文页连接到左侧菜单页。
- 之后,我们将左侧菜单页连接到右侧新闻页。
- 最后,我们将右侧新闻页连接到横幅页。
项目编译并启动后,我们可以观察到结果——我们的上下文页面被三层母版页包裹。
特别说明
请记住为每个母版页和上下文页上的控件提供特殊的字首。这将确保您不会遇到任何“重复控件名称”异常。
如果您在应用程序中使用了本文中的任何内容,并希望您的应用程序出现在基于此框架构建的项目列表中,请给我发送电子邮件。
如何设置演示项目
- 在文件系统上的某个位置(例如,c:\projects\MasterPages)创建一个名为 MasterPages 的项目文件夹。
- 将 effectivempages_demo.zip 的内容解压到该文件夹中。
- 打开 Internet 信息服务控制台,为您的网站创建一个名为 MasterPages 的虚拟目录,并使其指向您创建的 MasterPages 文件夹。
- 在 IIS 控制台中单击“demo”项目文件夹属性,然后在“属性”对话框中,按“创建”按钮为该文件夹创建 Web 应用程序。
- 在 Visual Studio .NET 2003 中打开 demo.sln 解决方案文件,或在 Visual Studio .NET 2002 中打开 demo2002.sln,以查看代码并编译项目。
- 使用 https:///masterpages/demo/vieworders.aspx URL 在浏览器中运行应用程序。
历史
- 版本 1.0。2004 年 10 月 24 日。
- 添加了解决方案文件,以及适用于 VS.NET 2002 的解决方案和项目文件。2004 年 10 月 29 日。
- 修复了位于 Web 应用程序子文件夹中的上下文页面问题。
- 修复了母版页 ViewState 的错误。2004 年 11 月 1 日。
- 添加了母版页别名(感谢 Dave Glaeser 的想法)。2004 年 11 月 2 日。
- 添加了母版页级联。2004 年 11 月 4 日。