
HttpClient SSL Tomcat 和 Eclipse
本文将展示一个在Eclipse开发环境中,使用Apache HttpComponents HttpClient消费https网络内容的示例。
引言
本文将展示一个在Eclipse开发环境中,使用Apache HttpComponents HttpClient消费https网络内容的示例。
背景
通常情况下,网络内容应该通过Web浏览器访问,但在某些情况下,您可能希望在应用程序中使用Apache HttpComponents HttpClient来消费它们。您可能会发现拥有一个良好的开发和调试环境对处理这些应用程序很有帮助。本文将展示一个在Eclipse开发环境中,使用Apache HttpComponents HttpClient消费https网络内容的示例。在此示例中,我将讨论以下主题:
- 如何配置Tomcat以使用https;
- 如何将多模块Maven项目导入Eclipse;
- 在开发环境中,用于配置https的证书通常不是由证书颁发机构签名的。我将向您展示如何在开发和调试应用程序时接受开发证书。
配置Tomcat使用Https
如何创建密钥库
要配置Tomcat使用https,我们首先需要创建一个密钥库。密钥库是一个包含用于启动https通信的加密密钥对的文件。JDK自带了“keytool.exe”来管理密钥库。但我更喜欢用户友好型GUI的keystore explorer。您可以从此链接下载keystore explorer。本文示例中使用的keystore explorer版本是“kse-51”。

要生成密钥库文件,我们可以从keystore explorer菜单中单击“文件” -> “新建”。
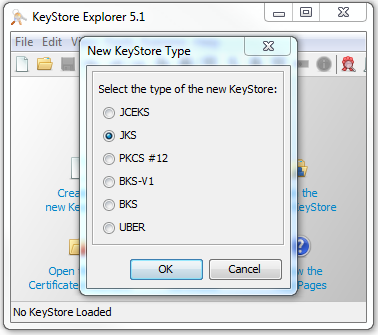
然后我们可以选择“JKS”类型,然后单击“确定”按钮来生成一个空的密钥库。

右键单击空的密钥库的空白区域,会弹出上下文菜单,然后单击“生成密钥对”将密钥对添加到空的密钥库中。

选择“RSA”算法,密钥大小,然后单击“确定”按钮继续。
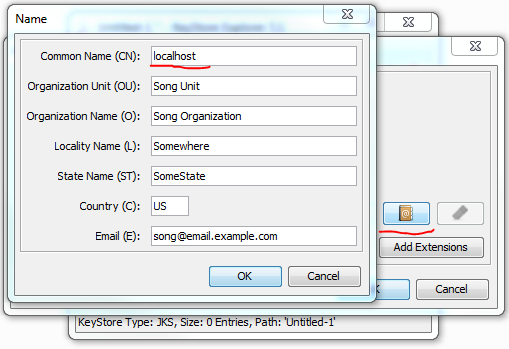
然后,我们可以填写所需信息来完成密钥对的生成。您应该特别注意“通用名称(CN)”字段。虽然不是绝对必要,但如果将其值设置为与您的网站主机名匹配,那将是很好的。保存密钥库时,keystore explorer将询问我们以下信息:
- 它会询问我们密钥库中密钥对的密码以及密钥库文件本身的密码。为了让Tomcat能够使用密钥库,我们应该将两个密码设置为相同;
- 它会询问我们密钥对的别名。最好使用为“通用名称(CN)”字段选择的值作为别名。在本例中,我简单地使用“localhost”作为密钥对的别名。
然后,我们可以选择所需的文件夹位置,并为密钥库文件命名进行保存。在本例中,我将其保存为“C:\Keystores\Stores\TestKeyStore.keystore”。
如何由证书颁发机构签名密钥
- 在生产环境中,总是需要由证书颁发机构签名密钥;
- 在测试或开发环境中,用于配置https的密钥几乎从未被签名,因为我们没有时间和金钱去获取签名。
在本文中,我将不讨论密钥的签名。如果您需要设置生产网站,我相信您能够从证书颁发机构那里获得帮助,因为他们渴望您的业务和金钱。
如何配置Tomcat使用密钥库
根据Tomcat的版本,配置可能略有不同,但应该大同小异。在本例中,我使用的是Tomcat 7.0.54。在Tomcat安装文件夹中,“conf”文件夹下可以找到“server.xml”文件。您可以使用任何文本编辑器打开“server.xml”文件。如果此文件从未被修改过,您会找到以下部分:
    <!--
    <Connector port="8443" protocol="org.apache.coyote.http11.Http11Protocol"
               maxThreads="150" SSLEnabled="true" scheme="https" secure="true"
               clientAuth="false" sslProtocol="TLS" />
    -->
您可以取消注释此部分,并将其替换为以下内容:
    <Connector port="8443" protocol="org.apache.coyote.http11.Http11Protocol"
               maxThreads="150" SSLEnabled="true" scheme="https" secure="true"
               clientAuth="false" sslProtocol="TLS"
           keystoreFile="C:\Keystores\Stores\TestKeyStore.keystore"
           keystorePass="password"/>
通过指定正确的密钥库文件位置和密钥库密码(此密码应与密钥对的密码相同),我们已经为Tomcat实例配置了https。现在启动Tomcat并在Web浏览器中输入URL“https://:8443/”,浏览器会给您一个警告,提示用于https通信的证书未由证书颁发机构签名。如果您忽略警告并继续访问网页,您应该会看到以下页面。

自动重定向
如果您希望Tomcat自动将Web请求重定向到HTTPS,可以在“web.xml”文件中,在“/web-app”结束标签之前添加以下部分。
<security-constraint>
         <web-resource-collection>
             <web-resource-name>Protected Context</web-resource-name>
             <url-pattern>/*</url-pattern>
         </web-resource-collection>

         <!-- auth-constraint goes here if you requre authentication -->
         <user-data-constraint>
             <transport-guarantee>CONFIDENTIAL</transport-guarantee>
         </user-data-constraint>
</security-constraint
导入多模块Maven项目到Eclipse

附件的项目是一个多模块Maven项目。在项目文件夹中,您可以找到父POM文件和两个文件夹。其中一个文件夹是服务器项目,另一个是客户端项目。父POM的实现如下:
<project xmlns="http://maven.apache.org/POM/4.0.0"
    xmlns:xsi="http://www.w3.org/2001/XMLSchema-instance"
    xsi:schemaLocation="http://maven.apache.org/POM/4.0.0
    http://maven.apache.org/xsd/maven-4.0.0.xsd">

  <modelVersion>4.0.0</modelVersion>
  <groupId>com.song.httpclientexample</groupId>
  <artifactId>httpclientexample</artifactId>
  <packaging>pom</packaging>
  <version>0.0.1-SNAPSHOT</version>

  <modules>
        <module>httpclientexample-server</module>
        <module>httpclientexample-client</module>
  </modules>

  <build>
        <finalName>${project.artifactId}</finalName>
        <plugins>
            <plugin>
                <artifactId>maven-compiler-plugin</artifactId>
                <version>3.1</version>
                <configuration>
                  <source>1.7</source>
                  <target>1.7</target>
                </configuration>
            </plugin>
        </plugins>
    </build>

</project>
Eclipse具有相当不错的Maven支持。我使用的Eclipse版本是Eclipse Java EE IDE for Web Developers Version Kepler Service Release 2。要将多模块Maven项目导入Eclipse,您可以创建一个空的文件夹作为工作区来启动Eclipse。然后,您可以转到“文件” -> “导入...”来打开项目导入向导。

选择“现有Maven项目”后,您可以单击“下一步”按钮继续导入Maven项目。

您需要浏览到包含父POM的文件夹,Eclipse将自动为您搜索子POM。然后,您可以单击“完成”按钮导入多模块Maven项目。在导入过程中,Eclipse可能会显示一些导入错误,但如果您足够耐心并让Eclipse完成工作,项目应该能够顺利导入。
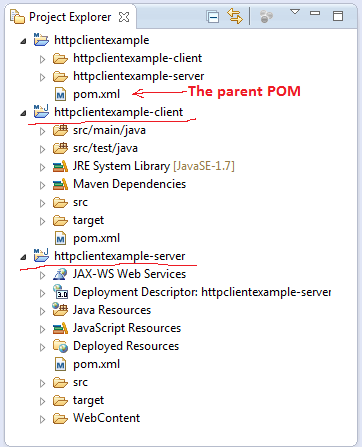
成功导入多模块Maven项目后,您可以在项目浏览器中看到三个项目:
- “httpclientexample”项目只是一个父POM的容器项目;
- “httpclientexample-server”是一个Spring MVC项目,用于实现一个简单的REST服务;
- “httpclientexample-client”是一个Swing应用程序,用于消费“httpclientexample-server”项目中实现的REST服务。
“httpclientexample-server”项目

“httpclientexample-server”项目是一个Spring MVC应用程序。其“pom.xml”文件的定义如下:
<project xmlns="http://maven.apache.org/POM/4.0.0"
    xmlns:xsi="http://www.w3.org/2001/XMLSchema-instance"
    xsi:schemaLocation="http://maven.apache.org/POM/4.0.0
    http://maven.apache.org/xsd/maven-4.0.0.xsd">

    <parent>
        <groupId>com.song.httpclientexample</groupId>
        <artifactId>httpclientexample</artifactId>
        <version>0.0.1-SNAPSHOT</version>
    </parent>

    <modelVersion>4.0.0</modelVersion>
    <artifactId>httpclientexample-server</artifactId>
    <packaging>war</packaging>

    <properties>
        <spring.version>4.0.7.RELEASE</spring.version>
        <tomcat.version>7.0.55</tomcat.version>
    </properties>

    <dependencies>
        <!-- Minimal dependencies for Spring MVC -->
        <dependency>
            <groupId>org.springframework</groupId>
            <artifactId>spring-core</artifactId>
            <version>${spring.version}</version>
        </dependency>

        <dependency>
            <groupId>org.springframework</groupId>
            <artifactId>spring-web</artifactId>
            <version>${spring.version}</version>
        </dependency>

        <dependency>
            <groupId>org.springframework</groupId>
            <artifactId>spring-webmvc</artifactId>
            <version>${spring.version}</version>
        </dependency>


        <!-- Sevlet jars for compilation, provided by Tomcat -->
        <dependency>
            <groupId>org.apache.tomcat</groupId>
            <artifactId>tomcat-servlet-api</artifactId>
            <version>${tomcat.version}</version>
            <scope>provided</scope>
        </dependency>
    </dependencies>

    <build>
        <finalName>${project.artifactId}</finalName>
        <plugins>
            <plugin>
                <artifactId>maven-war-plugin</artifactId>
                <version>2.4</version>
                <configuration>
                    <warSourceDirectory>WebContent</warSourceDirectory>
                    <failOnMissingWebXml>true</failOnMissingWebXml>
                </configuration>
            </plugin>
        </plugins>
    </build>

</project>
“web.xml”文件和“mvc-dispatcher-servlet.xml”文件的定义如下:
<?xml version="1.0" encoding="UTF-8"?>
<web-app xmlns:xsi="http://www.w3.org/2001/XMLSchema-instance"
    xmlns="http://java.sun.com/xml/ns/javaee"
    xsi:schemaLocation="http://java.sun.com/xml/ns/javaee
        http://java.sun.com/xml/ns/javaee/web-app_3_0.xsd"
    id="WebApp_ID" version="3.0">

    <display-name>Spring Web Example</display-name>
    <welcome-file-list>
        <welcome-file>index.jsp</welcome-file>
    </welcome-file-list>

    <filter>
        <filter-name>nocachefilter</filter-name>
        <filter-class>com.song.example.filter.NocacheFilter</filter-class>
    </filter>
    <filter-mapping>
        <filter-name>nocachefilter</filter-name>
        <url-pattern>/*</url-pattern>
    </filter-mapping>

    <servlet>
        <servlet-name>mvc-dispatcher</servlet-name>
          <servlet-class>
              org.springframework.web.servlet.DispatcherServlet
          </servlet-class>
          <load-on-startup>1</load-on-startup>
    </servlet>
    <servlet-mapping>
        <servlet-name>mvc-dispatcher</servlet-name>
        <url-pattern>/api/*</url-pattern>
    </servlet-mapping>
</web-app>
<?xml version="1.0" encoding="UTF-8"?>
<beans xmlns="http://www.springframework.org/schema/beans"
    xmlns:xsi="http://www.w3.org/2001/XMLSchema-instance"
    xmlns:p="http://www.springframework.org/schema/p"
    xmlns:context="http://www.springframework.org/schema/context"
    xmlns:mvc="http://www.springframework.org/schema/mvc"
    xsi:schemaLocation="
        http://www.springframework.org/schema/beans
        http://www.springframework.org/schema/beans/spring-beans-3.2.xsd
        http://www.springframework.org/schema/context
        http://www.springframework.org/schema/context/spring-context-3.2.xsd
        http://www.springframework.org/schema/mvc
        http://www.springframework.org/schema/mvc/spring-mvc-3.2.xsd">

     <context:component-scan base-package="com.song.example.controller" />
     <mvc:annotation-driven />
</beans>
REST服务由“ExampleController”类实现:
package com.song.example.controller;

import java.io.IOException;

import javax.servlet.http.HttpServletResponse;

import org.springframework.stereotype.Controller;
import org.springframework.web.bind.annotation.RequestMapping;
import org.springframework.web.bind.annotation.RequestMethod;

@Controller
public class ExampleController {

    @RequestMapping(value = "/getStudent", method = RequestMethod.GET)
    public void getAStudent(HttpServletResponse response) throws IOException {
        response.setContentType("application/json");

        response.getWriter().write("{\"name\": \"Song Li\", \"score\": 100}");
        response.flushBuffer();
    }
}
这是一个非常简单的Rest服务,它在接收到请求后简单地响应一个硬编码的Json字符串。该服务的全部目的是向您展示如何在开发环境中,使用一个未由证书颁发机构签名的证书配置的https来消费Web内容。要在Eclipse中启动MVC应用程序,您可以将项目附加到一个Tomcat服务器。您可以参考此链接了解如何在Eclipse中附加Tomcat服务器。如果您计算机上有多个Tomcat实例,您需要确保选择我们已经配置好的Tomcat实例,Eclipse将遵循这些配置和证书密钥库。

附加Tomcat实例后,您可以通过右键单击“httpclientexample-server”项目 -> “运行方式” -> “在服务器上运行”来启动MVC应用程序。然后,您可以在浏览器中输入URL“https://:8443/httpclientexample-server/api/getStudent”来确保服务正在运行。启动MVC应用程序时,您需要确保计算机上没有其他Tomcat实例正在运行,否则您可能无法成功启动MVC应用程序。

“httpclientexample-client”项目

“httpclientexample-client”项目是一个简单的Swing项目。其POM的定义如下:
<project xmlns="http://maven.apache.org/POM/4.0.0"
    xmlns:xsi="http://www.w3.org/2001/XMLSchema-instance"
    xsi:schemaLocation="http://maven.apache.org/POM/4.0.0
    http://maven.apache.org/xsd/maven-4.0.0.xsd">

    <parent>
        <groupId>com.song.httpclientexample</groupId>
        <artifactId>httpclientexample</artifactId>
        <version>0.0.1-SNAPSHOT</version>
    </parent>

    <modelVersion>4.0.0</modelVersion>
    <artifactId>httpclientexample-client</artifactId>

    <properties>
        <httpclient.version>4.3.6</httpclient.version>
        <commons-io.version>2.4</commons-io.version>
    </properties>

    <dependencies>
        <dependency>
            <groupId>org.apache.httpcomponents</groupId>
            <artifactId>httpclient</artifactId>
            <version>${httpclient.version}</version>
        </dependency>

        <dependency>
            <groupId>commons-io</groupId>
            <artifactId>commons-io</artifactId>
            <version>${commons-io.version}</version>
        </dependency>
    </dependencies>
</project>
- “httpclient”依赖项将用于在Swing应用程序中消费REST服务;
- “commons-io”依赖项将用于序列化从REST服务接收的数据以供显示。
为了在开发环境中能够使用未被证书颁发机构签名的密钥库,创建了“HttpClientFactory”类。
package com.song.example.httpclientutility;

import java.security.cert.CertificateException;
import java.security.cert.X509Certificate;

import org.apache.http.conn.ssl.SSLConnectionSocketFactory;
import org.apache.http.conn.ssl.SSLContextBuilder;
import org.apache.http.conn.ssl.TrustSelfSignedStrategy;
import org.apache.http.conn.ssl.TrustStrategy;
import org.apache.http.impl.client.CloseableHttpClient;
import org.apache.http.impl.client.HttpClients;

public class HttpClientFactory {
    public static CloseableHttpClient
        getHttpClient(SSLCertificateTrustLevel trustLevel) throws Exception {

        if (trustLevel == null) {
            return getHttpClient();
        }

        CloseableHttpClient client = null;
        SSLContextBuilder builder = null;
        SSLConnectionSocketFactory sslsf = null;

        switch (trustLevel) {
            case ANYCERTIFICATE:
                builder = new SSLContextBuilder();
                builder.loadTrustMaterial(null, new TrustStrategy(){
                    public boolean isTrusted(X509Certificate[] chain, String authType)
                            throws CertificateException {
                                return true;
                            }
                });

                sslsf = new SSLConnectionSocketFactory(builder.build(),
                        SSLConnectionSocketFactory.ALLOW_ALL_HOSTNAME_VERIFIER);
                client = HttpClients.custom().setSSLSocketFactory(sslsf).build();

                break;
            case SELFSIGNED:
                builder = new SSLContextBuilder();
                builder.loadTrustMaterial(null, new TrustSelfSignedStrategy());

                sslsf = new SSLConnectionSocketFactory(builder.build());
                client = HttpClients.custom().setSSLSocketFactory(sslsf).build();

                break;
            case DEFAULT:
                client = getHttpClient(); break;
        }

        return client;
    }

    public static CloseableHttpClient getHttpClient() {
        return HttpClients.createDefault();
    }
}
枚举“SSLCertificateTrustLevel”定义如下:
package com.song.example.httpclientutility;

public enum SSLCertificateTrustLevel {
    DEFAULT, SELFSIGNED, ANYCERTIFICATE
}
简单的Swing应用程序由“ClientMain”类实现。
package com.song.example;

import java.awt.GridLayout;
import java.awt.event.ActionEvent;
import java.awt.event.ActionListener;
import java.io.InputStream;

import javax.swing.JButton;
import javax.swing.JFrame;
import javax.swing.JOptionPane;

import org.apache.commons.io.IOUtils;
import org.apache.http.HttpEntity;
import org.apache.http.client.methods.CloseableHttpResponse;
import org.apache.http.client.methods.HttpGet;
import org.apache.http.impl.client.CloseableHttpClient;
import org.apache.http.util.EntityUtils;

import com.song.example.httpclientutility.HttpClientFactory;
import com.song.example.httpclientutility.SSLCertificateTrustLevel;

public class ClientMain extends JFrame {
    private static final long serialVersionUID = 1L;

    private String url = "https://:8443/httpclientexample-server/"
            + "api/getStudent";

    private ClientMain() {
       setTitle("HttpClient Example");
       setSize(600, 400);
       setLayout(new GridLayout(2, 1));
       setLocationRelativeTo(null);
       setDefaultCloseOperation(EXIT_ON_CLOSE);

       add(createButton("ACCEPT ONLY TRUSTED CERTIFICATE",
               SSLCertificateTrustLevel.DEFAULT));
       add(createButton("ACCEPT ANY CERTIFICATE",
               SSLCertificateTrustLevel.SELFSIGNED));
    }

    private JButton createButton(String label,
            final SSLCertificateTrustLevel trustLevel) {

        JButton btnAction = new JButton(label);
        btnAction.addActionListener(new ActionListener() {
               public void actionPerformed(ActionEvent e) {
                   String webContent = null;
                   try (CloseableHttpClient httpclient = HttpClientFactory
                           .getHttpClient(trustLevel)) {

                       HttpGet httpGet = new HttpGet(url);
                       try (CloseableHttpResponse response = httpclient.execute(httpGet)) {
                           HttpEntity entity = response.getEntity();

                           if (!entity.getContentType().getValue().toLowerCase()
                                   .contains("application/json")) {
                               throw new Exception(entity.getContentType().getValue());
                           }

                           InputStream stream = entity.getContent();
                           webContent = IOUtils.toString(stream, "UTF-8");

                           EntityUtils.consume(entity);
                       }

                   }catch(Throwable ex) {
                       System.out.println(ex.getMessage());
                       JOptionPane.showMessageDialog(null, "Rest service call failed");
                       return;
                   }

                   JOptionPane.showMessageDialog(null, webContent);
               }
           });

        return btnAction;
    }

    public static void main(String[] args) {
        ClientMain frame = new ClientMain();
        frame.setVisible(true);
    }

}
- 为简单起见,URL“https://:8443/httpclientexample-server/api/getStudent”已硬编码在程序中;
- 在“JFrame”中添加了两个按钮。每个按钮都会触发一次对REST服务的调用。一个使用默认的HttpClient,另一个使用可以绕过证书颁发机构检查和主机名验证的HttpClient。
运行客户端应用程序
确保MVC应用程序正在运行,然后您可以在Eclipse中右键单击“httpclientexample-client”项目 -> “运行方式” -> “Java应用程序”来启动客户端程序。

如果您点击“仅接受受信任证书”按钮,程序将使用默认的HttpClient调用MVC应用程序,而您的调用将失败。

但如果您点击“接受任何证书”按钮,您对该服务的调用将会成功。

关注点
- 本文展示了一个在Eclipse开发环境中,使用HttpClient消费https网络内容的示例;
- 本示例展示了如何配置Tomcat以使用https;
- 附件的项目是一个多模块Maven项目。我向您展示了如何将多模块项目导入Eclipse;
- 在开发环境中,用于配置https的证书通常不是由证书颁发机构签名的。我向您展示了如何在开发和调试应用程序时接受开发证书;
- 需要指出的是,绕过证书颁发机构和主机名验证的检查仅应在开发和验证环境中进行。在生产环境中,我们应始终使用由证书颁发机构签名的证书,除非我们有充分的理由不这样做;
- 我希望您喜欢我的文章,希望本文能以某种方式帮助您。
历史
首次修订 - 2015年1月19日