
Windows、iOS 和 Android 推送通知 - 快速、简便、灵活
4.81/5 (32投票s)
FlexiPush(推送通知)是一种快速、简便且灵活的方式,可以即时将推送通知发送到 Android、iOS 和 Windows 等不同平台,并附带自定义的 Payload。
引言
FlexiPush 主要为正在开发和测试具有推送通知功能的应用程序的开发者和测试人员而开发。开发和测试团队希望验证某些取决于服务器或推送通知的用例。

为什么推送通知对我们有用?
当发生有趣或重要的事情,并且您希望通知用户,即使应用程序未在用户设备上运行时,推送通知就会发挥作用。例如,也许当用户喜爱的球队赢得了比赛,或者他们的票已预订,或者有人给您发了消息时,用户会收到一条新推文。
幸运的是,Android、iOS 和 Windows 都提供了解决方案。与其让应用程序在后台持续检查这些内容,不如在服务器端编写代码来完成这项工作,而不是在客户端进行。
问题是什么
以下是我们可以使用 FlexiPush 的一些示例:
- 当应用程序在后台时收到通知?
- 当用户浏览应用程序时收到通知,通知会如何表现?
- 用户点击通知后,会跳转到特定页面吗?
- 应用程序是否会在相应页面上获取所需参数?
如果您不使用 FlexiPush,您将不得不等到通知从服务器到达,而等待时间可能需要几分钟、几小时或几天。
问题的解决方案
FlexiPush 是一种快速、简便且灵活的方式,可以即时将推送通知发送到 Android、iOS 和 Windows 等不同平台,并附带自定义的 Payload。
技术栈
- ASP.Net MVC 4.0
ASP.NET 是一个开发框架,用于使用 HTML、CSS、JavaScript 和服务器脚本构建网页和网站。ASP.NET 支持三种不同的开发模式:
- 网页
- MVC(模型-视图-控制器)
- Web 表单
- PushSharp
用于向 iOS(iPhone/iPad APNS)、Android(C2DM 和 GCM - Google Cloud Message)、Windows Phone、Windows 8、Amazon、Blackberry 和(即将推出的)FirefoxOS 设备发送推送通知的服务器端库!
- SingnalR
ASP.NET SignalR 是一个 ASP.NET 开发人员的新库,可以轻松开发实时 Web 功能。SignalR 允许服务器和客户端之间的双向通信。服务器现在可以在内容可用时立即将其推送到连接的客户端。
网站:SignalR 2 入门
- Bootstrap
Bootstrap 是最流行的用于在 Web 上开发响应式、移动优先项目的 HTML、CSS 和 JS 框架。
网站:Bootstrap
代码概述
- 模型类图

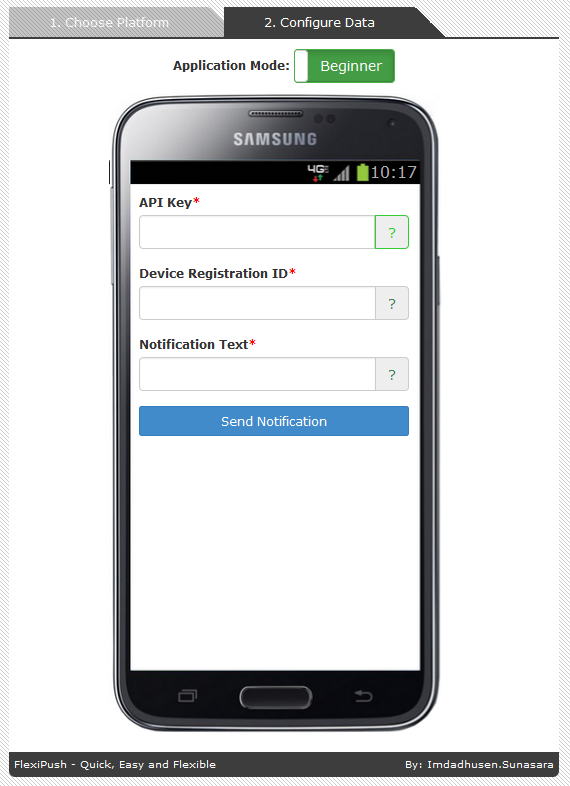
- 主屏幕

在主页上,用户可以选择平台和应用程序模式。
如果选择了新手模式,用户将只能向通知中心发送少量参数值。此模式通常由不了解自定义 JSON Payload 及其类型的用户使用。
如果选择了专家模式,用户将能够发送所有可能的 JSON Payload。此功能通常由了解自定义 JSON Payload 中每个参数的用户使用。请注意,此时应用程序将不负责验证每个字段和属性的值,也不执行任何验证。
如果用户输入了无效的 payload,由于 payload 不正确,他们将不会在设备上收到通知。.
- 向 Android 手机发送推送通知
- 屏幕
- 控制器中的服务器代码/NotificationController.cs
- 屏幕
// POST: /Notification/SendToAndroid
        [HttpPost]
        public ActionResult SendToAndroid(AndroidPushNotificationModel model, string ClientID, string JSONPayload)
        {
            responseResult result = new responseResult();
            try
            {
                NotificationController.SocketClientID = ClientID;
                updateProcessStatusToClient(100, "Initializing", "Initializing GCM Push Channel Settings...");
                var push = new PushBroker();
//PushSharp Event Registration comes here….
                push.RegisterGcmService(new GcmPushChannelSettings(model.APIKey));

	//This will sending notification to android device based on Application mode selection.
                string JSONData = (isExpertMode()) ? JSONPayload : "{\"message\":\"" + model.NotificationText + "\",\"badge\":\"" + model.NotificationBadge + "\",\"sound\":\"" + model.SoundFile + "\"}";
                push.QueueNotification(new GcmNotification().ForDeviceRegistrationId(model.DeviceRegistrationID).WithJson(JSONData));
            }
            catch (Exception ex)
            {
                updateProcessStatusToClient(110, "Error in sending notification", ex.Message);
            }
            return Json(result, JsonRequestBehavior.AllowGet);
        }
- 向 iOS 手机发送推送通知
- 屏幕

- 控制器中的服务器代码/NotificationController.cs
- 屏幕
第一步:在服务器上上传证书
[HttpPost]
        public void UploadFiles(string ClientID)
        {
            responseResult result = new responseResult();
            try
            {
                NotificationController.SocketClientID = ClientID;
                updateProcessStatusToClient(98, "Uploading Certificate...", "Uploading certificate on server");
                HttpPostedFileBase CertificateFile = null;
                foreach (string file in Request.Files)
                {
                    CertificateFile = Request.Files[file] as HttpPostedFileBase;
                    if (CertificateFile.ContentLength == 0) continue;
                    string uploadFileName = System.IO.Path.GetFileName(CertificateFile.FileName);
                    string uploadFilePathAndName = System.IO.Path.Combine(Server.MapPath(NotificationController.SaveCertificateFolder), uploadFileName);
                    if (System.IO.File.Exists(uploadFilePathAndName)) System.IO.File.Delete(uploadFilePathAndName);
                    CertificateFile.SaveAs(uploadFilePathAndName);
                }
                updateProcessStatusToClient(99, "Certificate Uploaded", "Certificate uploaded on server");
            }
            catch (Exception ex)
            {
                result.status = Status.Error;
                result.message = string.Format(RESULT_ERROR, ex.Message);
                updateProcessStatusToClient(104, "Notification Failed", ex.Message);
            }
        }
第二步:向服务器发送通知
// POST: /Notification/SendToiOS
        [HttpPost]
        public ActionResult SendToiOS(iOSPushNotificationModel model, string ClientID, string JSONPayload)
        {
            model.isDisableCertificateCheck = false;
            responseResult result = new responseResult();
            try
            {
                NotificationController.SocketClientID = ClientID;
                updateProcessStatusToClient(100, "Initializing", "Initializing Push Channel Settings...");

                string uploadFileName = "";
                string certificateFile = "";
	//First check if default certificate is checked then notification will refer existing certificate used for sending notification to the server instead of uploading new certificate.
                if (model.UseDefaultCertificate == "0")
                {
                    certificateFile = System.IO.Path.Combine(Server.MapPath(NotificationController.DefaultCertificateFolder), DefaultCertificateFile);
                }
                else
                {
	    //This will upload new certificate on server
                    uploadFileName = System.IO.Path.GetFileName(model.CertificateFile);
                    certificateFile = System.IO.Path.Combine(Server.MapPath(NotificationController.SaveCertificateFolder), uploadFileName);
                }
                var push = new PushBroker();
//PushSharp Event Registration comes here….
                bool isProduction = (model.PublishType == PublishType.Development) ? false : true;
                var appleCert = System.IO.File.ReadAllBytes(certificateFile);
                int badge = (String.IsNullOrEmpty(model.NotificationBadge)) ? 0 : int.Parse(model.NotificationBadge);
                push.RegisterAppleService(new ApplePushChannelSettings(isProduction, appleCert, model.CertificatePassword, model.isDisableCertificateCheck));

                if (isExpertMode()) {
	     //This methos WithJSON was not available in PushSharp Library as of now, so I have made necessary changes to their existing library to fulfill the requirement.
                    push.QueueNotification(new AppleNotification().ForDeviceToken(model.DeviceToken).WithJSON(JSONPayload));
}
                else
                    push.QueueNotification(new AppleNotification().ForDeviceToken(model.DeviceToken).WithAlert(model.NotificationText).WithBadge(badge));
            }
            catch (Exception ex)
            {
                result.status = Status.Error;
                result.message = string.Format(RESULT_ERROR, ex.Message);
                updateProcessStatusToClient(104, "Notification Failed", ex.Message);
            }
            return Json(result, JsonRequestBehavior.AllowGet);
        }
为了实现专家模式功能,我修改了以下文件(PushSharp 库):.
- 在 AppleFluentNotification.cs 中添加了以下方法:
public static AppleNotification WithJSON(this AppleNotification n, string json) { if (n.Payload == null) n.Payload = new AppleNotificationPayload(); n.Payload.JSON = json; return n; } - 在 AppleNotificationAlert.cs 中添加了属性:
public string JSON { get; set; } - 在 AppleNotificationPayload.cs 中添加了属性:
public string JSON { get; set; }并使用两行代码更新了 ToJson() 方法。public string ToJson() { if (!string.IsNullOrEmpty(this.JSON)) return this.JSON; /*Rest of code will be untouched*/ }
- 向 Windows Phone 发送推送通知
- 屏幕

- 控制器中的服务器代码/NotificationController.cs
- 屏幕
当应用程序模式为专家模式时,PushSharp 库不支持以 XML 格式发送自定义 Payload。因此,我编写了纯 .Net 代码来为 Windows 设备发送 Tile 和 Toast 通知 XML Payload。
以下是向 Windows 平台发送通知的方法:
// POST: /Notification/SendToWindows
 [HttpPost]
public ActionResult SendToWindows(WindowsPushNotificationModel model, string ClientID)
{
	//Following code will be used for Application mode is Expert
                    updateProcessStatusToClient(100, "Initializing", "Initializing Notification Request...");
                    string WindowsPhoneTarget = (model.NotificationType == Models.NotificationType.Toast) ? "toast" : "token";
                    string NotificationClass = (model.NotificationType == Models.NotificationType.Toast) ? "2" : "1";
                    string subscriptionUri = model.ChannelURI;
                    updateProcessStatusToClient(97, "Preparing Channel Headers", "Preparing headers for Windows phone channel");
                    HttpWebRequest sendNotificationRequest = (HttpWebRequest)WebRequest.Create(subscriptionUri);
                    sendNotificationRequest.Method = "POST";
                    byte[] notificationMessage = Encoding.Default.GetBytes(model.JSONPayload);
                    sendNotificationRequest.ContentLength = notificationMessage.Length;
                    sendNotificationRequest.ContentType = "text/xml";
                    sendNotificationRequest.Headers.Add("X-WindowsPhone-Target", WindowsPhoneTarget);
                    sendNotificationRequest.Headers.Add("X-NotificationClass", NotificationClass);
                    using (Stream requestStream = sendNotificationRequest.GetRequestStream())
                    {
                        requestStream.Write(notificationMessage, 0, notificationMessage.Length);
                    }
                    HttpWebResponse response = (HttpWebResponse)sendNotificationRequest.GetResponse();
                    string notificationStatus = response.Headers["X-NotificationStatus"];
                    string notificationChannelStatus = response.Headers["X-SubscriptionStatus"];
                    string deviceConnectionStatus = response.Headers["X-DeviceConnectionStatus"];
                    switch (notificationStatus.ToUpper())
                    {
                        case "RECEIVED": //The push notification was received and dropped by the Push Notification Service
                        case "QUEUEFULL": //The server maintains a maximum of 30 notifications (regardless of type) for each URI. Once the limit of 30 is reached, all new messages sent to the server are discarded until the device reconnects and the queue can be flushed.
                        case "SUPPRESSED": //The push notification was received and dropped by the Push Notification Service. The Suppressed status can occur if the notification type was not enabled by calling BindToShellTile or BindToShellToast
                            updateProcessStatusToClient(101, "Notification Sent", string.Format("Notification Status:{0}, Channel Status:{1}, Device Connection Status:{2}", notificationStatus, notificationChannelStatus, deviceConnectionStatus));
                            break;
                        case "N/A":
                            updateProcessStatusToClient(104, "Notification Failed", "Coloud service sends a notification request with a bad XML document or malformed notification URI");
                            break;
                        default:
                            updateProcessStatusToClient(104, "Notification Failed", "The Push Notification Service is unable to process the request");
                            break;
                    }
//Following code will be used for Application mode is Beginner
                    updateProcessStatusToClient(100, "Initializing", "Initializing Push Channel Settings...");
                    int badge = (String.IsNullOrEmpty(model.NotificationBadge)) ? 0 : int.Parse(model.NotificationBadge);
                    var push = new PushBroker();

//PushSharp Event Registration comes here….
                    push.RegisterWindowsPhoneService();

                    if (model.NotificationType == Models.NotificationType.Tile)
                    {
                        push.QueueNotification(new WindowsPhoneTileNotification()
                            .ForEndpointUri(new Uri(model.ChannelURI))
                            .ForOSVersion(WindowsPhoneDeviceOSVersion.Eight)
                            .WithBatchingInterval(BatchingInterval.Immediate)
                            .WithTitle(model.NotificationText)
                            .WithCount(badge));
                    }
                    else if (model.NotificationType == Models.NotificationType.Toast)
                    {
                        push.QueueNotification(new WindowsPhoneToastNotification()
                           .ForEndpointUri(new Uri(model.ChannelURI))
                           .ForOSVersion(WindowsPhoneDeviceOSVersion.Eight)
                           .WithBatchingInterval(BatchingInterval.Immediate)
                           .WithNavigatePath(model.NavigatePath)
                           .WithText1(model.NotificationText)
                           .WithText2(model.NotificationText2));
                    }
}
- SignalR 代码审查
- 安装
- 在程序包管理器控制台中运行以下命令:
PM> Install-Package Microsoft.AspNet.SignalR -Version 2.0.3
- 创建文件夹和文件,然后用现有文件中的完整代码替换。
\Hubs\ProcessStatusNotifyHub.cs
- 在文件中包含 SignalR JavaScript 文件。
<script src="~/Scripts/jquery.signalR-2.1.2.min.js">
</script><script src="~/signalr/hubs"></script> - 初始化 SignalR。
$(function () {
var chat = $.connection.processStatusNotifyHub;
    	chat.client.notify = function (response) {
}
    	$.connection.hub.start().done(function () {
       		$('#ClientID').val($.connection.hub.id);
       		 $('#' + platform + '-overlay').hide().find('div.log').removeClass('loading').addClass('log-' + platform);
    	});
});
- 在程序包管理器控制台中运行以下命令:
- 使用服务器代码通知客户端处理状态
以下方法将通知客户端服务器端执行的每个处理步骤,因此用户将从服务器获得通知是否发送的确认。
static public void updateProcessStatusToClient(int status, string title, string message) { if (prevStatus != status) { prevStatus = status; string clientid = NotificationController.SocketClientID; var hubContext = GlobalHost.ConnectionManager.GetHubContext<processstatusnotifyhub>(); SocketResponse response = new SocketResponse() { ClientID = clientid, Status = status, Title = title, Message = message, Time = DateTime.Now.ToString("hh:mm:ss tt") }; var json = new JavaScriptSerializer().Serialize(response); hubContext.Clients.All.notify(json); } } </processstatusnotifyhub> - 使用客户端代码显示处理状态
var res = JSON.parse(response); if (res.ClientID === $('#ClientID').val()) { var push = $('#' + platform + '-notification'); //console.log('----' + res.Status + ':' + res.ClientID + ":" + res.Message + ":" + res.Time); writeProcessLog(res.Time, res.Title); switch (res.Status) { case 100: trackTimeout = window.setTimeout(function () { writeProcessLog('', 'Request timeouts. Please verify you have entered the correct values. Please try again!'); $("div.close-log").show(); }, failureTimeout); break; case 101: clearTimeout(trackTimeout); window.setTimeout(function () { $('#' + platform + '-overlay').hide(); if (push.css('display') == 'none') { $('#notificationText').text(notificationText); push.show().removeClass(NOTIFICATION_SHOW).addClass(NOTIFICATION_SHOW); } }, 1500); break; case 103: case 104: case 105: case 106: case 107: case 108: case 110: clearTimeout(trackTimeout); $("div.close-log").show(); break; } } - JavaScript 代码片段
- 字段验证
function checkValidation(fields) { var _cook = readCookie('ExpertMode'); var _val = (_cook == null || _cook == "" || _cook == "false") ? false : true var fields, isValid = true; var msg = $('#NotificationText').val(); switch (platform) { case 'android': fields = [$('#APIKey'), $('#DeviceRegistrationID')]; if (_val) { fields.push($('#JSONPayload')); notificationText = notificationExpertText; } else { fields.push($('#NotificationText')); notificationText = msg; } break; case 'windows': fields = [$('#NotificationType'), $('#ChannelURI')]; if (_val) { fields.push($('#JSONPayload')); notificationText = notificationExpertText; } else { fields.push($('#NotificationText')); notificationText = msg; } break; case 'ios': fields = [$('#PublishType'), $('#DeviceToken'), $('#UseDefaultCertificate'), $('#CertificatePassword')]; if (_val) { fields.push($('#JSONPayload')); notificationText = notificationExpertText; } else { fields.push($('#NotificationText')); notificationText = msg; } break; } fields.forEach(function (field) { if (field.attr('id') == 'UseDefaultCertificate' && field.val() == "1" && $.trim($('#CertificateFile').val()) == "") { $('#CertificateFile').addClass('required'); isValid = false; } else if (field.attr('id') == 'UseDefaultCertificate' && field.val() != "1") { $('#CertificateFile').removeClass('required'); } if ($.trim(field.val()) == "") { field.addClass('required'); isValid = false; } else field.removeClass('required'); }); return isValid; } - 上传证书文件(仅限 iOS)
var fd = new FormData(); fd.append("fileCertificate", $("#fileCertificate")[0].files[0]); fd.append("ClientID", $("#ClientID").val()); $.ajax({ url: '/Notification/UploadFiles', data: fd, processData: false, contentType: false, type: 'POST', success: function (data) { submitFormData(); }, error: function (er) { hideProcessLog('Error in Certificate Upload. Please try again!'); } }); - 将数据提交到服务器
function submitFormData() { var form = $('#formSend'); var data = form.serialize(); $.ajax({ url: form.attr('action'), type: 'POST', data: data, dataType: 'json', success: function (result) { if (result.status == 'Warning') { hideProcessLog('Warning: ' + result.message); } }, error: function (er) { hideProcessLog('Error: ' + er); } }); } - 帮助和通知显示/隐藏动画
使用以下代码在屏幕上显示动画帮助:
//For Notification $('#notificationText').text(notificationText); push.show().removeClass(NOTIFICATION_SHOW).addClass(NOTIFICATION_SHOW); //For Help $("span.help-field").on('click', function (e) { var index = Number($(this).data('index')) - 1; $('#' + platform + '-fieldhelp').html(help[index]).show().removeClass(HELP_SHOW).addClass(HELP_SHOW); });使用以下代码隐藏屏幕上的动画帮助和通知:$('#android-notification, #android-fieldhelp, #windows-notification, #windows-fieldhelp, #ios-notification, #ios-fieldhelp').bind("animationend webkitAnimationEnd oAnimationEnd MSAnimationEnd", function () { var obj = $(this); var className = obj.attr('class'); //For Notification if (className.indexOf('flipOutX') > -1) { obj.removeClass(NOTIFICATION_HIDE).hide(); } //For Help else if (className.indexOf('zoomOut') > -1) { obj.removeClass(HELP_HIDE).hide(); } });
- 字段验证
- 安装
-
重要要点
-
Android
- 您必须确保在 API 控制台中启用了 GCM(Google Cloud Messaging)服务。更多详情请参阅适用于 Android 的 Google Cloud Messaging。
- iOS
- 请确保您使用了正确的推送证书。
- Apple 允许您生成一个用于连接到沙盒,另一个用于连接到生产环境。您必须使用正确的证书,以匹配您构建应用程序时使用的预配配置文件。更多详情请参阅如何创建 APNS 证书。
- Windows
- Toast 通知
Toast 通知是简短的基于文本的消息,它包含两个文本字符串,并显示在手机显示区域的顶部。
- Tile 通知
Tile 通知可以修改用户固定在其设备上的应用程序磁贴的外观。Tile 通知可以指定标题、计数和背景图像,该图像可以是本地或远程资源。
- Raw 通知
Raw 通知与 Tile 和 Toast 通知类似,除了它们没有特定的显示样式或预定义的 Payload 格式。Raw 通知中包含的数据由发送者确定,并且手机上运行的应用程序必须能够理解内容。由于底层操作系统不处理 Raw 通知,因此设计该通知的应用程序必须正在运行才能处理此类型的通知。目前不支持此类型的通知。
- Toast 通知
-
-
重要字段详情
-
Android
- API 密钥:API KEY 来自您的 Google API 控制台应用,在 API 访问部分,选择“创建新的服务器密钥...”来获取。
- 设备注册 ID:在此处使用您自己的注册 ID,该 ID 在您的 Android 应用本身中生成。
-
iOS
- 发布类型:如果您使用开发预配配置文件,则必须使用沙盒推送通知服务器。因此,您必须选择发布类型为“开发”。
如果您使用 AdHoc 或 AppStore 预配配置文件,则必须使用生产推送通知服务器。因此,您必须选择发布类型为“生产”。 - 设备令牌:设备令牌包含信息,使 APNS(Apple 推送通知)能够定位安装了客户端应用程序的设备。
- 选择证书:这将为用户提供一个选项,用于选择现有的预定义证书或上传新证书。
- 新证书:要为此 iOS App ID 配置推送通知,需要一个客户端 SSL 证书,该证书允许您的通知服务器连接到 APN 服务。每个 iOS App ID 都需要自己的客户端 SSL 证书。
- 证书密码:所选证书文件的 SSL 证书密码。
- 发布类型:如果您使用开发预配配置文件,则必须使用沙盒推送通知服务器。因此,您必须选择发布类型为“开发”。
- Windows
- 通知类型:将支持两种类型的警报:
Tile:代表并启动您的应用程序的开始屏幕磁贴。
Toast:应用程序特定的弹出通知。 - Channel URI:在此处使用您自己的端点 URI,该 URI 在您的 Windows Phone 应用本身中生成。
- 导航路径:用户点击推送通知时将重定向到特定页面。例如 (/MainPage.xaml)
- 通知文本 2:通知文本 2 是一个简短的消息,将显示在标题旁边。
- XML Payload:仅在应用程序模式设置为专家时可见。允许您向 payload 添加自定义数据。自定义值必须使用 XML 结构,包括 <?xml version="1.0" encoding="utf-8"?>
- 通知类型:将支持两种类型的警报:
- Common
- 通知文本:通知文本是一个简短的消息,将显示在安装了客户端应用程序的通知托盘上。
- 通知徽章:要显示为应用程序图标徽章的数字。
- JSON Payload:仅在应用程序模式设置为专家时可见。允许您向 payload 添加自定义数据。自定义值必须使用 JSON 结构和基本类型:字典(对象)、数组、字符串、数字和布尔值。
-
反馈
如果您需要任何帮助,请随时提出。您的宝贵反馈、评论、建议和投票将不胜感激。