
无人机之眼
将您的智能手机变成四轴飞行器无人机的“眼睛”和“耳朵”。
- 下载 eyeofdroneService-noexe.zip - 15.6 MB
- 下载 eyeofdroneService.zip - 15.6 MB
- 下载 eyeofdrone.WindowsPhone-noexe.zip - 4.7 MB
- 下载 eyeofdrone.WindowsPhone.zip - 4.7 MB
- 下载 eyeofdrone.Windows-noexe.zip - 7.4 MB
- 下载 eyeofdrone.Windows.zip - 7.4 MB
- 下载 eyeofdrone.Shared.zip - 11.2 KB
引言
四轴飞行器无人机已成为飞行自家无人机的一种非常受欢迎的选择。它们大多数(但并非全部)都配有内置摄像头,可以为无人机提供“眼睛”。但是,如果您想要高质量的摄像头或实时视频流到控制器,通常需要支付高昂的费用。并非每个人都能负担得起数百美元。“Eye of the Drone”项目旨在将您的智能手机用作无人机的终极传感器套件。智能手机可用于捕获图片、视频、声音、加速度、GPS 坐标和其他有用数据。凭借内置的蜂窝网络连接,智能手机是实时将所有这些数据转换到 Azure 存储的理想机制。从那里,用户可以通过网站或应用程序查看数据。也许最重要的是,通过利用您可能已经拥有的智能手机,您可以节省数百美元,只需专注于购买一个专为飞行而设计的四轴飞行器。
背景
这一切的开始是我的岳父对购买无人机表示了一些兴趣。但他当时主要是在开玩笑,因为他觉得无人机对普通人来说一定太贵了。我开始给他看亚马逊上一些低于 100 美元型号的无人机。他惊讶于它们竟然可以如此便宜。但我很快注意到,如果你想要一架带有良好摄像头并且可以传输实时视频流的四轴飞行器,你就得掏出几百美元。于是我想,把手机绑在其中一个上面,让它充当四轴飞行器的眼睛和耳朵,这是否可行。我越想,就越觉得这可能是一个好主意。你不仅可以用手机捕捉视频,还可以捕捉 GPS 数据,甚至可以实时上传所有这些数据,因为手机很可能拥有蜂窝网络连接。我当时其实已经在计划做这个项目了,然后看到了这个比赛。我觉得这可以完美地展示一个基于物联网的应用程序,利用 Azure 将用户连接到一个“东西”(在这个例子中是四轴飞行器无人机)。
对于我的演示,我计划构建一个 Windows Phone 8.1 应用程序,该应用程序将在四轴飞行器携带的智能手机上运行。客户端应用程序将定期收集 GPS 坐标和图像。如果检测到互联网连接,应用程序将实时将该数据上传到 Azure 移动服务。否则,利用 Azure 移动服务的离线同步功能,应用程序会将数据存储在本地存储中,并在稍后建立连接时与云同步。
要查看您的数据,我计划创建一个网站和一个 Windows 8.1 / WP8.1 通用应用程序。它们将显示一个 Bing 地图控件,用于绘制四轴飞行器的飞行路径。该网站和应用程序还将显示手机拍摄的照片。
将用户的服务器数据存储起来,并让他们在客户端应用程序中查看这些数据,将需要某种形式的账户管理和身份验证。为了避免用户费力地创建自己的账户,我们将使用 OAuth。通过 OAuth,用户可以使用第三方账户(如 Facebook、Microsoft 或 Google)登录。在本演示中,我还会将 CodeProject 作为一种身份验证选项。
Using the Code
拍照:对于我们的演示,我们将使用通用应用程序的 API 来拍照和录像。
首先,打开手机项目的 Package.appxmanifest。在“Capabilities”(功能)下,勾选 Webcam(摄像头)、Pictures Library(图片库)和 Videos Library(视频库)。Webcam 允许我们的应用程序访问设备的摄像头或网络摄像头来拍摄照片和录制视频。图片和视频库功能将允许我们将文件保存到用户的手机库中。在“Requirements”(要求)下,请确保选择了 Rear Camera(后置摄像头)。


在我的 XAML 中,我添加了一个名为 capturePreview 的 CaptureElement 来显示摄像头的视图。我还添加了一个名为 capturePost 的 Image 来显示拍摄的照片。在本演示中,我包含了一个按钮用于手动拍照,但最终的应用程序将通过计时器或 Web 调用进行拍照。
添加以下 using 语句
using Windows.Media.MediaProperties;
using System.Threading.Tasks;
using Windows.Media.Capture;
using Windows.Storage;
using Windows.UI.Xaml.Media.Imaging;
InitPreview 将设置 capturePreview CaptureElement 的源为摄像头。
        public Windows.Media.Capture.MediaCapture mediaElement;
        public ImageEncodingProperties imageProperties = ImageEncodingProperties.CreateJpeg();

        public MainPage()
        {
            this.InitializeComponent();

            //...

            InitPreview();
        }

        public async Task InitPreview()
        {
            mediaElement = new Windows.Media.Capture.MediaCapture();
            await mediaElement.InitializeAsync();

            this.capturePreview.Source = mediaElement;

            await this.mediaElement.StartPreviewAsync();
        }
将按钮绑定到一个异步的 takePicturesBtn_Click 事件。在本地存储中创建一个具有随机 Guid 名称的文件,以确保其唯一性。使用 CapturePhotoToStorageFileAsync 将照片捕获到该文件。请注意,您也可以将图像捕获到流中,这可能在以后很有用。然后创建一个 BitmapImage 并将其流设置为我们的本地文件。将此 BitmapImage 加载到 XAML 中的 Image 控件中以供用户查看。
        private async void takePictureBtn_Click(object sender, RoutedEventArgs e)
        {
            string picName = String.Format("{0}.jpg", Guid.NewGuid());

            StorageFile picFile = await ApplicationData.Current.LocalFolder.CreateFileAsync(picName, CreationCollisionOption.GenerateUniqueName);

            await mediaElement.CapturePhotoToStorageFileAsync(imageProperties, picFile);

            BitmapImage bi = new BitmapImage();
            var stream = await picFile.OpenStreamForReadAsync();
            bi.SetSource(stream.AsRandomAccessStream());

            capturePost.Source = bi;
        }
GPS 追踪:对于我们的演示,我们将使用 Windows Phone API 来跟踪 GPS 并显示一个以手机位置为中心的简单地图控件。目前,手机 API 和 Windows 8 API 略有不同。希望当 Windows 10 发布时,这些会更加统一。
首先,打开手机应用程序项目的 Package.appxmanifest。在“Capabilities”(功能)下,勾选 Location(位置)。这会让手机操作系统知道您的应用程序正在请求访问用户的位置。

这是我用于获取用户位置并更新手机上地图控件的基本代码集。地图控件不是必需的,因为这只是飞行员应用程序,但它对调试很有用。
using Windows.Devices.Geolocation;

public Geolocator locator = new Geolocator();

locator.ReportInterval = 1;
locator.MovementThreshold = 1;
locator.DesiredAccuracy = PositionAccuracy.High;
locator.PositionChanged += locator_PositionChanged;

mapControl.ZoomLevel = 15;

async void locator_PositionChanged(Geolocator sender, PositionChangedEventArgs args)
        {
            var position = args.Position.Coordinate.Point.Position;

            await Windows.ApplicationModel.Core.CoreApplication.MainView.CoreWindow.Dispatcher.RunAsync
            (Windows.UI.Core.CoreDispatcherPriority.Normal, () =>
            {
                gpsTxt.Text = String.Format("Altitude: {0}, Long: {1},
                Lat: {2}", position.Altitude, position.Longitude, position.Latitude);
                mapControl.Center = args.Position.Coordinate.Point;
            });
        }
要测试代码,让我们使用 WP8.1 模拟器的位置功能。在模拟器上,单击右侧工具栏上的双箭头 >>。这将展开您的高级模拟器功能。单击“Location”(位置)选项卡。放大您想要模拟手机所在位置的某个区域。让我们创建一个路线。在顶部栏中,“Live, Pin, Route”有一个下拉菜单。选择“Route”(路线)。在创建起点后单击地图一次。单击一次以创建终点。您将看到根据驾驶创建的路线。单击速度下拉菜单旁边的播放箭头开始路线。这是测试任何基于位置的应用程序的好方法!

身份验证:对于我们的演示,我们将使用 CodeProject API 和 OAuth 让用户通过其 CodeProject 账户进行身份验证。以下代码使用来自 https://api.codeproject.com/Samples/ResourceOwnerCsDoc 的示例来处理从收集数据的 WP8.1 应用程序以及用于查看服务器数据的客户端 WP8.1/W8.1 通用应用程序的身份验证。基本上,用户将在应用程序中输入他们的电子邮件和密码。我们使用这些信息通过 HttpClient Web 调用从 Code Project 获取访问令牌。我们可以获得的部分信息是用户的 MemberId。这将用作将用户数据与其账户关联的唯一 ID。因此,当手机应用程序将媒体和 GPS 数据上传到服务器时,这些数据将与其 CodeProject 账户的 MemberId 相关联。当用户使用其 CodeProject 凭据登录客户端应用程序时,服务器将向他们提供与其 MemberId 相关联的数据。
/// The client information used to get the OAuth Access Token from the server.
string clientId     = "JkOnJ9zIQ1vWvP3FvsJVx-3iOnSd-6a-";
string clientSecret = "U_ZHCQackGJHW4-Jn4qfGce6JLV9qAKhJEGahyRHVpeYVWf_r8iSaSt4z6AZn8kC";

// The server base address
string baseUrl      = "https://api.codeproject.com/";

//User email and password (will get these from text boxes on the form
string email = "test@live.com";
string password = "password";

// this will hold the Access Token returned from the server.
string accessToken  = null;
// this will hold the MemberId returned from the server.
string codeProjectMemberId  = null;

//Get our Access Token
using (var client = new HttpClient())
{
 client.BaseAddress = new Uri(baseUrl);

 // We want the response to be JSON.
 client.DefaultRequestHeaders.Accept.Clear();
 client.DefaultRequestHeaders.Accept.Add(new MediaTypeWithQualityHeaderValue("application/json"));

 // Build up the data to POST.
 List<keyvaluepair<string, string>> postData = new List<KeyValuePair<string, string>>();
 postData.Add(new KeyValuePair<string, string>("grant_type",    "password"));
 postData.Add(new KeyValuePair<string, string>("client_id",     clientId));
 postData.Add(new KeyValuePair<string, string>("client_secret", clientSecret));
 postData.Add(new KeyValuePair<string, string>("username",      email));
 postData.Add(new KeyValuePair<string, string>("password",      password));

 FormUrlEncodedContent content = new FormUrlEncodedContent(postData);

 // Post to the Server and parse the response.
 HttpResponseMessage response = await client.PostAsync("Token", content);
 string jsonString            = await response.Content.ReadAsStringAsync();
 object responseData          = JsonConvert.DeserializeObject(jsonString);

 // return the Access Token.
 accessToken = ((dynamic)responseData).access_token;
}

//Get the profile data
using (var client = new HttpClient())
{
 client.BaseAddress = new Uri(baseUrl);
 client.DefaultRequestHeaders.Accept.Clear();
 client.DefaultRequestHeaders.Accept.Add(new MediaTypeWithQualityHeaderValue("application/json"));

 // Add the Authorization header with the AccessToken.
 client.DefaultRequestHeaders.Add("Authorization", "Bearer " + accessToken);

 // create the URL string.
 string url = string.Format("v1/My/Profile");

 // make the request
 HttpResponseMessage response = await client.GetAsync(url);

 // parse the response and return the data.
 string jsonString   = await response.Content.ReadAsStringAsync();
 object responseData = JsonConvert.DeserializeObject(jsonString);
 codeProjectMemberId = ((dynamic)responseData).codeProjectMemberId;
}
使用 Azure Mobile Services
整节将专门用于解释我如何利用 Azure Mobile Services 将所有内容联系在一起。
实时:在我设想的场景中,我的应用程序将在连接到无人机的手机(称为飞行员)和一个或多个客户端设备上运行。飞行员应用程序将持续将数据上传到我的 Azure Mobile Service,而连接的客户端应用程序将显示这些数据。为了让此场景正常运行,我们需要飞行员和客户端应用程序之间(接近)实时的连接。我的第一个想法是利用 SignalR 等工具在 Web 服务和客户端应用程序之间提供近乎实时的连接。事实上,我找到了一篇可能对此场景至关重要的好文章:“Real-time with ASP.NET SignalR and Azure Mobile Service Backend”。但是,在深入研究之前,我决定先看看开箱即用的“刷新”功能效果如何。为此,我修改了刷新按钮的代码。
旧代码运行一次刷新。
        private async void ButtonRefresh_Click(object sender, RoutedEventArgs e)
        {
            ButtonRefresh.IsEnabled = false;

            //await SyncAsync(); // offline sync
            await RefreshTodoItems();

            ButtonRefresh.IsEnabled = true;
        }
我的新代码只是在一个循环中运行刷新操作,并更新按钮文本以告知您它运行了多少次。
        private async void ButtonRefresh_Click(object sender, RoutedEventArgs e)
        {
            ButtonRefresh.IsEnabled = false;

            //await SyncAsync(); // offline sync
            int counter = 0;
            DateTime startWatch = DateTime.Now;
            while (counter < 1000)
            {
                await RefreshTodoItems();
                ButtonRefresh.Content = String.Format("Refresh ({0}), {1} seconds", counter, DateTime.Now.Subtract(startWatch).Seconds);
                counter++;
            }

            ButtonRefresh.IsEnabled = true;
        }
我在两个模拟器中运行了新代码。我通过这个实验发现的结果令我惊讶。似乎只需轮询 Mobile Service 就能大约每 1/10 秒获得一次更新。这导致了近乎实时的体验。至少对我们的应用程序来说,已经足够接近了。所以,你可以说我懒,但我会选择这个。如果延迟成为问题,我将研究切换到 SignalR。

上传位置数据相当直接。在我们的代码中,当我们监听位置变化时,我们只需插入一个新的 Location Item。
    private IMobileServiceTable<LocationItem> _LocationItemTable = App.MobileService.GetTable<LocationItem>();
    async void locator_PositionChanged(Geolocator sender, PositionChangedEventArgs args)
        {
            var position = args.Position.Coordinate.Point.Position;

            //Record to Azure
            LocationItem newLocation = new LocationItem()
            {
                Altitude = position.Altitude,
                Longitude = position.Longitude,
                Latitude = position.Latitude,
                Time = DateTime.Now,
                SessionId = CurrentSession.Id
            };
            await _LocationItemTable.InsertAsync(newLocation);
        }
对于图片,我们必须利用 Azure Storage 来存储图片。要设置 Azure Storage,请在 Azure 中创建一个新的 Storage Account。单击底部的“Manage Access Keys”(管理访问密钥)。

现在转到您的移动服务,选择“Configure”(配置)选项卡,并将 STORAGE_ACCOUNT_NAME 和 STORAGE_ACCOUNT_ACCESS_KEY 值添加到应用程序设置部分。
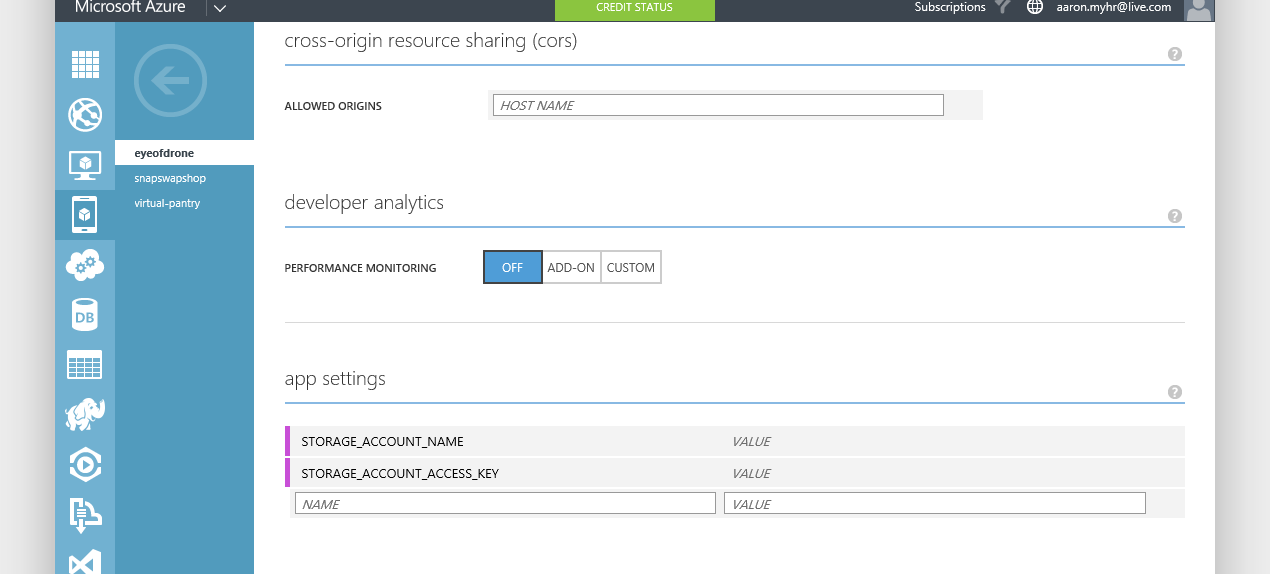
在您的解决方案中,将 WindowsAzure.Storage NuGet 包添加到所有项目中。在服务中,将以下行添加到您的 webconfig。

在 PictureItemController.cs 中,编辑 PostPictureItem 调用。
    // POST tables/PictureItem
        public async Task PostPictureItem(PictureItem item)
        {
            string storageAccountName;
            string storageAccountKey;

            // Try to get the Azure storage account token from app settings.
            if (!(Services.Settings.TryGetValue("STORAGE_ACCOUNT_NAME", out storageAccountName) |
            Services.Settings.TryGetValue("STORAGE_ACCOUNT_ACCESS_KEY", out storageAccountKey)))
            {
                Services.Log.Error("Could not retrieve storage account settings.");
            }

            // Set the URI for the Blob Storage service.
            Uri blobEndpoint = new Uri(string.Format("https://{0}.blob.core.windows.net", storageAccountName));

            // Create the BLOB service client.
            CloudBlobClient blobClient = new CloudBlobClient(blobEndpoint,
                new StorageCredentials(storageAccountName, storageAccountKey));

            if (item.containerName != null)
            {
                // Set the BLOB store container name on the item, which must be lowercase.
                item.containerName = item.containerName.ToLower();

                // Create a container, if it doesn't already exist.
                CloudBlobContainer container = blobClient.GetContainerReference(item.containerName);
                await container.CreateIfNotExistsAsync();

                // Create a shared access permission policy.
                BlobContainerPermissions containerPermissions = new BlobContainerPermissions();

                // Enable anonymous read access to BLOBs.
                containerPermissions.PublicAccess = BlobContainerPublicAccessType.Blob;
                container.SetPermissions(containerPermissions);

                // Define a policy that gives write access to the container for 5 minutes.
                SharedAccessBlobPolicy sasPolicy = new SharedAccessBlobPolicy()
                {
                    SharedAccessStartTime = DateTime.UtcNow,
                    SharedAccessExpiryTime = DateTime.UtcNow.AddMinutes(5),
                    Permissions = SharedAccessBlobPermissions.Write
                };

                // Get the SAS as a string.
                item.sasQueryString = container.GetSharedAccessSignature(sasPolicy);

                // Set the URL used to store the image.
                item.imageUri = string.Format("{0}{1}/{2}", blobEndpoint.ToString(),
                    item.containerName, item.resourceName);
            }


            PictureItem current = await InsertAsync(item);
            return CreatedAtRoute("Tables", new { id = current.Id }, current);
        }
在 Pilot.xaml.cs 类中,将此代码添加到 takePictureBtn_Click 事件。
    StorageFile picFile = await ApplicationData.Current.LocalFolder.CreateFileAsync(picName, CreationCollisionOption.GenerateUniqueName);

            await mediaElement.CapturePhotoToStorageFileAsync(imageProperties, picFile);

            var stream = await picFile.OpenStreamForReadAsync();

    PictureItem pictureItem = new PictureItem();
            pictureItem.ContainerName = "eyeofdrone";
            pictureItem.ResourceName = picName;

            await _PictureItemTable.InsertAsync(pictureItem);

            if (!string.IsNullOrEmpty(pictureItem.SasQueryString))
            {
                // Get the URI generated that contains the SAS
                // and extract the storage credentials.
                StorageCredentials cred = new StorageCredentials(pictureItem.SasQueryString);
                var imageUri = new Uri(pictureItem.ImageUri);

                // Instantiate a Blob store container based on the info in the returned item.
                CloudBlobContainer container = new CloudBlobContainer(
                    new Uri(string.Format("https://{0}/{1}",
                        imageUri.Host, pictureItem.ContainerName)), cred);

                // Upload the new image as a BLOB from the stream.
                CloudBlockBlob blobFromSASCredential =
                    container.GetBlockBlobReference(pictureItem.ResourceName);
                await blobFromSASCredential.UploadFromStreamAsync(stream.AsRandomAccessStream());

                // When you request an SAS at the container-level instead of the blob-level,
                // you are able to upload multiple streams using the same container credentials.

                stream = null;
            }
这将创建您的 Picture Item 并将图片上传到 Azure Storage 容器。
要查看数据,我们有一个名为 DroneDashboard.xaml 的通用 XAML 页面,该页面显示无人机会话的图片和位置。这是刷新方法的代码。
    public DroneDashboard()
        {
            this.InitializeComponent();

            RefreshItems(TimeSpan.FromSeconds(1));
        }


        private async Task RefreshItems(TimeSpan refreshInterval)
        {
            while (_stop == false)
            {
                try
                {
                    var newItems = await todoTable
                        .Where(todoItem => todoItem.Complete == false)
                        .ToCollectionAsync();

                    if (TodoItems == null || TodoItems.Count() != newItems.Count())
                    {
                        TodoItems = newItems.ToList();
                    }

                    var newPictures = await _PictureItemTable.ToCollectionAsync();

                    if (PictureItems == null || PictureItems.Count() != newPictures.Count())
                    {
                        PictureItems = newPictures.OrderByDescending(p => p.Time).ToList();
                    }

                    var newLocations = await _LocationItemTable.ToCollectionAsync();

                    if (LocationItems == null || LocationItems.Count() != newLocations.Count())
                    {
                        LocationItems = newLocations.OrderByDescending(p => p.Time).ToList();
                    }

                    await Task.Delay(refreshInterval);
                }
                catch (MobileServiceInvalidOperationException e)
                {
                    _stop = true;
                }
            }
        }
关注点
我应用程序的最初目标是提供实时视频流。但是,目前,我还没有找到关于将实时视频流上传到在线服务的 Windows Phone 示例代码。我相信这在技术上是可行的,因为有一些网络摄像头类型的应用程序。但为了节省时间,我将专注于上传 GPS 坐标和定期拍照,并在网站和客户端应用程序中显示这些数据。我希望赶在截止日期前完成,以便有机会再次尝试实时视频流。
我的项目的未来目标是找到一种方法从智能手机向四轴飞行器发送命令。弄清楚这一点将有可能在超出控制器范围的情况下飞行四轴飞行器。
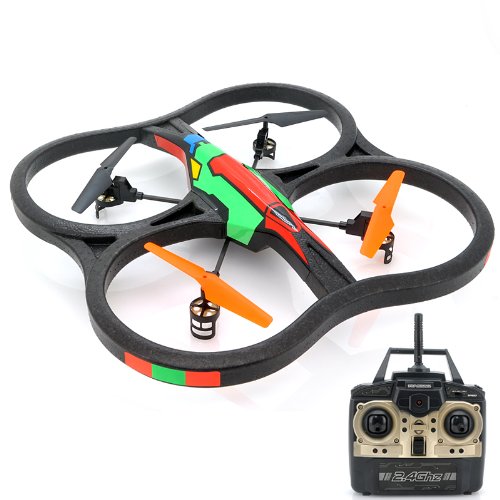
我将要购买的四轴飞行器是 亚马逊上的这款型号。价格为 70 美元,看起来足够大,甚至还附带一个用于携带智能手机的桶状配件。
历史
- 2015/2/17:首次撰写
- 2015/2/19:添加了使用用户 CodeProject 账户进行身份验证的说明和代码。这是我们将他们的数据与他们的账户关联的方式。
- 2015/3/15:添加了 GPS 跟踪内容
- 2015/3/22:添加了拍摄图片的介绍。
- 2015/3/31:为比赛提交最终撰写和代码。不幸的是,我的代码目前仍在进行中。但我计划在项目进展过程中继续编辑这篇文章。