
原生 WPF 4 PropertyGrid
4.93/5 (77投票s)
将工作流基础的属性网格重新打包供通用使用。
源代码在 github。见下文。


引言
这是我关于 PropertyGrid 控件的第二篇文章,这次是针对 WPF 的。我将以我之前的文章为基础:“PropertyGridCE - 移动版 PropertyGrid”。
在使用 Windows Workflow Foundation 4.0 时,我意识到 PropertyInspectorView 控件实际上是一个功能齐全的 WPF PropertyGrid 控件,包括支持属性自定义和自定义编辑器。一个 PropertyInspectorView 与一个父 WorkflowDesigner 对象和一个同级的 workflow View 对象相关联,后者是真正的拖放画布,如此 MSDN 截图所示。

Workflow Foundation 示例。左侧:活动工具箱,中间:设计器视图,右侧:属性检查器.
内部架构
使 PropertyInspector 可用于通用目的的总体方法如下:
- 从
Grid类派生一个新控件。该网格将包含真正的 UI 元素。 - 将一个 Workflow Foundation 的
WorkflowDesigner对象作为私有类成员合并进来。 - 对于设计器对象,将相应的
PropertyInspectorView添加为网格的子元素。尽管它被公开为Grid,但实际类型是ProperyInspector。 - 使用反射捕获
PropertyInspector的一些方法,以供后续使用。 - 像常规
PropertyGrid一样,实现SelectedObject和SelectedObjects属性,并在PropertyInspector中处理选择的变更。 - 添加一个
GridSplitter和一个TextBlock来模拟原始PropertyGrid的 HelpText 功能。
下图描绘了 WpfPropertyGrid 类的内部架构,如前文所述:

至少需要调用公共构造函数并设置 SelectedObject 或 SelectedObjects。当所选对象在外部发生变化时,RefreshPropertyList 方法将用于刷新控件。
设置 HelpVisible 属性以在底部显示属性描述,而 ToolbarVisible 将显示或隐藏上方的工具栏。这些属性与 Winform 的 PropertyGrid 中的属性同名,以保持一定程度的兼容性。
PropertySort 属性也是如此,它接受一个 PropertySort 枚举类型。它将允许按类别对属性进行分组,或以扁平化的方式显示它们。
FontAndColorData 属性可用于重新设计控件的样式,因为它在内部设置了 WorkflowDesigner.PropertyInspectorFontAndColorData 属性,但互联网上关于此的信息很少。这里是 MSDN 上一个关于它的有趣的论坛页面:http://social.msdn.microsoft.com/Forums/en-US/wfprerelease/thread/c1bc8265-530e-4f1c-ab58-a16eb069e0ee
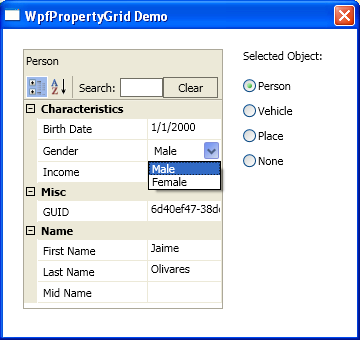
基本用法 - Person 类
提供的演示项目将允许您测试 WpfropertyGrid 的所有功能。在 DemoClasses.cs 中定义了三个类,它们具有不同的特性,如自定义特性和编辑器。以下是第一个也是最简单的一个的声明:
|
|
    public class Person
    {
        public enum Gender { Male, Female }

        #region private fields
        private string[] _Names = new string[3];
        #endregion

        // The following properties are wrapping an array of strings
        #region Public Properties
        [Category("Name")]
        [DisplayName("First Name")]
        public string FirstName
        {
            set { _Names[0] = value; }
            get { return _Names[0]; }
        }

        [Category("Name")]
        [DisplayName("Mid Name")]
        public string MidName
        {
            set { _Names[1] = value; }
            get { return _Names[1]; }
        }

        [Category("Name")]
        [DisplayName("Last Name")]
        public string LastName
        {
            set { _Names[2] = value; }
            get { return _Names[2]; }
        }

        // The following are auto-implemented properties (C# 3.0 and up)
        [Category("Characteristics")]
        [DisplayName("Gender")]
        public Gender PersonGender { get; set; }

        [Category("Characteristics")]
        [DisplayName("Birth Date")]
        public DateTime BirthDate { get; set; }

        [Category("Characteristics")]
        public int Income { get; set; }

        // Other cases of hidden read-only property and formatted property
        [DisplayName("GUID"), ReadOnly(true), Browsable(true)]
        public string GuidStr
        {
            get { return Guid.ToString(); }
        }

        [Browsable(false)]  // this property will not be displayed
        public System.Guid Guid
        {
            get;
            private set;
        }
        #endregion

        public Person()
        {
            // default values
            for (int i = 0; i < 3; i++)
                _Names[i] = "";
            this.PersonGender = Gender.Male;
            this.Guid = System.Guid.NewGuid();
        }

        public override string ToString()
        {
            return string.Format("{0} {1} {2}", FirstName,
                MidName, LastName).Trim().Replace("  ", " ");
        }
    }
|

请注意,该控件将只显示属性,而不是字段。由于我们使用的是 C# 3.0 或 4.0,我们可以在方便时使用自动实现的属性,从而避免声明底层的字段。
要显示一个 Person 对象的属性非常简单;只需将其分配给控件的 SelectedObject 属性,如下所示:
PropertyGrid1.SelectedObject = thePerson;
//'thePerson' is an object of class Person
基本特性
在 Person 类的实现中,您会注意到有些属性带有特性(那些带有方括号的);它们不会对您的类行为产生任何影响,但会对属性网格产生影响。这些特性类似于在 Winforms 的 PropertyGrid 中实现的特性。让我们来详细看看它们。
Category:允许您为受影响的属性指定一个类别组。默认情况下,类别在属性网格中以灰色背景显示,如第一张截图所示。如果属性没有Category特性,它将属于一个空白类别组,就像前一张截图中的 GUID 属性一样。建议始终为每个属性指定一个类别。DisplayName:当您希望显示的属性名称与真实名称不同时,这个特性会很有用。通常,当您需要通过空格增加可读性或缩写名称时会使用它。ReadOnly:当设置为true时,将阻止该属性被编辑;它将只在属性网格中显示。为了防止只读属性被隐藏,需要将它们标记为 Browsable=true,就像 GUIDStr 属性一样。Browsable:当设置为false时,该属性将不会显示。当您有一个完全不想显示的属性时,这个特性很有用,比如第一个示例中的 GUID 属性。
所有这些特性都在 System.ComponentModel 命名空间中声明,并被属性检查器自动识别。
自定义属性 - Vehicle 类
虽然 WpfPropertyGrid 的最简单实现会公开一个类的所有属性(除了那些将 Browsable 特性设置为 false 的属性),但 ICustomProperties 接口将允许有条件地公开某些属性。为了实现这一点,需要进行一些自定义,如下例所示:
|
|
    public class Vehicle :
        ICustomTypeDescriptor, INotifyPropertyChanged
    {
        public enum CarType { Sedan, StationWagon, Coupe,
            Roadster, Van, Pickup, Truck }
        public enum CarBrand { Acura, Audi, BMW, Citroen,
            Ford, GMC, Honda, Lexus, Mercedes, Mitsubishi,
            Nissan, Porshe, Suzuki, Toyota, VW, Volvo }

        #region Private fields
        private CarType _TypeOfCar;
        #endregion

        #region Public Properties
        [Category("Classification")]
        public CarBrand Brand { get; set; }

        [Category("Classification")]
        [DisplayName("Type")]
        public CarType TypeOfCar
        {
            get { return this._TypeOfCar; }
            set {
                this._TypeOfCar = value;
                NotifyPropertyChanged("TypeOfCar");
            }
        }

        [Category("Classification")]
        public string Model { get; set; }

        [Category("Identification")]
        [DisplayName("Manuf.Year")]
        public int Year { get; set; }

        [Category("Identification")]
        [DisplayName("License Plate")]
        public string Plate { get; set; }

        // Will shown only for Pickup and Truck
        [Category("Capacity")]
        [DisplayName("Volume (ft³)")]
        public int Volume { get; set; }

        [Category("Capacity")]
        [DisplayName("Payload (kg)")]
        public int Payload { get; set; }

        [Category("Capacity")]
        [DisplayName("Crew cab?")]
        public bool CrewCab { get; set; }
        #endregion

        #region ICustomTypeDescriptor Members
        public AttributeCollection GetAttributes() ...
        public string GetClassName() ...
        public string GetComponentName() ...
        public TypeConverter GetConverter() ...
        public EventDescriptor GetDefaultEvent() ...
        public PropertyDescriptor GetDefaultProperty() ...
        public object GetEditor(Type editorBaseType)
        public EventDescriptorCollection
            GetEvents(Attribute[] attributes) ...
        public EventDescriptorCollection GetEvents() ...
        public object
            GetPropertyOwner(PropertyDescriptor pd) ...
        public PropertyDescriptorCollection
            GetProperties(Attribute[] attributes) ...

        // Method implemented to expose Capacity properties
        // conditionally, depending on TypeOfCar
        public PropertyDescriptorCollection GetProperties()
        {
            var props = new PropertyDescriptorCollection(null);

            foreach (PropertyDescriptor prop in
                TypeDescriptor.GetProperties(this, true))
            {
                if (prop.Category=="Capacity" &&
                    (this.TypeOfCar != CarType.Pickup &&
                    this.TypeOfCar != CarType.Truck))
                    continue;
                props.Add(prop);
            }

            return props;
        }
        #endregion

        #region INotifyPropertyChanged Members
        public event PropertyChangedEventHandler PropertyChanged;

        private void NotifyPropertyChanged(String info)
        {
            if (PropertyChanged != null)
                PropertyChanged(this, new PropertyChangedEventArgs(info));
        }
        #endregion
    }
|


请注意,实现 PropertyGrideCE.ICustomProperties 接口所需的最重要的方法是 GetProperties()。此方法应根据某些条件,以数组形式返回您希望公开的所有属性的名称。在此示例中,如果汽车类型是 PickUp 或 Truck,则将公开 Volume、Payload 和 CrewCab 属性。
自定义编辑器 - Place 类
免责声明
虽然本文的目的不是深入探讨编辑器的自定义,但我将展示两种编辑器的几个例子:扩展编辑器和基于对话框的编辑器。更多信息可以在 Workflow Foundation 4 API 中找到,或者可能在我下一篇文章中找到 :)
自定义编辑器是此控件最强大的功能。您可以用它做很多事情。默认情况下,控件将为所有基本类提供编辑器:int、float、double 等,也包括字符串和枚举(后者为 ComboBox)。如果您有一个自定义类的对象作为属性,它将显示字符串表示形式,但仅为只读,因为网格控件不知道如何编辑它。
Place 类的实现展示了这两种情况。无论哪种编辑器,它都必须派生自 PropertyValueEditor 类,我们稍后将详细介绍。
为了给属性指定一个自定义编辑器,需要在属性声明中添加一个 EditorAttribute 特性,就像对 CountryInfo 和 Picture 属性所做的那样。
|
|
    public class Place
    {
        public struct CountryInfo
        {
            public static readonly CountryInfo[] Countries = {
                // African countries
                new CountryInfo(Continent.Africa , "AO", "ANGOLA" ),
                new CountryInfo(Continent.Africa, "CM", "CAMEROON" ),
                // American countries
                new CountryInfo(Continent.America, "MX", "MEXICO" ),
                new CountryInfo(Continent.America, "PE", "PERU" ),
                // Asian countries
                new CountryInfo(Continent.Asia, "JP", "JAPAN" ),
                new CountryInfo(Continent.Asia, "MN", "MONGOLIA" ),
                // European countries
                new CountryInfo(Continent.Europe, "DE", "GERMANY" ),
                new CountryInfo(Continent.Europe, "NL", "NETHERLANDS" ),
                // Oceanian countries
                new CountryInfo(Continent.Oceania, "AU", "AUSTRALIA" ),
                new CountryInfo(Continent.Oceania, "NZ", "NEW ZEALAND" )
            };

            public Continent Contin { get; set; }
            public string Abrev { get; set; }
            public string Name { get; set; }

            public override string ToString()
            {
                return string.Format("{0} ({1})", Name, Abrev);
            }
            public CountryInfo(Continent _continent,
                string _abrev, string _name) : this()
            {
                this.Contin = _continent;
                this.Abrev = _abrev;
                this.Name = _name;
            }
        }

        #region Private fields
        private string[] _Address = new string[4];
        #endregion

        #region Public properties
        [Category("Address")]
        public string Street
        {
            get { return _Address[0]; }
            set { _Address[0] = value; }
        }

        [Category("Address")]
        public string City
        {
            get { return _Address[1]; }
            set { _Address[1] = value; }
        }

        [Category("Address")]
        public string Province
        {
            get { return _Address[2]; }
            set { _Address[2] = value; }
        }

        [Category("Address")]
        public string Postal
        {
            get { return _Address[3]; }
            set { _Address[3] = value; }
        }

        // Custom editor for the following 2 properties
        [Category("Address")]
        [Editor(typeof(CountryEditor), typeof(PropertyValueEditor))]
        public CountryInfo Country { get; set; }

        [Category("Characteristics")]
        [Editor(typeof(PictureEditor), typeof(PropertyValueEditor))]
        public BitmapImage Picture { get; set; }

        [Category("Characteristics")]
        public int Floors { get; set; }

        [Category("Characteristics")]
        public int CurrentValue { get; set; }
        #endregion

        public Place()
        {
            for (int i = 0; i < _Address.Length; i++)
                _Address[i] = string.Empty;
            this.Country = CountryInfo.Countries[0];
        }
    }
|


如前所述,Place 类中有两个自定义编辑器的实现示例;第一个,CountryEditor,是一个扩展编辑器。它使用两个 ComboBox 来请求一个国家:一个用于 Continent(大洲),一个用于 Country(国家),如截图所示。为简化演示,所需的 XAML DataTemplate 放在了源代码文件中,这并不常见。
    class CountryEditor : ExtendedPropertyValueEditor
    {
        public CountryEditor()
        {
            // Template for normal view
            string template1 = @"...xaml template here...";

            // Template for extended view. Shown when dropdown button is pressed.
            string template2 = @"...xaml template here...";

            // Load templates
            using (var sr = new MemoryStream(Encoding.UTF8.GetBytes(template1)))
            {
                this.InlineEditorTemplate = XamlReader.Load(sr) as DataTemplate;
            }
            using (var sr = new MemoryStream(Encoding.UTF8.GetBytes(template2)))
            {
                this.ExtendedEditorTemplate = XamlReader.Load(sr) as DataTemplate;
            }
        }
    }
对于扩展编辑器,它必须派生自 ExtendedPropertyValueEditor 类。这将允许属性网格下拉一个自定义控件来输入属性数据。
构造函数应从一些 xaml DataTemplate 声明中加载普通模板和扩展模板。通常这些模板放在一个 xaml 资源文件中。
第二个自定义编辑器的例子是 PictureEditor;它与扩展编辑器不同,因为它在按下下拉按钮时会显示一个新对话框,因此需要单独实现该窗口。它也派生自一个不同的基类:DialogPropertyValueEditor。为简洁起见,示例类仅部分显示。
    class PictureEditor : DialogPropertyValueEditor
    {
        // Window to show the current image and optionally pick a different one
        public class ImagePickerWindow : Window
        {
            // regular window implementation here
        }

        public PictureEditor()
        {
            string template = @"...xmal template here...";

            using (var sr = new MemoryStream(Encoding.UTF8.GetBytes(template)))
            {
                this.InlineEditorTemplate = XamlReader.Load(sr) as DataTemplate;
            }
        }

        // Open the dialog to pick image, when the dropdown button is pressed
        public override void ShowDialog(PropertyValue propertyValue, IInputElement commandSource)
        {
            ImagePickerWindow window = new ImagePickerWindow(propertyValue.Value as BitmapImage);
            if (window.ShowDialog().Equals(true))
            {
                var ownerActivityConverter = new ModelPropertyEntryToOwnerActivityConverter();
                ModelItem activityItem = ownerActivityConverter.Convert(propertyValue.ParentProperty,
                    typeof(ModelItem), false, null) as ModelItem;
                using (ModelEditingScope editingScope = activityItem.BeginEdit())
                {
                    propertyValue.Value = window.TheImage;
                    editingScope.Complete(); // commit the changes
                }
            }
        }
    }
多选
虽然通过将 SelectedObject 属性设置为任何值可以实现单选,但多选是通过设置 SelectedObjects 属性来实现的。
当选择了多个对象时,控件顶部的类型标签将在类型名称的右侧显示单词“<multiple>”。如果所有选定的对象都是同一类型,则会显示该类型名称(见下面的截图)。如果不是,则显示类型“Object”。
所有对于所有选定对象都具有相同类型和名称的属性都会被显示,即使选定的对象不是同一类型。在演示应用程序中,可以尝试选择 Person 和 Place,它们共享 FirstName 和 LastName 属性。
帮助文本
控件底部的文本框称为“帮助文本”(HelpText)。它将显示通过 DescriptionAttribute 特性设置的属性描述(见上面的截图)。
当有多个选定对象时,只有当所有选定对象都属于同一类型时,才会显示描述。
通过在 PropertyGrid 中设置 HelpVisible 属性,可以显示或隐藏“帮助文本”框。
如何使用
WpfPropertyGrid 可以直接嵌入到您的应用程序中。它不需要被编译成一个单独的 DLL。要将其包含在某些 XAML 声明中,您必须指定正确的命名空间(一个本地的 System.Windows.Control)并将相应的标签添加到您的 WPF 窗口或对话框中。
<Window Title="WpfPropertyGrid Demo" x:class="WpfPropertyGrid_Demo.MainWindow"
    xmlns="http://schemas.microsoft.com/winfx/2006/xaml/presentation"
    xmlns:x="http://schemas.microsoft.com/winfx/2006/xaml"
    xmlns:wpg="clr-namespace:System.Windows.Control"
    Width="360" Resizemode="NoResize" Height="340">
    <Grid VerticalAlignment="Stretch" HorizontalAlignment="Stretch">

        <wpg:WpfPropertyGrid x:Name="PropertyGrid1" Width="200" Height="260" />

    </Grid>
</window>
依赖属性
由于控件的属性是*依赖属性*(Dependency Properties),它们可以绑定到容器对话框或窗口中的其他元素,就像在演示应用程序中一样(简化版):
<Window x:Class="WpfPropertyGrid_Demo.MainWindow"
   xmlns=http://schemas.microsoft.com/winfx/2006/xaml/presentation
   xmlns:x="http://schemas.microsoft.com/winfx/2006/xaml"
   xmlns:sys="clr-namespace:System;assembly=mscorlib"
   xmlns:wpg="clr-namespace:System.Windows.Controls"
   Title="WpfPropertyGrid Demo" mc:Ignorable="d" ResizeMode="CanResizeWithGrip"
   Width="360" Height="360" MinWidth="360" MinHeight="400">

   <wpg:WpfPropertyGrid x:Name="PropertyGrid1"
      Margin="20,20,118,21" HorizontalAlignment="Stretch" VerticalAlignment="Stretch"
      HelpVisible="{Binding ElementName=ShowDescrip, Path=IsChecked}"
      ToolbarVisible="{Binding ElementName=ShowToolbar, Path=IsChecked}"
      PropertySort="{Binding ElementName=ComboSort, Path=SelectedItem}" />
该演示应用程序是使用 Visual Studio 2010 构建的。由于 WPF 属性检查器是 .net 4.0 中的一个新功能,此实现将不适用于为 .net 3.0 或 3.5 编写的应用程序,即使它们实现了 Workflow Foundation。
要使用此控件,您只需将 WpfPropertyGrid.cs 文件添加到您的项目中。您的解决方案中将需要一些引用:
- System.Activities
- System.Activities.Core.Presentation
- System.Activities.Presentation
源代码
源代码和演示应用程序可以在 github 上找到: https://github.com/jaime-olivares/wpf-propertygrid
历史
- 2010年6月14日:第一版。
- 2010年8月31日:第二版。简化了实现(感谢 Drammy 和 brannonking)。
- 2010年9月13日:重大改进:多选、帮助文本框、扩展演示。
- 2011年7月12日:第四版。依赖属性、显示/隐藏工具栏和类别。
- 2015年9月16日:将源代码移至 github。