
使用 GridView 和 JQuery 钻取分层数据
4.18/5 (3投票s)
如何使用 GridView 控件钻取分层数据
引言
在我们的日常工作中,我们需要向用户显示分层数据,并允许用户钻取数据以获取详细信息。在我之前的专题“使用 MVC 和 JQuery 钻取分层数据”中,我展示了如何为 MVC 应用程序钻取数据。然而,仍然需要在基于 ASP.NET Web Form 的应用程序中显示分层数据。
在本专题中,我将引导您了解如何使用 GridView 控件为 ASP.NET Web Form 应用程序创建钻取表格数据。请注意,我专注于功能,而不是使其美观。在此演示中,我将使用 Student 对象来存储学生信息。Student 对象将包含 Course 对象来描述课程。
1.0 创建 ASP.NET Web 应用程序
使用 Visual Studio 2010 创建一个新的 ASP.NET Web 应用程序。默认情况下,Visual Studio 会为应用程序创建多个文件。在此演示中,我们将在 StudentView.aspx 页面中显示学生信息。当用户点击学生记录时,我们将加载课程数据并将其插入到选定记录下方的 StudentView.aspx 中。为了显示课程数据,我们需要创建一个单独的页面 CourseView.aspx。您将在后面的部分中找到将 CourseView.aspx 加载到 StudentView.aspx 中的详细信息。
添加一个新的“带母版页的 Web 窗体”并将其命名为 StudentView.aspx。由于 CourseView.aspx 将插入到 StudentView.aspx 页面中,因此我们不需要显示来自 Site.Master 页面的任何信息。因此,添加一个新的“Web 窗体”并将其命名为 CourseView.aspx。
右键单击 StudentView.aspx 页面,然后从上下文菜单中选择“设为起始页”。
2.0 将 JQuery 脚本添加到项目中
打开 Site.Master 并在 Head 部分中添加以下 JQuery 引用。
     <script type="text/javascript" src="Scripts/jquery-1.8.2.min.js"></script>
     <script type="text/javascript" src="Scripts/jquery-ui-1.8.24.min.js"></script>
默认情况下,ASP.NET 会将旧版本的 JQuery 库添加到项目中。您需要将新版本放入应用程序的 Scripts 文件夹中,并将这些文件添加到项目中。您可以从以下位置找到这些文件: www.JQuery.com 或从附加的演示应用程序中获取。
3.0 创建数据模型(Student 和 Course)
从解决方案资源管理器中,右键单击项目并添加一个新文件夹。将文件夹命名为 Model。在 Model 文件夹下添加一个类并将其命名为 Student。现在,Model 文件夹应该包含 Student.cs 类。同样,创建另一个类并将其命名为 Course。
打开 Student.cs 并添加字段。
namespace DrillDownDemo.Model
{
    public class Student
    {
        public int ID { get; set; }
        public String FirstName { get; set; }
        public String LastName { get; set; }
        public String Address { get; set; }
        public String email { get; set; }
        public String Department { get; set; }
        public List<Course> Courses = new List<Course>();
    }
}
打开 Course.cs 并添加字段
namespace DrillDownDemo.Model
{
    public class Course
    {
        public String CourseName { get; set; }
        public String SemesterName { get; set; }
    }
}
4.0 学生和课程数据
对于此演示应用程序,我们将使用静态数据。创建新文件夹并将其命名为 Data。在 Data 文件夹下,添加一个类 StudentData。这个静态类将包含一个学生对象列表,每个学生对象将包含一个课程对象列表。打开 StudentData.cs 文件并添加以下数据。
public static List<Model.Student> Students = new List<Model.Student>()
            {
                new Model.Student
                { ID = 1, FirstName = "Jhon", LastName = "Smith",
                            Courses = new List<Model.Course>()
                            {
                                new Model.Course { ID = 1, CourseName = "CS 101",
							SemesterName = "Winter 2010"},
                                new Model.Course { ID = 2, CourseName = "MATH 102",
							SemesterName = "Fall 2010"},
                                new Model.Course { ID = 3, CourseName = "ENG 103",
							SemesterName = "Winter 2011"},
                                new Model.Course { ID = 4, CourseName = "EE 104",
							SemesterName = "Fall 2012"}
                            }
                },
                new Model.Student
                { ID = 2, FirstName = "Jorge", LastName = "Garcia",
                            Courses = new List<Model.Course>()
                            {
                                new Model.Course { ID = 5, CourseName = "CS 205",
							SemesterName = "Winter 2010"},
                                new Model.Course { ID = 6, CourseName = "MATH 206",
							SemesterName = "Fall 2010"},
                                new Model.Course { ID = 7, CourseName = "ENG 207",
							SemesterName = "Winter 2011"},
                                new Model.Course { ID = 8, CourseName = "EE 208",
							SemesterName = "Fall 2012"}
                            }
                },
                new Model.Student
                { ID = 3, FirstName = "Gorge", LastName = "Klene",
                            Courses = new List<Model.Course>()
                            {
                                new Model.Course { ID = 9, CourseName = "CS 301",
							SemesterName = "Winter 2010"},
                                new Model.Course { ID = 10, CourseName = "MATH 302",
							SemesterName = "Fall 2010"},
                                new Model.Course { ID = 11, CourseName = "ENG 303",
							SemesterName = "Winter 2011"},
                                new Model.Course { ID = 12, CourseName = "EE 304",
							SemesterName = "Fall 2012"}
                            }
                }
};
此外,这个静态类还需要两个方法。GetStudentData 方法将返回 Students 列表,而 GetCourseData 方法将返回特定学生的 Course 列表。
public List<Model.Student> GetStudentData()
{
	return Students;
}
public List<Model.Course> GetCourseData(Int32 studentID)
{
	List<Model.Course> c = Students.Find(p => p.ID == studentID).Courses;

	return c;
}
5.0 修改页面
5.1 修改 StudentView.aspx
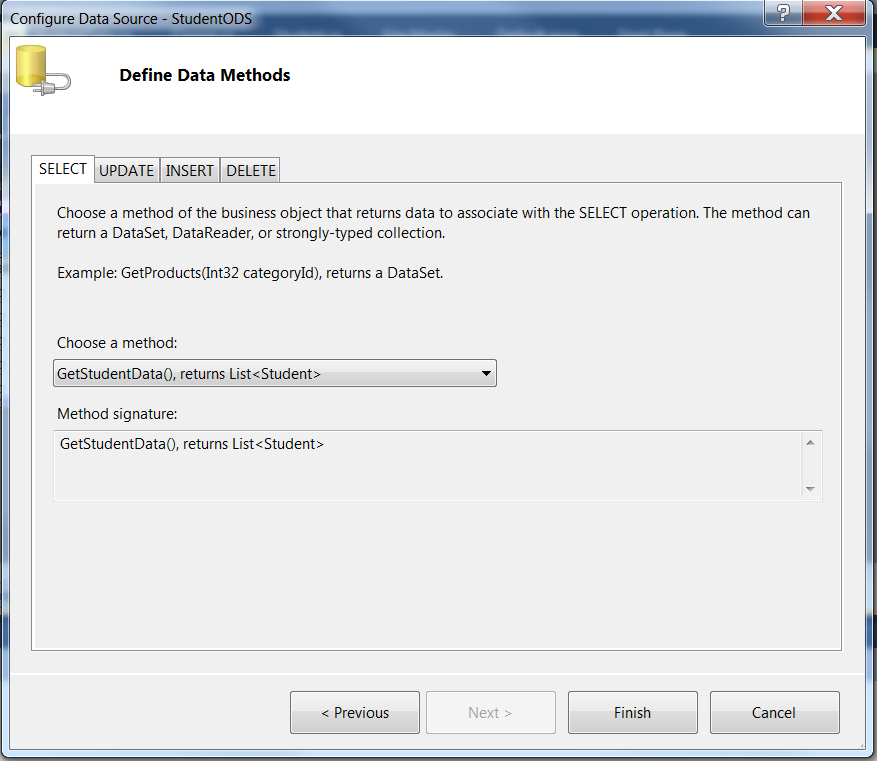
在设计模式下打开 StudentView.aspx。从工具箱中,拖动“ObjectDataSource”并将其放到页面上。将 ObjectDataSource1 的 ID 设置为一个有意义的名称。例如,StudentODS。现在您需要配置 StudentODS,以便它可以检索学生数据。单击 StudentODS 的上下文菜单,然后选择“配置数据源...”配置向导将打开。从“选择您的业务对象”下拉列表中,选择“DrilldownDemo.Data.StudentData”。如果您在列表中找不到它,请构建应用程序,这将编译项目,并且 StudentData 对象将可在列表中使用。

单击“下一步”按钮。从“选择方法”下拉列表中为“选择”选项卡选择“GetStudentData”方法。然后单击“完成”按钮。
现在从工具箱中拖放 GridView。为 GridView 的数据源选择 StudentODS。为 GridView 指定一个有意义的名称。例如,StudentGridView。
无论是使用 StudentView.aspx 页面的设计模式还是源模式,都将 TemplateField 添加为 StudentGridView 的第一列。对于 TemplateFiled 的 ItemTemplate,添加以下代码所示的两个超链接
<asp:TemplateField>
	<ItemTemplate>
		<a href="#" class="collapse expand-btn">
			<img src="Images/Plus.gif" alt="+"/>
		</a>
              	<a href="#" class="expand collapse-btn">
			<img src="Images/Minus.gif" alt="-" />
		</a>
	</ItemTemplate>
</asp:TemplateField>
第一个超链接显示“+”图像(展开),以便用户可以单击它并查看课程信息。另一个则折叠课程信息。
这些超链接的每个 class 属性中都有两个类。例如,“+”(展开)链接具有“collapse”和“expand-btn”。这两个类将用于控制钻取。我们不需要将它们定义为样式(css 文件)。这些将由 JQuery 方法用于查找正确的学生行以显示或隐藏内容,以及用于处理点击事件。更多详细信息将在 JQuery 部分中描述。
5.2 修改 CourseView.aspx
在设计模式下打开 CourseView.aspx。从工具箱中,拖放一个面板。将面板命名为 CoursePanel。将面板的高度属性设置为 100px。将面板的 ScrollBars 属性设置为 Auto。这将根据课程记录的数量来设置水平和/或垂直滚动条。
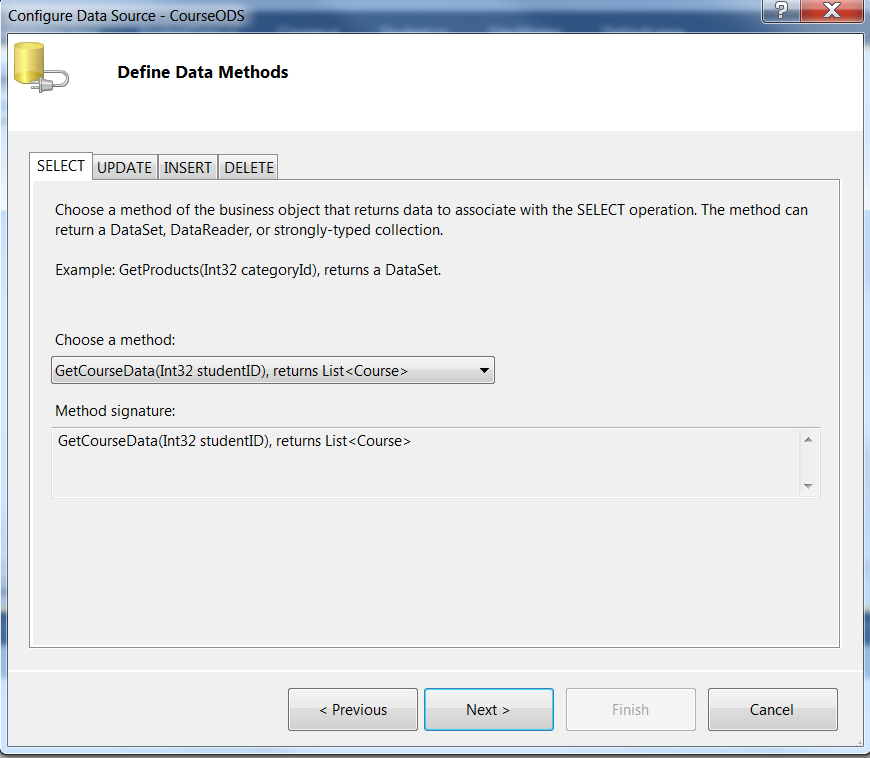
从工具箱中,拖动“ObjectDataSource”并将其放到页面上。将 ObjectDataSource1 的 ID 设置为一个有意义的名称。例如,CourseODS。现在您需要配置 CourseODS,以便它可以检索课程数据。单击 CourseODS 的上下文菜单,然后选择“配置数据源...”配置向导将打开。从“选择您的业务对象”下拉列表中,选择“DrilldownDemo.Data.CourseData”。如果您在列表中找不到它,请构建应用程序,这将编译项目,并且 CourseData 对象将可在列表中使用。
单击“下一步”按钮。从“选择方法”下拉列表中为“选择”选项卡选择“GetCourseData”方法。
单击“下一步”按钮以设置参数。从“参数源”中,选择 QueryString 并在 QueryStringField 中输入 ID。然后单击“完成”按钮。

现在从工具箱中拖放 GridView。为 GridView 的数据源选择 CourseODS。为 GridView 指定一个有意义的名称。例如,CourseGridView。
5.3 添加 JQuery 方法
我们将使用 JQuery 通过将 CourseView.aspx 信息加载到 StudentView.aspx 中来控制钻取。在源模式下打开 StudentView.aspx。在 GridView 标签结束后,添加一个 <script> 部分,如下所示
<script type="text/javascript">
        $(function () {
            	// Default - hide the '-' (Collapse) from Student
            	// Information's Action column
            	$('.expand').hide();

            	$('.expand-btn').on("click", function () {

		// Find the row, where user clicked
                var tr = $(this).parents('tr:first');

                // Find the number of column in the table and
                // then subtract 1, because course will be displayed
                // from 2nd column
  		var noOftd = tr.find("td").length - 1;

    		// Insert a row after the selected row
                // and add a div, which will be the place
                // holder for CourseView.
                tr.after("<tr>" +
                                "<td/>" +
                                "<td colspan='" +
                                        noOftd +
                                        "'> " +
                                        "<div id='courseDiv'>" +
                                        "This is a place holder for child" +
                                        "</div> " +
                               "<td/>" +
                          "</tr>");

		// toggle to display either Expand or Collapse
                // text in the Student Row
                tr.find('.expand, .collapse').toggle();

		// Find the value of selected row's StudentID
                var id = tr.find("td:first").next().html();

		// Call CourseView.aspx with Student ID
                // and use Load function of JQuery to refresh the div.
                // We do not need to load Header information from
  		// CourseView.aspx page. In other words, we only
  		// need to load the data which is under the CoursePanel
                // of CourseView.aspx. Hence, in the load method,
  		// we need to use ID of the Panel "CoursePanel"
                // as a the 2nd parameter
                tr.next().find("#courseDiv").load("CourseView.aspx?id=" + id,
							"#CoursePanel");

            });

            $('.collapse-btn').on("click", function () {
                var tr = $(this).parents('tr:first');

		// toggle to display either Expand or Collapse
                // text in the Student Row
                tr.find('.expand, .collapse').toggle();

		// toggle to display table row with Course information
                tr.next().toggle();
            });

        });
    </script>
第一个语句 `$('.expand').hide();` 查找文档中所有具有类属性“expand”的标签并将其隐藏。这将从学生记录中隐藏“-”(折叠)图像。因为,如果您回顾 StudentView 的代码,您可以看到学生表中的“-”(折叠)图像操作和表格行具有类属性“expand”。
接下来,我们需要定义一个函数,当用户点击学生记录“操作”列下的“+”(展开)时,该函数将被激活。在此方法中,它找到所点击操作(展开或折叠图像)的学生行。在该行下方,我们需要插入一行,其中包含课程信息。因此,我们首先找到现有表的总列数。在此演示中,我们不想在操作列下显示课程信息,所以我们从表的总列数中减去 1。
接下来,我们使用 JQuery 的“after”函数插入一行。然后我们切换展开和折叠。由于我们需要将 StudentID 传递给 CourseView.aspx,所以在下一个语句中,我们找到了 StudentID。现在,我们需要使用 StudentID 调用 CourseView.aspx 并重新加载 DIV 部分。因此,我们使用了 JQuery 的 Load 函数,其中 CourseView.aspx 作为参数。从 CourseView.aspx,我们只需要加载 CoursePanel 下的数据。所以,我们将面板 ID (CoursePanel) 作为第二个参数传递给 Load 方法。
接下来,我们需要定义一个函数,当用户点击学生记录“操作”列下的“-”(折叠)图像时,该函数将被激活。在此方法中,它找到所点击操作(折叠图像)的学生行并切换操作文本。
6.0 结论
JQuery 使使用 GridView 实现钻取分层数据变得容易。