
使用 JQuery Mobile & PHP Ajax 调用创建 CRUD Web 应用
4.92/5 (8投票s)
演示如何使用 jQuery Mobile 和 Php 在 Web 服务器中创建、更新、删除单个文件 json 记录。
引言
假设:您想创建一个多用户移动 Web 应用程序,该应用程序可以在全球任何地方访问。您希望该应用程序在创建、更新和删除记录方面速度快。您希望所有记录都持久保存在服务器上,并且无论用户使用何种设备登录,都可以轻松访问。此应用程序应直接从 Web 运行,但可以轻松移植到混合应用程序。
我之前的文章,大量地谈到了使用 JQuery Mobile 创建 CRUD Web 应用程序。自那时以来发生了很多事情,虽然我还没有一篇关于使用 WebSQL 和 IndexedDB 的类似文章,但我希望能够创建一些任何人都可以使用的东西,无论设备如何,并且信息将随处可用。虽然这可以使用任何后端数据库(如 MySQL、MongoDB 等)完成,但我选择了单文件记录方法。
这意味着什么?这意味着服务器上的每条记录都存储为单个 JSON 文件。
当用户从显示的记录中读取记录时,PHP 用于从服务器读取文件记录,然后显示。这是使用 Ajax 调用执行的。这种方法有优点也有缺点,但对于您可能想要创建的小型数据库来说,它是一个完美的工具。然而,您的服务器和客户端计算机的速度对于这种方法的性能至关重要。
一些简单的假设:您熟悉 JQuery Mobile,您还了解一些 JavaScript 并能够进行 Ajax 调用,您知道如何设置 Web 服务器和文件权限。您还熟悉 JSON。
您可以解压缩并使用 MS WebMatrix::: 或任何其他已安装 PHP 的 Web 服务器打开文件夹作为站点。此处提供实时演示:http://www.mbangas.com/jqmshow/myprojects/
背景
我们将创建一个包含两个模型(项目和人员)的项目跟踪移动应用程序。人员模型将存储我们项目中人员资源的详细信息,项目将存储我们项目的简单详细信息。由于人员应该对应用程序进行受控访问,因此我们将为该应用程序添加身份验证。
让我们把这个应用程序称为 MyProjects。
每个项目都将包含以下字段:
1. 项目名称 - 唯一、必填、文本
2. 状态 - 必填、下拉列表,可以是待处理、已批准、暂停等
3. 优先级 - 必填、单选按钮,可以是低、中、高
4. 到期日期 - 必填、日期选择器
5. 完成百分比 - 指示完成百分比的滑块
5. 负责人 - 从人员文件中派生的下拉列表
6. 备注 - 文本区域
这被转换为图 1 所示的 UI。
图 1:项目屏幕

按下“取消”将带用户进入项目列表屏幕,按下“保存”将把项目记录保存为 Web 服务器项目文件夹中的单个 json 文件。文件名即项目名称,例如 Write-CodeProject-Article.json,如下图 1.1 所示
图 1.1:项目 JSON 文件记录。

每个人将拥有以下字段:
1. 全名 - 必填,文本
2. 电子邮件地址 - 必填,电子邮件
3. 汇报给 - 必填,文本,该人员出于管理目的将向其汇报的人员。
这被转换为下图 2。
图 2:人员屏幕

并且人员记录存储为以下 JSON 文件记录。
图 2.1 个人 JSON 文件

从上图中,我们可以从文件夹结构中看出记录是如何组织的,以及使之成为可能的不同 php 文件。我将在下面的代码中展示这一切是如何连接在一起的。
每个用户将拥有以下字段:
1. 名字 - 必填,文本
2. 姓氏 - 必填,文本
3. 电子邮件地址 - 必填,电子邮件
4. 密码 - 必填,唯一,密码
5. 用户角色 - 必填,管理员/用户下拉列表
6. 活动 - 必填,复选框
这被翻译为下图 3。
图 3:用户屏幕

其产生的 JSON 记录如下图 3.1 所示
图 3.1:用户 JSON 文件记录
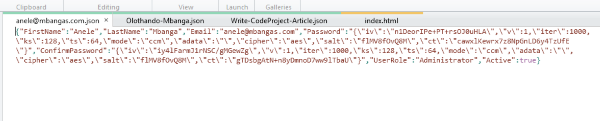
您会注意到这里存储的密码已加密,以隐藏它不被普通人看到。我的文章讨论了如何使用斯坦福加密库加密和解密密码。
对于这种方法,每个模型都创建了三个 php 文件。
1. 项目 - ajaxSaveProject.php、ajaxDeleteProject.php 和 ajaxGetProject.php
2. 人员 - ajaxSavePerson.php、ajaxDeletePerson.php 和 ajaxGetPerson.php
3. 用户 - ajaxSaveUser.php、ajaxDeleteUser.php 和 ajaxGetPerson.php
PHP 文件说明
ajaxSave...php - 此文件获取传递的 json 字符串并使用文件的主键作为文件名将其保存到 Web 服务器。
ajaxDelete...php - 此文件获取传递的主键并从服务器删除 json 文件。
ajaxGet...php - 此文件遍历该文件夹中所有可用的记录,并返回每个文件名称的 \n 分隔字符串。这些字符串被解析以获取每个文件的详细信息,结果存储为 json 对象。
注意:每个模型都会在文件夹中创建一个文件夹,例如所有用户都将存储在服务器上的 User 文件夹下。
使用代码
在我的文章《使用 JQuery Mobile 和 LocalStorage 创建 CRUD Web 应用程序》中,我详细解释了如何创建 CRUD Web 应用程序,您可以参考该文章了解更多详细信息。由于 CRUD 方法对于每个模型基本上是相同的,我将在此处深入探讨一个模型,即项目模型,因为用户模型和人员模型在添加、更新和删除记录方面遵循相同的方法论。
我的另一篇文章,题为《增强 MyFamily.Show JQuery Mobile 混合应用程序》,详细讨论了侧面板、为表单添加背景图像、d3 树形图绘制、创建表格和导出到 Excel 等,而题为《一次编写,随处运行:漫画收藏混合应用程序》的文章讨论了创建表格(用于报告)、关联组合框、导出到 Excel 等,因此本文将不关注这些内容。
最后,我的文章《为我们的 NoteKeeper JQuery Mobile 应用程序添加安全性》讨论了如何为移动应用程序创建登录和用户屏幕,以便用户可以进行身份验证。
MyProjects 的逻辑
MyProjects 是一个 Web 应用程序,将存储和检索我们项目的详细信息。MyProjects 的用户应进行身份验证,并且 MyProjects 应可从互联网/Web 访问。这里有一个项目层次结构的管理结构,我们也需要牢记这一点。每个项目都有一个分配给它的负责人。
由于 MyProjects 将在 Web 服务器上运行,因此服务器上应安装 PHP,并应为托管 MyProjects 项目、用户和人员的文件夹设置权限。
启动 MyProjects
最终用户会获得一个托管 myprojects 网站的链接,例如,我的这里有一个演示。用户一打开链接,就会显示一个欢迎屏幕。如果用户没有帐户,他们可以注册。由于这是一个实时应用程序,用户注册过程应该受到严格控制,但由于此处是演示,因此创建了一个宽松的注册过程。
图 4:登录

上面的登录屏幕允许用户登录以使用应用程序并创建、更新和删除项目、人员、用户详细信息。由于此处尚未添加授权,因此对于以数据为中心的安全 Web 应用程序,每个模型的 CRUD 操作过程应受到严格控制。
登录屏幕由下面的 HTML 定义。所有视图定义都存储在 index.html 文件中,如上面附件所示。
<div data-theme="a" id="pgSignIn" data-role="page">
        <header id="pgSignInHdr" data-role="header" data-position="fixed">
            <h1>MyProjects</h1>
        </header>
        <div id="pgSignIncontent" data-role="content">
            <h3>Welcome</h3><form action="#" method="post" id="pgSignInForm" name="pgSignInForm">
                <p>Existing Users</p><div data-role="fieldcontain">
                    <label for="pgSignInEmail" id="lblpgSignInEmail">Email Address<span style='color:red;'>*</span></label>
                    <input required title="Enter email address here." type="email" name="pgSignInEmail" id="pgSignInEmail" placeholder="Enter email address here." autocomplete="off" data-clear-btn="true"></input>
                </div>
                <div data-role="fieldcontain">
                    <label for="pgSignInPassword" id="lblpgSignInPassword">Password<span style='color:red;'>*</span></label>
                    <input required autocomplete="off" title="Enter password here." type="password" name="pgSignInPassword" id="pgSignInPassword" placeholder="Enter password here." data-clear-btn="true"></input>
                </div>
                <div><button type="submit" id="pgSignInIn" class="ui-btn ui-corner-all ui-shadow ui-btn-b">Sign In</button>
                </div>
                <p>Don't have an account</p><div><button id="pgAddUserUp" class="ui-btn ui-corner-all ui-shadow">Sign Up</button>
                </div>
            </form>
        </div>
        <footer id="pgSignInFtr" data-role="footer" data-position="fixed">
            <h1>Powered by JQM.Show © Anele Mbanga 2015</h1>
        </footer>
    </div>
当点击 Sign In 时,到底发生了什么?它从 Web 服务器读取用户记录。
此按钮背后的代码工作原理如下:使用 JQuery 语法从屏幕输入中读取用户电子邮件地址和密码。然后调用 PHP 函数 ajaxGetUser 从 Web 服务器读取一个由电子邮件地址组成的文件,因此对我来说,这个文件将是 _anele@mbangas.com.json_。如果文件存在,则将输入的密码与文件中存储的密码进行比较,如果匹配,则第一次检查通过。第二次检查是帐户是否处于活动状态。如果帐户未处于活动状态,则第二次检查失败,最终用户会收到警告。如果一切顺利,用户将被带到应用程序的主启动板。
“登录”背后的源代码。
应用程序的所有源代码都存储在 app.js 文件中。
// bind the sign in click event
            $('#pgSignInIn').on('click', function (e) {
                e.preventDefault();
                e.stopImmediatePropagation();
                // verify the user details
                app.SignInUser(
                $('#pgSignInEmail').val().trim(),
                $('#pgSignInPassword').val().trim()
                );
            });
如上所述,单击按钮会调用 app.SignInUser,并传入用户输入的电子邮件地址和密码。其源代码如下。
app.SignInUser = function (Email,Password) {
            // get users
            $('#pgSignIn').data('success', 'true');
            var uname = Email;
            Email = Email.replace(/ /g, '-');
            Email += '.json';
            var req = Ajax("ajaxGetUser.php?file=" + encodeURIComponent(Email));
            if (req.status == 200) {
                // parse string to json object
                var userRec = JSON.parse(req.responseText);
                // verify password and status of account
                var pwd = userRec.Password;
                // decript the password
                pwd = sjcl.decrypt('MashJQMShow', pwd);
                var atv = userRec.Active;
                if (Password != pwd) {
                    $('#pgSignIn').data('success', 'false');
                    uname = uname.replace(/-/g, ' ');
                    $('#alertboxheader h1').text('Password Error');
                    $('#alertboxtitle').text(uname);
                    $('#alertboxprompt').text('The password specified is incorrect!');
                    $('#alertboxok').data('topage', 'pgSignIn');
                    uname = uname.replace(/ /g, '-');
                    $('#alertboxok').data('id', uname);
                    $.mobile.changePage('#alertbox', {transition: 'pop'});
                }
                if (atv == false) {
                    $('#pgSignIn').data('success', 'false');
                    uname = uname.replace(/-/g, ' ');
                    $('#alertboxheader h1').text('Account Error');
                    $('#alertboxtitle').text(uname);
                    $('#alertboxprompt').text('This account is no longer active. Contact your System Administrator!');
                    $('#alertboxok').data('topage', 'pgSignIn');
                    uname = uname.replace(/ /g, '-');
                    $('#alertboxok').data('id', uname);
                    $.mobile.changePage('#alertbox', {transition: 'pop'});
                }
                } else {
                //user file is not found
                $('#pgSignIn').data('success', 'false');
                uname = uname.replace(/-/g, ' ');
                $('#alertboxheader h1').text('User Error');
                $('#alertboxtitle').text(uname);
                $('#alertboxprompt').text('This user is NOT registered in this App!');
                $('#alertboxok').data('topage', 'pgSignIn');
                uname = uname.replace(/ /g, '-');
                $('#alertboxok').data('id', uname);
                $.mobile.changePage('#alertbox', {transition: 'pop'});
            }
            //find if status is successful or not
            var succ = $('#pgSignIn').data('success');
            if (succ == 'true') {
                pgSignInClear();
                // show the page to display after sign in
                $.mobile.changePage('#pgMenu', {transition: pgtransition});
            }
        };
app.SignInUser 调用 ajaxGetUser.php 文件,该文件基本上使用电子邮件从 Web 服务器读取用户文件,并返回文件的 JSON 字符串。然后将其解析为 {} 对象以便于读取。
<?php
    //get the file contents from the server
    If (isset($_REQUEST['file'])) {
        $file = basename($_REQUEST['file']);
        echo file_get_contents('./User/'.$file);
        } Else {
        If (is_dir('./User') && $handle = opendir('./User/')) {
            While (False !== ($entry = readdir($handle))) {
                If (!is_dir($entry)) {
                    echo basename($entry)."\n";
                }
            }
            closedir($handle);
            } Else {
            header("HTTP/1.0 404 Not Found");
        }
    }

?>
文件变量通过以下方式传递给 Ajax 调用:
var req = Ajax("ajaxGetUser.php?file=" + encodeURIComponent(Email));
如 app.SignInUser 方法所示。所有使用 GET 方法从 Web 服务器读取文件的操作都将遵循相同的方法。主要决定因素是读取内容的文件夹。在这种特殊情况下,它是用户文件夹。
当点击 Sign Up 时会发生什么?这促进了在 Web 服务器上创建用户记录。
当用户点击注册时,他/她会被带到图 3 所示的添加用户屏幕。当所有用户详细信息都输入完毕后,用户点击保存。
当点击 保存 时会发生什么?一个新的用户正在被添加到网络服务器,从而创建了一条新记录。
用户输入详细信息并单击“保存”后,将调用以下方法将用户详细信息保存到 Web 服务器。
$('#pgAddUserSave').on('click', function (e) {
                e.preventDefault();
                e.stopImmediatePropagation();
                // save the User
                var UserRec;
                //get form contents into an object
                UserRec = pgAddUserGetRec();
                //save object to JSON
                app.addUser(UserRec);
            });
从屏幕读取用户输入的详细信息并存储在 UserRec 中,然后将此对象传递给 app.addUser 以将其保存到服务器。让我们看看 pgAddUserGetRec(),它获取输入的屏幕详细信息。
function pgAddUserGetRec() {
            //define the new record
            var UserRec
            UserRec = {};
            UserRec.FirstName = $('#pgAddUserFirstName').val().trim();
            UserRec.LastName = $('#pgAddUserLastName').val().trim();
            UserRec.Email = $('#pgAddUserEmail').val().trim();
            UserRec.Password = $('#pgAddUserPassword').val().trim();
            UserRec.Password = sjcl.encrypt('MashJQMShow', UserRec.Password);
            UserRec.ConfirmPassword = $('#pgAddUserConfirmPassword').val().trim();
            UserRec.ConfirmPassword = sjcl.encrypt('MashJQMShow', UserRec.ConfirmPassword);
            UserRec.UserRole = $('#pgAddUserUserRole').val().trim();
            UserRec.Active = $('#pgAddUserActive').prop('checked');
            return UserRec;
        }
上面的脚本使用 JQuery 语法从屏幕中读取详细信息并将其保存为对象。此对象被传递给 app.addUser,后者基本上执行此操作。
// add a new record to server storage.
        app.addUser = function (UserRec) {
            // define a record object to store the current details
            var Email = UserRec.Email;
            // cleanse the record key of spaces.
            Email = Email.replace(/ /g, '-');
            UserRec.Email = Email;
            //convert record to json to write to server
            var recordJSON = JSON.stringify(UserRec);
            // save the data to a server file, use the post method as it has 8MB minimum data limitation
            var req = Ajax("ajaxSaveUser.php", "POST" , recordJSON);
            if (req.status == 200) {
                //show a toast message that the record has been saved
                toastr.success('User record saved.', 'MyProjects');
                //find which page are we coming from, if from sign in go back to it
                var pgFrom = $('#pgAddUser').data('from');
                switch (pgFrom) {
                    case "pgSignIn":
                    $.mobile.changePage('#pgSignIn', {transition: pgtransition});
                    break;
                    default:
                    // clear the edit page form fields
                    pgAddUserClear();
                    //stay in the same page to add more records
                }
                } else {
                //show a toast message that the record has not been saved
                toastr.error('User record not saved. Please try again.', 'MyProjects');
            }
        };
电子邮件地址是每个用户的主键,这里对其进行了空字符清理。然后将从屏幕读取的传递的用户对象 JSON 字符串化以将其转换为字符串。然后对 ajaxSaveUser.php 进行 ajax 调用,将 json 字符串发布到其中,以将其保存到 Web 服务器。如果用户成功保存,将显示一个提示,告知用户记录已保存。这是通过 ajax 调用返回的状态消息 200 进行检查的。由于在这种情况下用户是从登录屏幕访问此屏幕的,因此他们保存详细信息后,将被带回登录页面进行登录。
如上图 3 所示的“添加用户”屏幕带有一个面板和标题上的菜单按钮,但这些都被隐藏了,因为在这种情况下用户正在注册。
将用户详细信息保存到 Web 服务器的 ajaxSaveUser.php 文件。
<?php
    // Get the data from the client.
    $record = file_get_contents('php://input');
    // convert file contents to json object
    $jsonrec = json_decode($record);
    // read the primary key
    $Email = $jsonrec->Email;
    //write the data out to a file on the server
    //make sure permissions are all OK!
    //create the parent folder
    if (!is_dir('./User/')) {
        mkdir('./User/');
    }
    //define the file
    $jsonFile = "User/" . $Email . ".json";
    $f = fopen($jsonFile, 'w') or die("Error: Can't open file. Got write permission?");
    fwrite($f, $record);
    fclose($f);
?>
请记住,调用此方法时,会向 Web 服务器发布一个字符串化的 JSON 对象。该字符串的内容会被读取并保存为 $record。然后使用 json_decode 对其进行解码,使其成为一个易于访问的数组,以便我们可以获取电子邮件地址,这是用户记录的主键。然后,通过在解码后的用户记录中执行 ->Email,将电子邮件地址读取到一个变量 $email 中。
在第一次运行时,User 目录可能不存在,因此我们会检查该文件夹是否存在,如果不存在,则创建它。然后,我们通过将 jsonFile 定义为以下内容来定义此记录的完整文件名:
$jsonFile = "User/" . $Email . ".json";
请记住,读取的电子邮件地址没有 .json 扩展名,因此我们在此处添加它。然后打开文件并将用户记录的内容原样(作为字符串)写入文件。
如果您一直密切关注,我已经演示了我们 CRUD 应用程序的 C 和 R。我们读取了用于登录的用户详细信息,并且也通过注册创建了一个用户。这是整个应用程序中用于 CRUD 操作的相同方法。我们现在将演示从数据库中更新用户和删除用户,以便完成 CRUD 操作的 UD 部分。之后我们将更多地讨论 MyProjects。
从成功登录后出现的启动板(如图 5 所示)中,选择“用户”。这将列出 MyProjects 中所有可用的用户。
图 5:启动板(在“增强 MyFamily.Show”文章中讨论了创建类似的仪表板,如上文所引用)

图 6:用户(创建类似列表已在几乎所有引用文章中讨论过)

目前,用户列表中只有我一个人。如果您从该列表中选择一个用户,将显示更新用户的屏幕。此应用程序使用不同的屏幕来添加记录和更新记录。尽管这可能看起来是重复工作,但我发现使用这种方法更容易维护我的代码。
图 7:编辑用户

如您所见,上面的页脚导航栏上有三个按钮。1. 取消 - 返回用户列表,2. 更新 - 将用户详细信息保存到 Web 服务器,3. 删除 - 删除用户详细信息。此屏幕类似于图 3 中所示的“添加用户”屏幕,但多了一个“删除”按钮。
当用户点击更新按钮时会发生什么?Web 服务器上现有用户记录将被更新。
点击此屏幕上的“更新”将从用户表单中读取详细信息并将其保存到数据库中。这与上面在“注册”屏幕中讨论的方式相同。应用相同的方法,但由于表单和页面名称的不同,因此调用 app.UpdateUser。
app.updateUser = function (UserRec) {
            // define a record object to store the current details
            var Email = UserRec.Email;
            // cleanse the record key of spaces.
            Email = Email.replace(/ /g, '-');
            UserRec.Email = Email;
            //convert record to json to write to server
            var recordJSON = JSON.stringify(UserRec);
            var req = Ajax("ajaxSaveUser.php", "POST" , recordJSON);
            if (req.status == 200) {
                //show a toast message that the record has been saved
                toastr.success('User record updated.', 'MyProjects');
                // clear the edit page form fields
                pgEditUserClear();
                // show the records listing page.
                $.mobile.changePage('#pgUser', {transition: pgtransition});
                } else {
                //show a toast message that the record has not been saved
                toastr.error('User record not updated. Please try again.', 'MyProjects');
            }
        };
传递给 app.updateUser 的对象包含从下方所示的用户编辑屏幕读取的用户记录。
//read contents of each form input
        function pgEditUserGetRec() {
            //define the new record
            var UserRec
            UserRec = {};
            UserRec.FirstName = $('#pgEditUserFirstName').val().trim();
            UserRec.LastName = $('#pgEditUserLastName').val().trim();
            UserRec.Email = $('#pgEditUserEmail').val().trim();
            UserRec.Password = $('#pgEditUserPassword').val().trim();
            UserRec.Password = sjcl.encrypt('MashJQMShow', UserRec.Password);
            UserRec.ConfirmPassword = $('#pgEditUserConfirmPassword').val().trim();
            UserRec.ConfirmPassword = sjcl.encrypt('MashJQMShow', UserRec.ConfirmPassword);
            UserRec.UserRole = $('#pgEditUserUserRole').val().trim();
            UserRec.Active = $('#pgEditUserActive').prop('checked');
            return UserRec;
        }
所有这些都由用户“更新”按钮的点击事件调用。
// Update click event on Edit Page
            $('#pgEditUserUpdate').on('click', function (e) {
                e.preventDefault();
                e.stopImmediatePropagation();
                // save the User
                var UserRecNew;
                //get contents of Edit page controls
                UserRecNew = pgEditUserGetRec();
                //save updated records to JSON
                app.updateUser(UserRecNew);
            });
从上面可以看出,当点击更新按钮时,用户详细信息会从屏幕中读取并通过 pgEditUserGetRec() 保存到 UserRecNew 对象中。然后将此对象传递给 app.updateUser 方法,该方法会调用 ajaxSaveUser.php 脚本。
至此,我们完成了本文讨论的 CRUD 中的 CRU 部分。我们使用 ajaxGetUser.php 读取用户记录,使用 ajaxSaveUser.php 创建和更新记录,然后我们将讨论删除方法。
通过此方法删除记录的唯一方法是从其列表中选择记录,然后从编辑屏幕中单击“删除”按钮。上面的图 7 是此编辑屏幕的典型示例。
当点击 删除 时会发生什么?记录将从服务器中删除。
当用户选择删除记录时,会提供一个提示以确认用户是否要删除记录,如下所示。我在这里创建了另一个用户来演示这一点。
图 8:确认消息框

如果最终用户确定要删除该记录,他/她应在此屏幕上选择“是”,该记录将从 Web 服务器中删除。
创建此类提示已在之前的文章中讨论过,但无论如何,让我们回顾一下。此处出现的提示实际上是一个具有对话框数据角色的页面。
// delete button on Edit Page
            $('#pgEditUserDelete').on('click', function (e) {
                e.preventDefault();
                e.stopImmediatePropagation();
                //read the record key from form control
                var Email = $('#pgEditUserEmail').val().trim();
                //show a confirm message box
                Email = Email.replace(/-/g, ' ');
                $('#msgboxheader h1').text('Confirm Delete');
                $('#msgboxtitle').text(Email);
                $('#msgboxprompt').text('Are you sure that you want to delete this user? This action cannot be undone.');
                $('#msgboxyes').data('method', 'deleteUser');
                $('#msgboxno').data('method', 'editUser');
                Email = Email.replace(/ /g, '-');
                $('#msgboxyes').data('id', Email);
                $('#msgboxno').data('id', Email);
                $('#msgboxyes').data('topage', 'pgEditUser');
                $('#msgboxno').data('topage', 'pgEditUser');
                $.mobile.changePage('#msgbox', {transition: 'pop'});
            });
在这种情况下,用户的电子邮件地址(因为用户已被定义为用户的主键)被读取并存储在一个名为 Email 的变量中。它被清理以去除任何空字符。消息框的标题设置为“确认删除”,标题是我们要删除的电子邮件地址,并向用户显示“您确定要删除此用户吗?此操作无法撤消。”的提示。然后设置用户选择“是”/“否”按钮时要执行的操作。
当用户选择“是”按钮时,将执行 app.deleteUser 方法。
$('#msgboxyes').data('method', 'deleteUser');
当选择“否”时,将执行 app.editUser。
$('#msgboxno').data('method', 'editUser');
基本上是回到编辑屏幕。
这些 deleteUser 和 editUser 方法是如何被调用的?
如果您从上面的代码中注意到,在消息框显示之前已为其设置了数据属性,然后它以弹出窗口的形式显示。
$.mobile.changePage('#msgbox', {transition: 'pop'});
$('#msgboxyes').on('click', function (e) {
                e.preventDefault();
                e.stopImmediatePropagation();
                var yesmethod = $('#msgboxyes').data('method');
                var yesid = $('#msgboxyes').data('id');
                app[yesmethod](yesid);
            });
上面是“是”按钮点击的代码。要执行的方法是从刚刚为按钮设置的 data-method 属性中读取的,然后执行该方法...
app[yesmethod](yesid);
编辑方法也一样。
$('#msgboxno').on('click', function (e) {
                e.preventDefault();
                e.stopImmediatePropagation();
                var nomethod = $('#msgboxno').data('method');
                var noid = $('#msgboxno').data('id');
                var toPage = $('#msgboxno').data('topage');
                // show the page to display after a record is deleted
                $.mobile.changePage('#' + toPage, {transition: pgtransition});
                app[nomethod](noid);
            });
当用户选择“否”时,要执行的方法将从在确认按钮显示之前已设置的 data-method 属性中读取。toPage 和 id 数据属性也会被读取,然后显示提供的页面。
$.mobile.changePage('#' + toPage, {transition: pgtransition});
app[nomethod](noid);
之所以采用这种方法,是因为应用程序对所有可用模型使用相同的消息框和警报。当用户从“人员”屏幕删除人员或从“项目”屏幕删除项目时,最终用户将看到相同的提示屏幕,但它将根据为每个模型传递给它的内容而采取不同的操作。
对于用户删除,将调用的方法是 deleteUser,如下所示
//delete a record from JSON using record key
        app.deleteUser = function (Email) {
            Email = Email.replace(/ /g, '-');
            var req = Ajax("ajaxDeleteUser.php/?Email=" + Email);
            if (req.status == 200) {
                toastr.success('User record deleted.', 'MyProjects');
                } else {
                toastr.error('User record not deleted.', 'MyProjects');
            }
            // show the page to display after a record is deleted, this case listing page
            $.mobile.changePage('#pgUser', {transition: pgtransition});
        };
删除用户使用电子邮件地址来删除用户。执行 Ajax 调用以删除记录的方法如下:
var req = Ajax("ajaxDeleteUser.php/?Email=" + Email);
如果执行成功,用户 json 文件记录将从 Web 服务器中删除,并向用户显示一条提示消息,告知记录已删除。我们之前的文章讨论了提示脚本。记录删除/未删除后,页面将更改为用户列表页面,并带有给定的转换。
<?php
    //delete the json record file from the server
    $Email = $_GET['Email'];
    unlink('./User/'.$Email.'.json');
?>
ajaxDeleteUser.php 基本上执行 unlink php 方法以从 Web 服务器删除
设计 MyProjects Web 应用程序...
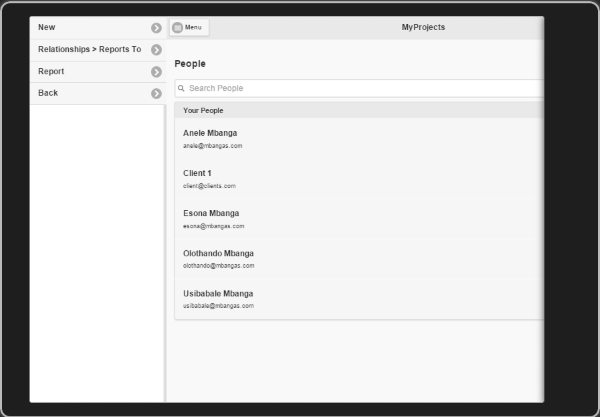
对于每个项目,首先应定义一个负责人。因此,在记录我们项目的第一个步骤中,我们需要添加我们的人员。在登录后的启动板中,选择“人员”,这将列出所有已捕获的人员,并在右上角提供一个名为“新建”的按钮,用于创建新人员。
图 9:人员列表

从列表中选择一个人会打开一个“人员编辑”屏幕,如上图 2 所示。然后可以通过选择“保存”更新人员详细信息,或者通过选择“删除”删除用户详细信息。在这种情况下,将执行 ajaxSavePerson 和 ajaxDeletePerson。
//listview item click eventt.
            $(document).on('click', '#pgPersonList a', function (e) {
                e.preventDefault();
                e.stopImmediatePropagation();
                //get href of selected listview item and cleanse it
                var href = $(this)[0].href.match(/\?.*$/)[0];
                var FullName = href.replace(/^\?FullName=/,'');
                //change page to edit page.
                $.mobile.changePage('#pgEditPerson', {transition: pgtransition});
                //read record from JSON and update screen.
                app.editPerson(FullName);
            });
人员文件的主键是人员的 FullName,并使用它来编辑人员记录。您可能想知道当记录位于服务器上时,所有可用人员是如何加载并在此列表视图中列出的。让我解释一下。我将继续用项目详细信息进行解释。如果您在“人员”屏幕上,选择左上角的“菜单”按钮。将出现一个面板,然后选择“返回”按钮。这将带您回到启动板。从启动板中,选择“项目”,这将列出您的所有项目,如下图 10 所示。
图 10:项目列表

如果您还没有项目,请选择“新建”并添加一些项目。添加用户的方法与上述说明相同。
列出项目:如何从服务器完成?
如前所述,对于我们存储的所有记录,无论是用户、人员还是项目,每条记录都作为单个 JSON 文件存储在 Web 服务器上。要将记录列在列表视图中,会执行 pagebeforechange 方法,
$(document).on('pagebeforechange', function (e, data) {
                //get page to go to
                var toPage = data.toPage[0].id;
                switch (toPage) {
                case 'pgProject':
                    $('#pgRptProjectBack').data('from', 'pgProject');
                    // restart the storage check
                    app.checkForProjectStorage();
                    break;
                case 'pgReports':
                    $('#pgRptProjectBack').data('from', 'pgReports');
                    break;
                    case 'pgRptProject':
                    app.ProjectRpt();
                    break;
                case 'pgEditProject':
                    $('#pgRptProjectBack').data('from', 'pgEditProject');
                    // clear the add page form fields
                    pgEditProjectClear();
                    //load related select menus before the page shows
                    app.pgEditProjectLoadOwner();
                    break;
                case 'pgAddProject':
                    $('#pgRptProjectBack').data('from', 'pgAddProject');
                    // clear the add page form fields
                    pgAddProjectClear();
                    //load related select menus before the page shows
                    app.pgAddProjectLoadOwner();
                    break;
                default:
                }
            });
上述方法在显示每个页面之前执行,并根据 switch 语句中指定的页面执行相应的代码。我们的项目列表页面名为 pgProject。
当 MyProjects 检测到 pgProject 是将要显示的下一个页面时,此方法,
app.checkForProjectStorage();
被执行。这到底有什么用?
//display records if they exist or tell user no records exist.
        app.checkForProjectStorage = function () {
            //get records from JSON.
            var ProjectObj = app.getProject();
            // are there existing Project records?
            if (!$.isEmptyObject(ProjectObj)) {
                // yes there are. pass them off to be displayed
                app.displayProject(ProjectObj);
                } else {
                // nope, just show the placeholder
                $('#pgProjectList').html(ProjectHdr + noProject).listview('refresh');
            }
        };
app.checkForProjectStorage 运行 app.getProject 以从服务器读取所有现有记录,如果存在现有记录,则通过 app.displayProject 将这些记录加载到列表视图。如果没有项目,则会告知最终用户没有可用的项目。
让我们来探索一下
//get records from JSON.
var ProjectObj = app.getProject();
我们为什么要调用 app.getProject()?正如您从源代码中看到的那样,app.getProject 方法在应用程序中被大量使用。从目前的情况来看,它已经被调用了 4 次。您会注意到,编辑项目的方法不是直接获取项目 json 文件记录,而是首先将所有记录读取到一个数组中,然后从该数组中获取我们正在编辑的记录。哇,这已经很拗口了。是的,这是一种非常冗长的方法,为什么要读取所有记录,而您可以只读取您想要的 json 项目文件呢?这只是为了演示目的而故意这样做的。在实际环境中,这种读取会消耗大量的服务器资源,甚至可能导致服务器崩溃。相反,在执行读取时,请读取您想要编辑的 json 文件记录,因为这样更快,并且不占用资源。
//get all existing records from JSON
        app.getProject = function () {
            // get Project records
            var ProjectObj = {};
            var icnt, itot;
            //get the list of files under directory
            var req = Ajax("ajaxGetProject.php"); //NB//
            if (req.status == 200) {
                var recFiles = req.responseText;
                recFiles = recFiles.split('\n');
                itot = recFiles.length - 1;
                for (icnt = 0; icnt <= itot; icnt++) {
                    var recFile = recFiles[icnt];
                    if (recFile.length > 0) {
                        // read the file contents and display them
                        var req = Ajax("ajaxGetProject.php?file=" + encodeURIComponent(recFile)); //NB//
                        if (req.status == 200) {
                            // parse string to json object
                            var record = JSON.parse(req.responseText);
                            var ProjectName = record.ProjectName;
                            record.ProjectName = record.ProjectName.replace(/-/g, ' ');
                            ProjectObj[ProjectName] = record;
                        }
                    }
                }
                //sort the objects
                var keys = Object.keys(ProjectObj);
                keys.sort();
                var sortedObject = Object();
                var i;
                for (i in keys) {
                    key = keys[i];
                    sortedObject[key] = ProjectObj[key];
                }
                ProjectObj = sortedObject;
                return ProjectObj;
            }
        };
app.getProject 方法执行 ajaxGetProject.php 以从服务器获取所有 project.json 文件名。现有文件名以 \n 分隔字符串返回。然后我们遍历所有这些文件名,读取每个文件名,并将每个文件的详细信息保存到 json {} 对象中。当所有这些记录都被读取后,它们将按主键(即 ProjectName)进行排序。请注意,ajaxGetProject.php 在 app.getProject 方法中被调用了两次。第一次没有解析文件名,第二次读取文件名时,解析了文件名。请参阅上面带有 //NB// 的代码行。
ajaxGetProject.php
<?php
    //get the file contents from the server
    If (isset($_REQUEST['file'])) {
        $file = basename($_REQUEST['file']);
        echo file_get_contents('./Project/'.$file);
        } Else {
        If (is_dir('./Project') && $handle = opendir('./Project/')) {
            While (False !== ($entry = readdir($handle))) {
                If (!is_dir($entry)) {
                    echo basename($entry)."\n";
                }
            }
            closedir($handle);
            } Else {
            header("HTTP/1.0 404 Not Found");
        }
    }
?>
当不带“file”属性调用时,ajaxGetProject.php 会遍历服务器 Project 文件夹并返回每个存在的文件的基本名称,并以 CRLF 即 \n 分隔。
这只是文件名,当这些文件名返回时,产生的响应...
var recFiles = req.responseText;
recFiles = recFiles.split('\n');
然后通过分割将其转换为字符串数组,然后对于读取的每个文件,读取每个文件的内容并存储到 {} 中。然后每个对象都将具有每个项目的属性。
var req = Ajax("ajaxGetProject.php?file=" + encodeURIComponent(recFile)); //NB//
                        if (req.status == 200) {
                            // parse string to json object
                            var record = JSON.parse(req.responseText);
                            var ProjectName = record.ProjectName;
                            record.ProjectName = record.ProjectName.replace(/-/g, ' ');
                            ProjectObj[ProjectName] = record;
                        }
然后,当所有项目详细信息都被读取后,调用 app.displayProject 并传递返回的项目对象。
//display records in listview during runtime.
        app.displayProject = function (ProjectObj) {
            // create an empty string to contain html
            var html = '';
            // make sure your iterators are properly scoped
            var n;
            // loop over records and create a new list item for each
            //append the html to store the listitems.
            for (n in ProjectObj) {
                //get the record details
                var ProjectRec = ProjectObj[n];
                // clean the primary key
                ProjectRec.ProjectName = ProjectRec.ProjectName.replace(/-/g, ' ');
                //define a new line from what we have defined
                var nItem = ProjectLi;
                //update the href to the key
                n = n.replace(/-/g, ' ');
                nItem = nItem.replace(/Z2/g,n);
                //update the title to display, this might be multi fields
                var nTitle = '';
                //assign cleaned title
                nTitle = n.replace(/-/g, ' ');
                //replace the title;
                nItem = nItem.replace(/Z1/g,nTitle);
                //there is a count bubble, update list item
                var nCountBubble = '';
                nCountBubble += ProjectRec.PercentComplete;
                //replace the countbubble
                nItem = nItem.replace(/COUNTBUBBLE/g,nCountBubble);
                //there is a description, update the list item
                var nDescription = '';
                nDescription += ProjectRec.Status;
                nDescription += ', ';
                nDescription += ProjectRec.Priority;
                //replace the description;
                nItem = nItem.replace(/DESCRIPTION/g,nDescription);
                html += nItem;
            }
            //update the listview with the newly defined html structure.
            $('#pgProjectList').html(ProjectHdr + html).listview('refresh');
        };
对于每个项目,我们获取项目名称,这将在列表视图的标题中显示,计数气泡显示每个项目的完成百分比,描述显示状态和优先级。这是通过循环遍历从服务器读取的所有项目 {} 元素来完成的。
这一切都在项目列表显示之前完成。
项目列表 HTML 定义
<div data-theme="a" id="pgProject" data-role="page">
                            <div data-position="left" data-display="reveal" data-position-fixed="true" id="pgProjectPnl" data-role="panel">
                                <ul data-role="listview" id="pgProjectPnlLV">
                                    <li ><a data-transition="slide" href="#pgAddProject">New</a></li>
                                    <li ><a data-transition="slide" href="#pgRptProject">Report</a></li>
                                    <li ><a data-transition="slide" href="#pgMenu">Back</a></li>
                                </ul>
                            </div>

                            <header id="pgProjectHdr" data-role="header" data-position="fixed">
                                <h1>MyProjects</h1>
                                <a data-role="button" id="pgProjectMenu" href="#pgProjectPnl" data-icon="bars" data-transition="slide" class="ui-btn-left">Menu</a>
                                <a data-role="button" id="pgProjectNew" data-icon="plus" data-theme="b" class="ui-btn-right">New</a>
                            </header>
                            <div id="pgProjectcontent" data-role="content">
                                <h3>Projects</h3><ul data-role="listview" data-inset="true" id="pgProjectList" data-filter="true" data-filter-placeholder="Search Projects" data-filter-reveal="false">
                                    <li data-role="list-divider">Your Projects</li>
                                    <li id="noProject">You have no projects</li>

                                </ul>
                            </div>

                        </div>
在其最简单的定义中,用于列出项目的屏幕基本上是空的,因为它的详细信息在运行时根据捕获的项目进行更新。此屏幕有一个滑动面板,可以访问项目报告,返回项目列表屏幕并添加新项目。
点击“新建”将进入添加新项目界面,如图 1 所示。
项目 HTML 定义。
如您在图 1 中所见,项目屏幕只是一个简单的屏幕,带有基本控件,可根据给定规范添加项目详细信息。这由这里的 HTML 代码定义。
<div data-theme="a" id="pgAddProject" data-role="page">
                            <div data-position="left" data-display="reveal" data-position-fixed="true" id="pgAddProjectPnl" data-role="panel">
                                <ul data-role="listview" id="pgAddProjectPnlLV">
                                    <li ><a data-transition="slide" href="#pgAddProject">New</a></li>
                                    <li ><a data-transition="slide" href="#pgRptProject">Report</a></li>
                                    <li ><a data-transition="slide" href="#pgProject">Back</a></li>
                                </ul>
                            </div>

                            <header id="pgAddProjectHdr" data-role="header" data-position="fixed">
                                <h1>MyProjects</h1>
                                <a data-role="button" id="pgAddProjectMenu" href="#pgAddProjectPnl" data-icon="bars" class="ui-btn-left">Menu</a>
                            </header>
                            <div id="pgAddProjectcontent" data-role="content">
                                <h3>Add Project</h3><form action="#" method="post" id="pgAddProjectForm" name="pgAddProjectForm">
                                    <div data-role="fieldcontain">
                                        <label for="pgAddProjectProjectName" id="lblpgAddProjectProjectName">Project Name<span style='color:red;'>*</span></label>
                                        <input required title="Enter project name here." type="text" name="pgAddProjectProjectName" id="pgAddProjectProjectName" placeholder="Enter project name here." autocomplete="off" data-clear-btn="true"></input>
                                    </div>
                                    <div data-role="fieldcontain">
                                        <fieldset id="fspgAddProjectStatus" data-role="controlgroup" data-type="horizontal" data-mini="true">
                                            <legend>Status<span style='color:red;'>*</span></legend>
                                            <input type="radio" name="pgAddProjectStatus" id="pgAddProjectStatusApproved" autocomplete="off" value="Approved"></input>
                                            <label for="pgAddProjectStatusApproved" id="lblpgAddProjectStatusApproved">Approved</label>
                                            <input type="radio" name="pgAddProjectStatus" id="pgAddProjectStatusPending" autocomplete="off" value="Pending"></input>
                                            <label for="pgAddProjectStatusPending" id="lblpgAddProjectStatusPending">Pending</label>
                                            <input type="radio" name="pgAddProjectStatus" id="pgAddProjectStatusStarted" autocomplete="off" value="Started"></input>
                                            <label for="pgAddProjectStatusStarted" id="lblpgAddProjectStatusStarted">Started</label>
                                            <input type="radio" name="pgAddProjectStatus" id="pgAddProjectStatusCancelled" autocomplete="off" value="Cancelled"></input>
                                            <label for="pgAddProjectStatusCancelled" id="lblpgAddProjectStatusCancelled">Cancelled</label>
                                            <input type="radio" name="pgAddProjectStatus" id="pgAddProjectStatusOn hold" autocomplete="off" value="On hold"></input>
                                            <label for="pgAddProjectStatusOn hold" id="lblpgAddProjectStatusOn hold">On hold</label>
                                        </fieldset>
                                    </div>
                                    <div data-role="fieldcontain">
                                        <fieldset id="fspgAddProjectPriority" data-role="controlgroup" data-type="horizontal" data-mini="true">
                                            <legend>Priority<span style='color:red;'>*</span></legend>
                                            <input type="radio" name="pgAddProjectPriority" id="pgAddProjectPriorityLow" autocomplete="off" value="Low"></input>
                                            <label for="pgAddProjectPriorityLow" id="lblpgAddProjectPriorityLow">Low</label>
                                            <input type="radio" name="pgAddProjectPriority" id="pgAddProjectPriorityMedium" autocomplete="off" value="Medium"></input>
                                            <label for="pgAddProjectPriorityMedium" id="lblpgAddProjectPriorityMedium">Medium</label>
                                            <input type="radio" name="pgAddProjectPriority" id="pgAddProjectPriorityHigh" autocomplete="off" value="High"></input>
                                            <label for="pgAddProjectPriorityHigh" id="lblpgAddProjectPriorityHigh">High</label>
                                        </fieldset>
                                    </div>
                                    <div data-role="fieldcontain">
                                        <label for="pgAddProjectDueDate" id="lblpgAddProjectDueDate">Due Date<span style='color:red;'>*</span></label>
                                        <input required data-options='{"mode":"flipbox","dateFormat":"%Y-%m-%d","overrideDateFormat":"%Y-%m-%d"}' title="Enter due date here." type="text" name="pgAddProjectDueDate" id="pgAddProjectDueDate" placeholder="Enter due date here." autocomplete="off" data-role="datebox"></input>
                                    </div>
                                    <div data-role="fieldcontain">
                                        <label for="pgAddProjectPercentComplete" id="lblpgAddProjectPercentComplete">Percent Complete<span style='color:red;'>*</span></label>
                                        <input required min="0" max="100" title="" type="range" name="pgAddProjectPercentComplete" id="pgAddProjectPercentComplete" autocomplete="off"></input>
                                    </div>
                                    <div dir="ltr" data-role="fieldcontain">
                                        <label for="pgAddProjectOwner" id="lblpgAddProjectOwner">Owner<span style='color:red;'>*</span></label>
                                        <select name="pgAddProjectOwner" id="pgAddProjectOwner" dir="ltr" class="required">
                                            <option value="null" data-placeholder="true">Select Owner</option>
                                            <option ></option>
                                        </select>
                                    </div>
                                    <div data-role="fieldcontain">
                                        <label for="pgAddProjectNotes" id="lblpgAddProjectNotes">Notes<span style='color:red;'>*</span></label>
                                        <textarea name="pgAddProjectNotes" id="pgAddProjectNotes" placeholder="Enter notes here." class="required"></textarea>
                                    </div>
                                </form>
                            </div>

                            <footer id="Ftr" data-role="footer" data-position="fixed">
                                <div data-role="navbar">
                                    <ul>
                                        <li><a id="pgAddProjectBack" data-icon="carat-l">Cancel</a>
                                        </li>
                                        <li><a type="submit" id="pgAddProjectSave" data-icon="action">Save</a>
                                        </li>
                                    </ul>
                                </div>
                            </footer></div>
此屏幕还带有一个面板,用于辅助项目屏幕的导航。添加项目的页面名称是
pgAddProject
当用户在项目屏幕上点击 保存 时会发生什么?
当用户点击保存时,就像我们上面讨论添加用户时一样,项目详细信息会被读取并保存到一个对象中,然后该对象被保存到 Web 服务器上。
// Save click event on Add page
            $('#pgAddProjectSave').on('click', function (e) {
                e.preventDefault();
                e.stopImmediatePropagation();
                // save the Project
                var ProjectRec;
                //get form contents into an object
                ProjectRec = pgAddProjectGetRec();
                //save object to JSON
                app.addProject(ProjectRec);
            });

function pgAddProjectGetRec() {
            //define the new record
            var ProjectRec
            ProjectRec = {};
            ProjectRec.ProjectName = $('#pgAddProjectProjectName').val().trim();
            ProjectRec.Status = $('input:radio[name=pgAddProjectStatus]:checked').val();
            ProjectRec.Priority = $('input:radio[name=pgAddProjectPriority]:checked').val();
            ProjectRec.DueDate = $('#pgAddProjectDueDate').val().trim();
            ProjectRec.PercentComplete = $('#pgAddProjectPercentComplete').val().trim();
            ProjectRec.Owner = $('#pgAddProjectOwner').val().trim();
            ProjectRec.Notes = $('#pgAddProjectNotes').val().trim();
            return ProjectRec;
        }
app.addProject 然后通过调用 ajaxSaveProject.php 将记录保存到服务器(保存记录已在上面详细讨论过)
// add a new record to server storage.
        app.addProject = function (ProjectRec) {
            // define a record object to store the current details
            var ProjectName = ProjectRec.ProjectName;
            // cleanse the record key of spaces.
            ProjectName = ProjectName.replace(/ /g, '-');
            ProjectRec.ProjectName = ProjectName;
            //convert record to json to write to server
            var recordJSON = JSON.stringify(ProjectRec);
            // save the data to a server file, use the post method as it has 8MB minimum data limitation
            var req = Ajax("ajaxSaveProject.php", "POST" , recordJSON);
            if (req.status == 200) {
                //show a toast message that the record has been saved
                toastr.success('Project record saved.', 'MyProjects');
                //find which page are we coming from, if from sign in go back to it
                var pgFrom = $('#pgAddProject').data('from');
                switch (pgFrom) {
                    case "pgSignIn":
                    $.mobile.changePage('#pgSignIn', {transition: pgtransition});
                    break;
                    default:
                    // clear the edit page form fields
                    pgAddProjectClear();
                    //stay in the same page to add more records
                }
                } else {
                //show a toast message that the record has not been saved
                toastr.error('Project record not saved. Please try again.', 'MyProjects');
            }
        };
要更新项目详细信息,最终用户应从项目列表中找到感兴趣的项目并选择它,这将打开如图 1 所示的“编辑项目”屏幕。然后最终用户可以更新其详细信息并单击“保存”,或者如果他们想删除项目,则可以单击“删除”。
当用户点击“编辑项目”中的删除时会发生什么?
// delete button on Edit Page
            $('#pgEditProjectDelete').on('click', function (e) {
                e.preventDefault();
                e.stopImmediatePropagation();
                //read the record key from form control
                var ProjectName = $('#pgEditProjectProjectName').val().trim();
                //show a confirm message box
                ProjectName = ProjectName.replace(/-/g, ' ');
                $('#msgboxheader h1').text('Confirm Delete');
                $('#msgboxtitle').text(ProjectName);
                $('#msgboxprompt').text('Are you sure that you want to delete this project? This action cannot be undone.');
                $('#msgboxyes').data('method', 'deleteProject');
                $('#msgboxno').data('method', 'editProject');
                ProjectName = ProjectName.replace(/ /g, '-');
                $('#msgboxyes').data('id', ProjectName);
                $('#msgboxno').data('id', ProjectName);
                $('#msgboxyes').data('topage', 'pgEditProject');
                $('#msgboxno').data('topage', 'pgEditProject');
                $.mobile.changePage('#msgbox', {transition: 'pop'});
            });
正如您将注意到的,这与上面删除用户的方式相同,但在这种情况下,会调用 app.deleteProject 方法来删除项目。
//delete a record from JSON using record key
        app.deleteProject = function (ProjectName) {
            ProjectName = ProjectName.replace(/ /g, '-');
            var req = Ajax("ajaxDeleteProject.php/?ProjectName=" + ProjectName);
            if (req.status == 200) {
                toastr.success('Project record deleted.', 'MyProjects');
                } else {
                toastr.error('Project record not deleted.', 'MyProjects');
            }
            // show the page to display after a record is deleted, this case listing page
            $.mobile.changePage('#pgProject', {transition: pgtransition});
        };
因为项目名称是项目的主键,所以它被传递给 ajaxDeleteProject.php,后者表示为...
<?php

    //delete the json record file from the server
    $ProjectName = $_GET['ProjectName'];
    unlink('./Project/'.$ProjectName.'.json');
?>
它基本上只是从 Web 服务器中删除项目文件,所有这些都通过点击此提示中的“是”按钮完成。
图 11:确认项目删除

对于我们的项目,有一个由我们捕获的人员定义的报告/管理结构。您会记得在“人员”屏幕中,必须指明人员向谁报告。
图 12:项目治理树

此报告结构可以通过以下 d3 树形图表演示,用户点击“导出”(右上角)时也可以导出为图片。创建这样的树形图已在我撰写的“增强 MyFamily.Show”文章中进行了大量讨论。这可以通过从“人员”屏幕中选择“菜单”并选择“关系”>“汇报给”来访问,如下所示。
图 13:人员列表侧边菜单
还可以从捕获的用户、人员和项目信息中生成 Excel 报告。从每个列表中选择“菜单”可以访问侧滑菜单。下面是捕获的项目报告示例
图 14:项目报告(点击“导出到 Excel”将生成如图 15 所示的报告)

图 15:Excel 报告

各位,就这些了!!!感谢阅读本文。
关注点
处理 PHP 文件的 Ajax 调用位于 remoteserver.js 文件中,在定义 HTML 文件时需要在 header 部分引用该文件。
function Ajax(URL, method, data, callback) {
    if (typeof(method) !== 'object') {
        var settings = new Object;
        if(!method || method === null || typeof(method) === 'undefined') method = "GET";
        settings.type = method.toUpperCase()
        if(!data || data === null || typeof(data) === 'undefined') data = "";
        settings.data = data;
        if (!callback) {
            settings.async = false;
            } else {
            settings.success = callback;
        settings.fail = callback}
    }
    return $.ajax(URL, settings);
}
要读取 Web 服务器文件,我们指定 URL 并根据返回的 req.status 执行相应的函数。对于写入,我们将方法定义为 POST,传递的数据是字符串化的 JSON 文本。
我们还在此处为所有列表视图控件添加了 iscroll.js。当表单需要滚动时,可以将类似的方法应用于代码以使元素滚动。
var pgUserListScroller = new IScroll('#pgUserList', {mouseWheel:true, scrollbars:true, bounce:true, zoom:false});
虽然采用这种方法似乎很容易开发移动 Web 应用程序,这些应用程序可以从任何设备访问,并且数据将存储在服务器上并供所有有权访问服务器的人员访问,但服务器的速度和应用程序的设计将影响性能。因此,尽可能优化代码至关重要,尤其是对于服务器的读写操作。
这里的挑战仍然是根据保存的信息生成查询,因为每条记录都以单个 JSON 文件形式存储在服务器上。对于不需要执行查询的非常小的数据库应用程序来说,这完美地解决了问题。这种方法还确保每个用户可以一次编辑/更新/删除一条记录,而无需将所有记录加载到编辑屏幕上。
这种访问方式意味着一旦另一位用户更新了记录,它就会在保存后立即可用。但是,尚未尝试锁定编辑中的记录。
不过,我将尝试显示一个进度条,因为在某些系统中,从服务器读取所有记录可能会有一些延迟。