
用户控件在设计器中拖放后提示 ControlName
一个带有自定义 ControlDesigner 的用户控件,在设计器中拖放后会提示 ControlName
引言
在本文中,我将向您展示如何在设计器中将您自己的用户控件拖放到窗体上之后/期间,通过提示来更改控件名称。 因此,用户必须先输入 ControlName,然后才能更改其他内容。 对于那些希望在拖放到窗体后立即显示许可对话框或其他内容的人来说,本文也可能很有用。
我提供的代码显示了一个使用 ControlDesigner 来提供 DesignTime 支持的用户控件。 ControlDesigner 实现了在 DesignTime 期间提示输入 ControlName 的逻辑。 此外,我编写了一个名为 NameCreationService 的类,该类实现了创建名称的“默认”逻辑,以及显示一个模态对话框(您可以在其中输入控件名称)的逻辑。
背景
有人在 C# 论坛上问,如果用户使用 VS 或 #Develop 中的设计器将其用户控件拖放到窗体上,如何提示输入控件名称。 我发现这个问题很有趣,但对于这种情况来说不太有用,因为如果我总是在拖放后直接指定名称,我会感到很烦。
Using the Code
首先,我们需要创建一个新类 MyControlDesigner,请确保它派生自 System.Windows.Forms.Design.ControlDesigner。 正如您在 ControlDesigner 的示例代码中看到的那样,我们需要重写 Initialize(IComponent) 以保存我们的用户控件,并重写 InitializeNewComponent(IDictionary) 以实现提示输入控件名称的功能。
其次,我们需要一个类 NameCreationService,该类实现了在设计时创建名称的逻辑。 我使用了很久以前为某个项目编写的代码……并使用针对我们用户控件的检查扩展了 CreateName(IContainer, Type) 的功能。 在这种情况下,我想显示一个模态对话框,用户可以在其中插入一个 string,而不是使用容器带来的信息来生成名称。
public string CreateName(IContainer container, Type dataType)
{
	if(container==null)
	{
		throw new ArgumentException("container");
	}
	if(dataType==null)
	{
		throw new ArgumentException("dataType");
	}

	string name = string.Empty;

        if(dataType == typeof(MyControl))
	{
		// Prompt for the name using a Dialog
		name = PromptName(container, dataType);
	}
	else
	{
		// use the normal way to generate the name
		name = GenerateDefaultName(container, dataType);
	}

	return name;
}

public string GenerateDefaultName(IContainer container, Type dataType)
{
	// look to see if the container already has this type
	// of component, if it does, then iterate until you
	// find a unique name
	int count = 1;
	string name = dataType.Name + count.ToString();
	if(container.Components[name]!=null)
	{
		for(int i=1; i<container.Components.Count; i++)
		{
			name = dataType.Name + (i+1).ToString();
			if(container.Components[name]==null)
			{
				break;
			}
		}
	}

	return name;
}

public string PromptName(IContainer container, Type dataType)
{
	string name = dataType.Name;
	do
	{
		using (EnterControlNameDialog dlg = new EnterControlNameDialog())
		{
			dlg.ControlName = name;

			DialogResult dlgRes =
				dlg.ShowDialog(container as IWin32Window);
			if(dlgRes == DialogResult.OK)
			{
				name = dlg.ControlName;
			}
			else
			{
				name = GenerateDefaultName(container, dataType);
			}
		}
	}while(!IsValidName(name));

	return name;
}
在 InitializeNewComponent(IDictionary) 中,我们首先让基类完成其工作,然后我们将使用 GetService(typeof(IDesignerHost)) 获取当前 IDE 设计器的 IDesignerHost。 IDesignerHost 用于访问设计器持有的当前组件。 下一步是创建我们之前编写的类 NameCreationService 的一个实例,使用 IDesignerHost.Container 和 Component.GetType() 作为参数来调用函数 CreateName。 返回值将使用 PropertyDescriptor 设置为组件属性名称。 您会在下面的图片中看到整个步骤。
ControlDesigner 代码
/// <summary>
/// Description of Designer.
/// </summary>
[System.Security.Permissions.PermissionSet
(System.Security.Permissions.SecurityAction.Demand, Name = "FullTrust")]
public class MyControlDesigner : System.Windows.Forms.Design.ControlDesigner
{
	private MyControl control ;
	public override void Initialize(IComponent component)
	{
		base.Initialize(component);

		control = component as MyControl;
	}

	public override void InitializeNewComponent
		(System.Collections.IDictionary defaultValues)
	{
		base.InitializeNewComponent(defaultValues);

		PropertyDescriptor namePropDesc =
   		     TypeDescriptor.GetProperties(Component)["Name"];

    		IDesignerHost host = (IDesignerHost)GetService(typeof(IDesignerHost));
    		Design.NameCreationService naming = new NameCreationService(host);
    		string name = naming.CreateName(host.Container, Component.GetType());

    		if (namePropDesc != null &&
    		    namePropDesc .PropertyType == typeof(string) &&
    		    !namePropDesc .IsReadOnly &&
    		    namePropDesc .IsBrowsable)
    		{
    		    namePropDesc .SetValue(Component, name);
   		}
	}
}
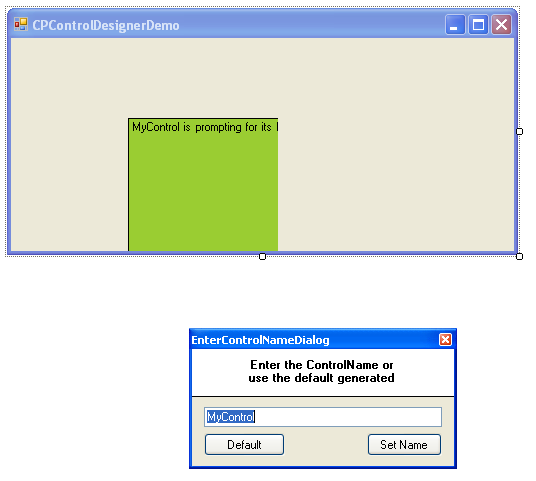
逐步教程
- 空窗体显示在设计器中(右侧),用户控件
MyControl显示在左侧。
- 拖动
MyControl并将其放到空窗体上。
- 拖放操作后,会立即显示一个模态对话框,用户可以在其中输入控件的名称。
- 将当前名称更改为
MyControl1234并按下“设置名称”按钮。
PropertyGrid显示所选控件MyControl,包括在属性名称中输入的名称“MyControl1234”。
- 将第二个
MyControl拖放到窗体上,然后按下“默认”按钮,让NameCreationService使用来自设计器的信息生成名称。
- “用例”结果显示了设计器的工作方式。 控件的名称现在是
MyControl2。(请参阅propertygrid中的属性名称。)
就是这样。 我希望本文能够帮助那些在设计时与设计器和自编写用户控件交互的人。
关注点
是的,现在我知道如何在 DesignTime 期间开始许可我的控件了 :)。
历史
- 2010/07/01
- 第一个版本发布