
NetProfiles - 轻松管理多个 IP 配置文件
一个用于管理多个 IP 配置的工具(家庭/工作/奶奶家等...)
引言
几年前,我在一家网络服务公司工作时,每天需要拜访多达十个客户现场,每个现场都有自己独特的 IP 地址方案。每次从一个现场或子网切换到另一个现场时,重新配置网络连接都非常麻烦。我编写了这个程序来处理这项任务,并跟踪我们每个客户的不同设置。在本文中,我将讨论几个主题,包括一些简单的方法,您可以用它们为基本的 Windows Forms 添加一点风格。
应用程序界面
对于这个应用程序,我选择了使用无边框窗体。在我看来,这是一种快速简便地为您的应用程序增添美感的方式。这可以通过在窗体代码中使用以下语句以编程方式完成
this.FormBorderStyle = FormBorderStyle.None;
更多信息将在下面介绍。
应用程序主窗口

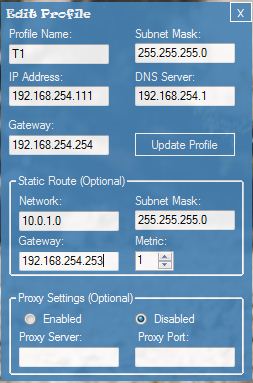
编辑配置窗口
应用程序背后的代码和概念
操作 Windows 注册表
Microsoft.Win32 命名空间提供了对 RegistryKey 类的访问,该类允许您操作 Windows 注册表。此应用程序利用了 RegistryKey 类的三个方法:OpenSubKey()、GetValue() 和 SetValue()。下面的代码说明了如何使用上述每个方法。
在接下来的代码块中,我创建了对象 Reg 并将其设置为引用注册表的 HKEY_LOCAL_MACHINE 根键,然后导航到子键 "SOFTWARE\AntiDesign\NetProfiles"。
 //read settings from the registry
 RegistryKey Reg = Registry.LocalMachine;
 Reg = Reg.OpenSubKey("Software\\AntiDesign\\NetProfiles", true);
下面,我使用 OpenSubKey() 方法从 Reg 对象的一个子键创建一个新的 RegistryKey 对象。string currProfile 被赋值为通过 RegistryKey 类的 GetValue() 方法获取的值。
 //get current profile to see if we need to remove static routes.
 RegistryKey adapter = Reg.OpenSubKey("__Adapters\\" + cboSelectAdapter.Text, true);
 string currProfile = adapter.GetValue("CurrentProfile").ToString();
在此示例中调用 SetValue() 方法将 IP 地址的字符串表示形式存储在注册表中。正如您从下面的示例中看到的,正在存储的类型是通过 Enum,RegistryValueKind 来选择的。
//save a setting into the registry
Reg.SetValue("IPAddress", txtIPAddress.Text, RegistryValueKind.String);
枚举您的网络适配器
System.Net 命名空间提供了许多与网络相关的类。此项目仅使用 NetworkInterface 类的 GetAllNetworkInterfaces() 方法。GetAllNetworkInterfaces() 返回一个 NetworkInterface 对象数组。我遍历数组中的每个对象,检查 NetworkInterfaceType 属性,以便仅列出以太网和 802.11 接口。
//Enumerate current system's network adapters and store results in a ComboBox
foreach (NetworkInterface netInterface in NetworkInterface.GetAllNetworkInterfaces())
{
    // Only get ethernet adapters
    if (netInterface.NetworkInterfaceType == NetworkInterfaceType.Ethernet |
         netInterface.NetworkInterfaceType == NetworkInterfaceType.Wireless80211)
    {
         cboSelectAdapter.Items.Add(netInterface.Name);
    }
}
try
{
    cboSelectAdapter.SelectedIndex = 0;
}
catch { }
以编程方式应用 IP 设置
Windows 提供了一个名为 netsh 的命令行工具来更改网络设置。为了避免重复造轮子,它透明地调用此实用程序来完成这项任务。为此,我将使用 System.Diagnostics.Process 类。进程的配置通过 Process.StartInfo 进行。在示例中,我定义了以下属性:
FileName(string)UseShellExecute(bool)- 使用 Shell 启动程序吗?此值为false才能重定向 IO 或隐藏控制台窗口。CreateNoWindow(bool)- 进程是否应该在隐藏窗口中运行?Arguments(string)- 要传递给应用程序的任何命令行参数
调用 Start() 方法并启动进程后,我们还调用 WaitForExit() 方法以暂停执行,直到 netsh.exe 完成修改 IP 设置。重用 netsh 对象,在更改 Arguments 属性后设置 DNS 服务器。
//build the argument strings for netsh.exe
string argsIP, argsDNS;

argsIP = "interface ip set address name=\"" + AdapterName + "\" static " +
         ipAddress + " " + subnetMask + " " + gateway + " 1";

argsDNS = "interface ip set dns name=\"" + AdapterName + "\" static " + dnsServer;

//apply the changes
Process netsh = new Process();
netsh.StartInfo.FileName = "netsh.exe";
netsh.StartInfo.UseShellExecute = false;
netsh.StartInfo.CreateNoWindow = true;
netsh.StartInfo.Arguments = argsIP;

netsh.Start();
netsh.WaitForExit();

//Add the dns server
netsh.StartInfo.Arguments = argsDNS;
netsh.Start();
netsh.WaitForExit();
netsh.Dispose();
使用嵌入式字体
嵌入式字体是另一种简单的方法,可以轻松地为您的应用程序提供“定制”外观,而无需太多麻烦或额外的代码。请注意,嵌入程序中的资源可能会大大增加应用程序的大小,因此如果可执行文件大小是一个主要问题,那么您可能需要跳过此步骤。
要开始嵌入字体,您必须使用 Interop 导入 gdi32.dll。需要为 AddFontMemResourceEx() 声明一个方法原型。将使用 PrivateFontCollection 来保存存储在内存中的字体。
[System.Runtime.InteropServices.DllImport("gdi32.dll")]
private static extern IntPtr AddFontMemResourceEx(IntPtr pbFont, uint cbFont,
     IntPtr pdv, [System.Runtime.InteropServices.In] ref uint pcFonts);

public static PrivateFontCollection PFC = new PrivateFontCollection();
由于调用的 Interop 方法的性质,您必须将代码包装在 unsafe 结构中。
//
// ♠ get Ravie font from our embedded resources
//
try
{
    unsafe
    {
        fixed (byte* pFontData = Properties.Resources.RAVIE)
        {
            uint nil = 0;
            PFC.AddMemoryFont((IntPtr)pFontData, Properties.Resources.RAVIE.Length);
            AddFontMemResourceEx((IntPtr)pFontData,
               (uint)Properties.Resources.RAVIE.Length, IntPtr.Zero, ref nil);
        }
    }
}
catch
{
    MessageBox.Show("Ravie font was not loaded.");
}
这是一个关于如何为 Label3 的 Font 属性使用我们嵌入式字体的示例。如果 PrivateFontCollection 中添加了多种字体,您需要迭代 Families[i].Name 属性来获取正确的索引。在下面的示例中,假设 PrivateFontCollection 中只有一种字体。
//
// ♠ Set title bar to use Ravie Font
//
label3.Font = new Font(PFC.Families[0], (float)10); //Font size is 10 pt
无边框窗体
我经常使用无边框窗体,因为它能为应用程序带来“定制”的外观,而且付出的努力非常少。但是,您需要添加几行代码才能使应用程序在屏幕上移动。这可以通过向您希望能够点击拖动的对象添加 MouseDown 和 MouseMove 事件处理程序来完成。
以下代码插入到每个您希望用作拖动点的对象的 MouseDown 事件中。变量 e 的类型为 MouseEventArgs,它包含两个有用的属性:e.X 和 e.Y,它们告诉我们鼠标单击的 X 和 Y 坐标。这些值存储在 public int 变量 x 和 y 中。
//add the following code to the MouseDown events
//x and y are public int values used to track click position
if (e.Button == MouseButtons.Left)
{
    x = e.X;
    y = e.Y;
}
以下代码需要插入到将用作拖动点的对象的 MouseMove 事件处理程序代码中。它使用当前鼠标位置以及在 MouseDown 事件期间填充的 x 和 y 变量来重新定位窗体。
//add the following code to your MouseMove Events
if (e.Button == MouseButtons.Left)
{
    this.Left += (e.X - x);
    this.Top += (e.Y - y);
}
结论
诸如确保字体可用(嵌入)和删除窗体边框之类的小调整,在用户体验方面可以起到很大的作用。我上传的程序版本不包含 Ravie 字体,并且没有完全实现嵌入式字体。(我开始做了,但在这个问题上没时间了……)
注意:在 Vista 上使用 netsh.exe 可能需要一段时间,因为 Windows 会“发现?”您的网络连接。这似乎在 Windows 7 中得到了解决,在 XP 中也不是问题。
最后的想法
我仍然在我随身携带的两台笔记本电脑上使用这个应用程序。虽然我不再花那么多时间在客户现场,但它仍然可以节省从静态 IP(工作)切换到 DHCP(家庭)的时间。
历史
- 2010-7-14 - 文章发布