
带搜索、上传、复制和电子邮件功能的 文件管理
4.33/5 (25投票s)
文件管理,包含搜索、上传和电子邮件功能,并使用了 ASP.NET 缓存。

引言
这是一个功能齐全的文件管理应用程序,通过 HTTP Web 服务公开了由Microsoft Indexing Service提供的基本搜索功能。为了统一用户界面层呈现的文件对象的方法,我遵循设计模式定义了一个抽象类,用于模仿来自挂载文件夹或搜索结果的文件对象。使用自定义的ICollection实现,DataGrid可以将其用作数据源并分页列出项目。此外,还包括文件和文件夹复制功能、将文件作为附件电子邮件发送以及 Web 缓存功能。
特点
此文件管理应用程序的功能包括
- 通过
AppSetting部分配置设置,挂载 Web 服务器下的任何文件夹。 - 搜索由 Microsoft Indexing Service 通过 HTTP Web 服务提供。
DataGrid使用来自ICollection实现的、包含抽象基类项的数据源,提供了进一步的可扩展性。- 提供列表视图和图标视图。
- 包含一个简单的上传功能。
- 通过鼠标点击在文件夹树中自由导航。
- 文件项通过文件类型在文件处理程序 - FileSender.aspx 中进行分类。因此,每种文件类型的响应操作都高度可定制,例如,选择 GIF 文件时发送图像流,而 ZIP 文件则作为附件发送给浏览器。
- 支持应用程序缓存以提高列表浏览性能。缓存过期时间可在WEB.CONFIG中配置。
- 通过 SMTP 服务器发送电子邮件功能允许用户选择通过电子邮件发送文件项,而无需先将其从服务器下载到客户端 PC。
- 将文件和整个子文件夹树从源复制到目标。

图 1 - 列表视图中的文件管理网页
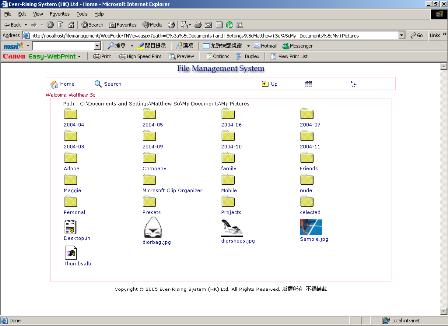
图 2 - 图标视图中的文件管理网页

图 3 - 通过 SMTP 服务器将文件作为附件发送
安装
设置步骤如下
- 运行setup.exe。
- 由于搜索由Microsoft Indexing Service提供,请使用Computer Management并选择Indexing Service来设置所需的目录。如果您不想创建自己的目录,可以使用默认目录 - system。只需检查您打算公开的文件夹是否已包含在system目录的
Directories属性下,如果没有,则添加。但我建议您创建一个新目录,并将打算服务的根文件夹包含在新目录的Directories属性下,以提高性能。这样做将提高缩小应用程序搜索范围时的响应时间。
图 4 - Indexing Service 设置
- 设置后,您的 Web 服务器下将创建两个虚拟目录,它们是
- filemanagement Web Application - 这里是主文件管理应用程序所在的地方。
- SearchingService Web Application - 这里是用于搜索的 Http Web 服务所在的地方。
对于filemanagement Web Application,请取消勾选匿名访问,仅使用Integrated Windows Authentication来保护您的文件夹,因为通过 Internet 访问时。它依赖于NTFS authorization检查,所以请确保您已在您打算公开的文件夹下设置了适当的访问权限。

图 5 - IIS 下的身份验证设置
- 在SearchingService Web Application虚拟文件夹下的WEB.CONFIG文件中,修改
appSettings部分下的IndexCatalog键,以匹配您在上一步中创建的新目录。<appSettings> <add key="IndexCatalog" value="system" /> </appSettings>
- 在filemanagement Web Application虚拟文件夹下的WEB.CONFIG文件中,修改
appSettings部分下的Root键,以匹配您打算在您的网站上服务的文件夹路径。您也可以在此处设置您的公司名称。<appSettings> <add key="Company" value="Ever-Rising System (HK) Ltd" /> <add key="Root" value="C:\" /> </appSettings>
- 通常,当设置为Integrated Windows Authentication时,Web 服务器仅在通过 Internet 访问您的 Web 服务器时,或者您尚未登录网络时(假设您使用的是Domain Network或在您的 PC 和 Web 服务器上使用相同的用户名和密码),才会提示输入密码。
但是,如果您访问您的 Intranet Web 服务器,并且仍然出现烦人的弹出登录对话框,您应该检查您的IE zone settings。在 Security 选项卡中,Custom Level设置,有一个参数如下

图 6 - Custom Zone Level 设置
默认设置应该允许在使用Intranet Zone资源时自动登录。但是,您还应该检查 Web 服务器名称是否在Intranet Zone中,例如,在浏览 Web 服务器时,IE状态栏将指示它属于哪个Zone。

图 7 - IE Zone 类型
当然,如果您从远程浏览 Web 服务器,并且它指示为 Internet,这是正常的。但如果您使用的是相同的本地网络,并且它不在Intranet Zone中,您仍然可以通过使用Local Intranet Sites设置,并在IE Option菜单的Security选项卡下单击Advanced按钮来将其添加到Intranet Zone,如下所示。

图 8 - Intranet Zone 设置
- 由于应用程序使用Windows Authentication,WEB.CONFIG中身份验证的默认设置是
<AUTHENTICATION mode="Windows" />
<IDENTITY impersonate="true" />
Impersonate 设置为
true,以便在访问 Web 服务器上的资源时,客户端的当前 Windows 用户被模拟。 - 电子邮件服务是可选的,并在WEB.CONFIG的
appSettings部分配置如下<ADD value="true" key="HasEmailService" /> <!-- Control email sending thread (use main thread or thread pool) --> <ADD value="true" key="SendByThreadInPool" /> <ADD value="true" key="LogNeeded" /> <ADD value="info@yourdomain.com" key="EmailFromUser" /> <ADD value="smtp.yourdomain.com" key="SMTPServer" /> <ADD value="SMTPUserID" key="SMTPUser" /> <ADD value="SMTPPAssword" key="SMTPPwd" /> <ADD value="log/FileManagementSiteLog.txt" key="FileManagementSiteLog" />
设置解释如下
- 参数
HasEmailService控制是否提供电子邮件服务。 - 参数
SendByThreadInPoll控制电子邮件是否由 .NET 提供的线程池发送。这可以提高 UI 的响应时间,因为发送电子邮件时会使用另一个线程。我建议您将其保留为true,仅在电子邮件发送出现问题时,出于调试目的才将其设置为false。 EmailFromUser是当需要发送文件项时,在“发件人”地址条目中填写的默认用户。这可以在SendMail.aspx页面中由用户覆盖。STMPServer、SMTPUser和SMTPPwd是您SMTP 服务器位置、SMTP 身份验证用户和密码的可选设置。如果未设置,则假定为localhost,并使用与 SMTP 服务器的默认身份验证。FileManagementSiteLog是日志文件的位置,默认为应用程序根目录下的 log 文件夹。
- 参数
- 由于应用程序将在上一步设置的日志文件中写入日志条目(现在只有电子邮件日志),请确保 ASPNET 用户在此文件夹(例如,C:\Inetpub\wwwroot\filemanagement\log)下具有写入访问权限。
- 所有发送到浏览器的项目列表都通过ASP.NET Application Cache进行缓存,以提高性能,特别是当大量用户使用 Web 服务器时。缓存项目在WEB.CONFIG的
appSettings部分中,可以通过参数ApplicationCacheTimeOut设置缓存过期时间(分钟)。默认为五分钟。
设计
定义一个抽象类
由于每个文件或文件夹对象都具有一些共同的属性,因此创建了一个抽象基类SimpleFileInfoBase,如下所示,它提供了在与 UI 元素(例如DataGrid)绑定时所需的字段。
abstract public class SimpleFileInfoBase
{
    public abstract string Name { get ; }
    public abstract string FullName { get ; }
    public abstract DateTime LastWriteTime { get ; }
    public abstract long Size { get ; }
}
在此类中,Name表示短名称,FullName表示文件或文件夹对象的完整路径。实际实现是让派生类FileSystemInfoExtend继承自SimpleFileInfoBase,这很简单,只需包装原始的FileSystemInfo类即可。
public class FileSystemInfoExtend : SimpleFileInfoBase
{
    private FileSystemInfo _file ;

    public FileSystemInfoExtend(FileSystemInfo file)
    {
        _file = file ;
    }

    override public string Name
    {
        get { return _file.Name ; }
    }

    override public string FullName
    {
        get { return _file.FullName ; }
    }

    public bool IsDirectory
    {
        get
        {
             return (_file.Attributes & FileAttributes.Directory)
                 ==FileAttributes.Directory ;
        }
    }

    public string Type
    {
        get { return this.IsDirectory?"Dir":"File" ; }
    }

    override public long Size
    {
        get
        {
              if ( this.IsDirectory )
                return 0L ;
            else
                return ((FileInfo)_file).Length  ;
        }
    }

    override public DateTime LastWriteTime
    {
        get { return _file.LastWriteTime ; }
    }
}
我决定在实现实际类之前先定义一个抽象类SimpleFileInfoBase,是因为来自索引服务的搜索结果项类型与来自挂载文件夹返回的项目类型FileSystemInfoExtend共享同一个抽象类SimpleFileInfoBase,如下所示,它是由派生类SearchResultItem继承的。
public class SearchResultItem : SimpleFileInfoBase
{
    private string _Name ;
    private string _FullName ;
    private DateTime _LastWriteTime ;
    private long _Size ;

    // Interface to Indexing Service used OleDb

    //which returns System.Data.DataSet type object.

    // By consuming the DataRow object, the data can be

    //transformed before presenting to UI.

    public SearchResultItem(DataRow row)
    {
        _Name=
          row["Filename"]==DBNull.Value?string.Empty:(string)row["Filename"];
        _FullName=
          row["Path"]==DBNull.Value?string.Empty:(string)row["Path"] ;
        _LastWriteTime =
          row["Write"]==DBNull.Value?DateTime.MinValue:(DateTime)row["Write"];
        _Size = row["Size"]==DBNull.Value?0L:(long)row["Size"] ;
    }

    override public string Name { get {return _Name ; } }
    override public string FullName { get { return _FullName; } }
    override public DateTime LastWriteTime {
                 get { return _LastWriteTime ; } }
    override public long Size { get { return _Size ; } }

}
由于我使用了两种不同的方式来列出项目,文件夹浏览功能使用System.IO中的类,而搜索功能使用System.Data.OleDb中的类(当访问 Indexing Service 时),在将它们呈现给DataGrid作为数据源之前,这两种结果都应该被因子化为一个公共基类。
当我们使用System.IO类列出请求路径中的文件或子文件夹时,它们会创建FileSystemInfo类型的对象数组,例如,在WebFolder.aspx页面中。
System.IO.DirectoryInfo CurrentRoot = new DirectoryInfo(this.RootPath);
FileSystemInfo[] files ;
另一方面,来自Indexing Service的结果使用ADO.NET OleDb类,会生成System.Data.DataTable对象中的项,例如。
string connstring = "Provider=MSIDXS;Data Source=" + _Catalog ;
using ( OleDbConnection conn = new OleDbConnection(connstring) )
{
    OleDbDataAdapter DataAdapter = new OleDbDataAdapter(_Query, conn);
    DataSet DataSetSearchResult = new DataSet();
    DataAdapter.Fill(DataSetSearchResult, "SearchResults");
    return DataSetSearchResult  ;
}
在实现了两个ICollection类,其中包含来自这两个类的项目集合后,它们可以共享 UI(DataGrid)中一致访问的公共属性。
// ICollection implementation for FileSystemInfoExtend items

public class FileSystemInfosExtend : ICollection
{
    private FileSystemInfoExtend[] _files ;
    // ... Other stuffs

}


// ICollection implementation for SearchResultItem items

public class SearchResultItems : ICollection
{
    private ArrayList _SearchResultItems ;
    public SearchResultItems(DataTable ResultDataTable)
    {
        _SearchResultItems = new ArrayList() ;
        _SearchResultItems.Clear() ;
        foreach ( DataRow row in ResultDataTable.Rows )
            _SearchResultItems.Add( new SearchResultItem(row) ) ;
    }
        // ... Other stuffs

}

图 9 - 类设计图
在实现了ICollection类之后,我们可以将DataGrid的数据源设置为这些ICollection类对象,例如。
// In WebFolder.aspx, bind the DataGrid as below

FileSystemInfosExtend FileInfosEx = new FileSystemInfosExtend(files) ;
DataGrid1.DataSource = FileInfosEx ;
DataGrid1.DataBind() ;
// In Search.aspx, bind the DataGrid as below

localhost.FileSearch FileSearcherInst = new localhost.FileSearch() ;
FileSearcherInst.Credentials = System.Net.CredentialCache.DefaultCredentials ;
DataTable results =  FileSearcherInst.Search(RootPath, SearchText).Tables[0] ;
SearchResultItems searchResultItems = new SearchResultItems(results) ;
DataGrid1.DataSource = searchResultItems  ;
DataGrid1.DataBind();
区分请求文件夹和文件项的场景
显然,请求文件夹和文件项是两件不同的事情;它们需要分开处理。文件夹请求将触发递归链接到相同的ASPX页面(WebFolder.aspx或WebFolderTNView.aspx),但带有不同的请求path参数(查询字符串参数),而文件请求将链接到另一个ASPX页面(FileSender.aspx),该页面将处理请求的文件项。为了解决这两种情况,创建了一个函数,如下所示。
protected string FormatLink(object file)
{
    FileSystemInfoExtend FileSystemInfoEx = file as FileSystemInfoExtend ;
    if ( FileSystemInfoEx == null )
        return "" ;

    string FileFullName = Server.UrlEncode(FileSystemInfoEx.FullName) ;

    if ( FileSystemInfoEx.IsDirectory )
       return string.Format("{0}?path={1}"
       , this.Request.Path, FileFullName ) ;
    else
       return string.Format("{0}?file={1}"
       , "FileSender.aspx", FileFullName ) ;
}
此函数将用作DataGrid的Name列,如下所示。
<ASP:HYPERLINK
Text='<%# DataBinder.Eval(Container, "DataItem.Name") %>'
navigateurl='<%# FormatLink(DataBinder.Eval(Container, "DataItem")) %>'
runat="server">
</ASP:HYPERLINK>
文件项请求处理程序
实际上,文件项处理页面非常简单,我确信将其作为IHttpHandler处理程序会更有效地提高性能。ASPX页面也派生自IHttpHandler,但在此情况下提供了过多不需要的服务!以下是FileSender.aspx源列表。
private void Page_Load(object sender, System.EventArgs e)
{
    string FileFullPath = string.Format("{0}", Request["file"]) ;
    if ( FileFullPath == "" )
        return ;

    FileInfo fileInfo =  new FileInfo(FileFullPath) ;
    if ( !fileInfo.Exists )
       return ;

    Response.ClearHeaders() ;
    Response.ClearContent() ;

    switch ( fileInfo.Extension.ToLower()  )
    {
        case ".htm" :
        case ".html" :
        case ".asp" :
        case ".aspx" :
        case ".xml":
            goto Send_File;
        case ".txt":
        case ".ini":
        case ".log":
            Response.ContentType = "text/plain" ;
            goto Add_Disposition_Inline;

        case ".jpg":
            Response.ContentType =
             string.Format("image/JPEG;name=\"{0}\"", fileInfo.Name) ;
            goto Add_Disposition_Inline;

        case ".gif":
        case ".png":
        case ".bmp":
            Response.ContentType = string.Format("image/{0};name=\"{1}\""
                , fileInfo.Extension.TrimStart('.')
                , fileInfo.Name) ;
            goto Add_Disposition_Inline;

        case ".tif":
            Response.ContentType =
             string.Format("image/tiff;name=\"{0}\"", fileInfo.Name) ;
            goto Add_Disposition_Inline;

        case ".doc":
            Response.ContentType = "Application/msword";
            goto Add_Disposition_Inline;

        case ".xls":
            Response.ContentType = "Application/x-msexcel";
            goto Add_Disposition_Inline;

        case ".pdf":
            Response.ContentType = "Application/pdf";
            goto Add_Disposition_Inline;

        case ".ppt":
        case ".pps":
            Response.ContentType = "Application/vnd.ms-powerpoint";
            goto Add_Disposition_Inline;

        case ".zip":
            Response.ContentType = "application/x-zip-compressed" ;
            goto Add_Disposition_Attachment;

        // Others as attachment only!

        default:
            goto Add_Disposition_Attachment;
    }


    Add_Disposition_Attachment:
        Response.AppendHeader("Content-Disposition"
          , string.Format("attachment;filename=\"{0}\"", fileInfo.Name)) ;
        goto Send_File;

    Add_Disposition_Inline:
        Response.AppendHeader("Content-Disposition"
          , string.Format("inline;filename=\"{0}\"", fileInfo.Name)) ;
        goto Send_File;

    Send_File:
        try
        {
            Response.WriteFile(FileFullPath) ;
        }
        catch (UnauthorizedAccessException)
        {
            string query = Request.UrlReferrer.Query ;
            int i = query.ToLower().IndexOf("error=") ;
            if ( i > -1 )
            {
                int j = query.IndexOf("&", i) ;
                if ( j > -1 )
                    query = query.Remove(i, j-i+1) ;
                else
                    query = query.Remove(i, query.Length-i) ;
            }

            if ( query == "" )
                query = "?" ;
            else if (!query.EndsWith("&"))
                query += "&" ;

            Response.Redirect( Request.UrlReferrer.LocalPath
                + query
                + string.Format("Error=You are not allow to access file {0}."
                , fileInfo.Name)) ;
       }
}
图标视图
毕竟,要将列表视图显示为图标项,我们需要首先获取关联的图标,在页面ShowFileIcon.aspx中,它将处理图标的检索和列表,如下所示。
icon = IconHandler.IconHandler.GetAssociatedIcon(fileinfo.FullName,
                                                                 IconSizeUsed) ;
if ( icon != null )
{
    Response.ContentType = "image/x-icon" ;
    string TempFileName =
       fileinfo.Extension != ""
           ? fileinfo.Name.Replace(fileinfo.Extension,".ico")
           : fileinfo.Name+".ico" ;
    Response.AppendHeader("Content-Disposition"
       , string.Format("inline;filename=\"{0}\"", TempFileName)) ;
    icon.Save(Response.OutputStream) ;
    icon.Dispose() ;
}
函数IconHandler.GetAssociatedIcon()完成了获取 Windows 中注册的大多数文件类型的图标资源的工作,详细信息如下。
public enum IconSize : uint
{
    Small = 0x0, //16x16

    Large = 0x1  //32x32

}

public class IconHandler
{
    // Filename - the file name to get icon from

    public static IntPtr GetAssociatedIconHandle(string Filename, IconSize size)
    {
        IntPtr hImgSmall; //the handle to the system image list

        IntPtr hImgLarge; //the handle to the system image list

        SHFILEINFO shinfo = new SHFILEINFO();

        if ( size == IconSize.Small )
            hImgSmall = Win32.SHGetFileInfo(Filename, 0
                , ref shinfo,(uint)Marshal.SizeOf(shinfo)
                , Win32.SHGFI_ICON |Win32.SHGFI_SMALLICON);
        else
            hImgLarge = Win32.SHGetFileInfo(Filename, 0
                , ref shinfo, (uint)Marshal.SizeOf(shinfo)
                , Win32.SHGFI_ICON | Win32.SHGFI_LARGEICON);

        return shinfo.hIcon ;
    }

    // Filename - the file name to get icon from

    public static Icon GetAssociatedIcon(string Filename, IconSize size)
    {
        return Icon.FromHandle(GetAssociatedIconHandle(Filename, size)) ;
    }

}

[StructLayout(LayoutKind.Sequential)]
public struct SHFILEINFO
{
    public IntPtr hIcon;
    public IntPtr iIcon;
    public uint dwAttributes;
    [MarshalAs(UnmanagedType.ByValTStr, SizeConst = 260)]
    public string szDisplayName;
    [MarshalAs(UnmanagedType.ByValTStr, SizeConst = 80)]
    public string szTypeName;
};


internal class Win32
{
    public const uint SHGFI_ICON = 0x100;
    public const uint SHGFI_LARGEICON = 0x0; // 'Large icon

    public const uint SHGFI_SMALLICON = 0x1; // 'Small icon

        [DllImport("shell32.dll", CharSet=CharSet.Unicode)]
    public static extern IntPtr SHGetFileInfo(
        [MarshalAs(UnmanagedType.LPWStr)]  // Use wide chars

        string pszPath
        , uint dwFileAttributes
        , ref SHFILEINFO psfi
        , uint cbSizeFileInfo
        , uint uFlags);
}
它利用了 Win32 Shell Api 函数,没有现有的Managed class为我们提供这种文件信息。所以这是唯一可行的方法,希望在 .NET 的下一个版本中能有所改进。
文件上传
文件上传功能太简单了,无需讨论,只需注意服务器代码可以处理多个文件,尽管我尚未更改 UI 以允许这样做。以下是函数源。
private void buttonSubmit_ServerClick(object sender, System.EventArgs e)
{
    for(int i = 0; i < Request.Files.Count ; ++i)
    {
       HttpPostedFile file = Request.Files[i] as HttpPostedFile;
       string path = string.Format(@"{0}\{1}"
           , this.RootPath.TrimEnd('\\'), Path.GetFileName(file.FileName)) ;
       file.SaveAs(path) ;
    }

    Response.Redirect(Request.Url.PathAndQuery) ;

}
电子邮件服务
电子邮件服务通过一个包装类Email提供,该类主要封装了System.Web.Mail提供的所有功能。尽管实现很简单,但一些关键功能仍然值得讨论。
使用线程池发送电子邮件
我认为 .NET 框架中最被忽视的功能之一是线程。实际上,在 .NET 中使用线程比许多人预期的要容易得多。通过后台线程发送电子邮件是此类适用领域的绝佳候选,此功能代码如下。
//

// In class Email send method

//

public void Send(string sTo, string sFrom, string sSubject
, string sBody, string sCc, string sBcc, bool SendByThreadInPool)
{
    MailMessage mailMessage = new MailMessage();

    // Other stuffs ...


    SmtpMail.SmtpServer = _mailServer ;

    if (!SendByThreadInPool)
    {
        SmtpMail.Send( mailMessage ) ;

        if (this._Logger != null)
        {
            string messageInfo = string.Format(
              "From:{0}\tTo:{1}\tSubject:{2}"
              , mailMessage.From
              , mailMessage.To
              , mailMessage.Subject) ;

            this._Logger.Write(messageInfo
              + " completed successfully.") ;
        }
    }
    else
    {
        // Use Thread pool to give immediate UI response

        if (!ThreadPool.QueueUserWorkItem(new WaitCallback(Start)
               , mailMessage))

            throw new ApplicationException(
              "Cannot queue task to send email.") ;
    }

    // Other stuffs ...

}

//

// In class Email Start method

//

private void Start(object mailMessage)
{
    MailMessage message = mailMessage as MailMessage ;
    if (message != null)
    {
        string messageInfo = string.Format("From:{0}\tTo:{1}\tSubject:{2}"
           , message.From, message.To, message.Subject) ;
        try
        {
            SmtpMail.Send( message  );

            if (this._Logger != null)
                this._Logger.Write(messageInfo + " completed successfully.") ;
        }
        catch(Exception excpt)
        {
            if (this._Logger != null)
            {
               this._Logger.Write(messageInfo + " failed.") ;
               this._Logger.Write(excpt.ToString()) ;
            }
            else
            // Re-throw the exception ;

               throw ;
        }
    }
}
ThreadPool类实现在System.Threading程序集中,并有一个方法QueueUserWorkItem,它为我们提供了一个方便的功能,可以将我们的任务排队,以便由 .NET 提供的系统线程池中的线程进行处理。要使函数由线程池中的线程运行,我们需要创建一个委托WaitCallBack,并使函数的布局与该委托匹配。函数布局要求如下。
void FunctioName(object state) ;
Email类的方法Start实际上符合此标准,当我排队批量任务时,我将MailMessage对象传递给了被调用的函数。
日志记录
在开发后台任务程序时,我们需要注意错误日志记录。显然,当出现问题时,没有 UI 的后台任务不容易提醒用户。所以请确保为后台任务实现适当的日志记录机制。由于我希望将日志记录机制与Email类解耦,我定义了一个接口来指示如何提供日志记录,如下所示。
public interface ILogger
{
    void Write(string MessageLine) ;
}
实际实现转到类FileLogger,它只是使用文本文件提供日志记录。但是,任何实现ILogger的类都可以完成同样的工作,您可以轻松地扩展应用程序以将信息记录到其他数据存储。
缓存服务
ASP.NET 提供的一个不错的特性是缓存,您可以通过在页面源中添加声明性语句来指定 WebForm 自动缓存。这是在 ASP.NET 应用程序中实现缓存的最简单方法。但是,要探索 ASP.NET 缓存功能的真正强大之处,您需要做更多的工作。
我定义了一个类CacheManager为我的应用程序提供缓存,实现如下。
public class CacheManager
{
    static public FileSystemInfosExtend
             GetFileItems(string CurrentRootPath, bool RefreshCache)
    {
        // Format cache key as FileSystemInfosExtend:{CurrentRootPath}

        string keyName =
             string.Format("FileSystemInfosExtend:{0}",  CurrentRootPath) ;
        if ( RefreshCache || HttpContext.Current.Cache[keyName] == null )
        {
            // Remove previous cached item

            if ( HttpContext.Current.Cache[keyName] != null )
                    HttpContext.Current.Cache.Remove(keyName) ;

            DirectoryInfo CurrentRoot =
                              new DirectoryInfo(CurrentRootPath) ;
            FileSystemInfo[] files = CurrentRoot.GetFileSystemInfos() ;
            FileSystemInfosExtend FileInfosEx =
                                new FileSystemInfosExtend(files) ;

            // Create cache item

            HttpContext.Current.Cache.Insert(
                keyName
                , FileInfosEx
                , null
                , DateTime.Now.Add(TimeSpan.FromMinutes(
                    AppSetting.ApplicationCacheTimeOut))
                , Cache.NoSlidingExpiration) ;
        }


        return HttpContext.Current.Cache[keyName] as FileSystemInfosExtend ;
    }
}
您应该注意缓存键,因为如果我们想缓存多个应用程序对象,我们需要定义一种方法来区分对象并稍后检索它们。由于我的应用程序对象是文件夹项的列表,因此逻辑命名约定应该是当前请求文件夹的路径名加上对象类型,即FileSystemInfosExtend。
我定义了一个特殊参数RefreshCache来显式刷新缓存。当按下“刷新”按钮时,通过调用Cache Manager并设置参数RefreshCache为true来刷新缓存。
.NET framework FileSystemWatcher组件使我们能够访问以下事件。
Created— 每当创建目录或文件时引发。Deleted— 每当删除目录或文件时引发。Renamed— 每当更改目录或文件的名称时引发。Changed— 每当对目录或文件的大小、系统属性、上次写入时间、上次访问时间或安全权限进行更改时引发。
我们可以利用此组件刷新应用程序缓存,这样应用程序用户将始终拥有最新的文件夹列表副本。
文件和文件夹复制
文件和文件夹复制功能使用System.IO类实现。在主文件列表屏幕上选择文件或子文件夹后,单击屏幕底部的COPY按钮,您将在FileCopy.aspx页面中看到主文件复制屏幕。

图 10 - 文件(多个)复制到目标目录选择
单击Subfolder链接按钮将带您到所选文件夹的子文件夹,单击所选文件夹本身会将顶部列表中的文件复制到其中。
在 ViewState 中存储选定的项目
由于我在文件项列表屏幕上提供了分页,当用户单击checkbox选择某些项目并切换到另一页时,我们需要记住选定的项目。将选定的项目列表保存在会话状态中可能是一种选择,但我认为将其存储在ViewState中更好,因为此信息仅附加到此特定页面,不应通过扩大范围使其可供其他页面使用。这是在编程第一课中确定变量范围时的基本经验法则。
在页面代码隐藏类中定义了一个方法SaveSelectedItemKey和一个属性SelectedKey,如下所示。
// Property to stored selected datagrid

//key (File/directory item full path) to ViewState

private ArrayList SelectedKey
{
    set
    {
       ViewState["SelectedKey"] = value ;
    }
    get
    {
        if ( ViewState["SelectedKey"] == null )
            return new ArrayList() ;
        else
            return ViewState["SelectedKey"] as ArrayList ;
    }
}


// Method to store datagrid keys to page property SelectedKey

private void SaveSelectedItemKey()
{
    ArrayList arrayList =  this.SelectedKey  ;

    foreach(DataGridItem listItem in this.DataGrid1.Items)
    {
       if (listItem.ItemType == ListItemType.AlternatingItem
            || listItem.ItemType == ListItemType.Item)
       {
            CheckBox selected = listItem.FindControl("Select") as CheckBox ;
            string keyItem = DataGrid1.DataKeys[listItem.ItemIndex] as string ;

            if (selected.Checked && !arrayList.Contains(keyItem))
                arrayList.Add(keyItem) ;

            if (!selected.Checked && arrayList.Contains(keyItem) )
                arrayList.Remove(keyItem) ;
        }
    }

    this.SelectedKey = arrayList ;
}
正如您所见,CheckBox项将被选中,所有选定的DataKey将存储在ArrayList中,稍后单击Copy按钮开始复制时将检索这些数据。
复制子文件夹树
复制文件列表很容易,但复制带有子目录树的目录则不然。有没有什么帮助?System.IO.Directory类中有一个Move方法可以帮助我们移动目录树,但没有找到Copy方法!
所以我们这些可怜的人需要自己开发这个功能。幸运的是,这并不难,有一堆System.IO类帮助我们完成任务。下面的代码列表是我在一个方法中完成的。
private int CopyFile(string SourceFile, string DestinationPath)
{
    int FileCount = 0 ;
    // Is SourceFile file or folder(directory) name?

    if (File.Exists(SourceFile))
    {
        File.Copy(SourceFile
            , DestinationPath
            + Path.DirectorySeparatorChar
            + Path.GetFileName(SourceFile)
            , true) ;
            ++FileCount ;
    }
    else if (Directory.Exists(SourceFile))
    {
        // Create the detsination sub-folder(subdirectory) first

        DirectoryInfo directoryInfo  = new DirectoryInfo(SourceFile) ;
        string DestinationSubDirectory = DestinationPath
              + Path.DirectorySeparatorChar
              +  directoryInfo.Name ;

        if (!Directory.Exists(DestinationSubDirectory))
                Directory.CreateDirectory(DestinationSubDirectory) ;

        // Copy all items under this folder(directory)

        //  to detsination sub-folder(subdirectory)

        FileSystemInfo[] fileinfos = directoryInfo.GetFileSystemInfos() ;
        foreach(FileSystemInfo fileinfo in fileinfos)
                FileCount +=
                   this.CopyFile(fileinfo.FullName, DestinationSubDirectory) ;
     }
     else
       throw new System.IO.FileNotFoundException("File not found!", SourceFile) ;

    return FileCount ;
}
这个CopyFile方法实现的要点是使用递归调用来实现子目录的复制。当源不是文件时,程序将列出其下的所有项,创建必要的目标子目录,然后再递归调用该函数。
其他附加功能
- 将页眉和页脚分开放在User Controls中,方便您进行自定义。
- 使用Cascading Style Sheets(CSS),也方便您进行自定义。
- WebUI.cs实用程序用于注入客户端 JavaScript。虽然在此项目中我没有大量使用它,但当您添加更多客户端功能时,它很有用。无论如何,我在另一个项目中大量使用它。
结论
距离为这个文件管理应用程序添加更多功能还有很长的路要走。我希望将来有时间的话,会添加更多功能,例如文件项的移动和删除,使用FileSystemWatcher的事件自动更新应用程序缓存,以及文件版本控制等其他高级功能。无论如何,我希望这是个开始,欢迎任何人根据我粗糙的工作来帮助我使其完美。