
C# 中的图像处理实验室
4.94/5 (521投票s)
一个用于图像处理的工具和库
引言
图像处理实验室是一个简单的图像处理工具,它包含了 AForge.NET 框架中提供的各种滤镜和图像分析工具。您可以轻松地开发自己的滤镜并将其集成到代码中,或在自己的应用程序中使用这些工具。以下滤镜已在 AForge.NET 框架中实现并在应用程序中进行了演示:
- 颜色滤镜(灰度、棕褐色、反色、旋转、通道提取、通道替换、通道滤波、颜色滤波、欧氏距离颜色滤波);
- HSL 滤镜(线性校正、亮度、对比度、饱和度、色相修改、HSL 滤波);
- YCbCr 滤镜(线性校正、YCbCr 滤波、通道提取/替换);
- 二值化滤镜(阈值、带进位的阈值、有序抖动、拜耳抖动、Floyd-Steinberg、Burkes、Jarvis-Judice-Ninke、Sierra、Stevenson-Arce、Stucki 抖动方法);
- 自动二值化(简单图像统计);
- 数学形态学滤镜(腐蚀、膨胀、开运算、闭运算、击中与不击中、细化、粗化);
- 卷积滤镜(均值、模糊、锐化、边缘、高斯);
- 2 源滤镜(合并、相交、相加、相减、差值、向...移动、变形);
- 边缘检测器(同质性、差值、Sobel、Canny);
- 斑点计数器、连通分量标记;
- 像素化、简单骨架化、抖动、收缩、油画;
- 色阶线性滤镜、伽马校正;
- 中值滤镜、自适应平滑、保守平滑;
- 缩放和旋转;
- 基于 Perlin 噪声的纹理生成器;
- 纹理滤镜(纹理化、纹理滤波、纹理合并);
- 傅里叶变换(低通和高通滤镜)。
您可以创建(保存和加载)自己的卷积滤镜或基于标准数学形态学算子的滤镜。彩色网格使得处理自定义卷积滤镜非常方便。
预览窗口允许您实时查看滤镜参数更改的效果。您可以使用鼠标在预览区域滚动图像。所有滤镜都只应用于当前可见的图像部分,以加快预览速度。
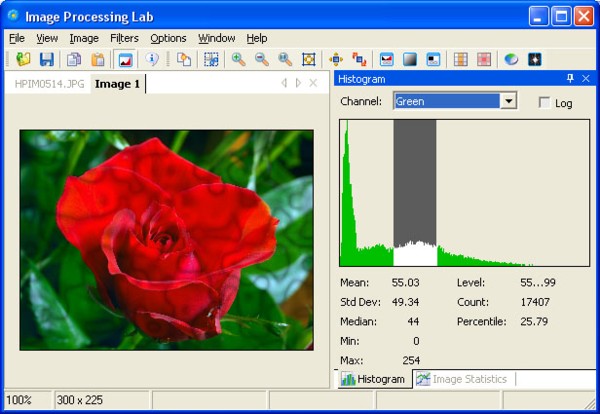
类似 Photoshop 的直方图允许您获取关于均值、标准差、中值、最小值和最大值的信息。
该程序允许您复制到剪贴板或从剪贴板粘贴,保存和打印图像。
Using the Code
大多数滤镜旨在处理 24bpp RGB 图像或灰度图像。对于灰度图像,我们使用 `PixelFormat.Format8bppIndexed` 和 256 个条目的调色板。为确保您的图像是其中一种格式,您可以使用以下代码:
// load an image
System.Drawing.Bitmap image = (Bitmap) Bitmap.FromFile( fileName );
// format image
AForge.Imaging.Image.FormatImage( ref image );
将任何滤镜应用于您的图像非常容易
// load an image
System.Drawing.Bitmap image = (Bitmap) Bitmap.FromFile( fileName );
// create filter
AForge.Imaging.Filters.Median filter = new AForge.Imaging.Filters.Median( );
// apply filter
System.Drawing.Bitmap newImage = filter.Apply( image );
假设您想对图像应用一系列滤镜。直接的方法是逐个应用滤镜,但这在处理 3 个或更多滤镜时不太可能。所有滤镜都实现了 `IFilter` 接口,因此我们可以创建一个滤镜集合并一次性将其应用于图像(此外,该集合还将使我们免于处理中间图像的释放操作)。
// create filters sequence AForge.Imaging.Filters.FiltersSequence
filter = new AForge.Imaging.Filters.FiltersSequence( );
// add filters to the sequence
filter.Add( new AForge.Imaging.Filters.Sepia( ) );
filter.Add( new AForge.Imaging.Filters.RotateBilinear( 45) );
filter.Add( new AForge.Imaging.Filters.ResizeBilinear( 320, 240 ) );
filter.Add( new AForge.Imaging.Filters.Pixellate( 8 ) );
filter.Add( new AForge.Imaging.Filters.Jitter( 2 ) );
filter.Add( new AForge.Imaging.Filters.Blur( ) );
// apply the sequence to an image
System.Drawing.Bitmap newImage = filter.Apply( image );
可以轻松获取图像统计信息,如均值、标准差、中值、最小值和最大值。这对于图像亮度和对比度调节非常有用。
// get image statistics
AForge.Imaging.ImageStatistics statistics =
    new AForge.Imaging.ImageStatistics( image );
// get the red histogram
AForge.Math.Histogram histogram = statistics.Red;
// get the values
double mean = histogram.Mean;     // mean red value
double stddev = histogram.StdDev; // standard deviation of red values
int    median = histogram.Median; // median red value
int    min = histogram.Min;       // min red value
int    max = histogram.Max;       // max value
// get 90% range around the median
AForge.IntRange range = histogram.GetRange( 0.9 );
图像统计信息可以轻松地与滤镜结合。假设图像中红色通道的最小值是 50,最大值是 200。那么,我们可以标准化红色通道的对比度。
// create levels filter
AForge.Imaging.Filters.LevelsLinear filter =
    new AForge.Imaging.Filters.LevelsLinear( );
filter.InRed = new IntRange( histogram.Min, histogram.Max );
// apply the filter
System.Drawing.Bitmap newImage = filter.Apply( image );
或者,我们可以标准化每个通道的对比度,只获取每个通道的 90% 范围。
// create levels filter
AForge.Imaging.Filters.LevelsLinear filter =
    new AForge.Imaging.Filters.LevelsLinear( );
filter.InRed = statistics.Red.GetRange( 0.9 );
filter.InGreen = statistics.Green.GetRange( 0.9 );
filter.InBlue = statistics.Blue.GetRange( 0.9 );
// apply the filter
System.Drawing.Bitmap newImage = filter.Apply( image );
HSL 滤镜
使用 HSL 颜色空间对某些类型的滤镜来说更直观。例如,使用 RGB 颜色空间调整图像的饱和度水平不是很清晰。但使用 HSL 颜色空间可以轻松完成。
// create filter
AForge.Imaging.Filters.SaturationCorrection filter =
    new AForge.Imaging.Filters.SaturationCorrection( 0.1 );
// apply the filter
System.Drawing.Bitmap newImage = filter.Apply( image );
 原始图像 |
 调整饱和度后 |
使用 HSL 颜色空间,我们可以修改像素的色相值。将所有色相值设置为相同的值将导致图像呈一种颜色的渐变。
// create filter
AForge.Imaging.Filters.HueModifier filter =
    new AForge.Imaging.Filters.HueModifier( 142 );
// apply the filter
System.Drawing.Bitmap newImage = filter.Apply( image );
使用 HSL 滤波可以获得更有趣的结果。例如,我们可以只保留指定的色相值范围,并使该范围之外的所有其他值去饱和。这样,将得到一个黑白图像,只有某些区域是彩色的。
// create filter
AForge.Imaging.Filters.HSLFiltering filter =
    new AForge.Imaging.Filters.HSLFiltering( );
filter.Hue = new IntRange( 340, 20 );
filter.UpdateHue = false;
filter.UpdateLuminance = false;
// apply the filter
System.Drawing.Bitmap newImage = filter.Apply( image );
 修改色相后 |
 HSL 滤波 |
数学形态学滤镜
可以使用数学形态学滤镜完成许多任务。例如,我们可以使用腐蚀来减少二值图像中的噪声,或者我们可以使用滤镜分离一些对象。使用膨胀,我们可以使图像中我们感兴趣的某些部分增长。最有趣的形态学算子之一是“击中与不击中”。所有其他形态学算子都可以从“击中与不击中”算子中导出。例如,我们可以用它来搜索图像中的特定结构。
// searching for vertical lines
short[,] vse = new short[3, 3] {
    { 0, 1, 0 },
    { 0, 1, 0 },
    { 0, 1, 0 }
};
AForge.Imaging.Filters.HitAndMiss vFilter =
    new AForge.Imaging.Filters.HitAndMiss( vse );
System.Drawing.Bitmap vImage = vFilter.Apply( image );
// searching for horizontal lines
short[,] hse = new short[3, 3] {
    { 0, 0, 0 },
    { 1, 1, 1 },
    { 0, 0, 0 }
};
AForge.Imaging.Filters.HitAndMiss hFilter =
    new AForge.Imaging.Filters.HitAndMiss( hse );
System.Drawing.Bitmap hImage = hFilter.Apply( image );
 原始图像 |
 搜索垂直线 |
 搜索水平线 |
使用粗化算子,我们可以在需要的地方增长图像的某些部分。例如,下面的示例将导致图像底部的水平线变粗。
// create filter
AForge.Imaging.Filters.FilterIterator filter =
    new AForge.Imaging.Filters.FilterIterator(
    new AForge.Imaging.Filters.HitAndMiss(
    new short [,] { { 1, 1, 1 }, { -1, 0, -1 }, { -1, -1, -1 } },
    HitAndMiss.Modes.Thinning ), 5 );
// apply the filter
System.Drawing.Bitmap newImage = filter.Apply( image );
原始图像 |
 粗化图像 |
使用细化算子,您可以去除图像中一些不必要的部门。例如,您可以开发一种带有适当结构元素的骨架化滤镜。
// create filter sequence
AForge.Imaging.Filters.FiltersSequence filterSequence =
    new AForge.Imaging.Filters.FiltersSequence( );
// add 8 thinning filters with different structuring elements
filterSequence.Add( new AForge.Imaging.Filters.HitAndMiss(
    new short [,] { { 0, 0, 0 }, { -1, 1, -1 }, { 1, 1, 1 } },
    HitAndMiss.Modes.Thinning ) );
filterSequence.Add( new AForge.Imaging.Filters.HitAndMiss(
    new short [,] { { -1, 0, 0 }, { 1, 1, 0 }, { -1, 1, -1 } },
    HitAndMiss.Modes.Thinning ) );
filterSequence.Add( new AForge.Imaging.Filters.HitAndMiss(
    new short [,] { { 1, -1, 0 }, { 1, 1, 0 }, { 1, -1, 0 } },
    HitAndMiss.Modes.Thinning ) );
filterSequence.Add( new AForge.Imaging.Filters.HitAndMiss(
    new short [,] { { -1, 1, -1 }, { 1, 1, 0 }, { -1, 0, 0 } },
    HitAndMiss.Modes.Thinning ) );
filterSequence.Add( new AForge.Imaging.Filters.HitAndMiss(
    new short [,] { { 1, 1, 1 }, { -1, 1, -1 }, { 0, 0, 0 } },
    HitAndMiss.Modes.Thinning ) );
filterSequence.Add( new AForge.Imaging.Filters.HitAndMiss(
    new short [,] { { -1, 1, -1 }, { 0, 1, 1 }, { 0, 0, -1 } },
    HitAndMiss.Modes.Thinning ) );
filterSequence.Add(new AForge.Imaging.Filters.HitAndMiss(
    new short [,] { { 0, -1, 1 }, { 0, 1, 1 }, { 0, -1, 1 } },
    HitAndMiss.Modes.Thinning ) );
filterSequence.Add( new AForge.Imaging.Filters.HitAndMiss(
    new short [,] { { 0, 0, -1 }, { 0, 1, 1 }, { -1, 1, -1 } },
    HitAndMiss.Modes.Thinning ) );
// create filter iterator for 10 iterations
AForge.Imaging.Filters.FilterIterator filter =
    new AForge.Imaging.Filters.FilterIterator( filterSequence, 10 );
// apply the filter
System.Drawing.Bitmap newImage = filter.Apply( image );
 原始图像 |
 细化图像 |
傅里叶变换
进行傅里叶变换很容易,这对于使用该库进行图像分析和滤波非常有用。
// create complex image from bitmap
AForge.Imaging.ComplexImage cimage =
    AForge.Imaging.ComplexImage.FromBitmap( bitmap );
// perform forward Fourier transformation
cimage.ForwardFourierTransform( );
// get frequency view
System.Drawing.Bitmap img = cimage.ToBitmap( );
 |
可以使用 `ComplexImage` 类的 `FrequencyFilter` 方法执行低通和高通滤波。
// lowpass filtering
cimage.FrequencyFilter( new Range( 0, 100 ) );
// perform backward Fourier transformation
cimage.BackwardFourierTransform( );
// get filtered image
System.Drawing.Bitmap img = cimage.ToBitmap( );
斑点计数器
斑点计数器是一个非常有用的功能,可以应用于许多不同的应用。它做什么?它可以计算二值图像上的对象并提取它们。这个想法来自于“连通分量标记”,这是一个用不同颜色着色每个独立对象的滤镜。让我们看一个小例子。
// create filter
AForge.Imaging.Filters.ConnectedComponentsLabeling filter =
    new AForge.Imaging.Filters.ConnectedComponentsLabeling( );
// apply filter
System.Drawing.Bitmap newImage = filter.Apply( image );
// objects count
System.Diagnostics.Debug.WriteLine( "Objects count: " +
    filter.ObjectCount );
这里有两个图像:原始图像和彩色图像。所以,看起来这个滤镜确实能够计数对象。
 |
 |
这是另一个对象计数并检索其位置和大小的例子。
// process an image
AForge.Imaging.BlobCounter blobCounter = new BlobCounter( image );
Rectangle[] rects = blobCounter.GetObjectRectangles( );
// objects count
System.Diagnostics.Debug.WriteLine( "Objects count: " + rects.Length );
// objects dimension
foreach ( Rectangle rc in rects )
{
    System.Diagnostics.Debug.WriteLine(
        string.Format("Position: ({0}, {1}), Size: {2} x {3}",
        rc.Left, rc.Top, rc.Width, rc.Height ) );
}
可以使用 `BlobCounter` 的 `GetObjects` 方法提取每个对象。
// process an image
AForge.Imaging.BlobCounter blobCounter = new BlobCounter( image );
Blob[] blobs = blobCounter.GetObjects( image );
// process blobs
foreach ( Blob blob in blobs )
{
    // ...
    // blob.Location - location of the blob
    // blob.Image - blob`s image
}
YCbCr 滤波
YCbCr 滤镜提供了与 RGB 和 HSL 滤镜类似的功能。YCbCr 线性校正滤镜的运行方式与其在其他颜色空间中的类似物相同,但分别对 Y、Cb 和 Cr 分量进行操作,为我们提供了额外的方便的颜色校正方法。以下小示例演示了 YCbCr 线性滤镜的使用以及就地滤波的使用:这是一个允许您过滤源图像而不是创建新结果图像的功能。
// create filter
YCbCrLinear filter = new YCbCrLinear( );
filter.InCb = new DoubleRange( -0.276, 0.163 );
filter.InCr = new DoubleRange( -0.202, 0.500 );
// apply filter
filter.ApplyInPlace( image );
 |
 |
Perlin 噪声滤镜
Perlin 噪声有许多应用,其中最有趣的之一是创建各种效果,如大理石、木纹、云等。将这些效果应用于图像可以分两步完成。第一步是生成效果纹理,第二步是将纹理应用于特定图像。纹理生成器位于库的 `Textures` 命名空间中,其中包含用于云、木纹、大理石、迷宫和织物等效果的生成器。所有这些纹理生成器都实现了 `ITextureGenerator` 接口。对于将纹理应用于图像,有三个滤镜。第一个是 `Texturer`,用于对图像进行纹理处理。第二个是 `TexturedFilter`,它允许使用纹理作为掩码将任何其他滤镜应用于图像。第三个是 `TexturedMerge`,它允许使用纹理作为掩码合并两个图像。
// 1 - Marble effect
// create texture
ITextureGenerator generator = new MarbleTexture( );
float[,] texture = generator.Generate( image.Width, image.Height );
// create filter
IFilter filter1 = new Texturer( texture );
// apply filter
Bitmap newImage1 = filter1.Apply( image );
// 2 - Wood effect
// create filter
IFilter filter2 = new Texturer( new WoodTexture( ) );
// apply filter
Bitmap newImage2 = filter2.Apply( image );
// 3 - Textile effect
// create filter
IFilter filter3 = new Texturer( new TextileTexture( ) );
// apply filter
Bitmap newImage3 = filter3.Apply( image );
// 4 - Rusty effect
IFilter filter4 = new TexturedFilter( new CloudsTexture( ),
    new Sepia( ) , new GrayscaleBT709( ) );
// apply filter
Bitmap newImage4 = filter4.Apply( image );
 |
 |
 |
 |
AForge.NET 框架
图像处理实验室应用程序基于 AForge.NET 框架,该框架提供了应用程序中所有可用的滤镜和图像处理例程。要获取有关该框架的更多信息,您可以阅读 The Code Project 上的 专用文章,或者访问 项目主页,您可以在那里获取有关它的所有最新信息,参与讨论组或提交问题或增强请求。
结论
我认为这段代码对于那些想开始学习图像处理的人或者滤镜/效果开发者来说可能很有趣。至于我,我将使用这个工具进行进一步的计算机视觉研究。此外,该库在我成功完成我的学士论文方面给了我很大的帮助。
历史
- [2007年3月8日] - 版本 2.4.0
- 应用程序已转换为 .NET 2.0;
- 与 AForge.NET 框架集成。
- [2006年6月13日] - 版本 2.3.0
- 引入了就地滤镜接口,允许在源图像上应用滤镜;
- Perlin 噪声纹理生成器(大理石、木纹、织物、迷宫、云);
- 纹理滤镜(纹理化、纹理滤波、纹理合并);
- RGB 到 YCbCr 和 YCbCr 到 RGB 转换器;
- YCbCr 滤镜;
- YCbCr 的图像统计信息;
- 其他小改动(Canny 边缘检测器修复,Pixellate 滤镜更新,morph 滤镜)。
- [2005年9月20日] - 版本 2.2.0
- Canny 边缘检测器;
- 油画、保守平滑;
- 简单的图像统计阈值。
- [2005年8月20日] - 版本 2.1.0
- 斑点计数器、连通分量标记;
- Sobel 边缘检测器;
- 自适应平滑、高斯模糊、图像裁剪。
- [2005年7月12日] - 版本 2.0.0
- 同质性和差值边缘检测器;
- 傅里叶变换(低通和高通滤镜);
- AForge 命名空间;
- 复制和粘贴到剪贴板;
- 图像保存和打印。
- [2005年6月20日] - 版本 1.4.0
- 更多形态学方法(击中与不击中、细化、粗化);
- HSL 滤镜;
- 伽马校正、滤镜迭代器等。
- [2005年3月29日] - 版本 1.3.0
- 缩放和旋转;
- 抖动、收缩,更多抖动方法;
- MaskedFilter。
- [2005年3月20日] - 版本 1.2.0
- 更多滤镜;
- 预览窗口;
- 用于形态学和卷积自定义滤镜的网格着色;
- 支持两个源滤镜;
- 工具栏。
- [2005年3月3日] - 版本 1.0.0