
使用 MVC 和 WCF REST 实现 Angular JS 购物车
4.87/5 (80投票s)
使用 AngularJS 和 WCF REST 服务创建简单的在线购物车

引言
您还可以查看我之前关于使用 MVC 和 WCF REST 服务构建 AngularJs 的文章
本文将详细介绍如何使用 Angular JS 和 WCF REST 服务创建一个简单的在线购物车。本文将介绍
- 如何创建 WCF REST 服务以及如何从数据库检索和插入数据。
- 如何将 Angular JS 包安装到 MVC 应用程序中。
- 如何使用 AngularJs 和 MVC 将图片上传到我们的根文件夹。
- 使用 AngularJS 和 WCF REST 从数据库中选择和插入项目详细信息
- 如何使用 Angular JS 中的 WCS 服务来创建我们自己的简单在线购物应用程序,包括
- 显示带有过滤和排序选项的项目
- 选择并将项目添加到购物车
- 在购物车中显示总价、总数量和总计
- 将图片上传到服务器根文件夹
- 从数据库插入和选择数据
- 显示购物车详细信息
注意:先决条件是 Visual Studio 2013(如果您没有 Visual Studio 2013,可以从 Microsoft 网站 这里下载)。
在这里,我们可以看到一些关于 Windows Communication Foundation (WCF) 的基础知识和参考链接。WCF 是一个用于构建面向服务应用程序的框架。
面向服务应用程序:使用此协议,服务可以在网络上共享和使用。
例如,我们假设现在我们正在处理一个项目,需要创建一些通用的数据库函数,而这些函数需要被多个项目使用,并且这些项目位于不同的位置并通过互联网等网络连接。
在这种情况下,我们可以创建一个 WCF 服务,并在我们的 WCF 服务类中编写所有通用的数据库函数。我们可以在 IIS 中部署我们的 WCF,并在应用程序中使用 URL 来执行数据库函数。在代码部分,让我们看看如何创建一个 WCF REST 服务并在我们的 AngularJS 应用程序中使用它。
如果您有兴趣阅读更多关于 WCF 的详细信息,请访问此 链接。
AngularJS
我们可能熟悉 Model、View 和 View Model (MVVM) 以及 Model、View 和 Controller (MVC) 是什么。AngularJS 是一个纯粹基于 HTML、CSS 和 JavaScript 的 JavaScript 框架。
与 MVC 和 MVVM 模式类似,AngularJS 使用 Model、View 和 Whatever (MVW) 模式。
在我们的示例中,我使用了 Model、View 和 Service。在代码部分,让我们看看如何在我们的 MVC 应用程序中安装和创建 AngularJS。
Using the Code
1) 创建数据库和表
我们将在名为 ShoppingDB 的数据库下创建一个 ItemDetails 表。以下是创建数据库、表和示例插入查询的脚本。在您的 SQL Server 中运行此脚本。我使用的是 SQL Server 2012。
-- =============================================

-- Author      : Shanu
-- Create date : 2015-03-20
-- Description : To Create Database,Table and Sample Insert Query
-- Latest
-- Modifier    : Shanu
-- Modify date : 2015-03-20

-- =============================================
--Script to create DB,Table and sample Insert data

USE MASTER
GO

-- 1) Check for the Database Exists .If the database is exist then drop and create new DB
IF EXISTS (SELECT [name] FROM sys.databases WHERE [name] = 'ShoppingDB' )
DROP DATABASE ShoppingDB
GO

CREATE DATABASE ShoppingDB
GO

USE ShoppingDB
GO

-- 1) //////////// ItemDetails table
-- Create Table ItemDetails,
-- This table will be used to store the details like Item Information

IF EXISTS ( SELECT [name] FROM sys.tables WHERE [name] = 'ItemDetails' )
DROP TABLE ItemDetails
GO

CREATE TABLE ItemDetails
(
   Item_ID int identity(1,1),
   Item_Name VARCHAR(100)  NOT NULL,
   Item_Price int  NOT NULL,
   Image_Name VARCHAR(100)  NOT NULL,
   Description VARCHAR(100)  NOT NULL,
   AddedBy VARCHAR(100)  NOT NULL,
CONSTRAINT [PK_ItemDetails] PRIMARY KEY CLUSTERED
(
  [Item_ID] ASC
)WITH (PAD_INDEX  = OFF, STATISTICS_NORECOMPUTE  = OFF, _
 IGNORE_DUP_KEY = OFF, ALLOW_ROW_LOCKS  = ON, ALLOW_PAGE_LOCKS  = ON) ON [PRIMARY]
) ON [PRIMARY]

GO

-- Insert the sample records to the ItemDetails Table

Insert into ItemDetails(Item_Name,Description,Item_Price,Image_Name,AddedBy) _
values('Access Point','Access Point for Wifi use',950,'AccessPoint.png','Shanu')

Insert into ItemDetails(Item_Name,Description,Item_Price,Image_Name,AddedBy) _
values('CD','Compact Disk',350,'CD.png','Afraz')

Insert into ItemDetails(Item_Name,Description,Item_Price,Image_Name,AddedBy) _
values('Desktop Computer','Desktop Computer',1400,'DesktopComputer.png','Shanu')

Insert into ItemDetails(Item_Name,Description,Item_Price,Image_Name,AddedBy) _
values('DVD','Digital Versatile Disc',1390,'DVD.png','Raj')

Insert into ItemDetails(Item_Name,Description,Item_Price,Image_Name,AddedBy) _
values('DVD Player','DVD Player',450,'DVDPlayer.png','Afraz')

Insert into ItemDetails(Item_Name,Description,Item_Price,Image_Name,AddedBy) _
values('Floppy','Floppy',1250,'Floppy.png','Mak')

Insert into ItemDetails(Item_Name,Description,Item_Price,Image_Name,AddedBy) _
values('HDD','Hard Disk',950,'HDD.png','Albert')

Insert into ItemDetails(Item_Name,Description,Item_Price,Image_Name,AddedBy) _
values('MobilePhone','Mobile Phone',1150,'MobilePhone.png','Gowri')

Insert into ItemDetails(Item_Name,Description,Item_Price,Image_Name,AddedBy) _
values('Mouse','Mouse',399,'Mouse.png','Afraz')

Insert into ItemDetails(Item_Name,Description,Item_Price,Image_Name,AddedBy) _
values('MP3 Player ','Multi MediaPlayer',897,'MultimediaPlayer.png','Shanu')

Insert into ItemDetails(Item_Name,Description,Item_Price,Image_Name,AddedBy) _
values('Notebook','Notebook',750,'Notebook.png','Shanu')

Insert into ItemDetails(Item_Name,Description,Item_Price,Image_Name,AddedBy) _
values('Printer','Printer',675,'Printer.png','Kim')

Insert into ItemDetails(Item_Name,Description,Item_Price,Image_Name,AddedBy) _
values('RAM','Random Access Memory ',1950,'RAM.png','Jack')

Insert into ItemDetails(Item_Name,Description,Item_Price,Image_Name,AddedBy) _
values('Smart Phone','Smart Phone',679,'SmartPhone.png','Lee')

Insert into ItemDetails(Item_Name,Description,Item_Price,Image_Name,AddedBy) _
values('USB','USB',950,'USB.png','Shanu')

select * from ItemDetails
2)创建 WCF REST 服务
打开 Visual Studio 2013,然后选择“文件” -> “新建” -> “项目...”,然后选择 WCF 服务应用程序,然后选择您的项目路径并命名您的 WCF 服务,然后单击 确定。

创建 WCF 服务后,我们可以在 解决方案资源管理器 中看到“IService.CS”和“Service1.svc”,如下所示:

IService.CS:在“IService.CS”中,默认可以看到三个契约。
[ServiceContract]描述了服务可用的方法或任何操作。服务契约是一个接口,方法可以使用 Operation Contract 属性在服务接口内声明。[OperationContract]类似于 Web 服务 [WEBMETHOD]。[DataContract]描述了客户端和服务之间的数据交换。
[ServiceContract]
以下代码将为所有IService.CS 文件自动创建。我们可以在这里修改并编写自己的代码。
    public interface IService1
    {
        [OperationContract]
        string GetData(int value);

        [OperationContract]
        CompositeType GetDataUsingDataContract(CompositeType composite);

        // TODO: Add your service operations here
    }

 // Use a data contract as illustrated in the sample below
 // to add composite types to service operations.

    [DataContract]
    public class CompositeType
    {
        bool boolValue = true;
        string stringValue = "Hello ";

        [DataMember]
        public bool BoolValue
        {
            get { return boolValue; }
            set { boolValue = value; }
        }

        [DataMember]
        public string StringValue
        {
            get { return stringValue; }
            set { stringValue = value; }
        }
    }
数据合同
在我们的示例中,我们需要从数据库中获取所有项目详细信息,因此我创建了一个数据契约“itemDetailsDataContract”。在这里,我们可以看到我们将整个表名列声明为数据成员。
public class shoppingCartDataContract
        {
            [DataContract]
            public class itemDetailsDataContract
            {
                [DataMember]
                public string Item_ID { get; set; }

                [DataMember]
                public string Item_Name { get; set; }

                [DataMember]
                public string Description { get; set; }

                [DataMember]
                public string Item_Price { get; set; }

                [DataMember]
                public string Image_Name { get; set; }

                [DataMember]
                public string AddedBy { get; set; }
            }
        }
服务合同
在 Operation Contract 中,我们可以看到“WebInvoke”和“WebGet”用于在 REST 服务中从数据库检索数据。
RequestFormat = WebMessageFormat.Json,
ResponseFormat = WebMessageFormat.Json,
在这里,我们可以看到请求和响应格式。在这里,我使用了 JavaScript 对象表示法 (JSON) 格式。
- JSON 是一种轻量级的数据交换格式。
UriTemplate:在这里我们提供我们的方法名
在这里,我声明了三个方法:“GetOrderMaster”、“SearchOrderMaster”和“OrderDetails”。“GetOrderMaster”方法获取订单主记录。“OrderDetails”方法通过Order_No 参数提供按订单号过滤的订单详细信息。
在这里,我声明了“GetItemDetails”方法,用于获取数据库中所有项目的详细信息。以及“addItemMaster”方法,用于将新项目插入数据库。
[ServiceContract]
    public interface IService1
    {
[OperationContract]
            [WebInvoke(Method = "GET",
               RequestFormat = WebMessageFormat.Json,
               ResponseFormat = WebMessageFormat.Json,
               UriTemplate = "/GetItemDetails/")]
            List<shoppingCartDataContract.itemDetailsDataContract> GetItemDetails();
            // TODO: Add your service operations here
            // to Insert the Item Master
            [OperationContract]
            [WebInvoke(Method = "POST",
               RequestFormat = WebMessageFormat.Json,
               ResponseFormat = WebMessageFormat.Json,
               UriTemplate = "/addItemMaster")]
            bool addItemMaster(shoppingCartDataContract.itemDetailsDataContract itemDetails);
 }
Iservice.Cs -> 完整源代码
using System;
using System.Collections.Generic;
using System.Linq;
using System.Runtime.Serialization;
using System.ServiceModel;
using System.ServiceModel.Web;
using System.Text;

namespace ShanuSchoppingCart_WCF
{
        [ServiceContract]
        public interface IService1
        {
            [OperationContract]
            [WebInvoke(Method = "GET",
               RequestFormat = WebMessageFormat.Json,
               ResponseFormat = WebMessageFormat.Json,
               UriTemplate = "/GetItemDetails/")]
            List<shoppingCartDataContract.itemDetailsDataContract> GetItemDetails();

            // to Insert the Item Master

            [OperationContract]
            [WebInvoke(Method = "POST",
               RequestFormat = WebMessageFormat.Json,
               ResponseFormat = WebMessageFormat.Json,
               UriTemplate = "/addItemMaster")]
            bool addItemMaster(shoppingCartDataContract.itemDetailsDataContract itemDetails);
        }

        public class shoppingCartDataContract
        {
            [DataContract]
            public class itemDetailsDataContract
            {
                [DataMember]
                public string Item_ID { get; set; }

                [DataMember]
                public string Item_Name { get; set; }

                [DataMember]
                public string Description { get; set; }

                [DataMember]
                public string Item_Price { get; set; }

                [DataMember]
                public string Image_Name { get; set; }

                [DataMember]
                public string AddedBy { get; set; }
            }
        }
    }
使用 ADO.NET 实体数据模型添加数据库
右键单击您的 WCF 项目,然后选择 添加新项,然后选择 ADO.NET 实体数据模型,然后单击 添加。

选择 从数据库生成 EF 设计器,然后单击 下一步。

单击 新建连接。

在这里,我们可以选择我们的数据库服务器名称,并输入您的 DB 服务器 SQL Server 身份验证用户名和密码。我们已经创建了名为“ShoppingDB”的数据库,因此我们可以选择该数据库并单击 确定。

单击 下一步,选择我们需要使用的表,然后单击 完成。
在这里,我们可以看到我们现在已经创建了我们的 shanuItemDetailsModel1。

Service1.SVC
“Service.SVC.CS”实现了IService 接口,并覆盖和定义了 Operation Contract 的所有方法。例如,在这里,我看到我在Service1类中实现了IService1。创建了我们实体模型的对象,并在GetToyDetails中使用 LINQ。
public class Service1 : IService1
    {
ShanuShoppingDBEntities OME;
        public Service1()
        {
            OME = new ShanuShoppingDBEntities();
        }

         // This method is get the Toys details from Db
         // and bind to list  using the Linq query
        public List<shoppingCartDataContract.itemDetailsDataContract> GetItemDetails()
        {
            var query = (from a in OME.ItemDetails
                         select a).Distinct();

            List<shoppingCartDataContract.itemDetailsDataContract> ItemDetailsList =
                          new List<shoppingCartDataContract.itemDetailsDataContract>();

            query.ToList().ForEach(rec =>
            {
                ItemDetailsList.Add(new shoppingCartDataContract.itemDetailsDataContract
                {
                    Item_ID =  Convert.ToString(rec.Item_ID),
                    Item_Name = rec.Item_Name,
                    Description=rec.Description,
                    Item_Price = Convert.ToString(rec.Item_Price),
                    Image_Name = rec.Image_Name,
                    AddedBy = rec.AddedBy
               });
            });

            return ItemDetailsList;
        }
“Service.SVC.CS” - 完整源代码
using System;
using System.Collections.Generic;
using System.Linq;
using System.Runtime.Serialization;
using System.ServiceModel;
using System.ServiceModel.Web;
using System.Text;
using ShanuSchoppingCart_WCF.Module;

namespace ShanuSchoppingCart_WCF
{
    public class Service1 : IService1
    {
        ShanuShoppingDBEntities OME;
        public Service1()
        {
            OME = new ShanuShoppingDBEntities();
        }

        public List<shoppingCartDataContract.itemDetailsDataContract> GetItemDetails()
        {
            var query = (from a in OME.ItemDetails
                         select a).Distinct();

            List<shoppingCartDataContract.itemDetailsDataContract> ItemDetailsList =
                           new List<shoppingCartDataContract.itemDetailsDataContract>();

            query.ToList().ForEach(rec =>
            {
                ItemDetailsList.Add(new shoppingCartDataContract.itemDetailsDataContract
                {
                    Item_ID =  Convert.ToString(rec.Item_ID),
                    Item_Name = rec.Item_Name,
                    Description=rec.Description,
                    Item_Price = Convert.ToString(rec.Item_Price),
                    Image_Name = rec.Image_Name,
                    AddedBy = rec.AddedBy
                });
            });

            return ItemDetailsList;
        }

        public bool addItemMaster(shoppingCartDataContract.itemDetailsDataContract ItmDetails)
        {
          try
          {
                 ItemDetails itm = OME.ItemDetails.Create();
                    itm.Item_Name = ItmDetails.Item_Name;
                    itm.Description=ItmDetails.Description;
                    itm.Item_Price = Convert.ToInt32(ItmDetails.Item_Price);
                    itm.Image_Name = ItmDetails.Image_Name;
                    itm.AddedBy = ItmDetails.AddedBy;
                    OME.ItemDetails.Add(itm);
                    OME.SaveChanges();
         }
         catch (Exception ex)
          {
               throw new FaultException<string>
                    (ex.Message);
          }
         return true;
       }
    }
    }
Web.Config
在 WCF 项目“Web.Config”中
- 将
<add binding="basicHttpsBinding" scheme="https" />更改为<add binding="webHttpBinding" scheme="http" /> - 将
</behaviors>替换为
<endpointBehaviors>
        <behavior>
          <webHttp helpEnabled="True"/>
        </behavior>
      </endpointBehaviors>
    </behaviors>
运行 WCF 服务:-> 现在我们已经创建了 WCF REST 服务,让我们运行并测试我们的服务。在我们的服务 URL 中,我们可以添加我们的方法名称,然后我们可以看到来自数据库的 JSON 结果数据。

创建 MVC Web 应用程序
现在,我们已经完成了 WCF 的工作,现在是时候创建我们的 MVC AngularJS 应用程序了。我们可以向现有项目添加一个新项目,并创建一个新的 MVC Web 应用程序,如下所示。右键单击解决方案中的项目,然后单击 添加新项目,然后输入您的项目名称,然后单击“确定”。
选择 MVC,然后单击“确定”。
<p<img src="988648/N8.JPG">
现在我们已经创建了 MVC 应用程序,现在是时候添加 WCF 服务并将 AngularJS 包安装到我们的解决方案中了。
添加 WCF 服务:右键单击 MVC 解决方案,然后单击 添加,然后单击 服务引用。

输入您的 WCF URL,然后单击 GO。这里,我的 WCF URL 是https://:4191/Service1.svc/。
添加您的名字,然后单击 确定。
现在我们已成功将 WCF 服务添加到我们的 MVC 应用程序中。

安装 Angular JS 包的步骤
右键单击您的 MVC 项目,然后单击 -> 管理 NuGet 程序包。

选择 Online,然后搜索 Angular JS。选择 AngularJs,然后单击 安装。

现在我们已将 AngularJS 包安装到我们的 MVC 项目中。现在让我们创建我们的 AngularJs。
- Modules.js
- Controllers.js
- shoppingController.js
- Services.js
请注意,我创建了 2 个不同的 AngularJs 控制器:“Controllers.js”和“shoppingController.js”。我将使用“shoppingController.js”用于购物车页面,使用“Controller.js”用于添加新项目和将新项目图片上传到根文件夹。
创建 AngularJs 脚本文件的过程
右键单击Script文件夹,然后创建您自己的文件夹来创建 AngularJs Model/Controller 和 Service JavaScript。在您的script文件夹中,添加三个 JavaScript 文件,并将它们命名为Modules.js、Controllers.js和Services.js,如下所示:

Modules.js:在这里,我们添加了Angular.js JavaScript 的引用。在我们的应用程序中,我们将从 MVC Controller 使用 AngularJs FileUpload。为了使用文件上传,我们需要添加“angular-file-upload.js”和“angular-file-upload.min.js”。我们将模块命名为“RESTClientModule”。
/// <reference path="../angular.js" />
/// <reference path="../angular.min.js" />
/// <reference path="../angular-animate.js" />
/// <reference path="../angular-animate.min.js" />
/// <reference path="../angular-file-upload.js" />
/// <reference path="../angular-file-upload.min.js" />
var app;
(function () {
    app = angular.module("RESTClientModule", []);
})();
Services.js:在这里,我们为我们的服务命名,并在controllers.js中使用此名称。在这里,对于 Angular 服务,我给了名称“AngularJs_WCFService”。您可以自行命名,但请注意在Controllers.js中更改名称。Angularjs 可以接收 json 数据,在这里我们可以看到我提供了 WCS 服务 URL 来获取项目详细信息作为 JSON 数据。要将项目信息结果插入数据库,我们将数据作为 JSON 数据传递给我们的 WCF insert 方法作为参数。
/// <reference path="../angular.js" />
/// <reference path="../angular.min.js" />
/// <reference path="../angular-animate.js" />
/// <reference path="../angular-animate.min.js" />
/// <reference path="Modules.js" />

app.service("AngularJs_WCFService", function ($http) {
    //Get Order Master Records
    this.GetItemDetails = function () {
        return $http.get("https://:4191/Service1.svc/GetItemDetails/");
    };

    //To Save the Item Details with Image Name to the Database
    this.post = function (ItemDetails) {
        var request = $http({
            method: "post",
            url: "https://:4191/Service1.svc/addItemMaster",
            data: ItemDetails
        });
      return request;
   }
});
AngularJs Controller:在此应用程序中,我创建了两个不同的控制器,用于项目主页插入页面和购物车页面。我们将在此逐一介绍。
shoppingController.js:在这里,我们添加了 Angular.js JavaScript 以及我们的Module.js和Services.js的引用。与 Services 类似,对于控制器,我给了名称“ AngularJs_ShoppingFController”。
在 Controller 中,我执行了所有业务逻辑,并将 WCF JSON 数据返回到我们的 MVC HTML 页面。对于每个变量和方法,我都添加了注释,解释了它们的每个部分。
1. 变量声明
首先,我声明了所有需要使用的局部变量,以及当前日期,并使用$scope.date存储日期。
2. 方法
GetItemDetails()
此方法用于从 JSON 获取所有项目的详细信息,并将结果绑定到购物页面。
3. $scope.showImage = function (imageNm, ItemID, ItemName, ItemPrize, ItemDescription){
此方法用于在用户单击网格中的图像时获取所有详细信息,并显示添加到购物车的项目详细信息。
4. $scope.showMyCart = function ()
此方法将隐藏详细信息表格行并显示购物车项目。
5. function getItemTotalresult()
此方法用于计算TotalPrice、TotalQty和 Grand Total price。
6. function addItemstoCart()
此方法会将项目添加到购物车;如果项目已存在,则Qty将增加1。
7. $scope.removeFromCart = function (index)
此方法用于从购物车中移除项目。购物车中的每个项目都可以被移除。从我们的 MVC HTML 页面,我们将行索引号传递给此方法以从数组中移除项目。
shoppingController.js 完整源代码
/// <reference path="../angular.js" />
/// <reference path="../angular.min.js" />
/// <reference path="../angular-animate.js" />
/// <reference path="../angular-animate.min.js" />
/// <reference path="Modules.js" />
/// <reference path="Services.js" />

app.controller("AngularJs_ShoppingFController",
    function ($scope, $http, $timeout, $rootScope, $window, AngularJs_WCFService) {
    $scope.date = new Date();
    //  To set and get the Item Details values
    var firstbool = true;
    $scope.Imagename = "";
    $scope.Item_ID = "";
    $scope.Item_Name = "";
    $scope.Description = "";
    $scope.Item_Price = "0";
    $scope.txtAddedBy = "";

    // Item List Arrays.This arrays will be used to Add and Remove Items to the Cart.
    $scope.items = [];
    //to display the Table for Shopping cart Page.
    $scope.showItem = false;
    $scope.showDetails = false;
    $scope.showCartDetails = false;

    //This variable will be used to Increment the item Quantity by every click.
    var ItemCountExist = 0;

    //This variable will be used to calculate and
    //display the Cat Total Price,Total Qty and GrandTotal result in Cart
    $scope.totalPrice = 0;
    $scope.totalQty = 0;
    $scope.GrandtotalPrice = 0;

    // This is publich method which will be called initially and load all the item Details.
    GetItemDetails();

    //To Get All Records
    function GetItemDetails() {

        $scope.showItem = false;
        $scope.showDetails = true;
        $scope.showCartDetails = false;

        var promiseGet = AngularJs_WCFService.GetItemDetails();
        promiseGet.then(function (pl) {
            $scope.getItemDetailsDisp = pl.data
        },
             function (errorPl) {
             });
    }

    //This method used to get all the details when user
    //clicks on Image Inside the Grid and display the details to add items to the Cart
    $scope.showImage = function (imageNm, ItemID, ItemName, ItemPrize, ItemDescription) {

        $scope.Imagename = imageNm;
        $scope.Item_ID = ItemID;
        $scope.Item_Name = ItemName;
        $scope.Description = ItemDescription;
        $scope.Item_Price = ItemPrize;
        $scope.showItem = true;
        $scope.showDetails = true;
        $scope.showCartDetails = false;

        ItemCountExist = 0;
    }

    //This method will hide the detail table Row and display the Cart Items
    $scope.showMyCart = function () {
        if ($scope.items.length > 0)
        {
            alert("You have added " +$scope.items.length + " Items in Your Cart !");
            $scope.showItem = false;
            $scope.showDetails = false;
            $scope.showCartDetails = true;
        }
        else {
            alert("Ther is no Items In your Cart.Add Items to view your Cart Details !")
        }
    }
    //This method will hide the detail table Row and display the Cart Items
    $scope.showCart = function () {
        //alert(shoppingCartList.length);
        $scope.showItem = true;
        $scope.showDetails = false;
        $scope.showCartDetails = true;
        addItemstoCart();
    }

   // This method is to calculate the TotalPrice,TotalQty and Grand Total price
    function getItemTotalresult() {
        $scope.totalPrice = 0;
        $scope.totalQty = 0;
        $scope.GrandtotalPrice = 0;

        for (count = 0; count < $scope.items.length; count++) {

            $scope.totalPrice += parseInt($scope.items[count].Item_Prices );
            $scope.totalQty += ($scope.items[count].ItemCounts);

            $scope.GrandtotalPrice += ($scope.items[count].Item_Prices *
                                       $scope.items[count].ItemCounts);
        }
    }

    //This method will add the Items to the cart and if the Item already exists,
    //then the Qty will be incremented by 1.
    function addItemstoCart() {

        if ($scope.items.length > 0)
            {
            for (count = 0; count < $scope.items.length; count++) {

                if ($scope.items[count].Item_Names == $scope.Item_Name) {

                    ItemCountExist = $scope.items[count].ItemCounts + 1;
                    $scope.items[count].ItemCounts = ItemCountExist;
                }
            }
        }

        if (ItemCountExist <= 0)
        {
            ItemCountExist = 1;
            var ItmDetails = {
                Item_IDs: $scope.Item_ID,
                Item_Names: $scope.Item_Name,
                Descriptions: $scope.Description,
                Item_Prices: $scope.Item_Price,
                Image_Names: $scope.Imagename,
                ItemCounts: ItemCountExist
            };
            $scope.items.push(ItmDetails);
            $scope.item = {};
        }
        getItemTotalresult();
    }

    //This method is to remove the Item from the cart.
    //Each Item inside the Cart can be removed.
    $scope.removeFromCart = function (index) {
        $scope.items.splice(index, 1);
    }

    //This Method is to hide the Chopping cart details and
    //show the Item Details to add more items to the cart.
    $scope.showItemDetails = function () {
        $scope.showItem = false;
        $scope.showDetails = true;
        $scope.showCartDetails = false;
    }
});
Controllers.js:在这里,我们添加了 Angular.js JavaScript 以及我们的Module.js和Services.js的引用。与 Services 类似,对于控制器,我给了名称“AngularJs_WCFController”。
在 Controller 中,我执行了所有业务逻辑,并将 WCF JSON 数据返回到我们的 MVC HTML 页面。对于每个变量和方法,我都添加了注释,解释了它们的每个部分。
1. 变量声明
首先,我声明了所有需要使用的局部变量,以及当前日期,并使用$scope.date存储日期。
2. 方法
GetItemDetails()
此方法用于从 JSON 获取所有项目的详细信息,并将结果绑定到购物页面。
3. $scope.ChechFileValid
此方法用于检查附加的图像文件是否有效。如果图像文件无效,则显示错误消息。
4. $scope.SaveFile = function ()
在此方法中,将图像文件传递给UploadFile方法,并且图像成功上传到我们的根文件夹后,Item详细信息将被插入到数据库中。
5. fac.UploadFile = function (file)
在此方法中使用$http.post,我们将图像文件传递给 MVC Controller 和我们的HTTPost方法,如下所示:
$http.post("/shanuShopping/UploadFile", formData,
            {
                withCredentials: true,
                headers: { 'Content-Type': undefined },
                transformRequest: angular.identity
            })
注意$http.post(“”),我们需要提供我们的 MVC Controller 名称和我们的HTTPost方法名称,我们在此处将图像上传到我们的根文件夹。以下是用于在 MVC Controller 中上传图像的代码。
[HttpPost]
        public JsonResult UploadFile()
        {
            string Message, fileName;
            Message = fileName = string.Empty;
            bool flag = false;
            if (Request.Files != null)
            {
                var file = Request.Files[0];
                fileName = file.FileName;
                try
                {
                    file.SaveAs(Path.Combine(Server.MapPath("~/Images"), fileName));
                    Message = "File uploaded";
                    flag = true;
                }
                catch (Exception)
                {
                    Message = "File upload failed! Please try again";
                }
            }
            return new JsonResult { Data = new { Message = Message, Status = flag } };
        }
MVC Controller WEB 方法
Controller.js 完整源代码
/// <reference path="../angular.js" />
/// <reference path="../angular.min.js" />
/// <reference path="../angular-animate.js" />
/// <reference path="../angular-animate.min.js" />
/// <reference path="Modules.js" />
/// <reference path="Services.js" />

app.controller("AngularJs_WCFController",
function ($scope, $timeout, $rootScope, $window, AngularJs_WCFService, FileUploadService) {
    $scope.date = new Date();
 //  To set and get the Item Details values
    var firstbool = true;
    $scope.Imagename = "";
    $scope.Item_ID = "0";
    $scope.Item_Name = "";
    $scope.Description = "";
    $scope.Item_Price = "0";
    $scope.txtAddedBy = "";

    // This is publich method which will be called initially and load all the item Details.
    GetItemDetails();
    //To Get All Records
    function GetItemDetails() {

        var promiseGet = AngularJs_WCFService.GetItemDetails();
        promiseGet.then(function (pl) {
            $scope.getItemDetailsDisp = pl.data
        },
             function (errorPl) {
             });
    }

    //Declaration and Function for Image Upload and Save Data
    //--------------------------------------------
    // Variables
    $scope.Message = "";
    $scope.FileInvalidMessage = "";
    $scope.SelectedFileForUpload = null;
    $scope.FileDescription_TR = "";
    $scope.IsFormSubmitted = false;
    $scope.IsFileValid = false;
    $scope.IsFormValid = false;

    //Form Validation
    $scope.$watch("f1.$valid", function (isValid) {
        $scope.IsFormValid = isValid;
    });

    // THIS IS REQUIRED AS File Control is not supported 2 way binding features of Angular
    // ------------------------------------------------------------------------------------
    //File Validation
    $scope.ChechFileValid = function (file) {
        var isValid = false;
        if ($scope.SelectedFileForUpload != null) {
            if ((file.type == 'image/png' || file.type == 'image/jpeg' ||
                 file.type == 'image/gif') && file.size <= (800 * 800)) {
                $scope.FileInvalidMessage = "";
                isValid = true;
            }
            else {
                $scope.FileInvalidMessage = "Only JPEG/PNG/Gif Image can be upload )";
            }
        }
        else {
            $scope.FileInvalidMessage = "Image required!";
        }
        $scope.IsFileValid = isValid;
    };

    //File Select event
    $scope.selectFileforUpload = function (file) {

        var files = file[0];
        $scope.Imagename = files.name;
        alert($scope.Imagename);
        $scope.SelectedFileForUpload = file[0];
    }
    //--------------------------------------------------------------------------------------
    //Save File
    $scope.SaveFile = function () {
        $scope.IsFormSubmitted = true;
        $scope.Message = "";
        $scope.ChechFileValid($scope.SelectedFileForUpload);
        if ($scope.IsFormValid && $scope.IsFileValid) {
            FileUploadService.UploadFile($scope.SelectedFileForUpload).then(function (d) {
                var ItmDetails = {
                    Item_ID:$scope.Item_ID,
                    Item_Name: $scope.Item_Name,
                    Description: $scope.Description,
                    Item_Price: $scope.Item_Price,
                    Image_Name: $scope.Imagename,
                    AddedBy: $scope.txtAddedBy
                };

                var promisePost = AngularJs_WCFService.post(ItmDetails);
                promisePost.then(function (pl) {
                    alert(p1.data.Item_Name);
                    GetItemDetails();
                }, function (err) {
                   // alert("Data Insert Error " + err.Message);
                });
                alert(d.Message + " Item Saved!");
                $scope.IsFormSubmitted = false;
                ClearForm();

            }, function (e) {
                alert(e);
            });
        }
        else {
            $scope.Message = "All the fields are required.";
        }
    };

    //Clear form
    function ClearForm() {
        $scope.Imagename = "";
        $scope.Item_ID = "0";
        $scope.Item_Name = "";
        $scope.Description = "";
        $scope.Item_Price = "0";
        $scope.txtAddedBy = "";
        angular.forEach(angular.element("input[type='file']"), function (inputElem) {
            angular.element(inputElem).val(null);
        });

        $scope.f1.$setPristine();
        $scope.IsFormSubmitted = false;
    }
})
.factory('FileUploadService', function ($http, $q) {
    var fac = {};
    fac.UploadFile = function (file) {
        var formData = new FormData();
        formData.append("file", file);

        var defer = $q.defer();
        $http.post("/shanuShopping/UploadFile", formData,
            {
                withCredentials: true,
                headers: { 'Content-Type': undefined },
                transformRequest: angular.identity
            })
        .success(function (d) {
            defer.resolve(d);
        })
        .error(function () {
            defer.reject("File Upload Failed!");
        });
        return defer.promise;
    }
    return fac;

    //---------------------------------------------
    //End of Image Upload and Insert record
});
有关 使用 MVC 进行 AngularJs 文件上传 的参考链接。
现在我们已经创建了 Angular Js Module、Controller 和 Service。接下来是什么?
创建 MVC Controller 和 View 以显示我们的结果。
添加 Controller
右键单击 Controllers,然后选择 Add Controller,然后选择 MVC 5 Controller –Empty,然后单击 Add。

更改 Controller 名称,我将其命名为“shanuShoppingController”,然后单击 OK。
添加 View
右键单击 Controller Index,然后单击 Add View。
MVC Controller CS 文件:在这里,在我的 MVC Controller 中,我创建了两个ActionResult,一个是Index,另一个是ItemMaster。在Index中,我创建了一个名为 Index 的 View,该页面用于显示我们的购物车详细信息及项目。在ItemMaster中,我创建了一个名为ItemMaster的 View,该页面用于显示项目详细信息、添加新项目以及为项目上传图片。接下来,我们有HttpPost UploadFile()方法,用于上传图像文件。
public class shanuShoppingController : Controller
    {
        // GET: shanuShopping
        public ActionResult Index()
        {
            return View();
        }

        public ActionResult ItemMaster()
        {
            return View();
        }

        [HttpPost]
        public JsonResult UploadFile()
        {
            string Message, fileName;
            Message = fileName = string.Empty;
            bool flag = false;
            if (Request.Files != null)
            {
                var file = Request.Files[0];
                fileName = file.FileName;
                try
                {
                    file.SaveAs(Path.Combine(Server.MapPath("~/Images"), fileName));
                    Message = "File uploaded";
                    flag = true;
                }
                catch (Exception)
                {
                    Message = "File upload failed! Please try again";
                }
            }
            return new JsonResult { Data = new { Message = Message, Status = flag } };
        }
    }
运行您的程序
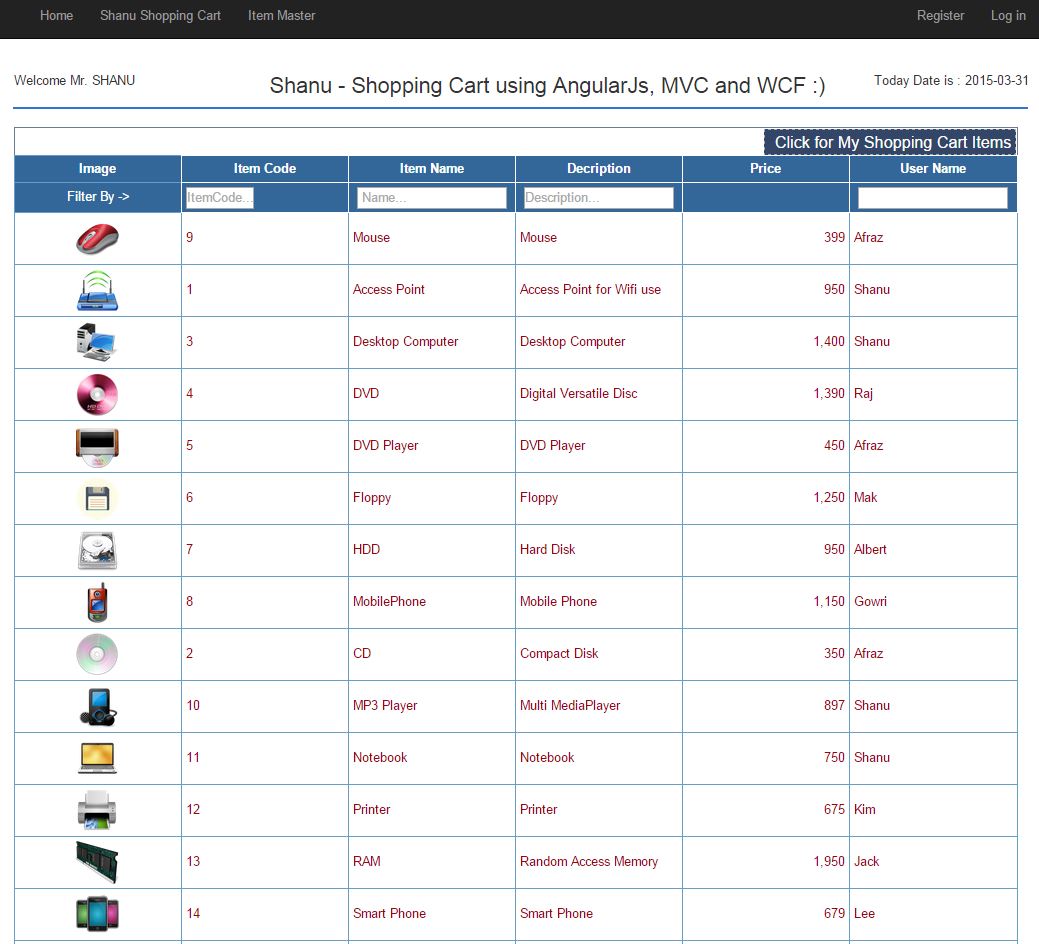
在这里,我们可以看到,当我运行程序时,首先我会在表格中显示订单主记录。您可以看到菜单中有“Shanu Shopping Cart”和“Item master”菜单项。首先,我们来看 Shanu Shopping Cart 菜单。当用户单击此菜单时,将显示Index.html (View)。
1) Shanu Shopping Cart 菜单:默认情况下,我将显示所有项目详细信息。用户可以使用按项目代码、项目名称和描述以及按用户名进行过滤来搜索列表中的项目。用户还可以通过单击列标题来对项目进行排序。
单击以查看我的购物车项目 - 此方法用于显示用户的购物车详细信息。如果用户没有项目,则会显示警告消息。
将项目添加到购物车 - 要将项目添加到购物车,请单击项目图像。
将项目添加到购物车 - 当用户单击项目列表中的每个图像时,我将显示项目详细信息,以便将所选项目添加到购物车,如下面的图像所示。

购物车详细信息 - 当用户单击 添加到购物车 时,我将显示购物车详细信息,如下所示。当用户第一次添加项目时,我将显示Qty为1。要增加Qty,用户可以再次单击同一项目。在这里,我将检查项目是否已存在于购物车中。如果它存在于购物车中,那么我将增加Qty;如果项目不可用,那么我将把项目添加到购物车列表中。

购物车完整详情。

2) Item Master 菜单:默认情况下,我将显示所有项目详细信息。用户可以使用按项目代码、项目名称和描述以及按用户名进行过滤来搜索列表中的项目。用户还可以通过单击列标题来对项目进行排序。
用户可以在此处添加新项目,并上传图片。

浏览图片并上传到根文件夹,然后将项目保存到数据库。

您可以根据您的需求扩展此应用程序,并添加更多功能,如用户管理、购物车支付详情等。
支持的浏览器:Chrome 和 Firefox
历史
- 2015年5月5日:初始版本