
AspNetDeploy:CI + 部署工具 (预览版)
0/5 (0投票)
用于 CI 和部署的新开源工具
引言
每次我需要设置持续集成和自动部署时,我都想哭。我怀念那些神奇的工具。
我想要一个能够了解我的源代码控制、项目、版本以及部署到不同环境的选项的工具,而无需花费数小时编写 XML 配置或命令行脚本。
现有的每一个工具对我来说似乎都存在问题:有的能构建但不能部署,有的能构建和部署但需要我编写大量的脚本。
所以我决定启动 AspNetDeploy.com 项目,一个开源的、能够正确工作的工具。
来源: GitHub
为什么?
给定一个带有 ASP.NET 解决方案的源代码控制和一堆服务器,我希望发生一些简单的事情。
- 获取源代码并了解解决方案内部的内容以及如何自动构建它。
- 将无法单独部署的项目组成包。整体
- 构建环境和简单的部署计划,并带有易于维护的变量。
- 与团队成员“一键部署” 审批。
- 直接的新版本/热修复机制。
替代方案
- TeamCity 可以构建但不能部署,其 Octopus Deploy 集成并不直接。
- Octopus Deploy 可以部署(惊喜!:))并且了解 ASP.NET,但不能构建,其包版本控制也不直接。
- Bamboo 可以构建和部署所有东西,但我们不能简单地构建和部署 ASP.NET 应用而不进行晦涩的批处理脚本和 NAnt XML。
- CruiseControl 已经注定要失败。
- TFS 让我感到恐惧(而且据我所知,它不能与 SVN 一起工作)。
- 我们不喜欢将源代码存储在在线(我们并不孤单,对吧?)并且不生活在云端,所以在线构建服务无法奏效。
有一天,我开始搜索如何构建解决方案、获取源代码等,结果发现每个操作都可以用几行代码来编程。而且,有一天我偶然看到了这个漂亮的图标:  我的想法是“就是它了!我必须用这个神奇的流畅图标制作一个持续集成工具!” :)
AspNetDeploy 的故事就此开始!
总体视图

SourceControlManager
负责获取源代码并解析项目。
 注意项目类型、构建和打包时间
想法很简单:

首先,我们为每个项目添加一个源代码控制(TeamCity 中的 VCS 根),然后添加版本。一旦 AspNetDeploy 获取源代码,它会搜索 *.sln 文件,解析它们,然后解析项目文件,以查看每个解决方案中有哪些项目。
获取源代码
每次源代码管理器启动以获取源代码时,它会请求 ISourceControlRepositoryFactory 来获取 ISourceControlRepository 的正确实现,并调用 LoadSources
namespace AspNetDeploy.SourceControls
{
    public class SourceControlRepositoryFactory : ISourceControlRepositoryFactory
    {
        public ISourceControlRepository Create(SourceControlType type)
        {
            switch (type)
            {
                case SourceControlType.Svn:
                    return new SvnSourceControlRepository();

                case SourceControlType.Git:
                    return new GitSourceControlRepository();

                case SourceControlType.FileSystem:
                    return new FileSystemSourceControlRepository();

                default:
                    throw new AspNetDeployException("Unknown SourceControlType: " + type);
            }
        }
    }
}
使用 SharpSvn 的 SvnSourceControlRepository
在获取源代码之前,我们必须检查,是第一次加载源代码,还是存在现有的 SVN 文件夹,调用 Update 就足够了。
我决定不为每个类创建数据库表结构,而是创建一个通用的 Property 表来存储源代码控件和源代码控件版本的特定设置。
        public LoadSourcesResult LoadSources(SourceControlVersion sourceControlVersion, string path)
        {
            NetworkCredential credentials = new NetworkCredential(
                        sourceControlVersion.SourceControl.GetStringProperty("Login"),
                        sourceControlVersion.SourceControl.GetStringProperty("Password"));

            using (SvnClient client = new SvnClient())
            {
                client.Authentication.DefaultCredentials = credentials;

                if (!Directory.Exists(path))
                {
                    return this.LoadSourcesFromScratch(sourceControlVersion, path, client);
                }

                return this.LoadSourcesWithUpdate(path, client);
            }
        }
首次获取源代码
        private LoadSourcesResult LoadSourcesFromScratch(SourceControlVersion sourceControlVersion, string path, SvnClient client)
        {
            SvnUpdateResult result;
            Directory.CreateDirectory(path);

            string uriString = this.GetVersionURI(sourceControlVersion);

            client.CheckOut(new Uri(uriString), path, out result);

            SvnInfoEventArgs info;
            client.GetInfo(path, out info);

            return new LoadSourcesResult
            {
                RevisionId = info.LastChangeRevision.ToString(CultureInfo.InvariantCulture)
            };
        }
在现有文件夹上调用更新
        private LoadSourcesResult LoadSourcesWithUpdate(string path, SvnClient client)
        {
            SvnUpdateResult result;

            try
            {
                client.Update(path, out result);
            }
            catch (SvnWorkingCopyException e)
            {
                client.CleanUp(path);
                client.Update(path, out result);
            }

            SvnInfoEventArgs info;
            client.GetInfo(path, out info);

            return new LoadSourcesResult
            {
                RevisionId = info.LastChangeRevision.ToString(CultureInfo.InvariantCulture)
            };
        }
解析解决方案文件
正如你可能注意到的,常规的 sln 文件如下所示:
Microsoft Visual Studio Solution File, Format Version 12.00
# Visual Studio 2013
VisualStudioVersion = 12.0.31101.0
MinimumVisualStudioVersion = 10.0.40219.1
Project("{FAE04EC0-301F-11D3-BF4B-00C04F79EFBC}") = "WebUI", "WebUI\WebUI.csproj", "{EE1686C9-1D29-4D7F-AB8A-E05A70003A5C}"
EndProject
Project("{FAE04EC0-301F-11D3-BF4B-00C04F79EFBC}") = "WebClient", "WebClient\WebClient.csproj", "{24F17881-DD9F-4007-B66B-70E645BDFDC6}"
EndProject
Project("{FAE04EC0-301F-11D3-BF4B-00C04F79EFBC}") = "Helpers", "PathHelper\Helpers.csproj", "{6D11DE3A-7E2D-4223-902A-411093EB02A3}"
EndProject
Project("{FAE04EC0-301F-11D3-BF4B-00C04F79EFBC}") = "Model", "Model\Model.csproj", "{395E2908-7FBD-4153-A332-4A92DEF6FE3E}"
EndProject
Project("{00D1A9C2-B5F0-4AF3-8072-F6C62B433612}") = "Database", "Database\Database.sqlproj", "{78F8DB8E-207F-4FBD-A5A3-EE8ECFCCB351}"
EndProject

....
项目
- TypeGuid
- E3E379DF-F4C6-4180-9B81-6769533ABE47 – MVC 4
- E53F8FEA-EAE0-44A6-8774-FFD645390401 – MVC 3
- F85E285D-A4E0-4152-9332-AB1D724D3325 – MVC 2
- 603C0E0B-DB56-11DC-BE95-000D561079B0 – MVC 1
- 名称
- Path
- ID
这些信息很好,但不足以了解项目具体是什么,我们需要深入研究。
<?xml version="1.0" encoding="utf-8"?>
<Project ToolsVersion="12.0" DefaultTargets="Build" xmlns="http://schemas.microsoft.com/developer/msbuild/2003">
  <Import Project="$(MSBuildExtensionsPath)\$(MSBuildToolsVersion)\Microsoft.Common.props" Condition="Exists('$(MSBuildExtensionsPath)\$(MSBuildToolsVersion)\Microsoft.Common.props')" />
  <PropertyGroup>
    <Configuration Condition=" '$(Configuration)' == '' ">Debug</Configuration>
    <Platform Condition=" '$(Platform)' == '' ">AnyCPU</Platform>
    <ProductVersion>
    </ProductVersion>
    <SchemaVersion>2.0</SchemaVersion>
    <ProjectGuid>{EE1686C9-1D29-4D7F-AB8A-E05A70003A5C}</ProjectGuid>
    <ProjectTypeGuids>{349c5851-65df-11da-9384-00065b846f21};{fae04ec0-301f-11d3-bf4b-00c04f79efbc}</ProjectTypeGuids>
    <OutputType>Library</OutputType>
    <AppDesignerFolder>Properties</AppDesignerFolder>
    <RootNamespace>InnovativeManagementSystems.BackgroundCMS.WebUI</RootNamespace>
    <AssemblyName>InnovativeManagementSystems.BackgroundCMS.WebUI</AssemblyName>
    <TargetFrameworkVersion>v4.5</TargetFrameworkVersion>
    <UseIISExpress>false</UseIISExpress>
    <IISExpressSSLPort />
    <IISExpressAnonymousAuthentication />
    <IISExpressWindowsAuthentication />
    <IISExpressUseClassicPipelineMode />
    <TargetFrameworkProfile />
  </PropertyGroup>
  <PropertyGroup Condition=" '$(Configuration)|$(Platform)' == 'Debug|AnyCPU' ">
    <DebugSymbols>true</DebugSymbols>
    <DebugType>full</DebugType>
    <Optimize>false</Optimize>
    <OutputPath>bin\</OutputPath>
    <DefineConstants>DEBUG;TRACE</DefineConstants>
    <ErrorReport>prompt</ErrorReport>
    <WarningLevel>4</WarningLevel>
  </PropertyGroup>
  <PropertyGroup Condition=" '$(Configuration)|$(Platform)' == 'Release|AnyCPU' ">
    <DebugType>pdbonly</DebugType>
    <Optimize>true</Optimize>
    <OutputPath>bin\</OutputPath>
    <DefineConstants>TRACE</DefineConstants>
    <ErrorReport>prompt</ErrorReport>
    <WarningLevel>4</WarningLevel>
  </PropertyGroup>
  <ItemGroup>
    <Content Include="Resources\Layout\bootstrap-theme.css" />
    <Content Include="Resources\Layout\bootstrap-theme.min.css" />
    <Content Include="Resources\Layout\bootstrap.css" />
    <Content Include="Resources\Layout\bootstrap.min.css" />

  .....

</Project>
- ProjectTypeGuids
- FAE04EC0-301F-11D3-BF4B-00C04F79EFBC – 类库
- A9ACE9BB-CECE-4E62-9AA4-C7E7C5BD2124 – 数据库
- 00D1A9C2-B5F0-4AF3-8072-F6C62B433612 – 再次是数据库
- 3AC096D0-A1C2-E12C-1390-A8335801FDAB – 测试项目
- 349C5851-65DF-11DA-9384-00065B846F21 – Web 项目
- OutputType
- Exe – 控制台应用
- WinExe – Windows 应用
- Database – 数据库项目
- OutputPath – 编译后的二进制文件将存放在这里,这个文件夹将与其他文件夹一起包含在包中。
- ItemGroup / Content / Include – 将包含在发布中的文件。
逻辑
- 从 ProjectTypeGuids 获取类型。
- 查看 OutputType ,看看它是控制台、Windows 应用还是数据库项目。
- 查找 UseIISExpress,如果存在,则是 Web 项目。
– 查看 sln 文件中的 TypeGuid,了解它是哪种 MVC 版本。
捆绑包
包是一组需要一起部署的项目。
每个包都必须有包版本,其中定义了部署步骤。当创建新的包版本时,部署步骤会无缝地转换为使用新版本的项目和设置。
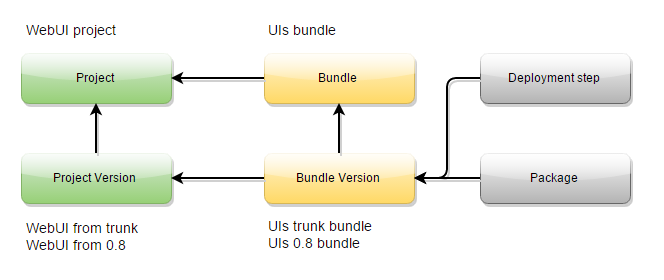
构建包会产生一个包,该包可以手动或自动部署到链中的第一个环境(测试 -> QA -> 生产),然后通过一键操作提升到下一个环境。

使用 MSBuild 构建解决方案
一切都始于 BuildServiceFactory
namespace AspNetDeploy.BuildServices
{
    public class BuildServiceFactory : IBuildServiceFactory
    {
        private readonly INugetPackageManager nugetPackageManager;

        public BuildServiceFactory(INugetPackageManager nugetPackageManager)
        {
            this.nugetPackageManager = nugetPackageManager;
        }

        public IBuildService Create(SolutionType project)
        {
            return new MSBuildBuildService(this.nugetPackageManager); // only one build service at this time
        }
    }
}
MSBuildService
嗯,这段代码更像是概念验证,而不是最先进的,但它完成了预期的功能。
using System;
using System.Collections.Generic;
using System.IO;
using AspNetDeploy.Contracts;
using AspNetDeploy.Model;
using Microsoft.Build.Evaluation;
using Microsoft.Build.Execution;
using Microsoft.Build.Framework;

namespace AspNetDeploy.BuildServices.MSBuild
{
    public class MSBuildBuildService : IBuildService
    {
        private readonly INugetPackageManager nugetPackageManager;

        public MSBuildBuildService(INugetPackageManager nugetPackageManager)
        {
            this.nugetPackageManager = nugetPackageManager;
        }

        public BuildSolutionResult Build(string solutionFilePath, Action<string> projectBuildStarted, Action<string, bool, string> projectBuildComplete, Action<string, string, string, int, int, string> errorLogger)
        {
            ProjectCollection projectCollection = new ProjectCollection();

            Dictionary<string, string> globalProperty = new Dictionary<string, string>
            {
                {"Configuration", "Release"},
                {"Platform", "Any CPU"}
            };

            BuildRequestData buildRequestData = new BuildRequestData(solutionFilePath, globalProperty, null, new[] { "Rebuild" }, null);

            BuildParameters buildParameters = new BuildParameters(projectCollection);
            buildParameters.MaxNodeCount = 1;
            buildParameters.Loggers = new List<ILogger>
            {
                new NugetPackageRestorer(nugetPackageManager, Path.GetDirectoryName(solutionFilePath)),
                new MSBuildLogger(projectBuildStarted, projectBuildComplete, errorLogger)
            };

            BuildResult buildResult = BuildManager.DefaultBuildManager.Build(buildParameters, buildRequestData);

            return new BuildSolutionResult
            {
                IsSuccess = buildResult.OverallResult == BuildResultCode.Success
            };
        }
    }
}
使用日志记录器,我们可以钩接到 ProjectStarted、 ProjectFinished 和 ErrorRaised 事件。这使我们能够测量每个项目的构建时间,以及指出构建失败的具体项目。
我遇到的一个问题是缺少 NuGet 包,这些包不属于解决方案,也不在源代码控制中。这个包的逻辑可能应该放在 SourceControlManager 的某个地方。
使用 NuGet 还原包
事实证明,调用 NuGet.exe 来拉取所有丢失的包更容易,因为它没有像 MSBuild 那样的 C# API。
namespace BuildServices.NuGet
{
    public class NugetPackageManager : INugetPackageManager
    {
        private readonly IPathServices pathServices;

        public NugetPackageManager(IPathServices pathServices)
        {
            this.pathServices = pathServices;
        }

        public void RestorePackages(string packagesConfigPath, string solutionDirectory)
        {
            Process process = new Process();
            process.StartInfo.UseShellExecute = false;
            process.StartInfo.RedirectStandardOutput = true;

            process.StartInfo.FileName = this.pathServices.GetNugetPath();
            process.StartInfo.Arguments = string.Format(
                "install \"{0}\" -source \"{1}\" -solutionDir \"{2}\"",
                packagesConfigPath,
                "https://nuget.net.cn/api/v2/",
                solutionDirectory);

            process.Start();

            process.WaitForExit();
        }
    }
}
示例调用
this.nugetPackageManager.RestorePackages(@"C:\MySolution\MyProject\packags.config", @"C:\MySolution");
(packagesConfigPath 可能与 solutionDirectory 不同)
未完待续
- 部署步骤
- 打包项目
- 环境和机器
- 变量
- 部署
- 将代理作为 Windows 服务运行,并托管 WCF 接口。
- 上传包和部署步骤
- 建立安全连接
- 日志记录
- 用户和角色
- 整合

下一步是什么?
我正在寻求反馈,并希望有勇敢的人来尝试运行这一切。也许有人会感兴趣加入这个项目。
历史
待更新