
使用 Edison:通过 MQTT 将 IoT 传感器安全地连接到互联网
在之前的博文中,我们已经在Edison上构建了Mosquitto MQTT代理,并创建了一个用于感知运动、温度和光照级别的传感器节点。在这里,我们将这些传感器和执行器连接到我们构建的Mosquitto MQTT服务器,以将这些传感器转变为真正的物联网传感器。
获取新的Intel®物联网开发者套件,这是一个完整的软硬件解决方案,允许开发人员使用Intel® Galileo和Intel® Edison开发板创建令人兴奋的新解决方案。请访问Intel®物联网开发者中心。
引言
在之前的博文中 [1], [2],我们已经在Edison上构建了Mosquitto MQTT代理,并创建了一个用于感知运动、温度和光照级别的传感器节点。在本文中,我们将这些传感器和执行器连接到我们构建的Mosquitto MQTT服务器,以将这些传感器转变为真正的物联网传感器。
使用MQTT
基本的MQTT发布/订阅
MQTT是一种构建在TCP/IP协议之上的发布/订阅协议。MQTT是用于M2M(机器对机器)通信的流行协议之一。MQTT的两个主要组成部分是MQTT客户端和MQTT代理。MQTT客户端发布消息到一个特定的主题,或者订阅并监听一个特定的主题。MQTT代理接收来自MQTT发布者的所有发布的消息,并将相关消息转发给所有MQTT订阅者。订阅者和发布者不必相互了解,只有主题和消息是相关的。为了正确通信,发布者和订阅者必须同意使用通用的主题名称和消息格式。
要发布或订阅MQTT主题,需要一个MQTT客户端程序。在Mosquitto MQTT发行版中,发布客户端称为‘mosquitto_pub’,订阅客户端称为‘mosquitto_sub’。
下图显示了我们将要描述的活动序列。红色窗口显示‘mosquitto_sub’命令的输出,黑色窗口显示‘mosquitto_pub’命令。命令已标记,以便我们可以方便地引用它们。
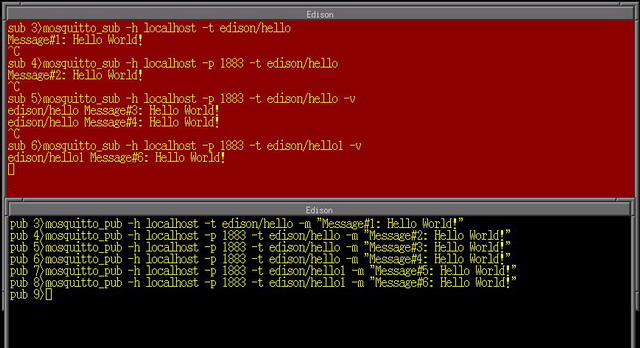
MQTT客户端所需的最小参数是:代理IP地址、主题名称,对于发布客户端,还需要消息。假设我们已经在127.0.0.1(localhost)上运行了一个MQTT代理,下面的命令将监听发布到名为‘edison/hello’的主题的所有消息。
sub 3> mosquitto_sub –h localhost –t edison/hello
发布到主题‘edison/hello’
pub 3> mosquitto_pub –h localhost –t edison/hello –m "Message#1: Hello World!”
当MQTT代理收到来自发布客户端(pub3)向主题‘edison/hello’发布的消息‘Message#1: Hello World’时,它会扫描正在监听主题‘edison/hello’的订阅者。发现订阅客户端(sub3)正在监听相同的主题后,MQTT代理会将消息转发给(sub3)。当订阅客户端(sub3)收到消息时,它会将消息内容回显到终端窗口。在(sub 3)和(pub 3)命令中,默认的MQTT端口号被隐式假定为1883,并未在命令行中指定。在(sub 4)和(pub 4)命令中,明确提供了端口号。在(sub 5)和(pub 5)命令中,向订阅参数添加了‘-v’选项,以启用打印主题名称以及消息。这在使用通配符订阅多个主题时非常有用。订阅客户端是持久的,因此订阅客户端将看到在命令(pub 6)中发布到主题‘edison/hello’的其他消息。
MQTT代理的默认行为是在消息传递给订阅客户端后立即将其丢弃。当客户端(pub 7)发布了一个新主题‘edison/hello1’时,正在监听主题‘edison/hello’的订阅客户端(sub 5)并未收到通知。然后,订阅客户端订阅新主题(sub 6),之前发布到主题‘edison/hello1’的消息已经被丢弃。它将接收后续发布到‘edison/hello1’主题的消息,如命令(pub 8)所示。还有其他选项可以指示MQTT代理保留发布到某个主题的最后一条消息,以及其他关于代理如何传递消息的QOS(服务质量)指令。有关这些功能的更多详细信息,请访问MQTT Wiki站点。
根据端口的配置,可能需要额外的参数。我们将在本文档的后面讨论这些。
订阅多个MQTT主题
通常,MQTT客户端会订阅发布者的多个主题,并根据收到的消息执行某些操作。讨论MQTT主题是如何组织的值得一提。
MQTT主题以目录结构组织,使用‘/’字符表示子主题。下面的列表是各种主题的示例。
Temperature/Building1/Room1/Location1
Temperature/Building1/Room1/Location2
Temperature/Building2/Room2
Temperature/Outdoor/West
Temperature/Outdoor/East
Temperature/Average
订阅者可以订阅单个主题,例如‘Temperature/Outdoor/West’,或者使用通配符订阅多个主题。MQTT中有两个通配符字符:‘+’和‘#’。‘+’通配符用于订阅同一层次级别的主题。‘#’通配符用于订阅指定主题下的所有子主题。例如,订阅主题‘Temperature/#’将在上述列表中任何主题有新消息时返回结果。订阅‘Temperature/+’将只返回‘Temperature/Average’,因为所有其他条目都是子主题。有关MQTT数据组织的更多详细信息,请访问MQTT wiki站点。
配置安全的Mosquitto代理
基本上有4种方法可以将MQTT客户端连接到Mosquitto服务器。
- 开放端口或无安全。这是在部署前开发和测试MQTT设备的便捷方法。代理和客户端之间的数据传输以明文形式传输,任何拥有正确工具的人都可以进行窃听。
- 用户名和密码保护。这主要用于对客户端进行代理身份验证。它不加密数据传输。
- TLS-PSK加密。客户端和代理拥有一个共享密钥,用于协商安全连接。这在Mosquitto版本1.3.5或更高版本中可用。
- SSL加密。这是Mosquitto MQTT发行版中最先进的加密和身份验证方案。使用SSL加密,需要从受信任的证书颁发机构(CA),如Verisign或Equifax获取服务器证书。通常,为了测试,可以创建一个自签名证书,然后用它来签署服务器证书。这种加密方法虽然更安全,但实现起来很麻烦,因为它要求所有客户端设备都配备正确的证书,并且必须开发现场升级机制来保持客户端和代理之间的证书版本同步。
要配置安全的Mosquitto MQTT代理,请使用下面显示的配置指令。我们在本例中使用的证书是用于测试目的的自签名证书,不应用于生产服务器。
port 1883
password_file /home/mosquitto/conf/pwdfile.txt
log_type debug
log_type error
log_type warning
log_type information
log_type notice
user root
pid_file /home/mosquitto/logs/mosquitto.pid
persistence true
persistence_location /home/mosquitto/db/
log_dest file /home/mosquitto/logs/mosquitto.log

listener 1995
# port 1995 is the TLS-PSK secure port, client must provide
# --psk-identity and --psk to access
psk_file /home/mosquitto/conf/pskfile.txt
# psk_hint must be present or port 1995 won't work properly
psk_hint hint

listener 1994
# port 1994 is the SSL secure port, client must present
# a certificate from the certificate authority that this server trust
# e.g. ca.crt
cafile /home/mosquitto/certs/ca.crt
certfile /home/mosquitto/certs/server.crt
keyfile /home/mosquitto/certs/server.key
文件pwdfile.txt是一个密码文件,其加密方式与Linux密码文件类似。它使用Mosquitto软件附带的mosquitto_passwd实用程序生成。文件pskfile.txt是用于TLS-PSK连接的预共享密码文件。此文件的格式是每行一个用户:密码对的文本文件。TLS-PSK使用的密码必须只使用十六进制字符,并且不区分大小写。密码文件和psk文件示例如下。
/* sample Mosquitto password_file */
user:$6$Su4WZkkQ0LmqeD/X$Q57AYfcu27McE14/MojWgto7fmloRyrZ7BpTtKOkME8UZzJZ5hGXpOea81RlgcXttJbeRFY9s0f+UTY2dO5xdg==
/* sample Mosquitto PSK file */
user1:deadbeef
user2:DEADBEEF0123456789ABCDEF0123456789abcdef0123456789abcdef0123456789abcdef
将MQTT集成到物联网传感器
由于Edison开发板实际上是一个运行Arduino草图作为其进程之一的Linux开发板,我们将利用我们之前构建的现有Mosquitto MQTT包。在Arduino草图中,我们将简单地使用Linux编程工具来调用‘mosquitto_sub’和‘mosquitto_pub’程序。这种方法有几个优点:
- 我们不必为Arduino重写MQTT客户端。Mosquitto MQTT包是一个公认且经过充分测试的软件。我们只需要创建一个包装类,以便在Arduino草图中启用使用。
- Mosquitto MQTT客户端能够使用SSL进行安全连接。另一方面,通用Arduino中的小型微控制器根本无法处理SSL的计算需求。
- 当找到不同的或更好的MQTT软件包,或者现有MQTT软件发布了新版本时,我们可以重用大部分现有代码,只需添加新代码即可利用新软件包的新功能。
MQTTClient类
由于Intel Edison开发板是一个功能齐全的Linux操作系统,所有Linux编程功能都可用于我们的Arduino草图。我们将创建一个名为MQTTClient的包装类,该类将在草图中 M使用。在MQTTClient方法中,我们将使用Linux系统调用来调用mosquitto_sub和mosquitto_pub程序,它们将为我们执行实际的MQTT数据传输。以下是极简MQTTClient的类定义。
// File: MQTTClient.h
/*
  Minimalist MQTT Client using mosquitto_sub and mosquitto_pub
  Assume Mosquitto MQTT server already installed and mosquitto_pub/sub
  are in search path
*/

#ifndef __MQTTClient_H__
#define __MQTTClient_H__

#include <Arduino.h>
#include <stdio.h>

enum security_mode {OPEN = 0, SSL = 1, PSK = 2};

class MQTTClient {

  public:
    MQTTClient();
    ~MQTTClient();
    void    begin(char * broker, int port, security_mode mode,
                  char* certificate_file, char *psk_identity, char *psk);
    boolean publish(char *topic, char *message);
    boolean subscribe(char* topic, void (*callback)(char *topic, char* message));
    boolean loop();
    boolean available();
    void    close();

  private:
    void           parseDataBuffer();
    FILE*          spipe;
    char           mqtt_broker[32];
    security_mode  mode;
    char           topicString[64];
    char           certificate_file[64];
    char           psk_identity[32];
    char           psk_password[32];
    int            serverPort;
    char           *topic;
    char           *message;
    boolean         retain_flag;
    void           (*callback_function)(char* topic, char* message);
    char           dataBuffer[256];
};
#endif
要使用该类,首先创建一个MQTTClient对象,然后使用MQTTClient::begin()来初始化MQTTClient::subscribe()和MQTTClient::publish()将用于连接MQTT代理的各种变量。这些变量是:
mqtt_broker: MQTT代理的名称。这可以是一个IP地址或DNS名称。在本篇文章中,我们将使用‘localhost’,因为代理运行在与Arduino草图相同的Edison开发板上。如果Edison开发板配置为使用静态IP地址,则可以使用该地址。serverPort: 要使用的端口。我们在Mosquitto代理上配置了3个不同的端口,具有不同的安全策略。- 端口1883是MQTT的默认端口,对所有客户端开放。
- 端口1994配置为安全的SSL端口。用户必须提供由服务器证书颁发机构颁发的SSL证书。
- 端口1995配置为安全的TLS-PSK端口。用户使用用户身份和预共享密码访问此端口。
mode: 要使用的安全模式。目前,安全模式可以是OPEN、SSL或PSK之一。根据所选的安全模式,证书、用户身份和预共享密码与方法的其他参数一起提供。不适用于所选安全模式的参数将被忽略。
要订阅一个主题,需要调用MQTTClient::subscribe(),提供一个主题名称和一个回调函数,当有新消息可用时将调用该函数。要发布到一个主题,需要调用MQTTClient::publish()并提供要发布的主题名称和消息。
对于subscribe和publish方法,使用方法的参数和存储的参数来构建调用mosquitto_sub或mosquitto_pub的适当命令字符串。然后打开一个Linux管道,执行命令字符串,并将结果通过管道返回给Arduino草图。发布时,管道在消息发送后立即关闭。订阅时,需要保持管道打开,以便接收新数据。在Arduino草图中,需要定期检查管道以查看是否有新数据。MQTTClient::loop()方法旨在检查管道中的数据并调用回调函数来处理新消息。因为当管道为空时检查管道会阻塞,所以我们将管道设置为非阻塞模式,这样MQTTClient::loop()方法将在管道为空时返回。下面的伪代码显示了MQTTClient类的典型用法。
#include <MQTTClient.h>
#define SAMPLING_PERIOD   100
#define PUBLISH_INTERVAL  30000

MQTTClient mqttClient;

void setup() {
   mqttClient.begin("localhost”,1833,PSK,NULL,”psk_user”,”psk_password”);
   mqttClient.subscribe("edison/#”,myCallBack);
}

void myCallBack(char* topic, char* message) {
   // scan for matching topic, scan for matching command, do something useful
}

unsigned long publishTime = millis();
void loop() {
   mqttClient.loop();        // check for new message
   if (millis() > publishTime) {
       publishTime = millis() + PUBLISH_INTERVAL;
       mqttClient.publish("edison/sensor1”,”sensor1value”);
       mqttClient.publish("edison/sensor2”,”sensor2value”);
   }
   delay(SAMPLING_PERIOD);
}
变量"SAMPLING_PERIOD”决定了代码检查新消息的频率,应该选择得当,以便导致草图采取行动的新消息不会来得太晚而无法采取有意义的行动。大多数时候,MQTTClient::loop()方法会很快返回,并且频繁采样循环的开销很小。发布间隔由变量"PUBLISH_INTERVAL”决定,应根据传感器的适当数据速率选择,例如,温度传感器可能每分钟发布一次其值,如果它只是为了信息目的,而烟雾传感器可能每隔几秒更新其结果,以便收听烟雾传感器消息的订阅者有机会在为时已晚之前采取行动。
下面显示了MQTTClient类的实现。
// File: MQTTClient.cpp
#include "MQTTClient.h"
#include <fcntl.h>

/*======================================================================
  Constructor/Destructor
========================================================================*/
MQTTClient::MQTTClient()
{
}
MQTTClient::~MQTTClient()
{
  close();
}
void MQTTClient::close()
{
  if (spipe) {
    fclose(spipe);
  }
}
/*========================================================================
  Initialization. Store variables to be used for subscribe/publish calls
==========================================================================*/
void MQTTClient::begin(char *broker, int port, security_mode smode,
                       char* cafile, char *user, char *psk)
{
  strcpy(mqtt_broker, broker);
  serverPort = port;
  mode = smode;
  if (mode == SSL) {
    strcpy(certificate_file, cafile);
  }
  else if (mode == PSK) {
    strcpy(psk_identity, user);
    strcpy(psk_password, psk);
  }
  Serial.println("MQTTClient initialized");
  Serial.print("Broker: "); Serial.println(mqtt_broker);
  Serial.print("Port:   "); Serial.println(serverPort);
  Serial.print("Mode:   "); Serial.println(mode);
}
/*=======================================================================
  Subscribe to a topic, (*callback) is a function to be called when client
  receive a message
=========================================================================*/
boolean MQTTClient::subscribe(char* topic,
                              void (*callback)(char* topic, char* message))
{
  char cmdString[256];

  if (mqtt_broker == NULL) {
    return false;
  }
  if (topic == NULL) {
    return false;
  }

  callback_function = callback;
  switch(mode) {
    case OPEN:
      sprintf(cmdString,
              "mosquitto_sub -h %s -p %d -t %s -v",
              mqtt_broker, serverPort, topic);
      break;
    case SSL:
      sprintf(cmdString,
              "mosquitto_sub -h %s -p %d -t %s -v --cafile %s",
               mqtt_broker, serverPort, topic, certificate_file);
      break;
    case PSK:
      sprintf(cmdString,
              "mosquitto_sub -h %s -p %d -t %s -v --psk-identity %s --psk %s",
              mqtt_broker, serverPort, topic, psk_identity, psk_password);
      break;
    default:
      break;
  }
  if ((spipe = (FILE*)popen(cmdString, "r")) != NULL) {
    // we need to set the pipe read mode to non-blocking
    int fd    = fileno(spipe);
    int flags = fcntl(fd, F_GETFL, 0);
    flags |= O_NONBLOCK;
    fcntl(fd, F_SETFL, flags);
    strcpy(topicString, topic);
    return true;
  }
  else {
    return false;
  }
}
/*====================================================================
  Check if there is data in the pipe,
  if true, parse topic and message and execute callback function
  return if pipe is empty
======================================================================*/
boolean MQTTClient::loop()
{
  if (fgets(dataBuffer, sizeof(dataBuffer), spipe)) {
    parseDataBuffer();
    callback_function(topic, message);
  }
}
/*====================================================================
  Publish a message on the given topic
======================================================================*/
boolean MQTTClient::publish(char *topic, char *message)
{
  FILE*   ppipe;
  char    cmdString[256];
  boolean retval = false;
  if (this->mqtt_broker == NULL) {
    return false;
  }
  if (topic == NULL) {
    return false;
  }
  switch (this->mode) {
    case OPEN:
      sprintf(cmdString,
              "mosquitto_pub -h %s -p %d -t %s -m \"%s\" %s",
              mqtt_broker, serverPort, topic, message, retain_flag?"-r":"");
      break;
    case SSL:
      sprintf(cmdString,
              "mosquitto_pub -h %s -p %d --cafile %s -t %s -m \"%s\" %s",
               mqtt_broker, serverPort, certificate_file,
               topic, message, retain_flag?"-r":"");
      break;
    case PSK:
      sprintf(cmdString,
          "mosquitto_pub -h %s -p %d --psk-identity %s --psk %s -t %s -m \"%s\" %s",
              mqtt_broker, serverPort, psk_identity, psk_password,
              topic, message, retain_flag?"-r":"");
      break;
  }
  if (!(ppipe = (FILE *)popen(cmdString, "w"))) {
    retval = false;
  }
  if (fputs(cmdString, ppipe) != EOF) {
    retval = true;
  }
  else {
    retval = false;
  }
  fclose(ppipe);
  return retval;
}
/*======================================================================
  Parse data in the data buffer to topic and message buffer
  delimiter is the first space
  if there is only one recognizable string, it is assumed a message
  string and topic is set to NULL
========================================================================*/
void MQTTClient::parseDataBuffer()
{
  topic   = dataBuffer;
  message = dataBuffer;
  while((*message) != 0) {
    if ((*message) == 0x20) {
      // replace the first space with the NULL character
      (*message) = 0;
      message++;
      break;
    }
    else {
      message++;
    }
  }
  if (strlen(message) == 0) {
    topic   = NULL;
    message = dataBuffer;
  }
}
传感器节点
在博文“使用Intel Edison:构建物联网传感器节点”中,我们构建了一个包含几个传感器和执行器的传感器节点。
- 一个运动传感器,用于检测运动
- 一个温度传感器,用于测量环境温度
- 一个光传感器,用于测量环境光照水平
- 一个按钮,用于检测用户操作,即用户按下按钮
- 一个红色LED,在感应到按钮按下时切换
- 一个绿色LED,在运动传感器检测到运动时亮起

使用MQTT,我们将定期将各种传感器读数发布到运行在同一Edison开发板上的Mosquitto代理,并订阅所有主题‘edison/#’。我们对传感器节点的操作进行了一些小的更改。
- 按钮不再切换红色LED。它已被重新用作切换布尔变量的信号,该变量将被传输给MQTT订阅者。
- 红色LED现在只能通过MQTT消息控制。这可以作为远程控制的互联网连接灯的代理。
- 绿色LED的行为现在可以通过MQTT控制。它可以被编程为跟踪运动传感器活动,或被禁用。
主Arduino草图如下所示。
// File: MQTT_IoT_Sensor.ino

/******************************************************************************
    Internet of Thing Sensor Node using Intel Edison Development board
******************************************************************************/

#include <stdio.h>
#include <Arduino.h>

#include "sensors.h"
#include "MQTTClient.h"

// Global variables
unsigned long          updateTime = 0;
// PIR variables
volatile unsigned long activityMeasure;
volatile unsigned long activityStart;
volatile boolean       motionLED = true;
unsigned long          resetActivityCounterTime;

// button variables
boolean                toggleLED = false;
volatile unsigned long previousEdgeTime = 0;
volatile unsigned long count = 0;
volatile boolean       arm_alarm = false;

// MQTT Client
#define SECURE_MODE     2
MQTTClient              mqttClient;
char                    fmtString[256];     // utility string
char                    topicString[64];    // topic for publishing
char                    msgString[64];      // message

/*****************************************************************************
  Setup
******************************************************************************/
void setup() {
  Serial.begin(115200);
  delay(3000);
  Serial.println("Ready");

  pinMode(RED_LED,    OUTPUT);
  pinMode(GREEN_LED,  OUTPUT);
  pinMode(BUTTON,     INPUT_PULLUP);
  pinMode(PIR_SENSOR, INPUT);

  // Button interrupt. Trigger interrupt when button is released
  attachInterrupt(BUTTON,     buttonISR, RISING);

  // PIR interrupt. We want both edges to compute pulse width
  attachInterrupt(PIR_SENSOR, pirISR,    CHANGE);
  digitalWrite(RED_LED,  HIGH);
  digitalWrite(GREEN_LED,LOW);
  resetActivityCounterTime = 0;

  // initializing MQTTClient
#if ( SECURE_MODE == 0 )
  Serial.println("No security");
  mqttClient.begin("localhost", 1883, OPEN, NULL, NULL, NULL);
#elif ( SECURE_MODE == 1 )
  Serial.println("SSL security");
  mqttClient.begin("localhost", 1994, SSL,
                   "/home/mosquitto/certs/ca.crt", NULL, NULL);
#elif ( SECURE_MODE == 2 )
  Serial.println("TLS-PSK security");
  mqttClient.begin("localhost", 1995, PSK, NULL, "user", "deadbeef");
#endif

  // subscribe to all topics published under edison
  mqttClient.subscribe("edison/#", mqttCallback);
  mqttClient.publish("edison/bootMsg","Booted");
  digitalWrite(RED_LED, LOW);
}
/**************************************************************************
  MQTT Callback function
**************************************************************************/
void mqttCallback(char* topic, char* message)
{
  sprintf(fmtString, "mqttCallback(), topic: %s, message: %s",topic,message);
  Serial.print(fmtString);
  // check for matching topic first
  if (strcmp(topic,"edison/LED") == 0) {
    // then execute command as appropriate
    if (message[0] == 'H') {
      digitalWrite(RED_LED, HIGH);
      toggleLED = false;
    }
    else if (message[0] == 'L') {
      digitalWrite(RED_LED, LOW);
      toggleLED = false;
    }
    else if (message[0] == 'B') {
      toggleLED = true;
    }
  }
  if (strcmp(topic, "edison/motionLED") == 0) {
    // note that there is an extra carriage return at the end of the message
    // using strncmp to exclude the last carriage return
    if (strncmp(message, "OFF", 3) == 0) {
      digitalWrite(GREEN_LED, LOW);
      motionLED = false;
    }
    else if (strncmp(message, "ON", 2) == 0) {
      motionLED = true;
    }
  }
}
/***********************************************************************
  Main processing loop
***********************************************************************/
void loop() {

    // check for any new message from mqtt_sub
    mqttClient.loop();

    if (millis() > resetActivityCounterTime) {
      resetActivityCounterTime = millis() + 60000;
      // publish motion level
      sprintf(msgString,"%.0f",100.0*activityMeasure/60000.0);
      mqttClient.publish("edison/ActivityLevel",msgString);
      activityMeasure = 0;
    }
    if (millis() > updateTime) {
      updateTime = millis() + 10000;
      // publish temperature
      sprintf(msgString,"%.1f",readTemperature(TEMP_SENSOR));
      mqttClient.publish("edison/Temperature",msgString);

      // publish light sensor reading
      sprintf(msgString,"%d",readLightSensor(LIGHT_SENSOR));
      mqttClient.publish("edison/LightSensor",msgString);

      // publish arm_alarm
      sprintf(msgString,"%s", (arm_alarm == true)? "ARMED"  : "NOTARMED");
      mqttClient.publish("edison/alarm_status", msgString);
    }

    if (toggleLED == true) {
      digitalWrite(RED_LED, digitalRead(RED_LED) ^ 1);
    }
    delay(100);
}
大部分代码是不言自明的。我们将传感器处理代码移到了单独的模块:sensors.h和sensors.cpp,以提高可读性。我们允许通过在主Arduino草图中设置SECURE_MODE变量来使用不同的安全模式。回调函数mqttCallback()在收到来自MQTT代理的新消息时被调用。订阅的MQTT主题名称和消息被传递给回调函数,在那里它们被扫描,如果匹配一组预定义的动作,则采取相应的操作。回调函数是从互联网控制物联网传感器的主要机制。在本例中,发布到主题‘edison/LED’的消息用于打开、关闭或闪烁红色LED,发布到主题‘edison/motionLED’的消息用于控制绿色LED的行为,使其跟踪运动传感器输出或不跟踪。
// File: sensors.h
//
#define USE_TMP036     0

#define RED_LED       10            // Red LED
#define GREEN_LED     11            // Green LED
#define BUTTON        13            // push button with 10K pull up resistor
#define PIR_SENSOR    12            // Infrared motion sensor
#define LIGHT_SENSOR  A0            // light sensor
#define TEMP_SENSOR   A1            // TMP36 or LM35 analog temperature sensor

#define MIN_PULSE_SEPARATION     200   // for debouncing button
#define ADC_STEPSIZE             4.61  // in mV, for temperature conversion.

#if (USE_TMP036 == 1)
#define TEMP_SENSOR_OFFSET_VOLTAGE       750
#define TEMP_SENSOR_OFFSET_TEMPERATURE   25
#else // LM35 temperature sensor
#define TEMP_SENSOR_OFFSET_VOLTAGE        0
#define TEMP_SENSOR_OFFSET_TEMPERATURE    0
#endif

// Global variables
extern unsigned long          updateTime;
// PIR variables
extern volatile unsigned long activityMeasure;
extern volatile unsigned long activityStart;
extern volatile boolean       motionLED;
extern unsigned long          resetActivityCounterTime;

// button variables
extern boolean                toggleLED;
extern volatile unsigned long previousEdgeTime;
extern volatile unsigned long count;
extern volatile boolean       arm_alarm;
float readTemperature(int analogPin);
int   readLightSensor(int analogPin);
void  buttonISR();
void  pirISR();
// File: sensors.cpp
#include <Arduino.h>
#include "sensors.h"
/***********************************************************************************
  PIR Sensor
  Each time the sensor detect motion, the output pin goes HIGH and stay HIGH as
  long as there is motion and goes LOW 2 or 3 seconds after motion ceased
  We will count the duration when the PIR sensor output is HIGH as a measure of
  Activity. The main loop will report the activity level as percentage of time in the
  previous time interval that motion was detected
************************************************************************************/
void pirISR()
{
  int pirReading;
  unsigned long timestamp;
  timestamp = millis();
  pirReading = digitalRead(PIR_SENSOR);
  if (pirReading == 1) {
    // mark the start of the pulse
    activityStart = timestamp;
  }
  else {
    int pulseWidth = timestamp-activityStart;
    activityMeasure += pulseWidth;
  }
  // light up GREEN LED when motion is detected
  if (motionLED == true) {
    digitalWrite(GREEN_LED, pirReading);
  }
}
/************************************************************************
  return light sensor reading
************************************************************************/
int readLightSensor(int sensorPin)
{
  return analogRead(sensorPin);
}
/***********************************************************************
  return temperature in Fahrenheit degrees
***********************************************************************/
float readTemperature(int sensorPin)
{
  int   sensorReading;
  float temperature;
  sensorReading = analogRead(sensorPin);
  // convert to millivolts
  temperature = sensorReading * ADC_STEPSIZE;
  // Both LM35 and TMP036 temperature sensor has temperature slope of 10mV
  // per degrees celsius
  // LM35 offset voltage is 0 mv, TMP036 offset voltage is 750 mV
  // LM35 offset temperature is 0 degree C, TMP036 offset temperature is 25 degrees C
  temperature = (temperature - TEMP_SENSOR_OFFSET_VOLTAGE)/10.0 +
                 TEMP_SENSOR_OFFSET_TEMPERATURE;
  // convert to fahrenheit
  temperature = temperature * 1.8 + 32.0;
  return temperature;
}
/*************************************************************************
  Interrupt handler for button press
**************************************************************************/
void buttonISR()
{
  // if current edge occurs too close to previous edge, we consider that a bounce
  if ((millis()-previousEdgeTime) >= MIN_PULSE_SEPARATION) {
    arm_alarm = !arm_alarm;
    Serial.print("Alarm is: ");
    if (arm_alarm == true) {
      Serial.println("ARMED");
    }
    else {
      Serial.println("NOT ARMED");
    }
    count++;
    Serial.print("Count: "); Serial.println(count);
  }
  previousEdgeTime=millis();
}
测试
要测试物联网传感器,我们需要使用一个MQTT客户端来订阅传感器发布的主题,以及另一个MQTT客户端来发布传感器将响应的主题。我们可以使用‘SSH’登录Edison开发板,并使用mosquitto_sub/pub命令在本地观察和控制传感器节点,或者我们可以使用另一个安装了Mosquitto软件包的主机。
测试传感器节点
在订阅客户端上,订阅所有主题。
$> mosquitto_sub –h ipaddr –p 1883 –t edison/# -v
其中ipaddr是Edison开发板的IP地址。如果直接在Edison开发板上运行,请将"localhost"替换。在这种情况下,我们使用开放端口1883连接到代理。我们也可以使用带证书的端口1994,或带PSK用户名和密码的端口1995。成功订阅主题‘edison/#’后,我们应该看到传感器读数以及通过发布客户端发出的任何命令。
在发布客户端上,发布到主题edison/LED以控制红色LED,或发布到Edison/motionLED以启用/禁用绿色LED。
$> mosquitto_pub –h ipaddr –p 1883 –t Edison/LED –m {H, L, B}
$> mosquitto_pub –h ipaddr –p 1883 –t Edison/motionLED –m {ON, OFF}
当发布上述每个命令时,红色LED应变为ON、OFF或闪烁。
要停止绿色LED跟踪运动传感器,请发布到主题‘edison/motionLED’,消息为ON或OFF。
所附视频显示了测试过程的屏幕录像。
摘要
我们已经展示了如何利用Arduino草图中的Linux编程功能,将Mosquitto MQTT等相当复杂的软件提供给Arduino草图使用。通过这样做,我们可以利用为Arduino生态系统开发的许多现有的Arduino硬件传感器库。通过利用支撑所有Arduino草图的Linux,我们还可以以相当简单的方式利用Linux可用的开源软件包。在下一篇文章中,我们将通过将传感器连接到Node-Red,执行一些初步的传感器数据分析并发送适当的警报来为我们的传感器节点增加更多功能。
参考和附加信息
- 在 Intel Edison 上构建和运行 Mosquitto MQTT
- 使用Intel Edison:构建物联网传感器节点
- MQTT Wiki站点 – http://mqtt.org/wiki
- Mosquitto MQTT Broker – http://mosquitto.org
- Intel Edison开发板规格 – http://www.intel.com/edison
立即开始创新!Intel® 物联网开发者计划提供知识、工具、套件以及专家社区,助您快速轻松地将您的创新想法转化为物联网解决方案。
尽情畅想,动手创造,使用Intel®物联网开发者套件,专为Intel® Edison和Intel® Galileo平台打造。这些套件功能多样,性能优化,并且是完全集成的端到端物联网解决方案,支持各种编程环境、工具、安全、云连接和硬件。
如需更多资源并了解新的 Intel® 物联网开发者套件 v1.0 如何帮助您简化物联网项目
- 下载 Intel® 物联网开发者套件
- 访问 Intel® 物联网开发者中心
- 参加我们的 Roadshows,获取创建您自己的物联网项目的实践培训