
C# 中现成的软件许可解决方案
一种使用数字签名进行软件许可的解决方案,用 C# 实现
- 下载源代码 - 233.6 KB
- 从 GitHub 下载源代码 @ https://github.com/soldierq/QLicense
- 从 Codeplex 下载源代码 @ https://qlicense.codeplex.com/
引言
[更新亮点]
2016.11 感谢各位指出演示中验证 UID 缺失的问题。该 bug 已修复,您可从 CodeProject 或 GitHub 获取最新代码。核心库无更改,核心库版本保持 1.1,演示应用程序更新至版本 1.2。
2016.9 感谢 Member 12119377 对公钥和私钥文件保护的评论,我已修改该库,将公钥和私钥文件作为程序集的嵌入资源,以确保它们不易被替换。此外,库版本已更新至 1.1。
首先,我想向您展示此解决方案的实时演示。
一个简单示例
我有一个应用程序,具有功能 1、2 和 3,我希望用户为他们喜欢的每个功能付费,而不是为整个软件包付费。因此,我设计了一个许可解决方案来实现这一点。
当前解决方案
- 我的应用程序启动并发现自己未激活

- 它显示激活表单,并显示当前设备 UID 以便购买许可
- 用户应将此设备 UID 提供给我们的供应商,通过邮件或电话购买许可。
- 在我们的供应商端,有一个许可发行程序,该程序根据设备 UID 和用户购买的功能来发行许可。

- 生成许可后,供应商应将许可字符串粘贴到文本文件中或发送给我们的用户以激活。
- 用户将许可字符串粘贴到激活表单中以激活应用程序。

好了,如果这引起了您的兴趣,请继续阅读。
此解决方案的亮点是
- 使用数字签名技术保护许可文件。
- 基于 XML 的许可文件允许包含应用程序所需的丰富信息。
- 支持单机许可模式和批量许可模式。
- 对于单机许可模式,PC 的唯一密钥是基于 PC 硬件生成的,并使用 BASE36 算法生成唯一密钥,以方便使用。
据我所知,这类许可解决方案的关键概念早在多年前就已提出,甚至在 CodeProject 上也有类似的文章。然而,似乎没有现成的解决方案或库。所以这是一个我来实现它的机会!
背景
我曾在一个项目上工作,该项目是一个拥有许多关键功能的系统,这些功能需要根据提供的许可进行激活或禁用。老板们希望许可系统的功能开关机制非常灵活,因此预定义的不同版本不适合此目的。
好处是最终用户只需为他们想要的功能付费。例如,用户 A 只能为功能 A、B 和 C 付费;而用户 B 只想要功能 A 和 C,用户 C 可能只为功能 B 付费。
一个好主意是将这些活动功能放入 XML 列表中,并将此列表用作许可文件。但是,下一个问题是如何保护此许可文件,因为它只是一个纯文本 XML。最后,数字签名解决方案解决了这个问题。
主要思路
主工作流程
下图描述了此许可解决方案的主要工作流程

注释
- 终端用户应用程序生成当前 PC 的唯一 ID。
- 唯一 ID 将被传递给许可发行者。这应是一个离线步骤,可能包括额外的操作,如购买和支付。
- 许可发行者根据唯一 ID 和许可选项发行许可文件,即决定根据购买和支付情况启用哪些功能。
- 将许可文件发送回终端用户。这同样是一个离线步骤,可以通过邮件或 USB 驱动器完成。
- 终端用户应用程序验证许可文件并启动。
设备的唯一 ID
目前,此解决方案仅用于 PC,包括服务器和笔记本电脑。尚未用于移动设备。我认为用于移动设备的获取唯一 ID 的算法应该不同。这里,我们先只讨论 PC。
PC 的唯一 ID 包含 4 部分
- Application Name
- 处理器 ID
- 主板序列号
- C 盘的磁盘卷序列号
这四部分被连接为 string,然后通过 MD5 生成 checksum。BASE36 编码用于将 checksum 格式化为类似 "XXXX-XXXX-XXXX-XXXX" 的 string,以便于阅读和传输。
/// <summary>
/// Combine CPU ID, Disk C Volume Serial Number and Motherboard Serial Number
/// as device Id
/// </summary>
/// <returns></returns>
public static string GenerateUID(string appName)
{
    //Combine the IDs and get bytes
    string _id = string.Concat(appName, GetProcessorId(),
                 GetMotherboardID(), GetDiskVolumeSerialNumber());
    byte[] _byteIds = Encoding.UTF8.GetBytes(_id);

    //Use MD5 to get the fixed length checksum of the ID string
    MD5CryptoServiceProvider _md5 = new MD5CryptoServiceProvider();
    byte[] _checksum = _md5.ComputeHash(_byteIds);

    //Convert checksum into 4 ulong parts and use BASE36 to encode both
    string _part1Id = BASE36.Encode(BitConverter.ToUInt32(_checksum, 0));
    string _part2Id = BASE36.Encode(BitConverter.ToUInt32(_checksum, 4));
    string _part3Id = BASE36.Encode(BitConverter.ToUInt32(_checksum, 8));
    string _part4Id = BASE36.Encode(BitConverter.ToUInt32(_checksum, 12));

    //Concat these 4 part into one string
    return string.Format("{0}-{1}-{2}-{3}", _part1Id, _part2Id, _part3Id, _part4Id);
}
基于 XML 的许可文件
因此,为了让许可文件包含更多信息,基于 XML 的许可文件是必要的。在 C# 中,我们可以轻松地使用 XML Serializer 将对象序列化为 XML,反之亦然。
基本许可实体定义如下:(某些代码可能包含中文,稍后将进行多语言处理)
 public abstract class LicenseEntity
    {
        [Browsable(false)]
        [XmlIgnore]
        [ShowInLicenseInfo(false)]
        public string AppName { get; protected set; }

        [Browsable(false)]
        [XmlElement("UID")]
        [ShowInLicenseInfo(false)]
        public string UID { get; set; }

        [Browsable(false)]
        [XmlElement("Type")]
        [ShowInLicenseInfo(true, "Type",
                           ShowInLicenseInfoAttribute.FormatType.EnumDescription)]
        public LicenseTypes Type { get; set; }

        [Browsable(false)]
        [XmlElement("CreateDateTime")]
        [ShowInLicenseInfo(true, "Creation Time",
                           ShowInLicenseInfoAttribute.FormatType.DateTime)]
        public DateTime CreateDateTime { get; set; }

        public abstract LicenseStatus DoExtraValidation(out string validationMsg);

    }
它包含三个默认属性
UID,这是设备的唯一 ID(用于识别单机许可指定的设备。批量许可不使用)Type,表示它是单机许可还是批量许可CreateDateTime,表示许可创建的时间
由于这是一个 abstract 类,您可以通过继承它来添加其他属性。
保护许可文件
好的,现在我们有了许可文件和所需的所有信息。问题在于,用于许可的 XML 文件非常脆弱,因为任何人都可以修改它。因此,我们需要引入数字签名解决方案。
生成证书
要使用数字签名,首先我们需要一对 RSA 密钥。私钥供系统所有者签名 XML 文件。公钥供终端用户的应用程序验证签名的 XML 许可文件。
一种简单的方法是使用 "makecert" 命令生成我们用来签名和验证 XML 许可文件所需的证书。详细信息将在本文的后续部分介绍,请继续阅读!
签名许可文件
C# 提供对数字签名的原生支持,因此很容易像下面这样签名 XML 许可文件:(这些代码是从 Microsoft 示例中复制的)
// Sign an XML file.
// This document cannot be verified unless the verifying
// code has the key with which it was signed.
private static void SignXML(XmlDocument xmlDoc, RSA Key)
{
    // Check arguments.
    if (xmlDoc == null)
        throw new ArgumentException("xmlDoc");
    if (Key == null)
        throw new ArgumentException("Key");

    // Create a SignedXml object.
    SignedXml signedXml = new SignedXml(xmlDoc);

    // Add the key to the SignedXml document.
    signedXml.SigningKey = Key;

    // Create a reference to be signed.
    Reference reference = new Reference();
    reference.Uri = "";

    // Add an enveloped transformation to the reference.
    XmlDsigEnvelopedSignatureTransform env = new XmlDsigEnvelopedSignatureTransform();
    reference.AddTransform(env);

    // Add the reference to the SignedXml object.
    signedXml.AddReference(reference);

    // Compute the signature.
    signedXml.ComputeSignature();

    // Get the XML representation of the signature and save
    // it to an XmlElement object.
    XmlElement xmlDigitalSignature = signedXml.GetXml();

    // Append the element to the XML document.
    xmlDoc.DocumentElement.AppendChild(xmlDoc.ImportNode(xmlDigitalSignature, true));
}
现在我们可以发布许可给终端用户了。最后的“优化”是将 XML 展平,因此我使用 BASE64 对其进行了编码,并将所有输出放入一个纯文本文件中作为许可。
验证许可文件
当许可文件安装在终端用户的 PC 上时,终端用户的应用程序应加载公钥文件并使用它来验证许可文件。
// Verify the signature of an XML file against an asymmetric
// algorithm and return the result.
private static Boolean VerifyXml(XmlDocument Doc, RSA Key)
{
    // Check arguments.
    if (Doc == null)
        throw new ArgumentException("Doc");
    if (Key == null)
        throw new ArgumentException("Key");

    // Create a new SignedXml object and pass it
    // the XML document class.
    SignedXml signedXml = new SignedXml(Doc);

    // Find the "Signature" node and create a new
    // XmlNodeList object.
    XmlNodeList nodeList = Doc.GetElementsByTagName("Signature");

    // Throw an exception if no signature was found.
    if (nodeList.Count <= 0)
    {
        throw new CryptographicException
        ("Verification failed: No Signature was found in the document.");
    }

    // This example only supports one signature for
    // the entire XML document. Throw an exception
    // if more than one signature was found.
    if (nodeList.Count >= 2)
    {
        throw new CryptographicException
        ("Verification failed: More that one signature was found for the document.");
    }

    // Load the first <signature> node.
    signedXml.LoadXml((XmlElement)nodeList[0]);

    // Check the signature and return the result.
    return signedXml.CheckSignature(Key);
}
如果上述验证成功,应用程序将开始读取 XML 内容,并可以相应地打开/关闭相关功能。
关于库
整个 .NET 解决方案是基于 .NET Framework 4.0 构建的,以提供最大的兼容性,即使对于已淘汰的 Windows XP 也是如此。
我提供了什么
该解决方案包含五个项目,分为两个部分
核心库
它包含两个项目。一个是 QLicense,包含核心对象和逻辑。另一个是 ActivationControls4Win,包含相关的 Windows 窗体控件,方便使用。

演示
这部分包含一个演示应用程序,该应用程序使用上述许可解决方案,以及一个发行许可的演示激活工具。

您需要做什么
以下步骤概述了如何使用此库。我将使用那些演示项目作为示例,来描述如何创建您自己的应用程序以集成此许可解决方案。
1. 为您的应用程序创建证书
出于安全考虑,建议您为每个新应用程序创建一组新的证书。
- 您可以使用
makecert命令执行此操作,如下所示makecert -pe -ss My -sr CurrentUser -$ commercial -n "CN=<YourCertName>" -sky Signature
将 "
<YourCertName>" 替换为您自己的证书名称。 - 执行上述命令后,通过运行 "certmgr.msc" 打开您的证书管理窗口。
- 在 "
Personal" 类别下找到您在上面<YourAppName>中指定的名称创建的证书。 - 右键单击证书,选择 "所有任务"-">"导出"
- 在 导出 对话框中,选择 "是,导出私钥",并保留其他设置的默认值。

- 在密码对话框中,输入一个密码来保护私钥。您需要在代码中使用此密码来使用此证书。例如,这里我们使用密码 "demo"。
- 对于文件名,我们可以在此演示中使用 "LicenseSign.pfx"。现在我们手上就有带有私钥的证书了。
- 再次执行步骤 4) 到 7) 来导出公钥,唯一的区别是选择 "否,不导出私钥" 并使用文件名 "LicenseVerify.cer" 代替。保留所有其他选项的默认值。
好了,现在我们为解决方案生成了私钥和公钥。
2. 创建您自己的许可实体类 - "DemoLicense"
- 您需要创建一个 类库 项目,其中包含您自己的许可实体,例如命名为 "
DemoLicense"。 - 添加对 QLicense 库 的引用
- 创建一个名为 "
MyLicense" 的新类,并继承 "QLicense.LicenseEntity" - 添加您需要的其他属性
最终代码应如下所示
using QLicense;
using System.ComponentModel;
using System.Xml.Serialization;

namespace DemoLicense
{
    public class MyLicense : QLicense.LicenseEntity
    {
        [DisplayName("Enable Feature 01")]
        [Category("License Options")]
        [XmlElement("EnableFeature01")]
        [ShowInLicenseInfo(true, "Enable Feature 01",
         ShowInLicenseInfoAttribute.FormatType.String)]
        public bool EnableFeature01 { get; set; }

        [DisplayName("Enable Feature 02")]
        [Category("License Options")]
        [XmlElement("EnableFeature02")]
        [ShowInLicenseInfo(true, "Enable Feature 02",
         ShowInLicenseInfoAttribute.FormatType.String)]
        public bool EnableFeature02 { get; set; }

        [DisplayName("Enable Feature 03")]
        [Category("License Options")]
        [XmlElement("EnableFeature03")]
        [ShowInLicenseInfo(true, "Enable Feature 03",
         ShowInLicenseInfoAttribute.FormatType.String)]
        public bool EnableFeature03 { get; set; }

        public override LicenseStatus DoExtraValidation(out string validationMsg)
        {
            //Here, there is no extra validation, just return license is valid
            validationMsg = string.Empty;
            return LicenseStatus.VALID;
        }
    }
}
注释
XmlElement属性指示对象序列化为 XML 时的元素名称。ShowInLicenseInfo属性指示此属性是否应显示在LicenseInfoControl中,该控件是ActivationControls4Win项目中包含的 WinForm 控件。
3. 将 QLicense 库集成到您的应用程序 - "DemoWinFormApp"
- 添加对
DemoLicense、QLicense和ActivationControls4Win的引用 - 将步骤 1 中生成的 LicenseVerify.cer 添加到项目中,并在文件属性设置中将其设为 嵌入式资源 并 不复制到输出目录。
- 将
ActivationControls4Win中的LicenseInfoControl放在您想要显示许可详情的窗体上,例如 关于窗体。在演示中,我将其放在了主窗体上。
- 主窗体的核心逻辑是验证许可,并在需要时通知用户激活应用程序。为了更好的用户体验,我将逻辑放在
Form_Shown事件中,以便主窗体在后台显示。您可以将此逻辑放在闪屏窗体或其他位置。private void frmMain_Shown(object sender, EventArgs e) { //Initialize variables with default values MyLicense _lic = null; string _msg = string.Empty; LicenseStatus _status = LicenseStatus.UNDEFINED; //Read public key from assembly Assembly _assembly = Assembly.GetExecutingAssembly(); using (MemoryStream _mem = new MemoryStream()) { _assembly.GetManifestResourceStream("DemoWinFormApp.LicenseVerify.cer").CopyTo(_mem); _certPubicKeyData = _mem.ToArray(); } //Check if the XML license file exists if (File.Exists("license.lic")) { _lic = (MyLicense)LicenseHandler.ParseLicenseFromBASE64String( typeof(MyLicense), File.ReadAllText("license.lic"), _certPubicKeyData, out _status, out _msg); } else { _status = LicenseStatus.INVALID; _msg = "Your copy of this application is not activated"; } switch (_status) { case LicenseStatus.VALID: //TODO: If license is valid, you can do extra checking here //TODO: E.g., check license expiry date if you have added //expiry date property to your license entity //TODO: Also, you can set feature switch here //based on the different properties you added to your license entity //Here for demo, just show the license information //and RETURN without additional checking licInfo.ShowLicenseInfo(_lic); return; default: //for the other status of license file, show the warning message //and also popup the activation form for user to activate your application MessageBox.Show(_msg, string.Empty, MessageBoxButtons.OK, MessageBoxIcon.Warning); using (frmActivation frm = new frmActivation()) { frm.CertificatePublicKeyData = _certPubicKeyData; frm.ShowDialog(); //Exit the application after activation to reload the license file //Actually it is not necessary, //you may just call the API to reload the license file //Here just simply the demo process Application.Exit(); } break; } } - 添加一个名为
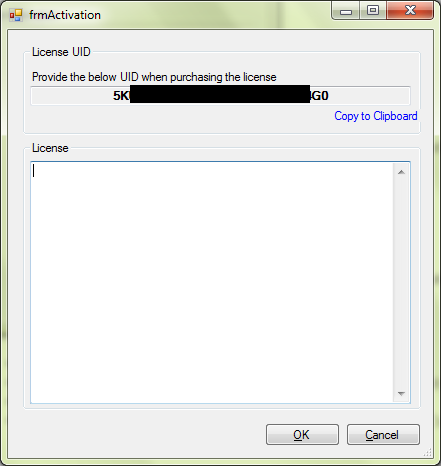
frmActivation的新窗体,并将LicenseActivateControl从ActivationControls4Win放在上面。这是用户需要输入许可内容并激活您的应用程序的窗体。
- 这是
frmActivation的主要逻辑。窗体弹出时,它将显示计算出的设备 UID。public partial class frmActivation : Form { public byte[] CertificatePublicKeyData { private get; set; } public frmActivation() { InitializeComponent(); } private void btnCancel_Click(object sender, EventArgs e) { if (MessageBox.Show("Are you sure to cancel?", string.Empty, MessageBoxButtons.YesNo, MessageBoxIcon.Warning, MessageBoxDefaultButton.Button2) == DialogResult.Yes) { this.Close(); } } private void frmActivation_Load(object sender, EventArgs e) { //Assign the application information values to the license control licActCtrl.AppName = "DemoWinFormApp"; licActCtrl.LicenseObjectType = typeof(DemoLicense.MyLicense); licActCtrl.CertificatePublicKeyData = this.CertificatePublicKeyData; //Display the device unique ID licActCtrl.ShowUID(); } private void btnOK_Click(object sender, EventArgs e) { //Call license control to validate the license string if (licActCtrl.ValidateLicense()) { //If license if valid, save the license string into a local file File.WriteAllText(Path.Combine(Application.StartupPath, "license.lic"), licActCtrl.LicenseBASE64String); MessageBox.Show("License accepted, the application will be close. Please restart it later", string.Empty, MessageBoxButtons.OK, MessageBoxIcon.Information); this.Close(); } } }
4. 创建您的许可发行工具 - "DemoActivationTool"
- 创建一个新的 Windows 窗体应用程序项目,命名为 "
DemoActivationTool"。 - 添加对
DemoLicense、QLicense和ActivationControls4Win的引用 - 将步骤 1 中生成的 LicenseSign.pfx 添加到项目中,并在文件属性设置中将其设为 嵌入式资源 并 不复制到输出目录。
- 在主窗体上绘制
LicenseSettingsControl和LicenseStringContainer控件,可能看起来像这样
- 为主窗体添加以下代码。详细信息在代码下方的注释中进行了解释。
    public partial class frmMain : Form
    {
        private byte[] _certPubicKeyData;
        private SecureString _certPwd = new SecureString();

        public frmMain()
        {
            InitializeComponent();

            _certPwd.AppendChar('d');
            _certPwd.AppendChar('e');
            _certPwd.AppendChar('m');
            _certPwd.AppendChar('o');
        }

        private void frmMain_Load(object sender, EventArgs e)
        {
            //Read public key from assembly
            Assembly _assembly = Assembly.GetExecutingAssembly();
            using (MemoryStream _mem = new MemoryStream())
            {
                _assembly.GetManifestResourceStream
                ("DemoActivationTool.LicenseSign.pfx").CopyTo(_mem);

                _certPubicKeyData = _mem.ToArray();
            }

            //Initialize the path for the certificate to sign the XML license file
            licSettings.CertificatePrivateKeyData = _certPubicKeyData;
            licSettings.CertificatePassword = _certPwd;

            //Initialize a new license object
            licSettings.License = new MyLicense();
        }

        private void licSettings_OnLicenseGenerated
        (object sender, QLicense.Windows.Controls.LicenseGeneratedEventArgs e)
        {
            //Event raised when license string is generated. Just show it in the text box
            licString.LicenseString = e.LicenseBASE64String;
        }

        private void btnGenSvrMgmLic_Click(object sender, EventArgs e)
        {
            //Event raised when "Generate License" button is clicked.
            //Call the core library to generate the license
            licString.LicenseString = LicenseHandler.GenerateLicenseBASE64String(
                new MyLicense(),
                _certPubicKeyData,
                _certPwd);
        }
    }
本指南就到这里,运行结果已在本文开头展示。
欢迎在下方留下您的评论和好想法。
历史
- 2015 年 5 月:发布版本 1.0
- 2016 年 9 月:发布版本 1.1。出于安全考虑,将公钥和私钥文件作为程序集的嵌入资源,而不是单独的本地文件。