
如何在 Visual Studio 2015 中使用 NLog (4.2)
这将使您能够快速使用 VS2015 和 NLog 4.2 开始记录日志。
您可以直接下载并运行它们,看看它们是如何工作的。
注意:为了减小下载量,我从较小的 zip 文件中的解决方案中删除了包,因此您第一次构建它时,它会从 NuGet 自动下载它们。
引言
时间飞逝,之前的技巧 (如何在 VisualStudio 2013 中使用 NLog (2.1 & 3.1)) 有点过时了,所以我花了一些时间来试用新版本。 这应该让您很快再次启动并运行。
背景
我写原始文章的原因是找不到任何有用且最新的东西。 这篇文章主要基于 NLog 团队的新、闪亮和更新的教程(参见这里)。 与之前的文章一样,本文的目的是让您立即启动并运行。
步骤 1:打开 VS2013,创建一个新的控制台项目


没什么特别的。 随意命名,放在你想要的地方。
- 奖励:将 "
hello world!" 打印到控制台。
步骤 2:从 NuGet 获取 NLog
转到“工具 -> NuGet 包管理器 -> 管理解决方案的 NuGet 包...”

步骤 2.1:获取 NLog 包
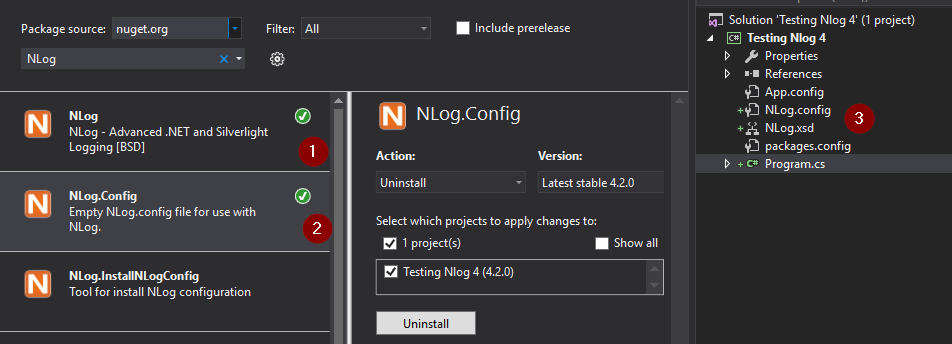
Visual Studio 2015 提供的管理器与 2013 不同。 您必须键入您要搜索的内容,然后安装它。

作为替代方案,您可以在程序包管理器控制台中运行以下命令
Install-Package NLog.Config
您快完成了。 您的解决方案应该如下所示

您要做的最后一件事是安装 NLog.Config(应该是您列表中的第二个)。 这将为您提供架构和默认配置。 如果没有它们,您将看不到任何日志记录。 完成此操作后,您应该得到类似如下的内容
步骤 3:编辑您的 NLog 配置
之前的步骤应该在您的解决方案中创建了一个名为 NLog.config 的配置文件。 打开它,看看里面,您将有一些合理的默认值和一个示例,您可以用来记录到文件中(只需注释掉代码,并按原样使用它,或进行修改)。
我假设您正在使用以下代码(您可以简单地将其复制粘贴到 config 文件中)
<?xml version="1.0" encoding="utf-8" ?>
<nlog xmlns="http://www.nlog-project.org/schemas/NLog.xsd"
      xmlns:xsi="http://www.w3.org/2001/XMLSchema-instance"
      xsi:schemaLocation="http://www.nlog-project.org/schemas/NLog.xsd NLog.xsd"
      autoReload="true"
      throwExceptions="false"
      internalLogLevel="Off" internalLogFile="c:\temp\nlog-internal.log" >

  <targets>
    <!-- Using the colored console as my target-->
    <target xsi:type="ColoredConsole" name="colored_console"/>
  </targets>

  <rules>
    <!-- Writing everything to the cololred console -->
    <logger name="*" minlevel="Trace" writeTo="colored_console"/>
  </rules>
</nlog>
步骤 4:编辑您的 Main 方法
您可以简单地将此代码复制/粘贴到您的 main 中
class Program
{
    /*
     * NLog tutorial suggests to use a static Logger, so here it is
     */
    private static Logger logger = LogManager.GetCurrentClassLogger();

    static void Main(string[] args)
    {
        /*
         * Welcome to this NLog demo
         */
        Console.Out.WriteLine("Greetings, some loggings is about to take place.");
        Console.Out.WriteLine("");


        Console.Out.WriteLine("Let's assume you're going to work, and using the bus to get there:");
        Console.Out.WriteLine("------------------------------------------------------------------");
        logger.Trace("Trace: The chatter of people on the street");
        logger.Debug("Debug: Where are you going and why?");
        logger.Info("Info: What bus station you're at.");
        logger.Warn("Warn: You're playing on the phone and not looking up for your bus");
        logger.Error("Error: You get on the wrong bus.");
        logger.Fatal("Fatal: You are run over by the bus.");

        /*
         * Closing app
         */
        Console.Out.WriteLine("");
        Console.Out.WriteLine("Done logging.");
        Console.Out.WriteLine("Hit any key to exit");
        Console.ReadKey();
    }
}
如果您遵循了以上所有建议,您应该会看到类似这样的内容

恭喜。 你完成了。
我建议您查看我之前的文章,了解一些日志查看器和更多链接。
一些额外的 - Fluent Interface
这并不是真正的“新”,因为它大约在 3.2 版本中添加,但我一直没有时间将其添加到之前的文章中,所以现在它来了
// From the tutorial
logger.Info()
    .Message("This is a test fluent message '{0}'.", DateTime.Now.Ticks)
    .Property("Test", "InfoWrite")
    .Write();
fluent interface 只是让您“链接”您的逻辑,并使其显示为一个语句(想想 linq,以及使用 .Where() 或 .Select())。
这是一个简单的例子,说明如何在没有额外的 if (condition) log; 的情况下进行条件日志记录
// Simple example of using a conditional write
for (int i = 0; i < 5; i++)
{
    logger.Trace()
          .Message("you'll only see this if `i` is a multiple of 2. i = {0}", i)
          .Property("Test", "boom")
          .WriteIf(i++ % 2 == 0);
}
这应该向我们的控制台输出 3 行(对于 i=0、2 和 4)。 (如果您正在使用该代码,只需取消注释 "FluidMethod()" 行,您就会看到它。
总结
我对开发人员最近有时间更新教程甚至评论上一篇文章印象深刻。 您应该能够在他们的 Github 页面中找到您需要的所有内容,如果您愿意并且有时间,欢迎您加入并提供帮助。 我希望这能帮助您启动并运行日志记录。 请随时发表评论和投票。
历史
2015 年 11 月 11 日
- 首次发布