
[tut5] 表单通信,多标签程序,为每个工具自定义光标
4.94/5 (3投票s)
了解如何实现一种父窗体通过选项卡控件创建和控制其他窗体的技术,同时学习如何为工具实现菜单,以及如何为每个工具添加自定义光标。
引言
这是本系列第五个教程,本系列教程 教程 将教您如何使用C#在Windows窗体中构建一个导出矢量格式艺术作品的图形程序。
- 教程1---https://codeproject.org.cn/Tips/1082353/tut-GDIplus-Artwork-from-svg
- 教程2---https://codeproject.org.cn/Tips/1082633/interactivaly-add-multiple-shapes-using-linked-lis
- 教程3---https://codeproject.org.cn/Tips/1084073/tut-graphics-program-using-Csharp-Drag-Drop-Delete
- 教程4---https://codeproject.org.cn/Tips/1105143/tut-Draw-Lines-with-Circle-and-Rectangle-End
……此外,您还将了解如何移动、删除、Ctrl+Z您的矢量图,并将其保存为特殊格式,以便您的程序再次读取。
此外,我们将学习如何保存 XML 文件... 如何导出为 Verilog 格式... 如何使用星形算法... 如何使用手形工具... 如何手动创建撤销技术。
您将能够构建什么
- https://drive.google.com/folderview?id=0B739QmcCMLMHVU1DbHhIQlZ3MTA&usp=sharing
- https://www.youtube.com/watch?v=6hXJ1EoAYc0
今天我们将把我们的解决方案提升到一个新的水平,在父窗体中拥有多个窗体实例,就像一个命令和控制窗体,控制所有其他子窗体。
我们还将讨论如何创建一个简单的菜单,包含程序中使用的所有工具(这将把我们在之前的教程中设计的 <仅拥有快捷关键字来选择所需工具> 提升到新的水平)。
我们还将为用户选择的每个工具提供特殊的自定义光标。
更新
在这里,我用枚举替换了操作字符串作为标志来区分不同的工具。
源代码也已为此更新。
背景
- 教程1---https://codeproject.org.cn/Tips/1082353/tut-GDIplus-Artwork-from-svg
- 教程2---https://codeproject.org.cn/Tips/1082633/interactivaly-add-multiple-shapes-using-linked-lis
- 教程3---https://codeproject.org.cn/Tips/1084073/tut-graphics-program-using-Csharp-Drag-Drop-Delete
- 教程4---https://codeproject.org.cn/Tips/1105143/tut-Draw-Lines-with-Circle-and-Rectangle-End
教程地图
首先,要实现表单通信,我们必须先
- 创建一个我称之为
(super_form)的父窗体,它将创建并控制其他窗体,并构建在选项卡控件中创建子窗体的技术。 - 将用于区分不同工具的操作字符串转换为枚举器,并将其位置从每个子窗体更改为
(super_form),并使其成为static,以便所有子窗体都能看到。 - 编辑
Form1中处理操作字符串的函数,使其现在处理新的静态操作字符串。 - 将键盘捕获事件的位置从每个子窗体更改为
(super_form)。
创建工具菜单并使用自定义光标
- 为
(super_form)添加所需的控件,如工具条容器和工具条本身。 - 为每个工具添加按钮并创建其点击事件。
- 每个工具的自定义光标
表单通信
1-创建(super_form)并构建创建和控制子窗体的技术。
首先,我们创建一个新的Windows窗体并称之为(super_form)。

不要忘记它将包含其他子窗体,所以我们需要它足够大,将其大小从300*300更改为1203*780。

现在我们需要添加一个容器来容纳所有子窗体,我们将使用TabControl。

只需在(super_form)的中间添加一个TabControl,并将其大小设置为1163, 717。

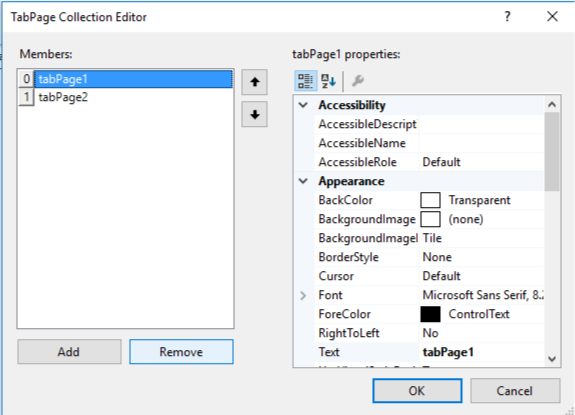
从tab pages中删除所有先前添加的页面。

现在让我们修改(super_form)的构造函数,创建一个名为Form1的子窗体实例,并将其添加到TabControl。
我们还需要一种数据结构来包含所有创建的子窗体,在这种情况下,我们将使用一个列表。
List<Form1> form_list=new List<Form1>();
要将新窗体添加到选项卡控件,我们将使用此函数。
        private void AddNewTab(Form frm)
        {
            TabPage tab = new TabPage(frm.Text);
            frm.TopLevel = false;
            frm.Parent = tab;
            frm.Visible = true;

            tabControl1.TabPages.Add(tab);

            frm.Location = new Point((tab.Width - frm.Width) / 2, (tab.Height - frm.Height) / 2);

            tabControl1.SelectedTab = tab;

            tabControl1.Select();// to select thsi tab
        }
因此,构造函数将(第一次)创建一个新窗体实例,将其添加到列表中,并使用AddNewTab将其添加到选项卡控件。
  List<Form1> form_list=new List<Form1>();
        public super_form()
        {
            InitializeComponent();

            Form1 frmChild = new Form1();
            frmChild.Dock = DockStyle.Right;
            form_list.Add(frmChild);

            AddNewTab(frmChild);
        }
现在我们需要一个按钮让用户创建窗体的新实例。

只需创建一个新按钮并创建一个点击事件,此事件的目标将与构造函数中的概念相同,但会进行一些修改,例如一个计数器来递增创建的窗体的名称。
 int count=1;
        private void button1_Click(object sender, EventArgs e)
        {
            Form1 frmChild = new Form1();
            frmChild.Text = "file" + count;
            frmChild.Dock = DockStyle.Right;
            AddNewTab(frmChild);
            count++;
            form_list.Add(frmChild);
        }
我们还需要创建一种技术,让程序知道哪个选项卡被选中。
我们将使用selecting事件。
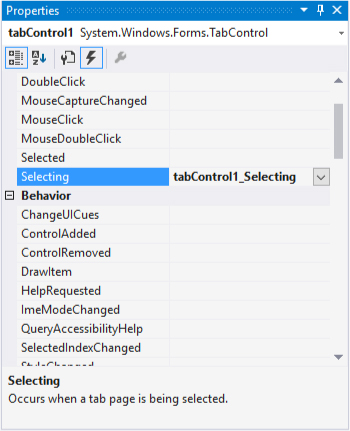
 int selected_tab = 0;
        private void tabControl1_Selecting(object sender, TabControlCancelEventArgs e)
        {
            selected_tab = e.TabPageIndex;
        }
2-使用名为action的枚举器,并将其放在super_form中,并使其成为static。
首先创建一个全局名为action的枚举器。
然后定义一个static变量,以便所有子窗体都能看到。
namespace drag_and_drop_and_delete   //inside the same namespace
{

           public enum action  //write it in global section
           {
           star, heart, line, move, none
           }

           public partial class super_form : Form
           {

               public static action super_action   //define the static variable inside the
                                                   //class of superForm

             //to make the action string that defines which tool
             //is selected universal and seen by all child forms

           }

}
3-编辑Form1以现在使用新的静态action。
编辑Form1中的一些函数,使其现在处理新的静态变量,编辑Form1_MouseClick。
 private void Form1_MouseClick(object sender, MouseEventArgs e)
        {
            if (super_form.super_action.Equals(action.star))
            {
            //old code
            }

            else if (super_form.super_action.Equals(action.heart))
            {
            //old code
            }

            else if (super_form.super_action.Equals(action.line))
            {
            //old code
            }
         }
并编辑Form1_MouseMove。
 private void Form1_MouseMove(object sender, MouseEventArgs e)
        {
            if (first == true && e.Button == m && super_form.super_action.Equals(action.move))
            {
             //old code
            }

            if (is_selected == true && e.Button == m && super_form.super_action.Equals(action.move))
            {
             //old code
            }

            //old code
       }
4-将键盘捕获事件的位置从每个子窗体更改为(super_form)。
我们将键盘捕获事件的位置从子窗体更改为选项卡控件,因此为选项卡控件添加一个keydown事件。
在上一个教程中,键盘捕获事件中存在一些仅针对窗体的变量,为解决此问题,我们将使用
Form1 selected_form = form_list.ElementAt<Form1>(selected_tab);
来编辑这些变量,仅适用于选定的窗体。
因此,选项卡控件的键盘事件将是
  private void tabControl1_KeyDown(object sender, KeyEventArgs e)
        {
            Form1 selected_form = form_list.ElementAt<Form1>(selected_tab);
            if (e.KeyData == Keys.S)
            {
                super_action = action.star;
            }
            else if (e.KeyData == Keys.H)
            {
                super_action = action.heart;
            }

            else if (e.KeyData == Keys.M)
            {
                super_action = action.move;
            }

            else if (e.KeyData == Keys.L)
            {
                super_action = action.line;
            }

            //new code
            else if (e.KeyData == Keys.Enter)
            {
                super_action = action.none;

                Invalidate();
                selected_form.first_point_in_line = true;
            }

            else if (e.KeyData == Keys.NumPad1)
            {
                lines current_line = new lines();
                current_line = selected_form.lines_list.ElementAt<lines>(selected_form.line_counter - 1);

                current_line.end_arrow = "circle";

                current_line.draw_arrow();
                super_action =action.none;
                selected_form.Invalidate();
                selected_form.first_point_in_line = true;
            }

            else if (e.KeyData == Keys.NumPad2)
            {
                lines current_line = new lines();
                current_line = selected_form.lines_list.ElementAt<lines>(selected_form.line_counter - 1);

                current_line.end_arrow = "box";

                current_line.draw_arrow();
                super_action =action.none;
                selected_form.Invalidate();
                selected_form.first_point_in_line = true;
            }
            //new code

            else if (e.KeyData == Keys.Delete && selected_form.is_selected == true)
            {
                selected_form.shape_list.RemoveAt(selected_form.selected);
                RectangleF null_rectangle = new RectangleF();
                selected_form.selected_recatngle = null_rectangle;
                selected_form.is_selected = false;
                selected_form.Invalidate();
            }
        }
工具菜单
现在我们需要添加一个菜单,其中包含用户将使用的所有工具,因此我们将使用一个菜单并放置circle, star, line和move工具,但请记住,我们需要设置线的端点的某些属性,为此,我们将使用2个菜单,一个用于主工具,另一个工具菜单仅用于线属性(在用户使用线工具之前会隐藏)。
1-为(super_form)添加所需的控件。
因此,我们将开始使用一个容器来容纳我们的所有菜单,因此我们将使用ToolStripContainer。

将其调整为与(super_form)相同的尺寸 1203, 755。

并将其置于背景。
您会注意到容器的四边都有四个箭头,所以展开左侧和顶部的容器(只需单击箭头),您会注意到顶部的箭头已经展开(您无需自己展开)。

现在我们需要在展开的区域添加菜单本身,所以我们将使用ToolStrip控件。

只需拖放到所需的展开区域(使用2个ToolStrips,一个主ToolStrip位于ToolStripContainer的左侧展开区域,另一个用于线属性的ToolStrip位于ToolStripContainer的顶部展开区域。

由于我们需要线的属性工具菜单(顶部ToolStrip)隐藏,并且仅在用户单击线按钮时可见,因此在ToolStrip属性中将可见性设置为隐藏。

2-为每个工具添加按钮并创建其点击事件。
现在我们需要将按钮本身添加到tool strip,我们将使用彩色按钮,这是在tool strip中添加的默认控件,所以只需单击工具条,您就会注意到一个带有圆形箭头的框,单击圆形箭头添加图像。
![]()
(或单击下拉菜单选择button),

添加3个按钮,然后添加一个分隔符(也可在下拉菜单中找到),然后添加另一个按钮。

现在我们需要在顶部工具条上添加2个按钮,但是怎么做呢?我们刚刚将其隐藏了,只需单击窗体下方的菜单中的工具条名称。

然后添加2个按钮。
现在我们想更专注于主工具,所以只需增大左侧工具条的大小,通过编辑image scaling size property将其设置为32*32。

现在我们需要将这些图像添加到菜单中的每个按钮中,只需右键单击所需的按钮,然后设置图像,然后从选择资源,本地资源,单击导入并选择所需的图像,使用这些图像。
![]()
![]()
![]()
![]()


二次顶部工具条也采用相同概念,结果将是


然后只需为每个按钮添加一个点击事件,在每个按钮的点击事件中,我们将确保第二个顶部工具菜单关闭,当然,除非单击线工具本身,单击菜单的概念与用户单击键盘时完全相同,您只需编辑static public action string。
        private void star_button_Click(object sender, EventArgs e)
        {
            action = "star";
            toolStrip2.Visible = false;
        }

        private void heart_button_Click(object sender, EventArgs e)
        {
            action = "heart";
            toolStrip2.Visible = false;
        }

        private void line_button_Click(object sender, EventArgs e)
        {
            action = "line";
            toolStrip2.Visible = true;
        }

        private void move_button_Click(object sender, EventArgs e)
        {
            action = "move";
            toolStrip2.Visible = false;
        }
顶部也是如此,它与用户单击1、2时的概念相同,只是添加了当用户单击这些按钮时,顶部线条属性会消失。
    private void end_tip_square_Click(object sender, EventArgs e)
        {
            Form1 selected_form = form_list.ElementAt<Form1>(selected_tab);

            lines current_line = new lines();
            current_line = selected_form.lines_list.ElementAt<lines>(selected_form.line_counter - 1);

            current_line.end_arrow = "box";

            current_line.draw_arrow();
            action = "none";
            selected_form.Invalidate();
            selected_form.first_point_in_line = true;
            toolStrip2.Visible = false;
        }

        private void end_tip_circle_Click(object sender, EventArgs e)
        {
            Form1 selected_form = form_list.ElementAt<Form1>(selected_tab);

            lines current_line = new lines();
            current_line = selected_form.lines_list.ElementAt<lines>(selected_form.line_counter - 1);

            current_line.end_arrow = "circle";

            current_line.draw_arrow();
            action = "none";
            selected_form.Invalidate();
            selected_form.first_point_in_line = true;
            toolStrip2.Visible = false;
        }
3-每个工具的自定义光标
现在我们需要为我们的每个工具添加自定义光标,为此,我们首先需要将每个光标的图标作为资源添加到我们的项目中。
要将资源添加到项目中,首先选择项目名称。

然后选择扳手图标(进入项目属性)。
![]()
然后从Resources,add resource下拉列表中,选择add existing file。

并选择这些图标。
现在让我们回到super_form.cs。
首先,我们将定义一个Cursor类型,我们将根据所选工具更改它,我们称之为cursor_super。
Cursor cursor_super;
现在我们将修改每个工具的按钮点击事件以更改super_form的光标,所以我们先从星形按钮开始。
 private void star_button_Click(object sender, EventArgs e)
        {
            action = "star";

            //new code
            cursor_super = new Cursor(drag_and_drop_and_delete.Properties.Resources.star_cursor.Handle);
            //just load our variable with the required cursor
            this.Cursor= cursor_super;
            //and make our variable (cursor_super ) to be the cursor of this form (super_form)
            //new code

            toolStrip2.Visible = false;
        }
所有其他工具也将进行相同的操作。
   private void heart_button_Click(object sender, EventArgs e)
        {
            action = "heart";

            //new code
            cursor_super = new Cursor(drag_and_drop_and_delete.Properties.Resources.heart_cursor.Handle);
            this.Cursor = cursor_super;
            //new code

            toolStrip2.Visible = false;

        }

        private void line_button_Click(object sender, EventArgs e)
        {
            action = "line";

            //new code
            cursor_super = new Cursor(drag_and_drop_and_delete.Properties.Resources.Line_cursor.Handle);
            this.Cursor = cursor_super;
            //new code

            toolStrip2.Visible = true;
        }

        private void move_button_Click(object sender, EventArgs e)
        {
            action = "move";

            //new code
            cursor_super = new Cursor(drag_and_drop_and_delete.Properties.Resources.move__cursor.Handle);
            this.Cursor = cursor_super;
            //new code

            toolStrip2.Visible = false;
        }