
以编程方式创建 SharePoint 定时作业
如何开发、部署和调试一个简单的定时器作业应用程序
引言
本技巧主要针对Sharepoint的初学者。 你将找到关于如何开发、部署和调试定时器作业的完整的分步解释。
我们的场景是
创建一个TimerJob,每15分钟运行一次,并通过计算TimerJob运行时已存在的时间来更新List列。
先决条件
作为先决条件,您必须在您的场上创建一个正在运行的 Web 应用程序,如果您不知道如何设置正在运行的 URL,请参考我的文章。
其次,您必须在您的站点上创建一个List并添加一些数据。
Using the Code
- 打开 Visual Studio 2013 并创建一个空的 Sharepoint 项目。 将工作 URL 提供给该框,然后选择 Farm Solution,然后单击 Finish。
- 在您的 SharePoint 站点(在浏览器上)中创建一个列表,并向其中添加一些值。
我的列表名称是
TutorBackUp,我有TutorID、FirstName和CompleatedHours作为列(都是string列),除了我添加的列之外,SharePoint 会自动创建“Created”列以及许多其他列。 现在我选择了'Created'列,也通过选中它们来显示在列表中。
现在它看起来像这样

正如您可能看到的,当添加数据时,将“
CompletedHours”列留空,因为这是我们要由TimerJob填充的列。 - 现在回到 Visual Studio 项目并向其中添加一个新类。

- 参考以下命名空间
using Microsoft.SharePoint.Administration;
using Microsoft.SharePoint;
using Microsoft.SharePoint.Utilities;
- 现在将这些构造函数和“
Execute”方法添加到其中,如下所示using System; using System.Collections.Generic; using System.Linq; using System.Text; using System.Threading.Tasks; using Microsoft.SharePoint.Administration; using Microsoft.SharePoint; using Microsoft.SharePoint.Utilities; namespace SecondTimerJob { public class CalculateRegisteredDays : SPJobDefinition { public CalculateRegisteredDays() : base() { } public CalculateRegisteredDays(string jobName, SPService service) : base(jobName, service, null, SPJobLockType.None) { this.Title = "Tutor Bakup update Timer"; } public CalculateRegisteredDays(string jobName, SPWebApplication webapp) : base(jobName, webapp, null, SPJobLockType.ContentDatabase) { this.Title = "Tutor Bakup update Timer"; } public override void Execute(Guid targetInstanceId) { SPWebApplication webApp = this.Parent as SPWebApplication; SPList taskList = webApp.Sites[1].OpenWeb().GetList ("mysitecollection/mySite/Lists/TutorBackUp"); if (taskList != null) { string convertedTodayDateTime = SPUtility.CreateISO8601DateTimeFromSystemDateTime(DateTime.Now); string qry = "<Where><Lt><FieldRef Name='Created' /> <Value IncludeTimeValue='TRUE' Type='DateTime'>" + convertedTodayDateTime + "</Value></Lt></Where>"; SPQuery Query = new SPQuery(); Query.Query = qry; SPListItemCollection collection = taskList.GetItems(Query); foreach (SPListItem item in collection) { int id = int.Parse(item["ID"].ToString()); SPListItem modifyItem = taskList.Items.GetItemById(id); if (modifyItem != null) { if (item["CompleatedHours"] == null) { DateTime createdData = Convert.ToDateTime(item["Created"]); var totalHours = (DateTime.Now - createdData).TotalHours; modifyItem["CompleatedHours"] = "When the Timer trigger it has compleated " + totalHours + " days"; modifyItem.Update(); } } } } } } } - 现在向解决方案添加一个功能。

- 我将其重命名为“
UpDateTutorFeature”。 双击它并更改Title,选择Scope到WebApplication,在属性窗口中,将 Active Force install 和 Active on default 改为TRUE。
- 右键单击添加的功能并添加事件接收器。

- 打开eventReceiver CS 文件并放置以下代码
using System; using System.Runtime.InteropServices; using System.Security.Permissions; using Microsoft.SharePoint; using Microsoft.SharePoint.Administration; namespace SecondTimerJob.Features.UpDateTutorFeature { [Guid("17e06635-6f9b-4d3c-a64f-d1428f7323fb")] public class UpDateTutorFeatureEventReceiver : SPFeatureReceiver { const string JobName = "Tutor Bakup update Timer"; public override void FeatureActivated(SPFeatureReceiverProperties properties) { try { SPSecurity.RunWithElevatedPrivileges(delegate { SPWebApplication parentWebApp = (SPWebApplication)properties.Feature.Parent; SPSite site = properties.Feature.Parent as SPSite; DeleteJob(JobName, parentWebApp); CreateJob(parentWebApp); }); } catch (Exception) { throw; } } public override void FeatureDeactivating(SPFeatureReceiverProperties properties) { lock (this) { try { SPSecurity.RunWithElevatedPrivileges(delegate() { SPWebApplication parentWebApp = (SPWebApplication)properties.Feature.Parent; DeleteJob(JobName, parentWebApp); }); } catch (Exception ex) { throw ex; } } } public bool CreateJob(SPWebApplication site) { bool jobCreated = false; try { CalculateRegisteredDays job = new CalculateRegisteredDays(JobName, site); SPMinuteSchedule schedule = new SPMinuteSchedule(); schedule.BeginSecond = 0; schedule.EndSecond = 59; schedule.Interval = 15; job.Schedule = schedule; job.Update(); } catch (Exception) { throw; } return jobCreated; } public bool DeleteJob(string jobName, SPWebApplication site) { bool jobdeleted = false; try { foreach (SPJobDefinition job in site.JobDefinitions) { if(job.Name==jobName) { job.Delete(); jobdeleted = true; } } } catch (Exception) { return jobdeleted; } return jobdeleted; } } } - 现在您已经完成了代码。 右键单击项目并单击“部署”。 部署成功后,转到 Central Administrator,选择 Application Management --> 选择站点并从功能区中单击 Manage Features。 如果部署成功,您将能够找到您的已激活的功能,如下所示

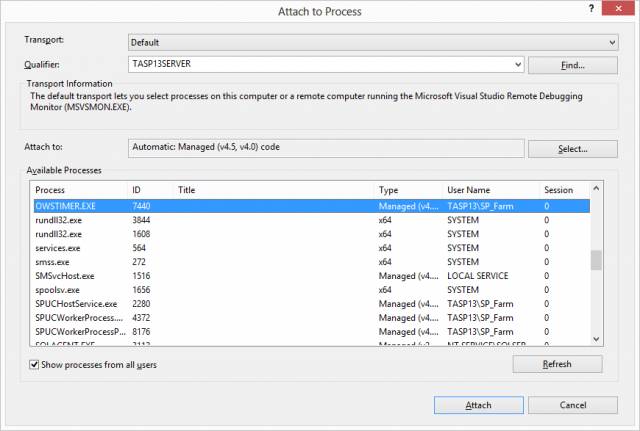
- 现在要调试您的代码,请返回 Visual Studio 并获取“附加到进程”弹出窗口并获取“OWSTIMER.EXE”并单击“附加”。
TimerJob已成功部署,并已完全准备好进行调试。 由于Timer将每 15 分钟工作一次,因此您无法立即开始调试。 因此,要立即调试,您可能需要手动调用计时器。 这仅用于调试目的,否则计时器作业将自行运行。调用 TimerJob 的步骤
返回 Central Administration --> 选择“Monitoring”--> Review job definition
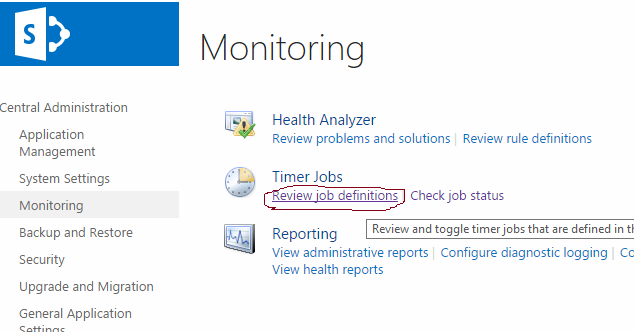
- 这将打开场中的所有定时器作业。 要找到您的
timerjob,请查找您在代码中给出的定时器作业名称。 在本例中,它是“Tutor Bakup update Timer”。
- 单击
TimerJob后,它将打开下面的窗口。 从那里,单击 Run Now,然后您将能够立即命中调试点。
特别说明
如果您修改了代码并且需要再次部署代码,您需要执行以下步骤
- 转到 Central Administration,然后从功能区中选择 Manage features。
- 找到该功能并将其停用,然后刷新站点。
- 打开您的 Services 并找到“
SharePointTimerService”。 右键单击并选择重新启动。 - 然后返回您的代码并部署您的解决方案。
- 然后从“附加到进程”弹出窗口中附加“OWSTIMER.EXE”。 现在您已经部署了修改后的代码,并且您的解决方案也已准备好进行调试。