
从头开始使用 MSBuild 构建项目文件
4.09/5 (5投票s)
本技巧展示了如何从头开始使用 MSBuild 构建自己的项目文件。它将加深您对 Visual Studio IDE 生成的项目文件的理解。
引言
当我们使用 Visual Studio IDE 创建 Windows 窗体应用程序时,Visual Studio 会创建一个项目文件和一个解决方案文件。当您单击“生成”按钮时,您的项目将被编译,然后您可以通过按 F5 键来运行您的应用程序。本技巧将向您展示如何从头开始创建项目文件,您将更深入地了解构建过程。
充分理解项目构建过程将帮助您设置自己的构建服务器和 CI(即持续集成)系统。
要阅读本技巧,您可能需要了解 MSBuild 的基础知识。请参阅我的参考部分以获取帮助。
这是我在 codeproject.com 上的第二篇文章。我的下一篇文章将介绍多目标构建过程。
背景
我想设置我的自动化构建过程。因此,我选择了 MSBuild 技术来测试一些简单的项目以获得更多经验。我猜那里有需求可以使更多人受益。
此技巧在以下情况下也很有帮助:如果您安装了 Windows SDK 7,但没有 Visual Studio,您仍然可以进行 .NET 编程。如果您下载了一个演示项目,但您没有 VS IDE,您仍然可以编译该项目来查看演示是如何工作的。以下是如何做的示例。
演示项目
在这里,我使用了 Visual Studio 2013 并创建了一个 Windows 窗体应用程序。这里只有一个窗体。它非常简单。我特意删除了 WindowApplication1.csproj 文件,以展示如何编写自己的 MSBuild 项目文件,通过提交 MSBuild 命令手动构建此项目。
文件结构通过以下两个屏幕截图进行了解释
此处列出了项目文件和文件夹

此处列出了 Properties 文件夹下的文件

创建 MSBuild 项目文件 basics.proj
您可以使用任何文本编辑器以 XML 格式编写以下 MSBuild 项目文件。我使用 NotePad++。如您所见,我只使用了 MSBuild 中的基本属性和项。
<Project xmlns="http://schemas.microsoft.com/developer/msbuild/2003"
DefaultTargets="Build" ToolsVersion="12">

 <ItemGroup>
  <FilesToCompile Include="Form1.cs" />
  <FilesToCompile Include="Form1.Designer.cs" />
  <FilesToCompile Include="Program.cs" />
  <FilesToCompile Include="Properties\AssemblyInfo.cs" />
  <FilesToCompile Include="Properties\Resources.Designer.cs" />
  <FilesToCompile Include="Properties\Settings.Designer.cs" />
 </ItemGroup>

 <ItemGroup>
  <ResourceFiles Include="Properties\Resources.resx" />
 </ItemGroup>

 <PropertyGroup>
  <OutputDir>bin\debug</OutputDir>
  <OutputAssembly>$(OutputDir)\aForm.exe</OutputAssembly>
  <Optimize>false</Optimize>
 </PropertyGroup>
 <Target Name="Build">
  <Message Text="build MSbuild project file from scratch" />
  <MakeDir Directories="$(OutputDir)"/>
  <GenerateResource Sources="@(ResourceFiles)">
   <Output TaskParameter="OutputResources" ItemName="CompiledResources"/>
  </GenerateResource>
  <Csc Sources="@(FilesToCompile)" OutputAssembly="$(OutputAssembly)"
   Optimize="$(Optimize)" TargetType="exe"
   Resources="@(CompiledResources)"/>
 </Target>

</Project>
运行 basics.proj 的说明
首先,让我们讨论您计算机上未安装 Visual Studio IDE 的情况。在构建服务器上,情况总是如此。首先,您需要找到 MSBuild 的安装位置。找到 msbuild.exe 所在的位置。对我而言,MSBuild 版本 12 安装在 C:\Program Files (x86)\MSBuild\12.0\Bin。因此,在项目文件文件夹下,与 basics.proj 在同一级别,使用文本编辑器创建一个 DOS 批处理文件 set.bat 。在此 set.bat 中,写入此语句:set path=C:\Program Files (x86)\MSBuild\12.0\Bin; 然后保存文件。在运行任何 msbuild 命令之前,请先运行 set.bat 。它将您的当前路径设置为此 bin 文件夹。如果您没有安装 MSBuild 版本 12,至少您会有 MSBuild 版本 4。路径应该是 C:\Windows\Microsoft.NET\Framework64\v4.0.30319。因此,将您的 PATH 设置为此值。
其次,如果您安装了 Visual Studio IDE,您可能会节省更多的键盘输入。您需要运行 Visual Studio 命令提示符,以便获得正确的 MSBuild 路径。您可以看到我的截图

请使用 DOS 命令转到您放置下载文件的项目文件夹,然后提交以下命令

现在转到您的 bin 文件夹,您将看到可执行文件在那里。
创建 MSBuild 项目文件 advanced.proj
现在我们为构建过程添加更多控制。我们定义一个属性 Config 来查看是调试模式还是发布模式,然后决定是否可以创建优化或非优化的可执行文件。
<Project xmlns="http://schemas.microsoft.com/developer/msbuild/2003"
 DefaultTargets="Build" ToolsVersion="12">

 <ItemGroup>
  <FilesToCompile Include="Form1.cs" />
  <FilesToCompile Include="Form1.Designer.cs" />
  <FilesToCompile Include="Program.cs" />
  <FilesToCompile Include="Properties\AssemblyInfo.cs" />
  <FilesToCompile Include="Properties\Resources.Designer.cs" />
  <FilesToCompile Include="Properties\Settings.Designer.cs" />
 </ItemGroup>

 <ItemGroup>
  <ResourceFiles Include="Properties\Resources.resx" />
 </ItemGroup>

 <!-- define Config property -->
 <PropertyGroup>
  <Config Condition="'$(Config)' == '' Or '$(Config)' != 'Debug' Or
   '$(Config)' != 'Release'">Debug</Config>
 </PropertyGroup>

 <!-- define Debug mode -->
 <PropertyGroup Condition="'$(Config)'=='Debug'">
  <OutputDir>bin\debug</OutputDir>
  <Optimize>false</Optimize>
 </PropertyGroup>

 <!-- define Release mode -->
 <PropertyGroup Condition="'$(Config)'=='Release'">
  <OutputDir>bin\release</OutputDir>
  <Optimize>true</Optimize>
 </PropertyGroup>

 <PropertyGroup>
  <OutputAssembly> $(OutputDir)\myapp.exe</OutputAssembly>
 </PropertyGroup>

 <Target Name="Build">
  <Message Text="build MSbuild project file from scratch" />
  <Message Text="the property config is: $(Config)" />
  <Message Text="final output directory: $(OutputDir)" />
  <MakeDir Directories="$(OutputDir)"/>
  <GenerateResource Sources="@(ResourceFiles)">
   <Output TaskParameter="OutputResources" ItemName="CompiledResources"/>
  </GenerateResource>
  <Csc Sources="@(FilesToCompile)" OutputAssembly="$(OutputAssembly)"
   Optimize="$(Optimize)" TargetType="exe"
   Resources="@(CompiledResources)"/>
 </Target>

</Project>
运行 advanced.proj 的说明
步骤与上面相同。您需要启动 Visual Studio 命令提示符,在其中运行 MSBuild 命令以设置正确的路径。以下是详细的屏幕截图

创建 MSBuild 项目文件 vs.proj 以与 Visual Studio IDE 集成
我们可以将 Microsoft.CSharp.Targets 文件导入我们的项目并删除 Csc 任务。因此,我们可以遵循 Microsoft.CSharp.Targets 中定义的标准过程来编译我们的项目。因此,我们需要使用 Compile 作为项名称来包含 C# 源文件。我们使用 EmbeddedResources 项名称来包含资源文件。AssemblyName 和 OutputType 属性需要根据 Microsoft.CSharp.Targets 的规范在此处定义。
正如所观察到的,您也需要在此项目文件中添加 Reference 项。否则,您将收到错误。
我们还演示了如何使用 BeforeBuild 目标和 AfterBuild 目标。因此,您可以看到您可以自定义构建过程。
<Project xmlns="http://schemas.microsoft.com/developer/msbuild/2003"
 DefaultTargets="Build" ToolsVersion="12">

 <ItemGroup>
  <Compile Include="Form1.cs" />
  <Compile Include="Form1.Designer.cs" />
  <Compile Include="Program.cs" />
  <Compile Include="Properties\AssemblyInfo.cs" />
  <Compile Include="Properties\Resources.Designer.cs" />
  <Compile Include="Properties\Settings.Designer.cs" />
 </ItemGroup>

 <ItemGroup>
  <EmbeddedResource Include="Properties\Resources.resx" />
 </ItemGroup>

 <!-- add reference assembly here, otherwise you will get error -->
 <ItemGroup>
  <Reference Include="System" />
  <Reference Include="System.Data" />
  <Reference Include="System.Deployment" />
  <Reference Include="System.Drawing" />
  <Reference Include="System.Windows.Forms" />
  <Reference Include="System.Xml" />
  </ItemGroup>

 <PropertyGroup>
  <AssemblyName>vsapp</AssemblyName>
  <OutputType>Exe</OutputType>
 </PropertyGroup>

 <!-- define Configuration property -->
 <PropertyGroup>
  <Configuration Condition="'$(Configuration)' == ''">Debug</Configuration>
 </PropertyGroup>

 <!-- define Debug mode -->
 <PropertyGroup Condition="'$(Configuration)'=='Debug'">
  <OutputPath>bin\Debug\</OutputPath>
  <Optimize>false</Optimize>
 </PropertyGroup>

 <!-- define Release mode -->
 <PropertyGroup Condition="'$(Configuration)'=='Release'">
  <OutputPath>bin\Release\</OutputPath>
  <Optimize>true</Optimize>
 </PropertyGroup>

 <Import Project="$(MSBuildBinPath)\Microsoft.CSharp.targets" />

 <!-- BeforeBuild target -->
 <Target Name="BeforeBuild">
  <Message Text="build MSbuild project file from scratch" />
  <Message Text="the property Configuration is: $(Configuration)" />
  <Message Text="final output directory: $(OutputPath)" />
  <Message Text="MSBuild installation path: $(MSBuildBinPath) " />
 </Target>
  <!-- AfterBuild target -->
 <Target Name="AfterBuild">
  <Message Text="AfterBuild step" />
 </Target>

</Project>
运行 vs.proj 的说明
请按照与上面相同的步骤,使用 Visual Studio 命令提示符。您将获得以下结果
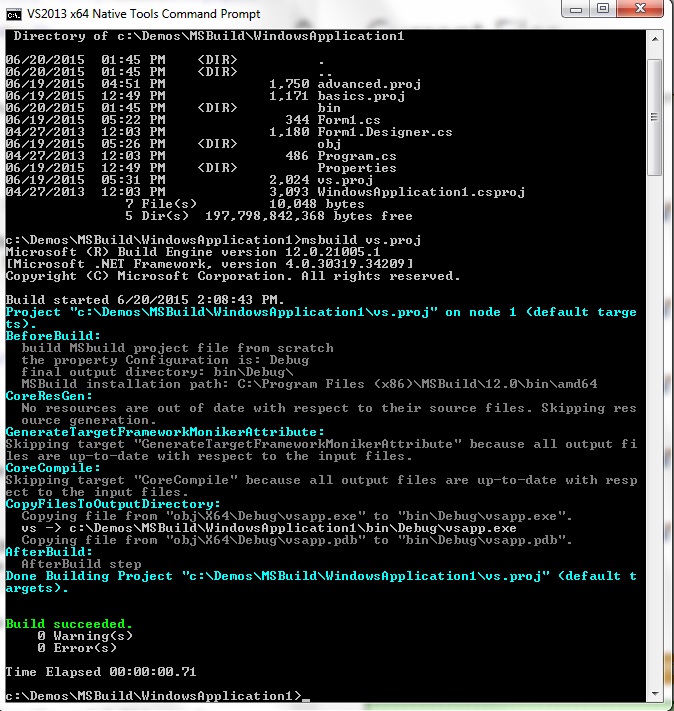
如果您没有安装 Visual Studio IDE,您需要在命令提示符下,在与项目文件相同的文件夹中运行 set.bat 。因为我们在 vs.proj 文件中定义了 Configuration 属性,所以我们可以通过两种方式构建此演示项目
- MSBuild vs.proj /p:Configuration=Debug
- MSBuild vs.proj /p:Configuration=Release
如果您想查看这两个构建过程的更多详细信息,可以设置另一个属性如下
- MSBuild vs.proj /p:Configuration=Debug /clp:v=d
- MSBuild vs.proj /p:Configuration=Release /clp:v=d
如果您在 Visual Studio 2013 中打开项目文件 vs.proj ,您会看到 Visual Studio 可以理解它。如果您按 F5 按钮运行 Build,项目将顺利编译。
关注点
如果您按照这些步骤构建项目文件,您将看到 Visual Studio IDE 如何构建项目。在项目文件中,DefaultTargets="Build"。这与您从 Visual Studio IDE 生成菜单项中单击 Build 按钮的过程相同。Build 对应于项目文件 vs.proj 中的 Build 目标。
如果您没有 Visual Studio 2013,您可能需要将 project ToolsVersion="12" 更改为 "4",或将其删除。
这是我在 CodeProject 上的第一篇文章。希望您喜欢。欢迎提出反馈。我的下一篇文章将是多目标构建过程。敬请关注。
参考文献
- MSBuild 简介
https://codeproject.org.cn/Articles/12985/Practical-NET-and-C-An-introduction-to-MSBuild - 使用 MSBuild 定制您的构建过程
http://www.developerfusion.com/article/84411/customising-your-build-process-with-msbuild/ - 深入了解 MSBuild 引擎
http://andreaspacific.com/Files/Inside_the_Microsoft_Build_Engine_Second_Edition.pdf
历史
- 2015 年 4 月 6 日 初始化本技巧
- 2015 年 6 月 20 日 完成本技巧