
ASP.NET Core、Angular2 通过模板包、WEB API 和 EF 1.0.1 实现带动画的 CRUD
4.94/5 (12投票s)
在本篇文章中,我们将了解如何使用模板包、WEB API 和 EF 1.0.1 来创建一个带 Angular2 动画的 ASP.NET Core CRUD Web 应用程序。
引言

在本篇文章中,我们将了解如何使用模板包、WEB API 和 EF 1.0.1 来创建一个带 Angular2 动画的 ASP.NET Core CRUD Web 应用程序。
注意
请阅读我之前的文章,其中详细介绍了 ASP.NET Core 模板包的入门知识。
- ASP.NET Core Angular 2 EF 1.0.1 Web API 使用模板包.
- https://codeproject.org.cn/Articles/1164078/ASP-NET-Core-Angular-Master-Detail-HTML-Grid-using
- https://codeproject.org.cn/Articles/1168725/ASP-NET-Core-Angular-Shopping-Cart-Using-Web-API
在本篇文章中,我们将看到以下内容
创建 ASP.NET Core 和 Angular2 的 CRUD Web 应用程序
- C: (创建): 使用 ASP.NET Core、EF 和 Web API 插入新的学生详细信息到数据库。
- R: (读取): 使用 ASP.NET Core、EF 和 Web API 从数据库中选择学生详细信息。
- U: (更新): 使用 ASP.NET Core、EF 和 Web API 更新学生详细信息到数据库。
- D: (删除): 使用 ASP.NET Core、EF 和 Web API 从数据库中删除学生详细信息。
我们将使用 WEB API 来执行我们的 CRUD 操作。Web API 具有以下四种方法:Get/Post/Put 和 Delete,其中
- Get 用于请求数据。(选择)
- Post 用于创建数据。(插入)
- Put 用于更新数据。(更新)
- Delete 用于删除数据。(删除)

通过简单的 Angular2 动画,让我们的 CRUD 应用程序更加丰富,例如:
- Angilar2 动画,用于元素的淡入效果和控件。
- Angilar2 动画,用于从左侧移动元素和控件。
- Angilar2 动画,用于从右侧移动元素和控件。
- Angilar2 动画,用于从顶部移动元素和控件。
- Angilar2 动画,用于从底部移动元素和控件。
Angilar2 动画,用于点击时放大按钮。

为了创建带动画的 ASP.NET Core、Angular2 CRUD,我们将
- 在 SQL Server 中创建示例数据库和表,以在我们的 Web 应用程序中显示。
- 使用模板包创建 ASP.NET Core Angular 2 入门应用程序 (.NET Core)。
- 创建 EF、DBContext 类和 Model 类。
- 为 Get/Post/Put 和 Delete 方法创建 WEB API。
- 创建第一个组件 TypeScript 文件,使用 Http Module 通过 Get/Post/Put 和 Delete 方法获取 WEB API JSON 结果。
- 为我们的第一个组件创建 HTML 文件,用于我们的动画和 CRUD Web 应用程序。
必备组件
请确保您已在计算机上安装了所有先决条件。如果没有,请逐一下载并安装所有软件。
- 首先,从这个 链接 下载并安装 Visual Studio 2015(带 Update 3)。
- 如果您已安装 Visual Studio 2015 但尚未更新到 Update 3,请从此 链接 下载并安装 Visual Studio 2015 Update 3。
- 下载 并安装 .NET Core 1.0.1
- 下载 并安装 TypeScript 2.0
- 下载并安装 Node.js v4.0 或更高版本。我已安装 V6.9.1 (下载 链接)。
- 从这个 链接 下载并安装 ASP.NET Core 模板包 visz 文件。
使用代码
步骤 1:创建数据库和表
我们将使用 SQL Server 数据库来支持我们的 WEB API 和 EF。首先,我们创建一个名为 StudentsDB 的数据库和一个名为 StudentMaster 的表。以下是创建数据库表和向表中插入示例记录的 SQL 脚本。在您的本地 SQL Server 中运行以下查询,以创建项目将使用的数据库和表。
USE MASTER
GO

-- 1) Check for the Database Exists .If the database is exist then drop and create new DB
IF EXISTS (SELECT [name] FROM sys.databases WHERE [name] = 'StudentsDB' )
DROP DATABASE StudentsDB
GO

CREATE DATABASE StudentsDB
GO

USE StudentsDB
GO


-- 1) //////////// StudentMasters

IF EXISTS ( SELECT [name] FROM sys.tables WHERE [name] = 'StudentMasters' )
DROP TABLE StudentMasters
GO

CREATE TABLE [dbo].[StudentMasters](
        [StdID] INT IDENTITY PRIMARY KEY,
        [StdName] [varchar](100) NOT NULL,
        [Email]  [varchar](100) NOT NULL,
        [Phone]  [varchar](20) NOT NULL,
        [Address]  [varchar](200) NOT NULL
)

-- insert sample data to Student Master table
INSERT INTO [StudentMasters]   ([StdName],[Email],[Phone],[Address])
     VALUES ('Shanu','syedshanumcain@gmail.com','01030550007','Madurai,India')

INSERT INTO [StudentMasters]   ([StdName],[Email],[Phone],[Address])
     VALUES ('Afraz','Afraz@afrazmail.com','01030550006','Madurai,India')

INSERT INTO [StudentMasters]   ([StdName],[Email],[Phone],[Address])
     VALUES ('Afreen','Afreen@afreenmail.com','01030550005','Madurai,India')


     select * from [StudentMasters]
步骤 2 - 创建 ASP.NET Core Angular 2 应用程序
安装完上述所有先决条件和 ASP.NET Core 模板后,在桌面上点击开始 > 所有程序 > Visual Studio 2015 > Visual Studio 2015。点击新建 > 项目。选择 Web > ASP.NET Core Angular 2 Starter。输入您的项目名称,然后点击确定。

创建 ASP.NET Core Angular 2 应用程序后,请等待几秒钟。您将看到所有依赖项都已自动还原。

ASP.NET Core 模板包解决方案有什么新内容?
- WWWroot
我们可以看到所有的 CSS、JS 文件都添加在“dist”文件夹下。“main-client.js”文件是最重要的文件,因为所有的 Angular2 结果都将编译并从这个“js”文件加载到我们的 html 文件中。

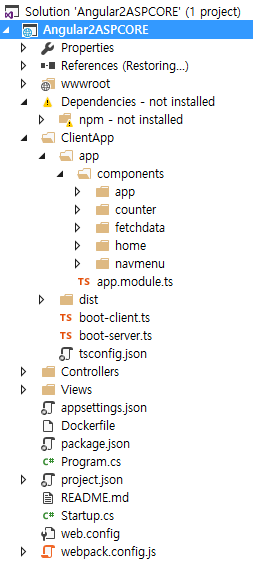
- ClientApp 文件夹
我们可以在项目解决方案内看到一个名为 ClientApp 的新文件夹。此文件夹包含所有与 Angular2 相关的应用程序,如 Modules、Components 等。我们可以在此文件夹下添加所有与 Angular 2 相关的 Modules、Component、Template HTML 文件。在下面的文章中,我们将详细介绍如何创建我们自己的 Angular2 应用程序。
在 app 文件夹下的 Components 文件夹中,我们可以看到许多子文件夹,如 app. counter、fetchdata、home 和 navemenu。默认情况下,所有这些示例应用程序都已创建,当我们运行应用程序时,我们可以看到所有示例 Angular2 应用程序的结果。

当我们运行应用程序时,我们可以在左侧看到导航,在右侧看到数据。所有的 Angular2 示例都将从上述文件夹加载。

3) Controllers 文件夹:这是我们的 MVC Controller 文件夹,我们可以在此文件夹中创建 MVC 和 Web API Controller。
4) View 文件夹:这是我们的 MVC View 文件夹。
5) 其他重要文件
我们还可以看到其他重要的 ASP.NET Core 文件,例如
project.json : ASP.NET Core 依赖项列表可以在此文件中找到。我们将把 Entity Framework 添加到此文件的依赖项部分。
package.json : 这是另一个重要文件,因为所有与 Angular2 相关的依赖项列表都将在此处添加。默认情况下,所有与 Angular2 相关的依赖项都已添加到 ASP.NET Core 模板包中。
appsettings.json : 我们可以在此 appsetting.json 文件中添加数据库连接字符串。
我们将在此项目中使用所有这些来创建、构建和运行我们的 Angular 2 与 ASP.NET Core 模板包、WEB API 和 EF 1.0.1。
步骤 – 3 创建 Entity Framework
添加 Entity Framework 包
要将我们的 Entity Framework 包添加到 ASP.NET Core 应用程序中,请打开 Project.JSON 文件,然后在 dependencies 中添加以下行。
注意:此处我们使用的是 EF 版本 1.0.1。
"Microsoft.EntityFrameworkCore.SqlServer": "1.0.1",
    "Microsoft.EntityFrameworkCore.Tools": "1.0.0-preview2-final"

当我们保存 project.json 文件时,可以看到 Reference 正在被还原。

几秒钟后,我们可以看到 Entity Framework 包已还原,并且所有引用都已添加。

添加连接字符串
要添加与 SQL 连接的连接字符串,请打开“appsettings.json”文件。是的,这是一个 JSON 文件,并且此文件默认看起来如下面的图片。

在此 appsettings.json 文件中添加我们的连接字符串
"ConnectionStrings": {
    "DefaultConnection": "Server=YOURDBSERVER;Database=StudentsDB;user id=SQLID;password=SQLPWD;Trusted_Connection=True;MultipleActiveResultSets=true;"
  },
注意:请根据您的本地连接更改 SQL 连接字符串。

下一步是创建一个名为“Data”的文件夹来创建我们的模型和 DBContext 类。

为 Student 创建 Model 类
我们可以通过在 Data 文件夹中添加一个新的类文件来创建一个模型。右键单击 Data 文件夹,点击添加 > 点击类。将类名输入为 StudentMasters,然后点击添加。

现在,在此类中,我们首先创建属性变量,添加学生。我们将在 WEB API 控制器中使用它。
using System;
using System.Collections.Generic;
using System.Linq;
using System.Threading.Tasks;
using System.ComponentModel.DataAnnotations;

namespace Angular2ASPCORE.Data
{
    public class StudentMasters
    {
  [Key]
  public int StdID { get; set; }

  [Required]
  [Display(Name = "Name")]
  public string StdName { get; set; }

  [Required]
  [Display(Name = "Email")]
  public string Email { get; set; }

  [Required]
  [Display(Name = "Phone")]
  public string Phone { get; set; }

  public string Address { get; set; }
 }
}
创建数据库上下文
DBContext 是用于建立数据库连接的 Entity Framework 类。
我们可以通过在 Data 文件夹中添加一个新的类文件来创建一个 DBContext 类。右键单击 Data 文件夹,点击添加 > 点击类。将类名输入为 StudentContext,然后点击添加。

在此类中,我们继承 DbContext 并为我们的 students 表创建了 DbSet。
using System;
using System.Collections.Generic;
using System.Linq;
using System.Threading.Tasks;
using Microsoft.EntityFrameworkCore;

namespace Angular2ASPCORE.Data
{
    public class studentContext:DbContext
 {
  public studentContext(DbContextOptions<studentContext> options)
            :base(options) { }
  public studentContext() { }
  public DbSet<StudentMasters> StudentMasters { get; set; }
 }
}
Startup.CS
现在我们需要添加我们的数据库连接字符串和提供程序作为 SQL SERVER。要添加此项,请在 Startup.cs 文件中的 **ConfigureServices** 方法下添加以下代码。
// Add Entity framework .
   services.AddDbContext<studentContext>(options =>
    options.UseSqlServer(Configuration.GetConnectionString("DefaultConnection")));
步骤 – 4 创建用于 CRUD 操作的 Web API
要创建我们的 WEB API Controller,请右键单击 Controllers 文件夹。点击添加,然后点击新建项。

在右侧点击 ASP.NET > 点击 Web API Controller Class。将名称输入为“StudentMastersAPI.cs”,然后点击添加。

正如我们所知,Web API 是构建浏览器和移动设备 HTTP 服务的简单易用的方式。
Web API 具有以下四种方法:Get/Post/Put 和 Delete。
- Get 用于请求数据。(选择)
- Post 用于创建数据。(插入)
- Put 用于更新数据。
- Delete 用于删除数据。
Get 方法 (Select 操作)
Get 方法用于从我们选择的数据库请求单个或多个项目。在这里,我们将获取 StudentMasters 表中的所有学生信息。
[HttpGet]
  [Route("Student")]
  public IEnumerable<StudentMasters> GetStudentMasters()
  {
   return _context.StudentMasters;

  }
Post 方法 (Insert 操作)
Post 方法将用于将数据插入到我们的数据库中。在 Post 方法中,我们还将检查 StudentID 是否已创建并返回消息。我们将传递所有 Student Master 列参数以插入到 Student Master 表中。
// POST: api/StudentMastersAPI
  [HttpPost]
  public async Task<IActionResult> PostStudentMasters([FromBody] StudentMasters studentMasters)
  {
   if (!ModelState.IsValid)
   {
    return BadRequest(ModelState);
   }

   _context.StudentMasters.Add(studentMasters);
   try
   {
    await _context.SaveChangesAsync();
   }
   catch (DbUpdateException)
   {
    if (StudentMastersExists(studentMasters.StdID))
    {
     return new StatusCodeResult(StatusCodes.Status409Conflict);
    }
    else
    {
     throw;
    }
   }

   return CreatedAtAction("GetStudentMasters", new { id = studentMasters.StdID }, studentMasters);
  }
  private bool StudentMastersExists(int id)
  {
   return _context.StudentMasters.Any(e => e.StdID == id);
  }
Put 方法 (Update 操作)
Put 方法将用于将选定的学生数据更新到我们的数据库中。在 Put 方法中,我们将传递 StudentID 以及所有其他更新参数。我们传递 StudentID 来按 StudentID 更新 StudentMaster 表。
// PUT: api/StudentMastersAPI/5
  [HttpPut("{id}")]
  public async Task<IActionResult> PutStudentMasters([FromRoute] int id, [FromBody] StudentMasters studentMasters)
  {
   if (!ModelState.IsValid)
   {
    return BadRequest(ModelState);
   }

   if (id != studentMasters.StdID)
   {
    return BadRequest();
   }

   _context.Entry(studentMasters).State = EntityState.Modified;

   try
   {
    await _context.SaveChangesAsync();
   }
   catch (DbUpdateConcurrencyException)
   {
    if (!StudentMastersExists(id))
    {
     return NotFound();
    }
    else
    {
     throw;
    }
   }

   return NoContent();
  }
Delete 方法 (Delete 操作)
Delete 方法将用于从我们的数据库中删除选定的学生数据。在 Delete 方法中,我们将传递 StudentID 来删除记录。
// DELETE: api/StudentMastersAPI/5
  [HttpDelete("{id}")]
  public async Task<IActionResult> DeleteStudentMasters([FromRoute] int id)
  {
   if (!ModelState.IsValid)
   {
    return BadRequest(ModelState);
   }

   StudentMasters studentMasters = await _context.StudentMasters.SingleOrDefaultAsync(m => m.StdID == id);
   if (studentMasters == null)
   {
    return NotFound();
   }

   _context.StudentMasters.Remove(studentMasters);
   await _context.SaveChangesAsync();

   return Ok(studentMasters);
  }
要测试 Get 方法,我们可以运行我们的项目并复制 get 方法的 api 路径。在这里,我们可以看到 get 方法的 API 路径是 api/StudentMastersAPI/Student。
运行程序并粘贴上述 API 路径以测试我们的输出。

使用 Angular2
我们在 ClientApp/App 文件夹下创建所有与 Angular2 相关的 App、Module、Services、Component 和 html 模板。
我们在 app 文件夹下创建一个“students”文件夹,以创建我们的 TypeScript 和 html 文件来显示 Student 详细信息。

步骤 5:使用 Angular2 动画
Angular 动画全部构建在标准的 Web Animations API 之上。请检查此参考链接,其中更详细地解释了 Angular2 动画 https://angular.io/docs/ts/latest/guide/animations.html
在 Web 应用程序中添加动画将使我们的网站看起来更加丰富。在这里,在本应用程序中,我们将使用 Angular2 动画来实现点击事件时的淡入放大控件,以及从左、右、上、下移动元素或控件。
Home Component 中的 Angular2 动画
在这里,我们将动画添加到我们的主页。为此,我们编辑 Home Component 以创建我们的 Angular2 动画。
导入部分
要使用 Angular2 动画,我们首先需要导入“trigger, state, style, transition, animate”。
我们的导入将如下所示
import {Component, Input, trigger, state, style, transition, animate, keyframes} from <a href="mailto:'@angular/core'">'@angular/core'</a>;
Component 部分
在 component 中,我们需要添加 animations: [] 来执行我们的动画并触发。
trigger 用于将 Component 连接到我们的 HTML 模板。例如,这里我们来看一个简单的动画,用于在点击事件时更改按钮的颜色和大小。
为此,我们首先创建一个名为“moveBottom”的 trigger。我们将在 HTML 元素或控件中使用此 trigger 名称来从底部移动。在此动画中,我们使用了 transition('void => *'),这意味着此动画将在页面加载期间执行。我们将动画时间设置为 '1s',并在 style 中设置 'translateY(-200px),这意味着我们最初将按钮位置设置为比按钮实际位置底部偏移 -200px。当页面加载时,按钮将从 -200 Y 轴位置开始,向上移动到按钮的实际位置,即 'translateY(0)'。
trigger('moveBottom', [
            transition('void => *', [
                animate('1s', keyframes([
                    style({ opacity: 0, transform: 'translateY(-200px)', offset: 0 }),
                    style({ opacity: 1, transform: 'translateY(25px)', offset: .75 }),
                    style({ opacity: 1, transform: 'translateY(0)', offset: 1 }),

                ]))
            ])

        ])
在 HTML 模板中,我们将使用此 trigger 名称和 @ 符号来执行动画,如下所示。这里我们为 div 标签添加了动画。
<div  [@moveBottom]= ‘moveBottom’>
        ASP.NET  Angular2
    </div>
与 Bottom 类似,我们为 Left、Right、Top 和 Fade-In 执行其余动画。这是 Home Animation component 的完整代码。
import { Component, Input, trigger,  state,  style,  transition,   animate,    keyframes } from <a href="mailto:'@angular/core'">'@angular/core'</a>;

@Component({
    selector: 'home',
    animations: [
        trigger('moveBottom', [
            transition('void => *', [
                animate('1s', keyframes([
                    style({ opacity: 0, transform: 'translateY(-200px)', offset: 0 }),
                    style({ opacity: 1, transform: 'translateY(25px)', offset: .75 }),
                    style({ opacity: 1, transform: 'translateY(0)', offset: 1 }),

                ]))
            ])

        ]),
        trigger('moveTop', [

            transition('void => *', [
                animate('1s', keyframes([
                    style({ opacity: 0, transform: 'translateY(+400px)', offset: 0 }),
                    style({ opacity: 1, transform: 'translateY(25px)', offset: .75 }),
                    style({ opacity: 1, transform: 'translateY(0)', offset: 1 }),

                ]))
            ])

        ]),

        trigger('moveRight', [

            transition('void => *', [
                animate('1s', keyframes([
                    style({ opacity: 0, transform: 'translateX(-400px)', offset: 0 }),
                    style({ opacity: 1, transform: 'translateX(25px)', offset: .75 }),
                    style({ opacity: 1, transform: 'translateX(0)', offset: 1 }),

                ]))
            ])

        ]),
        trigger('movelLeft', [

            transition('void => *', [
                animate('4s', keyframes([
                    style({ opacity: 0, transform: 'translateX(+800px)', offset: 0 }),
                    style({ opacity: 1, transform: 'translateX(150px)', offset: .75 }),
                    style({ opacity: 1, transform: 'translateX(0)', offset: 1 }),

                ]))
            ])

        ]),
        trigger('fadeIn', [

            transition('void => *', [
                animate('3s', keyframes([
                    style({ opacity: 0, transform: 'translateX(0)', offset: 0 }),
                    style({ opacity: 1, transform: 'translateX(0)', offset: 1 }),
                ]))
            ])
        ])
    ],
    template: require('./home.component.html')
})
export class HomeComponent {
    myName: string = "Shanu";
}
这是 Home Html Template 的完整代码。
<h1 [@fadeIn]='animStatus'>ASP.NET Core,Angular2 CRUD with Animation using Template Pack, WEB API and EF 1.0.1  </h1>
<div class="column">


    <div style="background-color:#0094ff;color:#FFFFFF;font-size:xx-large;width:340px;height:50px;text-shadow:  -2px -1px 0px #000,
         0px -1px 0px #000,
         1px -1px 0px #000,
        -2px  0px 0px #000,
         1px  0px 0px #000,
        -2px  1px 0px #000,
         0px  1px 0px #000,
         1px  1px 0px #000;text-align:center;display:inline-block;
                              border-color:#a2aabe;border-style:dashed;border-width:2px;" [@moveBottom]='moveBottom'>

        ASP.NET  Angular2

    </div>

    <div style="background-color:#ff00dc;color:#FFFFFF;font-size:xx-large;width:340px;height:50px;text-shadow:  -2px -1px 0px #000,
         0px -1px 0px #000,
         1px -1px 0px #000,
        -2px  0px 0px #000,
         1px  0px 0px #000,
        -2px  1px 0px #000,
         0px  1px 0px #000,
         1px  1px 0px #000;text-align:center;display:inline-block;
                              border-color:#a2aabe;border-style:dashed;border-width:2px;" [@moveTop]='moveTop'>

        CRUD

    </div>

    <div style="background-color:#3ab64a;color:#FFFFFF;font-size:xx-large;width:340px;height:50px;text-shadow:  -2px -1px 0px #000,
         0px -1px 0px #000,
         1px -1px 0px #000,
        -2px  0px 0px #000,
         1px  0px 0px #000,
        -2px  1px 0px #000,
         0px  1px 0px #000,
         1px  1px 0px #000;text-align:center;display:inline-block;
                              border-color:#a2aabe;border-style:dashed;border-width:2px;" [@moveRight]='moveRight'>

        Animation

    </div>
</div>
<div class="column">
    <h2>Created by : </h2>
    <div style="background-color:#ff6a00;color:#FFFFFF;font-size:xx-large;width:320px;height:50px;text-shadow:  -2px -1px 0px #000,
         0px -1px 0px #000,
         1px -1px 0px #000,
        -2px  0px 0px #000,
         1px  0px 0px #000,
        -2px  1px 0px #000,
         0px  1px 0px #000,
         1px  1px 0px #000;text-align:center;
                              border-color:#a2aabe;border-style:dashed;border-width:2px;" [@movelLeft]='movelLeft'>

        {{myName}}

    </div>
</div>
步骤 – 6 创建我们的 Component TypeScript
右键单击 students 文件夹,然后点击添加新项。从左侧选择 Client-side,然后选择 TypeScript File,将文件名命名为“students.component.ts”,然后点击添加。

在 students.component.ts 文件中,我们有三个部分:首先是,
- import 部分
- 接下来是 component 部分
- 接下来是用于编写业务逻辑的类。
首先,我们导入要在此组件中使用的 angular 文件,这里我们导入 http 以在我们的 Angular2 组件中使用 http 客户端以及动画。
在 component 中,我们有 selector、animation 和 template。Selector 用于为此应用命名,在我们的 html 文件中,我们使用此 selector 名称在我们的 html 页面中显示。Animation 用于为我们的 Angular2 应用程序执行动画。正如我们在 home component 中看到的,我们使用了 Move、Left、Right、Bottom、Top 和 fade-In,我们将在我们的 CRDU 页面中使用相同的动画。
在 template 中,我们给出输出 html 文件的名称。这里我们将创建一个名为“students.component.html”的 html 文件。
Export Class 是主类,我们在此类中完成所有业务逻辑和变量声明,以供组件模板使用。在此类中,我们获取 API 方法的结果并将结果绑定到 student 数组,我们还将执行 rest 或 Post、Put 和 Delete 方法来执行我们的 CRUD 操作。
import {
    Component, Input, trigger,
    state,
    style,
    transition,
    animate,
    keyframes } from <a href="mailto:'@angular/core'">'@angular/core'</a>;
import { Http, Response,  Headers, RequestOptions } from <a href="mailto:'@angular/http'">'@angular/http'</a>;
import { FormsModule } from <a href="mailto:'@angular/forms'">'@angular/forms'</a>;

@Component({
    selector: 'students'
   ,

    animations: [

        trigger('buttonReSize', [
            state('inactive', style({
                transform: 'scale(1)',
                backgroundColor: '#f83500'
            })),
            state('active', style({
                transform: 'scale(1.4)',
                backgroundColor: '#0094ff'
            })),
            transition('inactive => active', animate('100ms ease-in')),
            transition('active => inactive', animate('100ms ease-out'))
        ]),

        trigger('moveBottom', [

            transition('void => *', [
                animate(900, keyframes([
                    style({ opacity: 0, transform: 'translateY(-200px)', offset: 0 }),
                    style({ opacity: 1, transform: 'translateY(25px)', offset: .75 }),
                    style({ opacity: 1, transform: 'translateY(0)', offset: 1 }),

                ]))
            ])

        ]),
        trigger('moveTop', [

            transition('void => *', [
                animate(900, keyframes([
                    style({ opacity: 0, transform: 'translateY(+400px)', offset: 0 }),
                    style({ opacity: 1, transform: 'translateY(25px)', offset: .75 }),
                    style({ opacity: 1, transform: 'translateY(0)', offset: 1 }),

                ]))
            ])

        ]),

        trigger('moveRight', [

            transition('void => *', [
                animate(900, keyframes([
                    style({ opacity: 0, transform: 'translateX(-400px)', offset: 0 }),
                    style({ opacity: 1, transform: 'translateX(25px)', offset: .75 }),
                    style({ opacity: 1, transform: 'translateX(0)', offset: 1 }),

                ]))
            ])

        ]),
        trigger('movelLeft', [

            transition('void => *', [
                animate(900, keyframes([
                    style({ opacity: 0, transform: 'translateX(+400px)', offset: 0 }),
                    style({ opacity: 1, transform: 'translateX(25px)', offset: .75 }),
                    style({ opacity: 1, transform: 'translateX(0)', offset: 1 }),

                ]))
            ])

        ]),
        trigger('fadeIn', [
            transition('* => *', [
                animate('1s', keyframes([
                    style({ opacity: 0, transform: 'translateX(0)', offset: 0 }),
                    style({ opacity: 1, transform: 'translateX(0)', offset: 1 }),
                ]))
            ])
        ]),


    ],
    template: require('./students.component.html')
})

export class studentsComponent {
      // to get the Student Details
    public student: StudentMasters[] = [];
    // to hide and Show Insert/Edit
    AddstudetnsTable: Boolean = false;
    // To stored Student Informations for insert/Update and Delete
    public StdIDs = "0";
    public StdNames  = "";
    public Emails = "";
    public Phones = "";
    public Addresss= "";

    //For display Edit and Delete Images
    public imgEdit = require("./Images/edit.gif");
    public imgDelete = require("./Images/delete.gif");

    myName: string;
    //for animation status
    animStatus: string = 'inactive';
    constructor(public http: Http) {
        this.myName = "Shanu";
        this.AddstudetnsTable = false;
        this.getData();
    }

    //for Animation to toggle Active and Inactive
    animButton() {
        this.animStatus = (this.animStatus === 'inactive' ? 'active' : 'inactive');
    }

    //to get all the Student data from Web API
    getData()
    {
        this.http.get('/api/StudentMastersAPI/Student').subscribe(result => {
            this.student = result.json();
        });
    }

    // to show form for add new Student Information
    AddStudent() {
        this.animButton();
        this.AddstudetnsTable = true;
    this.StdIDs = "0";
    this.StdNames = "";
    this.Emails = "";
    this.Phones = "";
    this.Addresss = "";
    }

    // to show form for edit Student Information
    editStudentsDetails(StdID, StdName, Email, Phone, Address) {
        this.animButton();
        this.AddstudetnsTable = true;
        this.StdIDs = StdID;
        this.StdNames = StdName;
        this.Emails = Email;
        this.Phones = Phone;
        this.Addresss = Address;
    }

    // If the studentid is 0 then insert the student infromation using post and if the student id is more than 0 then edit using put mehod
    addStudentsDetails(StdID, StdName, Email, Phone, Address) {
        alert(StdName);
        var headers = new Headers();
        headers.append('Content-Type', 'application/json; charset=utf-8');
        if (StdID == 0)
        {
            this.http.post('api/StudentMastersAPI', JSON.stringify({ StdID: StdID, StdName: StdName, Email: Email, Phone: Phone, Address: Address }), { headers: headers }).subscribe();
            alert("Student Detail Inserted");
        }
        else
        {
            this.http.put('api/StudentMastersAPI/' + StdID, JSON.stringify({ StdID: StdID, StdName: StdName, Email: Email, Phone: Phone, Address: Address }), { headers: headers }).subscribe();
            alert("Student Detail Updated");
        }

        this.AddstudetnsTable = false;
        this.getData();
    }

    //to Delete the selected student detail from database.
    deleteStudentsDetails(StdID) {
        var headers = new Headers();
        headers.append('Content-Type', 'application/json; charset=utf-8');

        this.http.delete('api/StudentMastersAPI/' + StdID, { headers: headers }).subscribe();
            alert("Student Detail Deleted");
            this.getData();
    }

    closeEdits()
    {
        this.AddstudetnsTable = false;
        this.StdIDs = "0";
        this.StdNames = "";
        this.Emails = "";
        this.Phones = "";
        this.Addresss = "";
    }
}

export interface StudentMasters {
    stdID: number;
    stdName: string;
    email: string;
    phone: string;
    address: string;
}
步骤 – 7 创建我们的 HTML 模板文件
右键单击 students 文件夹,然后点击添加新项。从左侧选择 Client-side,然后选择 html File,将文件名命名为“students.component.html”,然后点击添加。

编写以下 html 代码以在我们 html 页面中绑定结果。
<h1 [@fadeIn]='animStatus'>ASP.NET Core,Angular2 CRUD with Animation using Template Pack, WEB API and EF 1.0.1 </h1>
<div class="column">
<h2>Created by : </h2>
<div style="background-color:#ff6a00;color:#FFFFFF;font-size:xx-large;width:260px;height:50px;text-shadow: -2px -1px 0px #000,
0px -1px 0px #000,
1px -1px 0px #000,
-2px 0px 0px #000,
1px 0px 0px #000,
-2px 1px 0px #000,
0px 1px 0px #000,
1px 1px 0px #000;text-align:center;
border-color:#a2aabe;border-style:dashed;border-width:2px;" [@movelLeft]='animStatus'>
{{myName}}
</div>
</div>
<hr style="height: 1px;color: #123455;background-color: #d55500;border: none;color: #d55500;" />
<p *ngIf="!student"><em>Loading Student Details please Wait ! ...</em></p>
<table id="tblContainer" style='width: 99%;table-layout:fixed;'>
<tr>
<td>
<table style="background-color:#FFFFFF; border: dashed 3px #FFFFFF; padding: 5px;width: 99%;table-layout:fixed;" cellpadding="2"
cellspacing="2">
<tr style="height: 30px; color:#123455 ;border: solid 1px #659EC7;">
<td width="40px"> </td>
<td width="50%">
<h1> Add New Students Information <strong style="color:#0094ff"> </strong></h1>
</td>
<td align="right">
<button (click)=AddStudent() style="background-color:#f83500;color:#FFFFFF;font-size:large;width:260px;height:50px;
border-color:#a2aabe;border-style:dashed;border-width:2px;" [@moveRight]='animStatus' [@buttonReSize]='animStatus'>
Add New Studetnt Information
</button>
</td>
</tr>
</table>
</td>
</tr>
<tr>
<td>
<hr style="height: 1px;color: #123455;background-color: #d55500;border: none;color: #d55500;" />
</td>
</tr>
<tr *ngIf="AddstudetnsTable">
<td [@fadeIn]='animStatus'>
<table>
<tr>
<td>
<table style="background-color:#FFFFFF; border: dashed 3px #6D7B8D; padding :5px;width :99%;table-layout:fixed;" cellpadding="2" cellspacing="2">
<tr style="height: 30px; background-color:#336699 ; color:#FFFFFF ;border: solid 1px #659EC7;">
<td width="40">
</td>
<td>
<h2>Insert/Edit Student Details : </h2>
</td>
</tr>
<tr>
<td width="100">
</td>
<td>
<table style="color:#9F000F;font-size:large; padding :5px;" cellpadding="12" cellspacing="16">
<tr>
<td><b>Students ID: </b> </td>
<td>
<input type="text" #StdID (ngModel)="StdIDs" value="{{StdIDs}}" style="background-color:tan" readonly>
</td>
<td width="20"> </td>
<td><b>Students Name: </b> </td>
<td>
<input type="text" #StdName (ngModel)="StdNames" value="{{StdNames}}">
</td>
<td></td>
</tr>
<tr>
<td><b>Email: </b> </td>
<td>
<input type="text" #Email (ngModel)="Emails" value="{{Emails}}">
</td>
<td width="20"> </td>
<td><b>Phone: </b> </td>
<td>
<input type="text" #Phone (ngModel)="Phones" value="{{Phones}}">
</td>
<td></td>
</tr>
<tr>
<td><b>Address: </b> </td>
<td >
<input type="text" #Address (ngModel)="Addresss" value="{{Addresss}}">
</td>
<td width="20"> </td>
<td align="right" colspan="2">
<button (click)=addStudentsDetails(StdID.value,StdName.value,Email.value,Phone.value,Address.value) style="background-color:#428d28;color:#FFFFFF;font-size:large;width:220px;
border-color:#a2aabe;border-style:dashed;border-width:2px;" [@moveBottom]='animStatus' >
Save
</button>
</td>
<td>
<button (click)=closeEdits() style="background-color:#334668;color:#FFFFFF;font-size:large;width:180px;
border-color:#a2aabe;border-style:dashed;border-width:2px;" [@moveTop]='animStatus' >
Close
</button>
</td>
</tr>
</table>
</td>
</tr>
</table>
</td>
</tr>
<tr>
<td colspan="2">
<hr style="height: 1px;color: #123455;background-color: #d55500;border: none;color: #d55500;" />
</td>
</tr>
</table>
</td>
</tr>
<tr>
<td [@moveBottom]='animStatus' >
<table class='table' style="background-color:#FFFFFF; border:2px #6D7B8D; padding:5px;width:99%;table-layout:fixed;" cellpadding="2" cellspacing="2" *ngIf="student">
<tr style="height: 30px; background-color:#336699 ; color:#FFFFFF ;border: solid 1px #659EC7;">
<td width="70" align="center">Edit</td>
<td width="70" align="center">Delete</td>
<td width="100" align="center">Student ID</td>
<td width="160" align="center">Student Name</td>
<td width="160" align="center">Email</td>
<td width="120" align="center">Phone</td>
<td width="180" align="center">Address</td>
</tr>
<tbody *ngFor="let StudentMasters of student" [@moveTop]='animStatus'>
<tr>
<td align="center" style="border: solid 1px #659EC7; padding: 5px;table-layout:fixed;">
<span style="color:#9F000F">
<img src="{{imgEdit}}" style="height:32px;width:32px" (click)=editStudentsDetails(StudentMasters.stdID,StudentMasters.stdName,StudentMasters.email,StudentMasters.phone,StudentMasters.address)>
</span>
</td>
<td align="center" style="border: solid 1px #659EC7; padding: 5px;table-layout:fixed;">
<span style="color:#9F000F">
<img src="{{imgDelete}}" style="height:32px;width:32px" (click)=deleteStudentsDetails(StudentMasters.stdID)>
</span>
</td>
<td align="center" style="border: solid 1px #659EC7; padding: 5px;table-layout:fixed;">
<span style="color:#9F000F">{{StudentMasters.stdID}}</span>
</td>
<td align="left" style="border: solid 1px #659EC7; padding: 5px;table-layout:fixed;">
<span style="color:#9F000F">{{StudentMasters.stdName}}</span>
</td>
<td align="left" style="border: solid 1px #659EC7; padding: 5px;table-layout:fixed;">
<span style="color:#9F000F">{{StudentMasters.email}}</span>
</td>
<td align="center" style="border: solid 1px #659EC7; padding: 5px;table-layout:fixed;">
<span style="color:#9F000F">{{StudentMasters.phone}}</span>
</td>
<td align="left" style="border: solid 1px #659EC7; padding: 5px;table-layout:fixed;">
<span style="color:#9F000F">{{StudentMasters.address}}</span>
</td>
</tr>
</tbody>
</table>
</td>
</tr>
</table>
步骤 – 8 添加 Students 导航菜单
我们可以将新创建的学生详细信息菜单添加到现有菜单中。
要添加新的导航菜单,请打开“navmenu.component.html”下的 navmenu 菜单。编写以下代码以添加我们的导航菜单链接以显示学生。
<li [routerLinkActive]="['link-active']">
                    <a [routerLink]="['/students']">
                        <span class='glyphicon glyphicon-th-list'></span> Students
                    </a>
                </li>
步骤 – 9 App Module
App Module 是所有文件的根,我们可以在 ClientApp\ app 下找到 app.module.ts。
导入我们的 students component
import { studentsComponent } from './components/students/students.component';
接下来在 @NGModule 中添加 studentsComponent。
在 routing 中添加我们的 students 路径。
代码将如下所示
import { NgModule } from <a href="mailto:'@angular/core'">'@angular/core'</a>;
import { RouterModule } from <a href="mailto:'@angular/router'">'@angular/router'</a>;
import { UniversalModule } from 'angular2-universal';
import { AppComponent } from './components/app/app.component'
import { NavMenuComponent } from './components/navmenu/navmenu.component';
import { HomeComponent } from './components/home/home.component';
import { FetchDataComponent } from './components/fetchdata/fetchdata.component';
import { CounterComponent } from './components/counter/counter.component';
import { studentsComponent } from './components/students/students.component';

@NgModule({
    bootstrap: [ AppComponent ],
    declarations: [
        AppComponent,
        NavMenuComponent,
        CounterComponent,
        FetchDataComponent,
        HomeComponent,
        studentsComponent
    ],
    imports: [
        UniversalModule, // Must be first import. This automatically imports BrowserModule, HttpModule, and JsonpModule too.
        RouterModule.forRoot([
            { path: '', redirectTo: 'home', pathMatch: 'full' },
            { path: 'home', component: HomeComponent },
            { path: 'counter', component: CounterComponent },
            { path: 'fetch-data', component: FetchDataComponent },
            { path: 'students', component: studentsComponent },
            { path: '**', redirectTo: 'home' }
        ])
    ]
})
export class AppModule {
}
步骤 – 10 构建并运行应用程序
构建并运行应用程序,您可以看到我们的带有动画的主页,以及 Students CRUD 页面的动画。
关注点
首先在您的 SQL Server 中创建数据库和表。您可以运行本文中的 SQL 脚本来创建 StudentsDB 数据库和 StudentMasters 表,并且不要忘记更改“appsettings.json”中的连接字符串。
历史
Angular2ASPCORE.zip - 2017/03/02