
Master Chef (第 4 部分) - ASP.NET Core and Angular 2 CRUD SPA
4.98/5 (18投票s)
在本文中,我将介绍如何使用 ASP.NET Core MVC、Entity Framework Core 和 Angular 2 来实现一个 CRUD SPA(单页应用程序)。
引言
在 Master Chef (第 1 部分) 和 Master Chef (第 2 部分) 中,我介绍了如何使用 ASP.Net Core 和 Angular JS。从 Master Chef (第 3 部分) 开始,我开始介绍如何创建 ASP.NET Core 和 Angular 2 应用程序。在本文中,我将继续介绍如何使用 ASP.NET Core MVC、Entity Framework Core 和 Angular 2 来实现一个 CRUD SPA(单页应用程序)。
服务器数据模型
创建、读取、更新和删除 (CRUD) 是持久化存储的四个基本功能。
我们首先需要在存储库类中实现数据库级别的 CRUD。添加一个基本的 Entity 类。
    public class Entity
    {
        public virtual Guid Id { get; set; }

        public virtual Guid? ParentId { get; set; }
}
然后让 Recipe、RecipeStep 和 RecipeItem 继承 Entity 类,并使用 Id 和 ParentId 这两个通用名称来替换相应的键和引用。
    public partial class Recipe : Entity
    {
        public Recipe()
        {
            RecipeSteps = new HashSet<RecipeStep>();
        }

        public string Name { get; set; }
        public DateTime ModifyDate { get; set; }
        public string Comments { get; set; }

        public virtual ICollection<RecipeStep> RecipeSteps { get; set; }
}

    public partial class RecipeStep : Entity
    {
        public RecipeStep()
        {
            RecipeItems = new HashSet<RecipeItem>();
        }

        public int StepNo { get; set; }
        public string Instructions { get; set; }

        public virtual ICollection<RecipeItem> RecipeItems { get; set; }
        [JsonIgnore]
        public Recipe Recipe { get; set; }
}
    public partial class RecipeItem : Entity
    {
        public string Name { get; set; }
        public decimal Quantity { get; set; }
        public string MeasurementUnit { get; set; }
        [JsonIgnore]
        public RecipeStep RecipeStep { get; set; }
}
现在我们需要修改 DbContext 类来应用 Id 和 ParentId。
            modelBuilder.Entity<RecipeItem>(entity =>
            {
                entity.HasKey(e => e.Id)
                    .HasName("PK_RecipeItems");

                entity.Property(e => e.Id).ValueGeneratedNever().HasColumnName("ItemId");
                entity.Property(e => e.ParentId).HasColumnName("RecipeStepId");
                entity.Property(e => e.MeasurementUnit)
                    .IsRequired()
                    .HasColumnType("varchar(20)");

                entity.Property(e => e.Name)
                    .IsRequired()
                    .HasColumnType("varchar(255)");

                entity.Property(e => e.Quantity).HasColumnType("decimal");

                entity.HasOne(d => d.RecipeStep)
                    .WithMany(p => p.RecipeItems)
                    .HasForeignKey(d=>d.ParentId)
                    .OnDelete(DeleteBehavior.Cascade)
                    .HasConstraintName("FK_RecipeItems_RecipeSteps");
            });
对于 RecipeItem 实体,我们使用 "HasColumnName" 来告知模型构建器映射关系,"Id" 映射到 "ItemId","ParentId" 映射到 "RecipeStepId"。然后在引用定义中,将 HasForeignKey(d=>d.RecipeStepId) 更改为 HasForeignKey(d=>d.ParentId)。
对于 RecipeStep,解决方案相同。
            modelBuilder.Entity<RecipeStep>(entity =>
            {
                entity.HasKey(e => e.Id)
                    .HasName("PK_RecipeSteps");

                entity.Property(e => e.Id).ValueGeneratedNever().HasColumnName("RecipeStepId");
                entity.Property(e => e.ParentId).HasColumnName("RecipeId");
                entity.Property(e => e.Instructions).HasColumnType("text");

                entity.HasOne(d => d.Recipe)
                    .WithMany(p => p.RecipeSteps)
                    .HasForeignKey(d => d.ParentId)
                    .OnDelete(DeleteBehavior.Cascade)
                    .HasConstraintName("FK_RecipeSteps_Recipes");
            });
DeleteBehavior.Cascade 是什么?这是当你删除父对象时删除子对象的一个选项。对我们来说,删除一个食谱将删除该食谱的所有步骤和所有条目,删除一个步骤将删除该步骤的所有条目。
Recipe 类没有 ParentId。因此,我们需要告诉模型构建器忽略此映射。
            modelBuilder.Entity<Recipe>(entity =>
            {
                entity.HasKey(e => e.Id)
                    .HasName("PK_Recipes");
                entity.Ignore(e => e.ParentId);
                entity.Property(e => e.Id).ValueGeneratedNever().HasColumnName("RecipeId");

                entity.Property(e => e.Comments).HasColumnType("text");

                entity.Property(e => e.ModifyDate).HasColumnType("date");

                entity.Property(e => e.Name)
                    .IsRequired()
                    .HasColumnType("varchar(255)");
            });
应用这些更改后,我们就可以在存储库类中使用泛型来实现 Recipe、RecipeStep 和 RecipeItem 的创建、读取、更新和删除功能。
        public T GetEntity<T>(Guid id) where T : Entity
        {
            try
            {
                return _dbContext.Find<T>(id);
            }
            catch (Exception ex)
            {
                throw ex;
            }
        }

        public T AddEntity<T>(T entity) where T : Entity
        {
            _dbContext.Add<T>(entity);
            _dbContext.SaveChanges();
            var result = GetEntity<T>(entity.Id);
            return result;
        }

        public void UpdateEntity<T>(T entity) where T : Entity
        {
            _dbContext.Update<T>(entity);
            _dbContext.SaveChanges();
        }

        public void DeleteEntity<T>(Guid id) where T : Entity
        {
            var entity = GetEntity<T>(id);
            _dbContext.Remove<T>(entity);
            _dbContext.SaveChanges();
        }
Web API 控制器
在 RecipesController 类中,我们设置了用于处理基本 CRUD 请求的函数。这里我们有一个 GET 请求,用于请求所有食谱。我们还有另一个 Get 函数,它接受一个 id,以便用户可以请求返回特定食谱。我们还有更多函数:POST – 允许用户创建新食谱。以及 PUT – 我们可以更新现有食谱。最后是 DELETE – 可以删除特定食谱。
        [HttpGet("{id}")]
        public IActionResult Get(Guid id)
        {
            var recipe = _repository.GetEntity<Recipe>(id);
            if (recipe != null)
                return new ObjectResult(recipe);
            else
                return new NotFoundResult();
        }

        [HttpPost]
        public IActionResult Post([FromBody]Recipe recipe)
        {
            if (recipe.Id == Guid.Empty)
            {
                recipe.Id = Guid.NewGuid();
                recipe.ModifyDate = DateTime.Now;
                return new ObjectResult(_repository.AddEntity<Recipe>(recipe));
            }
            else
            {
                var existingOne = _repository.GetEntity<Recipe>(recipe.Id);
                existingOne.Name = recipe.Name;
                existingOne.Comments = recipe.Comments;
                existingOne.ModifyDate = DateTime.Now;
                _repository.UpdateEntity<Recipe>(existingOne);
                return new ObjectResult(existingOne);
            }
        }

        [HttpPut("{id}")]
        public IActionResult Put(Guid id, [FromBody]Recipe recipe)
        {
            var existingOne = _repository.GetEntity<Recipe>(recipe.Id);
            existingOne.Name = recipe.Name;
            existingOne.Comments = recipe.Comments;
            _repository.UpdateEntity<Recipe>(existingOne);
            return new ObjectResult(existingOne);
        }

        [HttpDelete("{id}")]
        public IActionResult Delete(Guid id)
        {
            _repository.DeleteEntity<Recipe>(id);
            return new StatusCodeResult(200);
        }
但是 RecipeStep 和 RecipeItem 呢?我们可以在一个 API 控制器中放入不同的 HttpGet、HttpPost 和 HttpDelete 吗?
路由是 Web API 如何将 URI 匹配到操作的方法。Web API 2 支持一种新型路由,称为属性路由。顾名思义,属性路由使用属性来定义路由。属性路由让您可以更好地控制 Web API 中的 URI。例如,您可以轻松创建描述资源层次结构的 URI。
因此,现在我们使用属性路由在一个 API 控制器中定义多个 HTTPGet、HTTPPost 和 HTTPDelete。
        //GET api/recipes/step/:id
        [HttpGet]
        [Route("step/{id}")]
        public IActionResult GetStep(Guid id)
        {
            var recipeStep = _repository.GetEntity<RecipeStep>(id);
            if (recipeStep != null)
                return new ObjectResult(recipeStep);
            else
                return new NotFoundResult();

        }

        //POST api/recipes/step
        [HttpPost]
        [Route("step")]
        public IActionResult UpdateStep([FromBody]RecipeStep recipeStep)
        {
            if (recipeStep.Id == Guid.Empty)
            {
                recipeStep.Id = Guid.NewGuid();
                return new ObjectResult(_repository.AddEntity<RecipeStep>(recipeStep));
            }
            else
            {
                var existingOne = _repository.GetEntity<RecipeStep>(recipeStep.Id);
                existingOne.StepNo = recipeStep.StepNo;
                existingOne.Instructions = recipeStep.Instructions;
                _repository.UpdateEntity<RecipeStep>(existingOne);
                return new ObjectResult(existingOne);
            }
        }

        //DELETE api/recipes/step/:id
        [HttpDelete]
        [Route("step/{id}")]
        public IActionResult DeleteStep(Guid id)
        {
            _repository.DeleteEntity<RecipeStep>(id);
            return new StatusCodeResult(200);
        }

        // GET api/recipes/item/:id
        [HttpGet]
        [Route("item/{id}")]
        public IActionResult GetItem(Guid id)
        {
            var recipeItem = _repository.GetEntity<RecipeItem>(id);
            if (recipeItem != null)
                return new ObjectResult(recipeItem);
            else
                return new NotFoundResult();

        }

        //POST api/recipes/item
        [HttpPost]
        [Route("item")]
        public IActionResult UpdateItem([FromBody]RecipeItem recipeItem)
        {
            if (recipeItem.Id == Guid.Empty)
            {
                recipeItem.Id = Guid.NewGuid();
                if (recipeItem.MeasurementUnit == null)
                    recipeItem.MeasurementUnit = "";
                return new ObjectResult(_repository.AddEntity<RecipeItem>(recipeItem));
            }
            else
            {
                var existingOne = _repository.GetEntity<RecipeItem>(recipeItem.Id);
                existingOne.Name = recipeItem.Name;
                existingOne.Quantity = recipeItem.Quantity;
                existingOne.MeasurementUnit = recipeItem.MeasurementUnit;
                _repository.UpdateEntity<RecipeItem>(existingOne);
                return new ObjectResult(existingOne);
            }
        }

        //DELETE api/recipes/item/:id
        [HttpDelete]
        [Route("item/{id}")]
        public IActionResult DeleteItem(Guid id)
        {
            _repository.DeleteEntity<RecipeItem>(id);
            return new StatusCodeResult(200);
        }
客户端视图模型
在上篇文章中,我们创建了一个食谱视图模型。现在,我们继续创建 recipestep 和 recipeitem。
右键单击“viewmodels”,添加一个新的 typescript 文件。命名为“recipeStep”,这是一个我们在视图上显示的食谱步骤视图模型。

export class RecipeStep {
    public parentId: string;
    public id: string;
    public stepNo: number;
    public instructions: string;
    constructor() { }
}
右键单击“viewmodels”,添加另一个 typescript 文件。命名为“recipeItem”,这是一个我们在视图上显示的食谱条目视图模型。

客户端服务
在我们的客户端服务 "app.service.ts" 中,我们需要添加更多方法来执行 CRUD 功能。
首先导入客户端视图模型类。
import { Recipe } from "../viewmodels/recipe";
import { RecipeStep } from "../viewmodels/recipeStep";
import { RecipeItem } from "../viewmodels/recipeItem";
import { Observable } from "rxjs/Observable";
请注意,正如我们在 web API 控制器中所实现的,食谱、步骤和条目的 URL 是不同的。
因此,在服务类中,我们定义了三个常量 URL 字符串。
    //URL to web api
    private recipeUrl = 'api/recipes/';
    private stepUrl = 'api/recipes/step/';
private itemUrl = 'api/recipes/item/';
获取、更新和删除食谱方法
    getRecipe(id: string) {
        if (id == null) throw new Error("id is required.");
        var url = this.recipeUrl + id;
        return this.http.get(url)
            .map(response => <Recipe>response.json())
            .catch(this.handleError);
    }

    saveRecipe(recipe: Recipe) {
        if (recipe == null) throw new Error("recipe is required.");
        var url = this.recipeUrl;
        return this.http.post(url, recipe)
            .map(response => <Recipe>response.json())
            .catch(this.handleError);
    }

    deleteRecipe(id:string) {
        if (id == null) throw new Error("id is required.");
        var url = this.recipeUrl + id;
        return this.http.delete(url)
            .catch(this.handleError);
}
获取、更新和删除食谱步骤方法
    getStep(id: string) {
        if (id == null) throw new Error("id is required.");
        var url = this.stepUrl + id;
        return this.http.get(url)
            .map(response => <RecipeStep>response.json())
            .catch(this.handleError);
    }

    saveStep(step: RecipeStep) {
        if (step == null) throw new Error("recipe step is required.");
        var url = this.stepUrl;
        return this.http.post(url, step)
            .map(response => <RecipeStep>response.json())
            .catch(this.handleError);
    }

    deleteStep(id: string) {
        if (id == null) throw new Error("id is required.");
        var url = this.stepUrl + id;
        return this.http.delete(url)
            .catch(this.handleError);
}

Get, update and delete recipe item methods:
    getItem(id: string) {
        if (id == null) throw new Error("id is required.");
        var url = this.itemUrl + id;
        return this.http.get(url)
            .map(response => <RecipeItem>response.json())
            .catch(this.handleError);
    }

    saveItem(item: RecipeItem) {
        if (item == null) throw new Error("recipe item is required.");
        var url = this.itemUrl;
        return this.http.post(url, item)
            .map(response => <RecipeItem>response.json())
            .catch(this.handleError);
    }

    deleteItem(id: string) {
        if (id == null) throw new Error("id is required.");
        var url = this.itemUrl + id;
        return this.http.delete(url)
            .catch(this.handleError);
}
客户端路由
在使用 ASP.NET 中的 MVC 时,您会在指定 URL 时指定要命中的控制器。我们还可以选择指定要传递到控制器方法的参数。这就是服务器端路由。
在 SPA 中,客户端路由基本上做同样的事情。唯一的区别是我们永远不必调用服务器。这使得我们所有的“页面”都是虚拟的。我们不必要求访问者始终从我们的主页开始并导航到我们站点的其余部分;我们不必为站点的每个页面在服务器上创建单独的页面;我们可以一次性加载所有站点,用户可以导航到他们想要去的任何页面。他们甚至可以直接链接到该页面,客户端将负责正确显示页面。
通常,在实现完所有通用代码后,路由就会在应用程序的顶部启用。因此,在需要路由生效的位置,添加以下标签:
<router-outlet></router-outlet>
App 组件
现在我们更改 App 组件以启用客户端路由以实现单页应用程序。
import { Component, OnInit } from "@angular/core";
import { Router } from "@angular/router";
import { Recipe } from "./viewmodels/recipe";
import { AppService } from "./services/app.service";

@Component({
    selector: 'masterchef2',
    template: `
        <h1>{{title}}</h1>
        <router-outlet></router-outlet>
    `
})

export class AppComponent {
   title = "Master Chef Recipes";
}
您可以看到 App 组件现在非常简单。只显示一个标题。<router-outlet></router-outlet> 会根据路径显示不同的模板。
Recipe List 组件
在上篇文章中,我们将食谱列表放在了 app 组件中。由于我们需要实现更复杂的功能,因此我将其从 app 组件中移出。
右键单击 "scripts/app/components" 文件夹,添加一个新项。选择 ".Net Core/Client-Side" TypeScript File。命名为 "recipe-list.component.ts"。

import { Recipe } from "../viewmodels/recipe";
import { AppService } from "../services/app.service";

@Component({
    selector: 'recipe-list',
    templateUrl: '../partials/recipes.html'
})

export class RecipeListComponent implements OnInit {

    items: Recipe[];
    errorMessage: string;

    constructor(private appService: AppService) {
        //called first time before the ngOnInit()
    }

    ngOnInit() {
        //called after the constructor and called  after the first ngOnChanges()
        var service = this.appService.getAllRecipes();
        service.subscribe(
            items => {
                this.items = items;
            },
            error => this.errorMessage = <any>error
        );
    }

    public Expand(recipe:Recipe) {
        recipe.show = !recipe.show;
    }

}
请注意 Expand 方法中的更改。现在 "show" 属性不再是组件级别的了。它已移至 Recipe 视图模型。这是因为我想控制每个食谱,而不是所有食谱。
Recipe Detail 组件
右键单击 "scripts/app/components" 文件夹,并添加一个新项。选择 ".Net Core/Client-Side" TypeScript File。命名为 "recipe-detail.component.ts"。

import { Component, OnInit, OnDestroy } from "@angular/core";
import { Router, ActivatedRoute } from "@angular/router";
import { Recipe } from "../viewmodels/recipe";
import { AppService } from "../services/app.service";

@Component({
    selector: 'recipe-detail',
    templateUrl: '../partials/edit.html'
})

export class RecipeDetailComponent implements OnInit {
    item: Recipe;
    sub: any;

    constructor(private AppService: AppService, private router: Router, private route: ActivatedRoute) { }

    ngOnInit() {
        this.sub = this.route.params.subscribe(params => {
            var id = params['id'];
            this.AppService.getRecipe(id).subscribe(item => this.item = item);
        });
    }

    ngOnDestroy() {
        this.sub.unsubscribe();
    }

    public editRecipe() {
        this.AppService.saveRecipe(this.item).subscribe(
            item => { this.item = item; this.router.navigate(['/recipes']); },
            error => console.log(error)
        )
    }
}
在此类中,我们首先调用 getRecipe 服务函数来获取食谱信息,然后调用 saveRecipe 服务函数来更新食谱。
Recipe New 组件
右键单击 "scripts/app/components" 文件夹,添加一个新项。选择 ".Net Core/Client-Side" TypeScript File。命名为 "recipe-new.component.ts"。

import { Component, OnInit, OnDestroy } from "@angular/core";
import { Router, ActivatedRoute } from "@angular/router";
import { Recipe } from "../viewmodels/recipe";
import { AppService } from "../services/app.service";

@Component({
    selector: 'recipe-new',
    templateUrl: '../partials/add.html'
})

export class RecipeNewComponent implements OnInit {
    item: Recipe;
    sub: any;

    constructor(private AppService: AppService, private router: Router, private route: ActivatedRoute) { }

    ngOnInit() {
        this.item = new Recipe();
    }

    ngOnDestroy() {
    }

    public addRecipe() {
        this.AppService.saveRecipe(this.item).subscribe(
            item => { this.item = item; this.router.navigate(['/recipes']); },
            error => console.log(error)
        )
    }

}
在此类中,我们首先创建一个新食谱,然后调用 saveRecipe 服务函数来添加食谱。
Recipe Delete 组件
右键单击 "scripts/app/components" 文件夹,并添加一个新项。选择 ".Net Core/Client-Side" TypeScript File。命名为 "recipe-delete.component.ts"。

import { Component, OnInit, OnDestroy } from "@angular/core";
import { Router, ActivatedRoute } from "@angular/router";
import { Recipe } from "../viewmodels/recipe";
import { AppService } from "../services/app.service";

@Component({
    selector: 'recipe-delete',
    templateUrl: '../partials/delete.html'
})

export class RecipeDeleteComponent implements OnInit {
    item: Recipe;
    sub: any;

    constructor(private AppService: AppService, private router: Router, private route: ActivatedRoute) { }

    ngOnInit() {
        this.sub = this.route.params.subscribe(params => {
            var id = params['id'];
            this.AppService.getRecipe(id).subscribe(item => this.item = item);
        });
    }

    ngOnDestroy() {
        this.sub.unsubscribe();
    }

    public deleteRecipe() {
        this.AppService.deleteRecipe(this.item.id).subscribe(
            () => this.router.navigate(['/recipes']),
            error => console.log(error)
        )
    }

}
在此类中,我们首先调用 getRecipe 服务函数来获取食谱信息,然后调用 deleteRecipe 服务函数来删除食谱。
Step Detail 组件
右键单击 "scripts/app/components" 文件夹,添加一个新项。选择 ".Net Core/Client-Side" TypeScript File。命名为 "step-detail.component.ts"。

import { Component, OnInit, OnDestroy } from "@angular/core";
import { Router, ActivatedRoute } from "@angular/router";
import { RecipeStep } from "../viewmodels/recipestep";
import { AppService } from "../services/app.service";

@Component({
    selector: 'step-detail',
    templateUrl: '../partials/editStep.html'
})

export class StepDetailComponent implements OnInit {
    item: RecipeStep;
    sub: any;

    constructor(private AppService: AppService, private router: Router, private route: ActivatedRoute) { }

    ngOnInit() {
        this.sub = this.route.params.subscribe(params => {
            var id = params['id'];
            this.AppService.getStep(id).subscribe(item => this.item = item);
        });
    }

    ngOnDestroy() {
        this.sub.unsubscribe();
    }

    public editRecipeStep() {
        this.AppService.saveStep(this.item).subscribe(
            item => { this.item = item; this.router.navigate(['/recipes']); },
            error => console.log(error)
        )
    }

}
在此类中,我们首先调用 getStep 服务函数来获取食谱步骤信息,然后调用 saveStep 服务函数来更新食谱步骤。
Step New 组件
右键单击 "scripts/app/components" 文件夹,并添加一个新项。选择 ".Net Core/Client-Side" TypeScript File。命名为 "step-new.component.ts"。

import { Component, OnInit, OnDestroy } from "@angular/core";
import { Router, ActivatedRoute } from "@angular/router";
import { RecipeStep } from "../viewmodels/recipeStep";
import { AppService } from "../services/app.service";

@Component({
    selector: 'step-new',
    templateUrl: '../partials/addStep.html'
})

export class StepNewComponent implements OnInit {
    item: RecipeStep;
    sub: any;

    constructor(private AppService: AppService, private router: Router, private route: ActivatedRoute) { }

    ngOnInit() {
        this.sub = this.route.params.subscribe(params => {
            var parentId = params['id'];
            this.item = new RecipeStep();
            this.item.parentId = parentId;
        });
    }

    ngOnDestroy() {
        this.sub.unsubscribe();
    }

    public addRecipeStep() {
        this.AppService.saveStep(this.item).subscribe(
            item => { this.item = item; this.router.navigate(['/recipes']);},
            error => console.log(error)
        )
    }

}
在此类中,我们首先创建一个新步骤,然后调用 saveStep 服务函数来添加一个食谱步骤。
Step Delete 组件
右键单击 "scripts/app/components" 文件夹,并添加一个新项。选择 ".Net Core/Client-Side" TypeScript File。命名为 "step-delete.component.ts"。

import { Component, OnInit, OnDestroy } from "@angular/core";
import { Router, ActivatedRoute } from "@angular/router";
import { RecipeStep } from "../viewmodels/recipeStep";
import { AppService } from "../services/app.service";

@Component({
    selector: 'step-delete',
    templateUrl: '../partials/deleteStep.html'
})

export class StepDeleteComponent implements OnInit {
    item: RecipeStep;
    sub: any;

    constructor(private AppService: AppService, private router: Router, private route: ActivatedRoute) { }

    ngOnInit() {
        this.sub = this.route.params.subscribe(params => {
            var id = params['id'];
            this.AppService.getStep(id).subscribe(item => this.item = item);
        });
    }

    ngOnDestroy() {
        this.sub.unsubscribe();
    }

    public deleteStep() {
        this.AppService.deleteStep(this.item.id).subscribe(
            () => this.router.navigate(['/recipes']),
            error => console.log(error)
        )
    }

}
在此类中,我们首先调用 getStep 服务函数来获取食谱步骤信息,然后调用 deleteStep 服务函数来删除食谱步骤。
Item Detail 组件
右键单击 "scripts/app/components" 文件夹,并添加一个新项。选择 ".Net Core/Client-Side" TypeScript File。命名为 "item-detail.component.ts"。

import { Component, OnInit, OnDestroy } from "@angular/core";
import { Router, ActivatedRoute } from "@angular/router";
import { RecipeItem } from "../viewmodels/recipeitem";
import { AppService } from "../services/app.service";

@Component({
    selector: 'item-detail',
    templateUrl: '../partials/editItem.html'
})

export class ItemDetailComponent implements OnInit {
    item: RecipeItem;
    sub: any;

    constructor(private AppService: AppService, private router: Router, private route: ActivatedRoute) { }

    ngOnInit() {
        this.sub = this.route.params.subscribe(params => {
            var id = params['id'];
            this.AppService.getItem(id).subscribe(item => this.item = item);
        });
    }

    ngOnDestroy() {
        this.sub.unsubscribe();
    }

    public editRecipeItem() {
        this.AppService.saveItem(this.item).subscribe(
            item => { this.item = item; this.router.navigate(['/recipes']); },
            error => console.log(error)
        )
    }

}
在此类中,我们调用 getItem 服务函数来获取食谱条目信息,然后调用 saveItem 服务函数来更新食谱条目。
Item New 组件
右键单击 "scripts/app/components" 文件夹,添加一个新项。选择 ".Net Core/Client-Side" TypeScript File。命名为 "item-new.component.ts"。

import { Component, OnInit, OnDestroy } from "@angular/core";
import { Router, ActivatedRoute } from "@angular/router";
import { RecipeItem } from "../viewmodels/recipeItem";
import { AppService } from "../services/app.service";

@Component({
    selector: 'item-new',
    templateUrl: '../partials/addItem.html'
})

export class ItemNewComponent implements OnInit {
    item: RecipeItem;
    sub: any;

    constructor(private AppService: AppService, private router: Router, private route: ActivatedRoute) { }

    ngOnInit() {
        this.sub = this.route.params.subscribe(params => {
            var parentId = params['id'];
            this.item = new RecipeItem();
            this.item.parentId = parentId;
        });
    }

    ngOnDestroy() {
        this.sub.unsubscribe();
    }

    public addRecipeItem() {
        this.AppService.saveItem(this.item).subscribe(
            item => { this.item = item; this.router.navigate(['/recipes']);},
            error => console.log(error)
        )
    }

}
在此类中,我们首先创建一个新条目,然后调用 saveItem 服务函数来添加一个食谱条目。
Item Delete 组件
右键单击 "scripts/app/components" 文件夹,添加一个新项。选择 ".Net Core/Client-Side" TypeScript File。命名为 "item-delete.component.ts"。

import { Component, OnInit, OnDestroy } from "@angular/core";
import { Router, ActivatedRoute } from "@angular/router";
import { RecipeItem } from "../viewmodels/recipeItem";
import { AppService } from "../services/app.service";

@Component({
    selector: 'item-delete',
    templateUrl: '../partials/deleteItem.html'
})

export class ItemDeleteComponent implements OnInit {
    item: RecipeItem;
    sub: any;

    constructor(private AppService: AppService, private router: Router, private route: ActivatedRoute) { }

    ngOnInit() {
        this.sub = this.route.params.subscribe(params => {
            var id = params['id'];
            this.AppService.getItem(id).subscribe(item => this.item = item);
        });
    }

    ngOnDestroy() {
        this.sub.unsubscribe();
    }

    public deleteItem() {
        this.AppService.deleteItem(this.item.id).subscribe(
            () => this.router.navigate(['/recipes']),
            error => console.log(error)
        )
    }

}
在此类中,我们首先调用 getItem 服务函数来获取食谱步骤信息,然后调用 deleteItem 服务函数来删除食谱条目。
更改 App 模块
Angular 模块类描述了应用程序的各个部分如何组合在一起。每个应用程序至少有一个 Angular 模块,即您要引导以启动应用程序的根模块。您可以随意命名。因此,我们加载所有创建的组件。
///<reference path="../../typings/index.d.ts"/>
import { NgModule } from "@angular/core";
import { BrowserModule } from "@angular/platform-browser";
import { HttpModule } from "@angular/http";
import { RouterModule } from "@angular/router";
import { FormsModule } from "@angular/forms";
import "rxjs/Rx";

import { AppComponent } from "./app.component";
import { RecipeListComponent } from "./components/recipe-list.component";
import { RecipeDetailComponent } from "./components/recipe-detail.component";
import { RecipeNewComponent } from "./components/recipe-new.component";
import { RecipeDeleteComponent } from "./components/recipe-delete.component";
import { StepDetailComponent } from "./components/step-detail.component";
import { StepNewComponent } from "./components/step-new.component";
import { StepDeleteComponent } from "./components/step-delete.component";
import { ItemDetailComponent } from "./components/item-detail.component";
import { ItemNewComponent } from "./components/item-new.component";
import { ItemDeleteComponent } from "./components/item-delete.component";

import { AppRouting } from "./app.routing";
import { AppService } from "./services/app.service";

@NgModule({
    // directives, components, and pipes
    declarations: [
        AppComponent,
        RecipeListComponent,
        RecipeDetailComponent,
        RecipeNewComponent,
        RecipeDeleteComponent,
        StepDetailComponent,
        StepNewComponent,
        StepDeleteComponent,
        ItemDetailComponent,
        ItemNewComponent,
        ItemDeleteComponent,
    ],
    // modules
    imports: [
        BrowserModule,
        HttpModule,
        FormsModule,
        RouterModule,
        AppRouting

    ],
    // providers
    providers: [
        AppService
    ],
    bootstrap: [
        AppComponent
    ]
})
export class AppModule { }
此外,我们在此导入路由模块。然后我们可以进行路由配置。
客户端路由配置
一个路由的 Angular 应用程序有一个 Router 服务的单例实例。当浏览器 URL 更改时,该路由器会查找相应的 Route,然后可以根据该 Route 确定要显示的组件。
在配置路由之前,路由器没有任何路由。我们在 app.routing.ts 中配置客户端路由。
右键单击 "scripts/app/components" 文件夹,并添加一个新项。选择 ".Net Core/Client-Side" TypeScript File。命名为 "app.routing.ts"。
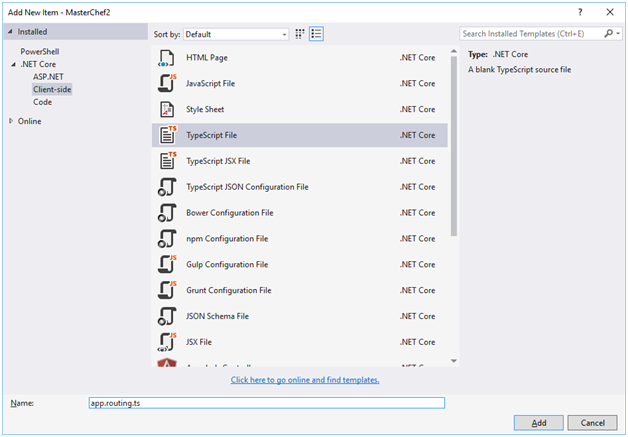
import { ModuleWithProviders } from "@angular/core";
import { Routes, RouterModule } from "@angular/router";
import { RecipeListComponent } from "./components/recipe-list.component";
import { RecipeDetailComponent } from "./components/recipe-detail.component";
import { RecipeNewComponent } from "./components/recipe-new.component";
import { RecipeDeleteComponent } from "./components/recipe-delete.component";
import { StepDetailComponent } from "./components/step-detail.component";
import { StepNewComponent } from "./components/step-new.component";
import { StepDeleteComponent } from "./components/step-delete.component";
import { ItemDetailComponent } from "./components/item-detail.component";
import { ItemNewComponent } from "./components/item-new.component";
import { ItemDeleteComponent } from "./components/item-delete.component";

const routes: Routes = [
    {
        path: '',
        redirectTo: '/recipes',
        pathMatch: 'full'
    },
    {
        path: 'recipes',
        component: RecipeListComponent
    },
    {
        path: 'recipes/edit/:id',
        component: RecipeDetailComponent
    },
    {
        path: 'recipes/add',
        component: RecipeNewComponent
    },
    {
        path: 'recipes/delete/:id',
        component: RecipeDeleteComponent
    },
    {
        path: 'recipes/editStep/:id',
        component: StepDetailComponent
    },
    {
        path: 'recipes/addStep/:id',
        component: StepNewComponent
    },
    {
        path: 'recipes/deleteStep/:id',
        component: StepDeleteComponent
    },
    {
        path: 'recipes/editItem/:id',
        component: ItemDetailComponent
    },
    {
        path: 'recipes/addItem/:id',
        component: ItemNewComponent
    },
    {
        path: 'recipes/deleteItem/:id',
        component: ItemDeleteComponent
    },
];

export const AppRoutingProviders: any[] = [
];

export const AppRouting: ModuleWithProviders = RouterModule.forRoot(routes);
在这里,我们在一个数组中配置所有路径和组件,然后 app 模块导入这个数组。
Recipe List 模板 (Repcipes.html)
<div>
    <a routerLink="/recipes/add" class="btn breadcrumb m-2">create a new recipe</a>
    <div *ngFor="let recipe of items">
        <div class="btn-group tab-pane mb-2">
            <button class="btn-info pull-left" (click)="Expand(recipe)"><h5>{{recipe.name}} - {{recipe.comments}}</h5></button>
        </div>
        <div class="btn-group">
            <a routerLink="/recipes/edit/{{recipe.id}}" class="breadcrumb-item">edit</a>
            <a routerLink="/recipes/delete/{{recipe.id}}" class="breadcrumb-item">delete</a>
        </div>
        <div *ngIf="recipe.show">
            <a routerLink="/recipes/addStep/{{recipe.id}}" class="btn breadcrumb m-2">create a new step</a>
            <div *ngFor="let step of recipe.recipeSteps">
                <div class="row ml-2">
                    <div class="breadcrumb ml-2">
                        <span>step {{step.stepNo}} : {{step.instructions}}</span>
                    </div>
                    <div class="btn-group m-2">
                        <a routerLink="/recipes/editStep/{{step.id}}" class="breadcrumb-item">edit</a>
                        <a routerLink="/recipes/deleteStep/{{step.id}}" class="breadcrumb-item">delete</a>
                    </div>
                </div>
                <a routerLink="/recipes/addItem/{{step.id}}" class="btn breadcrumb ml-4">create a new item</a>
                <div *ngFor="let item of step.recipeItems">
                    <div class="row ml-4">
                        <div class="card-text ml-4">
                            <p> {{item.name}}  {{item.quantity}} {{item.measurementUnit}}</p>
                        </div>
                        <div class="btn-group ml-2">
                            <a routerLink="/recipes/editItem/{{item.id}}" class="breadcrumb-item">edit</a>
                            <a routerLink="/recipes/deleteItem/{{item.id}}" class="breadcrumb-item">delete</a>
                        </div>
                    </div>
                </div>
            </div>
        </div>
    </div>
</div>
锚点标签上的 RouterLink 指令使路由器控制这些元素。导航路径是固定的,因此您可以为 routerLink 分配一个字符串(“一次性”绑定)。
如果导航路径更具动态性,您还可以绑定到一个返回路由链接参数数组(链接参数数组)的模板表达式。路由器会将该数组解析为完整的 URL。
在 Recipe List 模板中,我们既有固定链接也有动态链接。我使用 ngIf="recipe.show" 来展开或折叠相应的食谱。我必须提到的一点是,对于所有编辑和删除功能,我们传递对象 ID,但在创建新步骤和新条目时,我们需要传递父对象的 ID。这意味着创建新步骤时,我们需要传递食谱 ID;创建新条目时,我们需要传递步骤 ID。显然,创建新食谱时我们不需要传递任何内容。
Recipe Detail 模板 (edit.html)
右键单击 "wwwroot/partials" 文件夹,并添加一个新项。选择 ".Net Core/Client-Side" HTML Page。命名为 "edit.html"。

<div class="badge badge-info">
    <h4>Edit Recipe</h4>
</div>
<div *ngIf="item" class="card-text">
    <form  (ngSubmit)="editRecipe()">
        <div class="row">
            <div class="col-xl-6 form-group">
                <label for="name">Name</label>
                <input [(ngModel)]="item.name" name="name" type="text" class="form-control" />
            </div>
        </div>
        <div class="row">
            <div class="col-xl-6 form-group">
                <label for="comments">Comments</label>
                <input [(ngModel)]="item.comments" name="comments" type="text" class="form-control" />
            </div>
        </div>
        <div class="row m-2">
            <button type="submit" class="btn btn-primary">Save</button>
            <a routerLink="/recipes" class="btn btn-default">Cancel</a>
        </div>
    </form>
</div>
Recipe Details 模板实际上是一个提交表单。但是,ngSubmit 确保在处理程序代码引发异常(这是 submit 的默认行为)时表单不会提交,并且不会导致实际的 http post 请求。
为了注册表单控件,我们使用 ngModel 指令。结合 name 属性,ngModel 会在后台为我们创建一个表单控件抽象。通过 ngModel 注册的每个表单控件都会自动显示在 form.value 中,然后可以轻松用于进一步的后处理。
在此模板中,ngSubmit 与 Recipe Detail Component 中的 eidtRecipe() 方法绑定。 "Cancel" 按钮只是返回列表。
Recipe New 模板 (add.html)
右键单击 "wwwroot/partials" 文件夹,添加一个新项。选择 ".Net Core/Client-Side" HTML Page。命名为 "add.html"。

<div class="badge badge-info">
    <h4>Add Recipe</h4>
</div>
<div *ngIf="item" class="card-text">
    <form (ngSubmit)="addRecipe()">
        <div class="row">
            <div class="col-xl-6 form-group">
                <label for="name">Name</label>
                <input [(ngModel)]="item.name" name="name" type="text" class="form-control" />
            </div>
        </div>
        <div class="row">
            <div class="col-xl-6 form-group">
                <label for="comments">Comments</label>
                <input [(ngModel)]="item.comments" name="comments" type="text" class="form-control" />
            </div>
        </div>
        <div class="row m-2">
            <button type="submit" class="btn btn-primary">Save</button>
            <a routerLink="/recipes" class="btn btn-default">Cancel</a>
        </div>
    </form>
</div>
在此模板中,ngSubmit 与 Recipe New Component 中的 addRecipe() 方法绑定。 "Cancel" 按钮只是返回列表。
Recipe Delete 模板 (delete.html)
右键单击 "wwwroot/partials" 文件夹,并添加一个新项。选择 ".Net Core/Client-Side" HTML Page。命名为 "delete.html"。

<div *ngIf="item">

    <div class="row">
        <div class="alert alert-warning">
            <p>Do you really want to delete this recipe?</p>
            <p> {{item.name}} - {{item.comments}}</p>
        </div>
    </div>
    <button (click)="deleteRecipe()" class="btn btn-danger">Yes</button>
    <a routerLink="/recipes" class="btn btn-default">No</a>

</div>
Recipe Delete 模板不是提交表单。"Yes" 按钮直接调用 Recipe Delete Component 的 deleteRecipe()。 "No" 按钮导航回食谱列表。
Step Detail 模板 (editStep.html)
右键单击 "wwwroot/partials" 文件夹,并添加一个新项。选择 ".Net Core/Client-Side" HTML Page。命名为 "editStep.html"。

<div class="badge badge-info">
    <h4>Edit Recipe Step</h4>
</div>
<div *ngIf="item" class="card-text">
    <form (ngSubmit)="editRecipeStep()">
        <div class="row">
            <div class="col-xl-6 form-group">
                <label for="stepNo">Step No.</label>
                <input [(ngModel)]="item.stepNo" name="stepNo" type="text" class="form-control" />
            </div>
        </div>

        <div class="row">
            <div class="col-xl-6 form-group">
                <label for="instructions">Instructions</label>
                <input [(ngModel)]="item.instructions" name="instructions" type="text" class="form-control" />
            </div>
        </div>
        <div class="row m-2">
            <button type="submit" class="btn btn-primary">Save</button>
            <a routerLink="/recipes" class="btn btn-default">Cancel</a>
        </div>
    </form>
</div>
在此模板中,ngSubmit 与 Step Detail Component 中的 editRecipeStep() 方法绑定。 "Cancel" 按钮只是返回列表。
Step New 模板 (addStep.html)
右键单击 "wwwroot/partials" 文件夹,并添加一个新项。选择 ".Net Core/Client-Side" HTML Page。命名为 "addStep.html"。
<div class="badge badge-info">
    <h4>Add a new recipe Step</h4>
</div>
<div *ngIf="item" class="card-text">
    <form (ngSubmit)="addRecipeStep()">
        <div class="row">
            <div class="col-xl-6 form-group">
                <label for="stepNo">Step No.</label>
                <input [(ngModel)]="item.stepNo" name="stepNo" type="text" class="form-control" />
            </div>
        </div>

        <div class="row">
            <div class="col-xl-6 form-group">
                <label for="instructions">Instructions</label>
                <input [(ngModel)]="item.instructions" name="instructions" type="text" class="form-control" />
            </div>
        </div>
        <div class="row m-2">
            <button type="submit" class="btn btn-primary">Save</button>
            <a routerLink="/recipes" class="btn btn-default">Cancel</a>
        </div>
    </form>
</div>
在此模板中,ngSubmit 与 Step New Component 中的 addRecipeStep() 方法绑定。 "Cancel" 按钮只是返回列表。
Step Delete 模板 (deleteStep.html)
右键单击 "wwwroot/partials" 文件夹,并添加一个新项。选择 ".Net Core/Client-Side" HTML Page。命名为 "deleteStep.html"。

<div *ngIf="item">

    <div class="row">
        <div class="alert alert-warning">
            <p>Do you really want to delete this recipe step?</p>
            <p>Step {{item.stepNo}} - {{item.instructions}}</p>
        </div>
    </div>
    <button (click)="deleteStep()" class="btn btn-danger">Yes</button>
    <a routerLink="/recipes" class="btn btn-default">No</a>

</div>
Step Delete 模板不是提交表单。"Yes" 按钮直接调用 Step Delete Component 的 deleteStep()。 "No" 按钮导航回食谱列表。
Item Detail 模板 (editItem.html)
右键单击 "wwwroot/partials" 文件夹,并添加一个新项。选择 ".Net Core/Client-Side" HTML Page。命名为 "editItem.html"。

<div class="badge badge-info">
    <h4>Edit Recipe Item</h4>
</div>
<div *ngIf="item" class="card-text">
    <form (ngSubmit)="editRecipeItem()">
        <div class="row">
            <div class="col-xl-6 form-group">
                <label for="name">Name</label>
                <input [(ngModel)]="item.name" name="name" type="text" class="form-control" />
            </div>
        </div>
        <div class="row">
            <div class="col-xl-6 form-group">
                <label for="quantity">Quantity</label>
                <input [(ngModel)]="item.quantity" name="quantity" type="text" class="form-control" />
            </div>
        </div>
        <div class="row">
            <div class="col-xl-6 form-group">
                <label for="measurementUnit">Measurement Unit</label>
                <input [(ngModel)]="item.measurementUnit" name="measurementUnit" type="text" class="form-control" />
            </div>
        </div>
        <div class="row m-2">
            <button type="submit" class="btn btn-primary">Save</button>
            <a routerLink="/recipes" class="btn btn-default">Cancel</a>
        </div>
    </form>
</div>
在此模板中,ngSubmit 与 Item Detail Component 中的 editRecipeItem() 方法绑定。 "Cancel" 按钮只是返回列表。
Item New 模板 (addItem.html)
右键单击 "wwwroot/partials" 文件夹,添加一个新项。选择 ".Net Core/Client-Side" HTML Page。命名为 "addItem.html"。

<div class="badge badge-info">
    <h4>Add a new recipe Item</h4>
</div>
<div *ngIf="item" class="container-fluid">
    <form (ngSubmit)="addRecipeItem()">
        <div class="row">
            <div class="col-xl-6 form-group">
                <label for="name">Name</label>
                <input [(ngModel)]="item.name" name="name" type="text" class="form-control" />
            </div>
        </div>
        <div class="row">
            <div class="col-xl-6 form-group">
                <label for="quantity">Quantity</label>
                <input [(ngModel)]="item.quantity" name="quantity" type="text" class="form-control" />
            </div>
        </div>
        <div class="row">
            <div class="col-xl-6 form-group">
                <label for="measurementUnit">Measurement Unit</label>
                <input [(ngModel)]="item.measurementUnit" name="measurementUnit" type="text" class="form-control" />
            </div>
        </div>
        <div class="row m-2">
            <button type="submit" class="btn btn-primary">Save</button>
            <a href="/" class="btn btn-default">Cancel</a>
        </div>
    </form>
</div>
在此模板中,ngSubmit 与 Item New Component 中的 addRecipeItem() 方法绑定。 "Cancel" 按钮只是返回列表。
Item Delete 模板 (deleteItem.html)
右键单击 "wwwroot/partials" 文件夹,添加一个新项。选择 ".Net Core/Client-Side" HTML Page。命名为 "deleteItem.html"。

<div *ngIf="item">
    <div class="row">
        <div class="alert alert-warning">
            <p>Do you really want to delete this recipe item?</p>
            <p> {{item.name}}  {{item.quantity}} {{item.measurementUnit}}</p>
        </div>
    </div>
    <button (click)="deleteItem()" class="btn btn-danger">Yes</button>
    <a routerLink="/recipes" class="btn btn-default">No</a>
</div>
Item Delete 模板不是提交表单。"Yes" 按钮直接调用 Item Delete Component 的 deleteItem()。 "No" 按钮导航回食谱列表。
添加 base 标签
我们需要设置 base 标签,因为它将告诉路由引擎如何组合我们应用程序将来可能使用的所有导航 URL。
我们在 index.html(位于 wwwroot 文件夹下)中添加 base 标签。
<html>
<head>
    <base href="/">
    <title>Master Chef2</title>
    <meta name="viewport" content="width=device-width, initial-scale=1">

    <!-- Step 1. Load libraries -->
    <!-- Polyfill(s) for older browsers -->
    <script src="js/shim.min.js"></script>
    <script src="js/zone.js"></script>
    <script src="js/Reflect.js"></script>
    <script src="js/system.src.js"></script>

    <!-- Angular2 Native Directives -->
    <script src="/js/moment.js"></script>

    <!-- Step 2. Configure SystemJS -->
    <script src="systemjs.config.js"></script>
    <script>
        System.import('app').catch(function (err) { console.error(err); });
    </script>
    <link href="lib/bootstrap/dist/css/bootstrap.min.css" rel="stylesheet" media="screen">
</head>
<!-- Step 3. Display the application -->
<body>
    <div class="container-fluid">
        <!-- Application PlaceHolder -->
        <masterchef2>Please wait...</masterchef2>
    </div>
</body>
</html>
Angular 2 Typescript 无法找到名称
当我构建解决方案时,会出现很多编译错误。例如,错误 TS2304: Build:Cannot find name 'Promise'。
有两种解决方法。
- 将转译器的目标从 ES5 切换到 ES6。为此,请将您的 tsconfig.json 文件修改为与以下值匹配:
{
  "compileOnSave": false,
  "compilerOptions": {
    "emitDecoratorMetadata": true,
    "experimentalDecorators": true,
    "module": "system",
    "moduleResolution": "node",
    "noImplicitAny": false,
    "noEmitOnError": false,
    "removeComments": false,
    "sourceMap": true,
    "target": "es6"
  },
  "exclude": [
    "node_modules",
    "wwwroot"
  ]
}
但是,这样做可能会带来一些问题:您可能无法使用一些不支持 ES6 的工具/包/库,例如 UglifyJS。
- 安装 Typings 和 core-js 类型定义文件。转译器的目标仍然是 ES5。
{
  "compileOnSave": false,
  "compilerOptions": {
    "emitDecoratorMetadata": true,
    "experimentalDecorators": true,
    "module": "system",
    "moduleResolution": "node",
    "noImplicitAny": false,
    "noEmitOnError": false,
    "removeComments": false,
    "sourceMap": true,
    "target": "es5"
  },
  "exclude": [
    "node_modules",
    "wwwroot"
  ]
}
打开 package.json 文件(列出 NPM 包的那个),并检查 typings 包是否已包含在 dependencies 或
devDependencies节点中,以及在 scripts 块中的 post-install 阶段运行它的脚本。如果它们不在那里,请添加它们,以便您的文件看起来像这样:{ "version": "1.0.0", "name": "asp.net", "dependencies": { "@angular/common": "2.0.0", "@angular/compiler": "2.0.0", "@angular/core": "2.0.0", "@angular/forms": "2.0.0", "@angular/http": "2.0.0", "@angular/platform-browser": "2.0.0", "@angular/platform-browser-dynamic": "2.0.0", "@angular/router": "3.0.0", "@angular/upgrade": "2.0.0", "core-js": "^2.4.1", "reflect-metadata": "^0.1.8", "rxjs": "5.0.0-rc.4", "systemjs": "^0.19.41", "typings": "^1.3.2", "zone.js": "^0.7.2", "moment": "^2.17.0" }, "devDependencies": { "gulp": "^3.9.1", "gulp-clean": "^0.3.2", "gulp-concat": "^2.6.1", "gulp-less": "^3.3.0", "gulp-sourcemaps": "^1.9.1", "gulp-typescript": "^3.1.3", "gulp-uglify": "^2.0.0", "typescript": "^2.0.10" }, "scripts": { "postinstall": "typings install dt~core-js@^0.9.7 --global" } }请注意,我们必须指定版本 "0.9.7",否则它将安装最新版本,这仍然会导致问题。现在 ES6 TypeScript 包应该可以毫无问题地编译了。
运行应用程序
首先,重新构建解决方案。然后转到 Tasks Runner Explorer 窗口运行默认任务。

所有任务完成后,点击 "IIS Express"。

添加一个新食谱,麻婆豆腐。

保存后,您可以为每个步骤添加步骤和条目。
在 Google Chrome 中调试 Angular 代码
尽管 Angular 2 是 TypeScript,但所有 TypeScript 文件都通过 gulp 任务转换为 JavaScript 最小化文件。看下面的截图,对应的 JavaScript 文件创建在 wwwroot/app 文件夹下。

所以您无法直接调试 TypeScript。幸运的是,我们可以调试 JavaScript 文件。
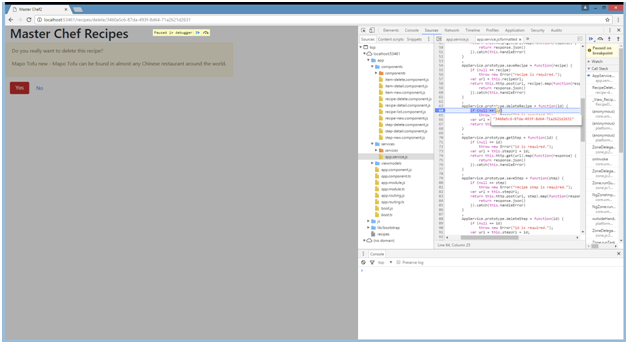
点击 "IIS Express" 下拉按钮,为 Web 浏览器选择 Google Chrome。然后通过点击 "IIS Express" 启动应用程序。应用程序启动后,在 Google Chrome 的 "More tools" 中点击 "Developer Tools"。然后点击 "Source"。现在您可以在树状视图中看到所有 JavaScript 文件。选择您想调试的任何 JavaScript 文件。这里我们以删除食谱为例。所以我选择了 "recipe-delete.component.js"。

正如我所说,所有 JavaScript 文件都以最小化样式创建,这非常难以阅读。但别担心,Chrome 可以为您将最小化文件还原为正常文件。只需点击中间窗口左下角的 "{}",最小化文件就会变成 "pretty print" 文件。我在 deleteRecipe() 函数处设置了断点。

点击食谱旁边的 "delete"。应用程序显示 Recipe Delete 模板。

然后点击 "Yes" 来触发断点,您可以观察到您感兴趣的变量。

在 app.service.js 的 deleteRecipe 函数处设置断点。然后点击 "Resume script" 按钮或按 F8,app.service.js 中的断点也会被触发。
从 App Service,它调用服务器端 web API。如果您在服务器端的 Http Delete 方法处设置断点,当您恢复脚本时,服务器端断点也会被触发。
结论
在这些文章中,我向您展示了如何在 ASP.NET Core 的上下文中构建一个 Angular 2 CRUD SPA。我们还学习了如何使用 Angular 2 Route 通过客户端路由配置导航到不同的组件和模板。由于 Angular 4 已于 3 月发布,下一篇文章将把 Master Chef 迁移到 Visual Studio 2017 和 Angular 4。
我在 github 上创建了一个公共仓库,Master Chef Repository。请随时参与开发。