
推理引擎样本
本主题演示如何运行图像分类示例应用程序,该应用程序使用AlexNet和GoogLeNet等图像分类网络进行推理。
图像分类示例
描述
本主题演示如何运行图像分类示例应用程序,该应用程序使用AlexNet*和GoogLeNet*等图像分类网络进行推理。
工作原理
启动时,示例应用程序会读取命令行参数,并将网络和图像加载到推理引擎插件中。推理完成后,应用程序会创建一个输出图像并将数据输出到标准输出流。
运行
使用-h选项运行应用程序将显示以下用法消息
./classification_sample -h
InferenceEngine:
    API version ............ <version>
    Build .................. <number>

classification_sample [OPTION]
Options:

    -h                        Print a usage message.
    -i "<path1>" "<path2>"    Required. Path to a folder with images or path to an image files: a .ubyte file for LeNet
                              and a .bmp file for the other networks.
    -m "<path>"               Required. Path to an .xml file with a trained model.
        -l "<absolute_path>"  Optional. Absolute path to library with MKL-DNN (CPU) custom layers (*.so).
        Or
        -c "<absolute_path>"  Optional. Absolute path to clDNN (GPU) custom layers config (*.xml).
    -pp "<path>"              Path to a plugin folder.
    -d "<device>"             Specify the target device to infer on; CPU, GPU, FPGA or MYRIAD is acceptable. Sample will look for a suitable plugin for device specified
    -nt "<integer>"           Number of top results (default 10)
    -ni "<integer>"           Number of iterations (default 1)
    -pc                       Enables per-layer performance report
    -p_msg                    Enables messages from a plugin
使用空选项列表运行应用程序将显示上述用法消息和一条错误消息。
要运行此示例,您可以使用Intel® OpenVINO™工具套件模型下载器下载的AlexNet和GoogLeNet模型,或其他图像分类模型。
注意:在运行带训练模型的示例之前,请确保使用模型优化器工具将模型转换为推理引擎格式(*.xml + *.bin)。
例如,要在CPU上对AlexNet模型(已转换为推理引擎格式)执行推理,请使用以下命令
./classification_sample -i <path_to_image>/cat.bmp -m <path_to_model>/alexnet_fp32.xml
示例输出
默认情况下,应用程序输出前10个推理结果。通过向之前的命令添加-nt选项,可以修改输出结果的数量。
例如,要在Intel®高清显卡上获取前5个结果,请使用以下命令
./classification_sample -i <path_to_image>/cat.bmp -m <path_to_model>/alexnet_fp32.xml -nt 5 -d GPU
异步图像分类示例
描述
此示例演示了如何在分类网络的示例上以流水线模式构建和执行推理。
流水线模式可以提高图像吞吐量。一次推理的延迟与同步执行相同。吞吐量提高的原因如下
- 一些插件内部具有异构性。数据传输、远程设备执行、主机上的预处理和后处理
- 使用显式的异构插件,在不同设备上执行网络的各个部分
当两个或多个设备参与单个图像的推理过程时,创建多个推理请求并开始异步推理是利用设备的最高效方式。如果两个设备参与执行,则-nireq选项的最佳值为2。为了提高效率,图像分类示例异步使用轮询算法进行推理请求。该示例开始执行当前推理请求,然后切换到等待前一次推理的结果。等待时间结束后,机器切换推理请求并重复此过程。
另一个提高吞吐量所需的重要方面是迭代次数。只有在大量迭代的情况下,您才能模拟实际应用程序的工作并看到性能
批处理模式是流水线模式的独立属性。流水线模式可与任何批处理大小高效配合使用。
工作原理
启动时,示例应用程序会读取命令行参数,并将网络和图像加载到推理引擎插件中。然后,应用程序创建由-nireq参数指定的多个推理请求,并加载图像进行推理。
然后,在循环中,它开始执行当前推理请求,并切换到等待另一个请求。当结果准备好后,推理请求将被交换。
推理完成后,应用程序会将数据输出到标准输出流。
运行
使用-h选项运行应用程序将显示以下消息
./classification_sample_async -h
InferenceEngine:
    API version ............ <version>
    Build .................. <number>

classification_sample_async [OPTION]
Options:

    -h
                            Print a usage message.
    -i "<path1>" "<path2>"
                            Required. Path to a folder with images or path to an image files: a .ubyte file for LeNet
                            and a .bmp file for the other networks.
    -m "<path>"
                            Required. Path to an .xml file with a trained model.
        -l "<absolute_path>"
                            Optional. Absolute path to library with MKL-DNN (CPU) custom layers (*.so).
        Or
        -c "<absolute_path>"
                            Optional. Absolute path to clDNN (GPU) custom layers config (*.xml).
    -pp "<path>"
                            Path to a plugin folder.
    -d "<device>"
                            Specify the target device to infer on; CPU, GPU, FPGA or MYRIAD is acceptable. Sample will look for a suitable plugin for device specified
    -nt "<integer>"
                            Number of top results (default 10)
    -ni "<integer>"
                            Number of iterations (default 1)
    -pc
                            Enables per-layer performance report
    -nireq "<integer>"
                            Number of infer request for pipelined mode (default 1)
    -p_msg
                            Enables messages from a plugin
使用空选项列表运行应用程序将显示上述用法消息和一条错误消息。
您可以使用以下命令,在FPGA上使用Intel®处理器回退来对带训练的AlexNet*网络执行图像推理
./classification_sample_async -i <path_to_image>/cat.bmp -m <path_to_model>/alexnet_fp32.xml -nt 5 -d HETERO:FPGA,CPU -nireq 2 -ni 200
注意:在运行带训练模型的示例之前,请确保使用模型优化器工具将模型转换为推理引擎格式(*.xml + *.bin)。
示例输出
默认情况下,应用程序输出每个推理请求的前10个推理结果。此外,它还将提供以每秒帧数为单位测得的吞吐量值。
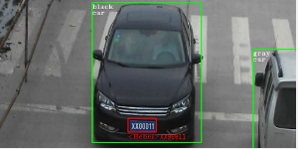
安全屏障摄像头演示
描述
此演示展示了车辆和车牌检测网络,然后在车辆检测结果的基础上应用车辆属性和车牌识别。相应的拓扑结构随产品一起提供
vehicle-license-plate-detection-barrier-0106,这是一个用于查找车辆和车牌的主要检测网络vehicle-attributes-recognition-barrier-0039,它在第一个网络的输出之上执行,并报告通用的车辆属性,例如车辆类型(轿车/面包车/巴士/卡车)和颜色license-plate-recognition-barrier-0001,它在第一个网络的输出之上执行,并报告每个已识别车牌的字符串
有关拓扑结构的更多详细信息,请参阅Intel® OpenVINO™工具套件安装目录中的deployment_tools/intel_models文件夹中的描述。
其他演示目标是
- 通过OpenCV*将视频/摄像头作为输入
- 简单的异步网络流水线示例:车辆属性和车牌识别网络在车辆检测结果之上执行
- 可视化每个检测对象的车辆属性和车牌信息
工作原理
启动时,应用程序会读取命令行参数并加载指定的网络。必需车辆和车牌检测网络,其他两个为可选。
从OpenCV VideoCapture获取帧后,应用程序执行车辆和车牌检测网络的推理,然后执行车辆属性检测和车牌识别网络(如果已在命令行中指定)的另外两次推理,并显示结果。
运行
使用-h选项运行应用程序将显示以下用法消息
./security_barrier_camera_demo -h
InferenceEngine:
    API version ............ <version>
    Build .................. <number>

interactive_vehicle_detection [OPTION]
Options:

    -h                         Print a usage message.
    -i "<path1>" "<path2>"     Required. Path to video or image files. Default value is "cam" to work with cameras.
    -m "<path>"                Required. Path to the Vehicle and License Plate Detection model .xml file.
    -m_va "<path>"             Optional. Path to the Vehicle Attributes model .xml file.
    -m_lpr "<path>"            Optional. Path to the License Plate Recognition model .xml file.
      -l "<absolute_path>"     Optional. For CPU custom layers, if any. Absolute path to a shared library with the kernels implementation.
          Or
      -c "<absolute_path>"     Optional. For GPU custom kernels, if any. Absolute path to an .xml file with the kernels description.
    -d "<device>"              Optional. Specify the target device for Vehicle Detection (CPU, GPU, FPGA, MYRIAD, or HETERO).
    -d_va "<device>"           Optional. Specify the target device for Vehicle Attributes (CPU, GPU, FPGA, MYRIAD, or HETERO).
    -d_lpr "<device>"          Optional. Specify the target device for License Plate Recognition (CPU, GPU, FPGA, MYRIAD, or HETERO).
    -pc                        Optional. Enable per-layer performance statistics.
    -r                         Optional. Output inference results as raw values.
    -t                         Optional. Probability threshold for vehicle and license plate detections.
    -no_show                   Optional. Do not show processed video.
    -auto_resize               Optional. Enable resizable input with support of ROI crop and auto resize.
    -nireq                     Optional. Number of infer request for pipelined mode (default value is 1)
    -nc                        Optional. Number of processed cameras (default value is 1) if the input (-i) is specified as camera.
使用空选项列表运行应用程序将显示上述用法消息和一条错误消息。
要运行此演示,您可以使用公共模型或随程序包提供的预训练和优化模型集
- <INSTALL_DIR>/deployment_tools/intel_models/vehicle-license-plate-detection-barrier-0106
- <INSTALL_DIR>/deployment_tools/intel_models/vehicle-attributes-recognition-barrier-0039
- <INSTALL_DIR>/deployment_tools/intel_models/license-plate-recognition-barrier-0001
例如,要使用Intel Distribution of OpenVINO toolkit预训练模型在GPU上进行推理,请运行以下命令
./security_barrier_camera_demo -i <path_to_video>/inputVideo.mp4 -m vehicle-license-plate-detection-barrier-0106.xml -m_va vehicle-attributes-recognition-barrier-0039.xml -m_lpr license-plate-recognition-barrier-0001.xml -d GPU
要使用两个异步推理请求在FPGA上对两个视频输入进行推理,请使用Intel Distribution of OpenVINO toolkit预训练模型,运行以下命令
./security_barrier_camera_demo -i <path_to_video>/inputVideo_0.mp4 <path_to_video>/inputVideo_1.mp4 -m vehicle-license-plate-detection-barrier-0106.xml -m_va vehicle-attributes-recognition-barrier-0039.xml -m_lpr license-plate-recognition-barrier-0001.xml -d HETERO:FPGA,CPU -d_va HETERO:FPGA,CPU -d_lpr HETERO:FPGA,CPU -nireq 2
注意:在运行带训练模型的演示之前,请确保使用模型优化器工具将模型转换为推理引擎格式(*.xml + *.bin)。
FPGA异构场景优化提示
OMP_NUM_THREADS:指定要使用的线程数。对于带有FPGA的异构场景,当多个推理请求异步使用时,限制CPU线程数OMP_NUM_THREADS可以避免线程之间的资源竞争。对于安全屏障摄像头演示,建议值是OMP_NUM_THREADS=1。KMP_BLOCKTIME:设置线程在完成并行区域执行后,在休眠之前等待的时间(以毫秒为单位)。默认值为200毫秒,这对于演示来说不是最佳的。建议值是KMP_BLOCKTIME=1。
演示输出
演示使用OpenCV显示结果帧,检测显示为边界框和文本
Faster R-CNN对象检测演示
描述
本主题演示如何运行对象检测演示应用程序,该应用程序使用Faster R-CNN等对象检测网络在Intel®处理器和Intel®高清显卡上进行推理。
工作原理
启动时,演示应用程序会读取命令行参数,并将网络和图像加载到推理引擎插件中。推理完成后,应用程序会创建一个输出图像并将数据输出到标准输出流。
下载和转换Caffe*模型
VGG16-Faster-RCNN是一个公共CNN,可以轻松从GitHub获取
- 从https://raw.githubusercontent.com/rbgirshick/py-faster-rcnn/master/models/pascal_voc/VGG16/faster_rcnn_end2end/test.prototxt下载test.prototxt
- 从https://dl.dropboxusercontent.com/s/o6ii098bu51d139/faster_rcnn_models.tgz?dl=0下载预训练模型
- 解压缩存档。您将需要VGG16_faster_rcnn_final.caffemodel文件。
要正确转换源模型,请运行模型优化器。您可以使用以下命令转换源模型
python3 ${MO_ROOT_PATH}/mo_caffe.py --input_model <path_to_model>/VGG16_faster_rcnn_final.caffemodel --input_proto <path_to_model>/deploy.prototxt
有关如何转换Caffe模型的文档,请参阅使用模型优化器转换Caffe*模型
运行
使用-h选项运行应用程序将显示以下用法消息
./object_detection_demo -h
InferenceEngine:
    API version ............ <version>
    Build .................. <number>

object_detection_demo [OPTION]
Options:

    -h                        Print a usage message.
    -i "<path>"               Required. Path to an .bmp image.
    -m "<path>"               Required. Path to an .xml file with a trained model.
      -l "<absolute_path>"    Required for MKLDNN (CPU)-targeted custom layers. Absolute path to a shared library with the kernels impl.
      -c "<absolute_path>"    Required for clDNN (GPU)-targeted custom kernels. Absolute path to the xml file with the kernels desc.
    -pp "<path>"              Path to a plugin folder.
    -d "<device>"             Specify the target device to infer on; CPU, GPU, FPGA or MYRIAD is acceptable. The demo will look for a suitable plugin for a specified device.
    -pc                       Enables per-layer performance report
    -ni "<integer>"           Number of iterations (default 1)
    -bbox_name "<string>"     The name of output box prediction layer (default: bbox_pred)
    -proposal_name "<string>" The name of output proposal layer (default: proposal)
    -prob_name "<string>"     The name of output probability layer (default: cls_prob)
    -p_msg                    Enables messages from a plugin
使用空选项列表运行应用程序将显示上述用法消息和一条错误消息。
使用以下命令在Intel®处理器上对图像使用带训练的Faster R-CNN网络执行推理
$ ./object_detection_demo -i <path_to_image>/inputImage.bmp -m <path_to_model>/faster-rcnn.xml -d CPU
注意:在运行带训练模型的演示之前,请确保使用模型优化器工具将模型转换为推理引擎格式(*.xml + *.bin)。
演示输出
应用程序输出一个名为out_0.bmp的图像,其中检测到的对象被包含在矩形中。它将检测到的对象的类别列表以及相应的置信度值和矩形坐标输出到标准输出流。
SSD对象检测演示,异步API性能展示
描述
此演示展示了SSD对象检测和新的异步API。异步API的使用可以提高应用程序的总帧率,因为应用程序不必等待推理完成,而可以在加速器忙碌时继续在主机上执行其他操作。具体来说,此演示保持两个并行推理请求,当当前请求正在处理时,下一个请求的输入帧正在捕获。这基本上隐藏了捕获的延迟,因此总帧率由MAXIMUM(检测时间, 输入捕获时间)而不是SUM(检测时间, 输入捕获时间)决定。
此技术可以推广到任何可用的并行空闲时间,例如,在对结果(先前)帧进行编码的同时进行推理,或者在面部检测结果之上运行进一步的推理,如情绪检测。
请注意性能注意事项。在并行运行任务时,避免过度使用共享计算资源。例如,在CPU大部分空闲的情况下,在FPGA上进行推理时,在CPU上执行并行任务。在Intel®集成显卡上进行推理时,在同一GPU上并行执行视频编码等任务的收益很小,因为设备已经很忙了。
有关异步API的更多性能影响和提示,请参阅优化指南
其他演示目标
- 通过OpenCV*支持视频输入
- 可视化结果边界框和文本标签(来自
.labels文件)或类号(如果未提供文件) - OpenCV*提供结果边界框、标签和其他信息。您可以复制粘贴此代码,而无需将推理引擎示例助手集成到您的应用程序中。
- 演示异步API的实际应用。为此,演示功能提供了两个模式,可通过Tab键切换。
- 老式“同步”方式 - OpenCV*的帧捕获与检测背靠背执行
- 真正的“异步”方式 - 检测在当前帧上执行,而OpenCV*捕获下一帧。
工作原理
启动时,应用程序会读取命令行参数并将网络加载到推理引擎中。从OpenCV VideoCapture获取帧后,它会执行推理并显示结果。
新的“异步API”使用“推理请求”的新概念,该概念封装了输入/输出,并分离了调度和等待结果。性能差异如下
- 在默认的“同步”模式下,帧被捕获然后立即处理。伪代码如下
while(true) {
    capture frame
    populate CURRENT InferRequest
    start CURRENT InferRequest //this call is async and returns immediately
    wait for the CURRENT InferRequest
    display CURRENT result
}
这是一个参考实现,其中新的异步API以串行/同步方式使用。
- 在真正的“异步”模式下,帧被捕获然后立即处理
while(true) {
        capture frame
        populate NEXT InferRequest
        start NEXT InferRequest //this call is async and returns immediately
            wait for the CURRENT InferRequest (processed in a dedicated thread)
            display CURRENT result
        swap CURRENT and NEXT InferRequests
    }
在这种情况下, NEXT 请求在主(应用程序)线程中填充,而 CURRENT 请求正在处理。这由推理引擎运行时内部的专用线程处理。
异步API
在此版本中,推理引擎提供了一个基于推理请求概念的新API。通过此API,请求封装了输入和输出分配。您可以通过GetBlob方法访问blob。
您可以异步地在后台执行请求,并等待直到您需要结果。在此期间,您的应用程序可以继续执行
// load plugin for the device as usual
  auto enginePtr = PluginDispatcher({"../../../lib/intel64", ""}).getSuitablePlugin(
                getDeviceFromStr("GPU"));
// load network
CNNNetReader network_reader;
network_reader.ReadNetwork("Model.xml");
network_reader.ReadWeights("Model.bin");
// populate inputs etc
auto input = async_infer_request.GetBlob(input_name);
...
// start the async infer request (puts the request to the queue and immediately returns)
async_infer_request->StartAsync();
// Continue execution on the host until you need the request results
//...
async_infer_request.Wait(IInferRequest::WaitMode::RESULT_READY);
auto output = async_infer_request.GetBlob(output_name);
注意:您无法直接测量正在异步运行的推理请求的执行时间,除非在StartAsync之后立即测量Wait。但这本质上意味着串行化和同步执行。
这就是odem在默认“同步”模式下执行的操作,并在屏幕上报告为Detection time/fps消息。在真正异步(“异步”)模式下,主机在主线程中继续执行,与推理请求并行。如果请求在调用主线程中的Wait之前完成(比OpenCV解码新帧更早),那么报告StartAsync和Wait之间的时间将明显不正确。这就是为什么在“异步”模式下不报告推理速度的原因。
有关新的基于请求的推理引擎API(包括异步执行)的更多信息,请参阅如何将推理引擎集成到您的应用程序中。
运行
使用-h选项运行应用程序会产生以下用法消息
./object_detection_demo_ssd_async -h
InferenceEngine:
    API version ............ <version>
    Build .................. <number>

object_detection_demo_ssd_async [OPTION]
Options:

    -h                        Print a usage message.
    -i "<path>"               Required. Path to a video file (specify "cam" to work with camera).
    -m "<path>"               Required. Path to an .xml file with a trained model.
      -l "<absolute_path>"    Optional. Required for MKLDNN (CPU)-targeted custom layers. Absolute path to a shared library with the kernels impl.
          Or
      -c "<absolute_path>"    Optional. Required for clDNN (GPU)-targeted custom kernels. Absolute path to the xml file with the kernels desc.
    -d "<device>"             Optional. Specify the target device to infer on (CPU, GPU, FPGA, or MYRIAD). The demo will look for a suitable plugin for a specified device.
    -pc                       Optional. Enables per-layer performance report.
    -r                        Optional. Inference results as raw values.
    -t                        Optional. Probability threshold for detections.
    -auto_resize              Optional. Enables resizable input with support of ROI crop & auto resize.
使用空选项列表运行应用程序将导致错误消息和上述用法列表。
您可以使用以下命令在GPU上使用预训练的对象检测模型进行推理
./object_detection_demo_ssd_async -i <path_to_video>/inputVideo.mp4 -m <path_to_model>/ssd.xml -d GPU
注意:在运行带训练模型的演示之前,请确保使用模型优化器工具将模型转换为推理引擎格式(*.xml + *.bin)。
唯一的GUI开关是使用“Tab”键在同步执行和真正的异步模式之间切换。
演示输出
输出使用OpenCV*显示结果帧,检测显示为边界框和标签(如果提供)。在默认模式下,演示报告
- OpenCV时间:帧解码+渲染边界框、标签和显示结果的时间。
- 检测时间:对象网络的推理时间。此项在同步模式下报告。
- 挂钟时间:应用程序级别的总性能。
SSD-VGG对象检测示例
描述
本主题演示如何运行对象检测示例应用程序,该应用程序使用SSD-VGG等对象检测网络在Intel®处理器和Intel®高清显卡上进行推理。
工作原理
启动时,示例应用程序会读取命令行参数,并将网络和图像加载到推理引擎插件中。推理完成后,应用程序会创建一个输出图像并将数据输出到标准输出流。
运行
使用-h选项运行应用程序将显示以下用法消息
./object_detection_sample_ssd -h
InferenceEngine:
    API version ............ <version>
    Build .................. <number>

object_detection_sample_ssd [OPTION]
Options:

    -h                      Print a usage message.
    -i "<path>"             Required. Path to an .bmp image.
    -m "<path>"             Required. Path to an .xml file with a trained model.
      -l "<absolute_path>"    Required for MKLDNN (CPU)-targeted custom layers. Absolute path to a shared library with the kernels impl.
          Or
      -c "<absolute_path>"    Required for clDNN (GPU)-targeted custom kernels. Absolute path to the xml file with the kernels desc.
    -pp "<path>"            Path to a plugin folder.
    -d "<device>"           Specify the target device to infer on; CPU, GPU, FPGA or MYRIAD is acceptable. Sample will look for a suitable plugin for device specified
    -pc                     Enables per-layer performance report
    -ni "<integer>"         Number of iterations (default 1)
    -p_msg                  Enables messages from a plugin
使用空选项列表运行应用程序将显示上述用法消息和一条错误消息。
要运行此示例,您可以使用随程序包提供的预训练和优化模型集,或Caffe*公共模型。
例如,要在CPU上使用Intel Distribution of OpenVINO toolkit的行人检测SSD模型进行推理,请运行以下命令
./object_detection_sample_ssd -i <path_to_image>/inputImage.bmp -m <INSTAL_DIR>/deployment_tools/intel_models/person-detection-retail-0013/FP32/person-detection-retail-0013.xml -d CPU
或
./object_detection_sample_ssd -i <path_to_image>/inputImage.jpg -m <INSTALL_DIR>/deployment_tools/intel_models/person-detection-retail-0002/FP32/person-detection-retail-0002.xml -d CPU
注意:在运行带训练模型的示例之前,请确保使用模型优化器工具将模型转换为推理引擎格式(*.xml + *.bin)。
示例输出
应用程序输出一个名为out_0.bmp的图像,其中检测到的对象被包含在矩形中。它将检测到的对象的类别列表以及相应的置信度值和矩形坐标输出到标准输出流。
TensorFlow*对象检测Mask R-CNNs分割演示
描述
本主题演示如何运行分割演示应用程序,该应用程序使用由对象检测API创建的图像分割网络进行推理。请注意,仅支持批处理大小为1。
该演示具有一个后处理部分,该部分收集与来自检测输出层的具有高概率的边界框对应的掩码数组。然后,该演示生成带有已识别掩码的图片。
工作原理
启动时,演示应用程序会读取命令行参数,并将网络和图像加载到推理引擎插件中。推理完成后,应用程序会创建一个输出图像。
运行
使用-h选项运行应用程序将显示以下用法消息
./mask_rcnn_demo -h
InferenceEngine:
    API version ............ <version>
    Build .................. <number>

mask_rcnn_demo [OPTION]
Options:

    -h                      Print a usage message.
    -i "<path>"             Required. Path to an .bmp image.
    -m "<path>"             Required. Path to an .xml file with a trained model.
      -l "<absolute_path>"    Required for MKLDNN (CPU)-targeted custom layers.Absolute path to a shared library with the kernels impl.
          Or
      -c "<absolute_path>"    Required for clDNN (GPU)-targeted custom kernels.Absolute path to the xml file with the kernels desc.
    -pp "<path>"            Path to a plugin folder.
    -d "<device>"           Specify the target device to infer on; CPU, GPU, FPGA or MYRIAD is acceptable. The demo will look for a suitable plugin for a specified device (CPU by default)
    -ni "<integer>"         Number of iterations (default 1)
    -detection_output_name "<string>" The name of detection output layer (default: detection_output)
    -masks_name "<string>" The name of masks layer (default: masks)
    -pc                     Enables per-layer performance report
使用空选项列表运行应用程序将显示上述用法消息和一条错误消息。
您可以使用以下命令在Intel®处理器上对带训练的网络执行图像推理
./mask_rcnn_demo -i <path_to_image>/inputImage.bmp -m <path_to_model>/faster_rcnn.xml
演示输出
应用程序输出是分割后的图像(out.png)。
自动语音识别示例
本主题展示了如何运行语音示例应用程序,该应用程序演示基于Kaldi*神经网络和语音特征向量的声学模型推理。
工作原理
启动时,应用程序会读取命令行参数,并将Kaldi训练的神经网络以及Kaldi ARK语音特征向量文件加载到推理引擎插件中。然后,它会对输入ARK文件中存储的所有语音发音执行推理。根据-bs参数,上下文窗口的语音帧以1-8帧的批次进行处理。此示例不支持跨发音的批处理。推理完成后,应用程序会创建一个输出ARK文件。如果提供了-r选项,则会为每个语音发音提供错误统计信息,如上所示。
GNA特定细节
量化
如果选择了GNA设备(例如,使用-d GNA_AUTO标志),则GNA推理引擎插件在执行推理之前会将模型和输入特征向量序列量化为整数表示。几个参数控制神经网络量化
-q标志确定量化模式。支持三种模式- 静态 - 在静态量化模式下,将扫描输入ARK文件中的第一个发音以确定动态范围。用于将第一个发音的最大输入值缩放到16384(15位)的比例因子(浮点标量乘数)将用于所有后续输入。神经网络将被量化以适应缩放后的输入动态范围。
- 动态 - 在动态量化模式下,每个输入批次的比例因子将在该批次推理之前计算。输入和网络会实时(on-the-fly)进行(重新)量化,使用高效的程序。
- 用户定义 - 在用户定义量化模式下,用户可以通过
-sf标志指定一个比例因子,该比例因子将用于静态量化。
-qb标志向GNA插件提供有关所有层的首选目标权重分辨率的提示。例如,当指定-qb 8时,插件将在可能的情况下在网络中使用8位权重。请注意,由于GNA硬件限制,并非总是可以使用8位权重。例如,卷积层始终使用16位权重(GNA硬件版本1和2)。此限制将在GNA硬件版本3及更高版本中删除。
执行模式
通过-d标志支持几种执行模式
- 如果设备设置为
CPU并选择了GNA插件,则GNA设备将以快速但非位精确模式进行模拟。 - 如果设备设置为
GNA_AUTO,则在可用且驱动程序已安装的情况下使用GNA硬件。否则,GNA设备将以快速但非位精确模式进行模拟。 - 如果设备设置为
GNA_HW,则在可用且驱动程序已安装的情况下使用GNA硬件。否则,将发生错误。 - 如果设备设置为
GNA_SW,则GNA设备将以快速但非位精确模式进行模拟。 - 如果设备设置为
GNA_SW_EXACT,则GNA设备将以位精确模式进行模拟。
加载和保存模型
GNA插件支持通过-rg和-wg标志加载和保存GNA优化模型(非IR)。因此,可以避免运行时完全模型量化的成本。GNA插件还支持通过-we标志(仅保存)导出适用于Intel® Speech Enabling Developer Kit和Amazon Alexa* Premium Far-Field Voice Development Kit的固件兼容的嵌入式模型映像。
除了直接从GNA模型文件执行推理外,这些选项还可以
- 从IR格式转换为GNA格式模型文件(
-m,-wg) - 从IR格式转换为嵌入式格式模型文件(
-m,-we) - 从GNA格式转换为嵌入式格式模型文件(
-rg,-we)
运行
使用-h选项运行应用程序将显示以下用法消息
$ ./speech_sample -h
InferenceEngine:
    API version ............ <version>
    Build .................. <number>

speech_sample [OPTION]
Options:

    -h                      Print a usage message.
    -i "<path>"             Required. Path to an .ark file.
    -m "<path>"             Required. Path to an .xml file with a trained model (required if -rg is missing).
    -o "<path>"             Output file name (default name is scores.ark).
    -l "<absolute_path>"    Required for MKLDNN (CPU)-targeted custom layers.Absolute path to a shared library with the kernels impl.
    -d "<device>"           Specify the target device to infer on; CPU, GPU, GNA_AUTO, GNA_HW, GNA_SW, GNA_SW_EXACT is acceptable. Sample will look for a suitable plugin for device specified
    -p                      Plugin name. For example MKLDNNPlugin. If this parameter is pointed, the sample will look for this plugin only
    -pp                     Path to a plugin folder.
    -pc                     Enables performance report
    -q "<mode>"             Input quantization mode:  static (default), dynamic, or user (use with -sf).
    -qb "<integer>"         Weight bits for quantization:  8 or 16 (default)
    -sf "<double>"          Optional user-specified input scale factor for quantization (use with -q user).
    -bs "<integer>"         Batch size 1-8 (default 1)
    -r "<path>"             Read reference score .ark file and compare scores.
    -rg "<path>"            Read GNA model from file using path/filename provided (required if -m is missing).
    -wg "<path>"            Write GNA model to file using path/filename provided.
    -we "<path>"            Write GNA embedded model to file using path/filename provided.
    -nthreads "<integer>"   Optional. Number of threads to use for concurrent async inference requests on the GNA
使用空选项列表运行应用程序将显示上述用法消息和一条错误消息。
模型准备
注意:在运行带训练模型的示例之前,请确保使用模型优化器工具将模型转换为推理引擎格式(*.xml + *.bin)。
以下预训练模型可用
- wsj_dnn5b_smbr
- rm_lstm4f
- rm_cnn4a_smbr
您可以从https://download.01.org/openvinotoolkit/2018_R3/models_contrib/GNA/下载它们。
您可以使用以下模型优化器命令将Kaldi nnet1或nnet2神经网络转换为Intel IR格式
python3 mo.py --framework kaldi --input_model wsj_dnn5b_smbr.nnet --counts wsj_dnn5b_smbr.counts --remove_output_softmax
假设模型优化器(mo.py)、Kaldi训练的神经网络(wsj_dnn5b_smbr.nnet)和Kaldi类计数文件(wsj_dnn5b_smbr.counts)在工作目录中,此命令将生成由wsj_dnn5b_smbr.xml和wsj_dnn5b_smbr.bin组成的IR网络。
语音推理
创建IR后,您可以使用以下命令在带有GNA协处理器(或仿真库)的Intel®处理器上执行推理
./speech_sample -d GNA_AUTO -bs 2 -i wsj_dnn5b_smbr_dev93_10.ark -m wsj_dnn5b_smbr_fp32.xml -o scores.ark -r wsj_dnn5b_smbr_dev93_scores_10.ark
在此,假设输入特征文件(wsj_dnn5b_smbr_dev93_10.ark)对应的浮点Kaldi生成的参考神经网络分数(wsj_dnn5b_smbr_dev93_scores_10.ark)可用于比较。
在Kaldi*语音识别管道中使用示例
此示例中使用的Wall Street Journal DNN模型是使用Kaldi s5配方和Kaldi Nnet(nnet1)框架准备的。通过将speech_sample替换为Kaldi nnet-forward命令,可以识别语音。由于speech_sample尚未使用管道,因此在运行Kaldi语音识别管道时,需要使用临时文件来存储说话人转换的特征向量和分数。以下操作假定已根据s5配方执行了特征提取,并且Kaldi源树中的工作目录为egs/wsj/s5。
- 根据
final.feature_transform中指定的特征转换和feats.scp中指定的特征文件,准备说话人转换的特征集nnet-forward --use-gpu=no final.feature_transform "ark,s,cs:copy-feats scp:feats.scp ark:- |" ark:feat.ark
- 使用
speech_sample对特征集进行评分./speech_sample -d GNA_AUTO -bs 8 -i feat.ark -m wsj_dnn5b_smbr_fp32.xml -o scores.ark
- 运行Kaldi解码器以生成n-best文本假设,并根据WFST(HCLG.fst)、词汇表(words.txt)和TID/PID映射(final.mdl)选择最可能的文本
latgen-faster-mapped --max-active=7000 --max-mem=50000000 --beam=13.0 --lattice-beam=6.0 --acoustic-scale=0.0833 --allow-partial=true --word-symbol-table=words.txt final.mdl HCLG.fst ark:scores.ark ark:-| lattice-scale --inv-acoustic-scale=13 ark:- ark:- | lattice-best-path --word-symbol-table=words.txt ark:- ark,t:- > out.txt &
- 运行词错误率工具以根据词汇表(words.txt)和参考转录(test_filt.txt)检查准确性
cat out.txt | utils/int2sym.pl -f 2- words.txt | sed s:\<UNK\>::g | compute-wer --text --mode=present ark:test_filt.txt ark,p:-
示例输出
所有发音的声学对数似然序列存储在Kaldi ARK文件中scores.ark。如果使用了-r选项,则为每个发音生成一个统计分数错误报告,如下所示
Utterance 0: 4k0c0301
   Average inference time per frame: 6.26867 ms
         max error: 0.0667191
         avg error: 0.00473641
     avg rms error: 0.00602212
       stdev error: 0.00393488
神经风格迁移示例
描述
本主题演示如何构建和运行神经风格迁移示例(NST示例)应用程序,该应用程序使用风格迁移拓扑模型进行推理。
运行
使用-h选项运行应用程序将显示以下用法消息
./style_transfer_sample --help
InferenceEngine:
    API version ............ <version>
    Build .................. <number>

style_transfer_sample [OPTION]
Options:

    -h                      Print a usage message.
    -i "<path>"             Required. Path to an .bmp image.
    -m "<path>"             Required. Path to an .xml file with a trained model.
    -pp "<path>"            Path to a plugin folder.
    -d "<device>"           Specify the target device to infer on; CPU, GPU, FPGA or MYRIAD is acceptable. Sample will look for a suitable plugin for device specified
    -ni "<integer>"         Number of iterations (default 1)
    -pc                     Enables per-layer performance report
    -mean_val_r,
    -mean_val_g,
    -mean_val_b             Mean values. Required if the model needs mean values for preprocessing and postprocessing
使用空选项列表运行应用程序将显示上述用法消息和一条错误消息。
您可以使用以下命令在Intel®处理器上对带训练的NST网络模型执行图像推理
./style_transfer_sample -i <path_to_image>/cat.bmp -m <path_to_model>/1_decoder_FP32.xml
注意:在运行带训练模型的示例之前,请确保使用模型优化器工具将模型转换为推理引擎格式(*.xml + *.bin)。
示例输出
应用程序输出一个或多个风格化的图像,开头名称为out(1).bmp,这些图像以用于推理的模型风格重新绘制。输出图像的风格取决于用于该示例的模型。
Hello Infer Request Classification Sample
描述
本主题描述如何运行Hello Infer Classification示例应用程序。该示例是图像分类示例的简化版本。它演示了如何在应用程序中使用推理引擎的新的推理请求API。有关详细信息,请参阅如何将推理引擎集成到您的应用程序中。
运行
在Intel®处理器上使用带训练的AlexNet*网络对图像执行推理
./hello_request_classification <path_to_model>/alexnet_fp32.xml <path_to_image>/cat.bmp CPU
示例输出
应用程序输出前10个推理结果。
交互式人脸检测演示
此演示展示了使用一系列神经网络进行人脸识别的对象检测任务。异步API可以提高应用程序的总帧率,因为应用程序不必等待推理完成,而可以在加速器忙碌时继续在主机上运行。此演示执行四个并行推理请求,用于年龄/性别识别、头部姿态估计、情绪识别和面部特征点检测网络,这些网络同时运行。相应的预训练模型随产品一起提供
face-detection-adas-0001,这是一个用于查找人脸的主要检测网络age-gender-recognition-retail-0013,它在第一个模型的输出之上执行,并报告每个检测到人脸的估计年龄和性别head-pose-estimation-adas-0001,它在第一个模型的输出之上执行,并以Tait-Bryan角度报告估计的头部姿态emotions-recognition-retail-0003,它在第一个模型的输出之上执行,并报告每个检测到人脸的情绪facial-landmarks-35-adas-0001,它在第一个模型的输出之上执行,并报告估计的面部特征点的归一化坐标
其他演示目标是
- 通过OpenCV*支持视频输入
- 可视化来自人脸检测网络的脸部边界框
- 可视化每个检测到人脸的年龄/性别、头部姿态、情绪信息和面部特征点位置
OpenCV用于绘制结果边界框、标签和其他信息。您可以复制粘贴此代码,而无需将推理引擎演示助手集成到您的应用程序中。
工作原理
- 应用程序读取命令行参数,并根据
-m...选项系列加载多达五个网络到推理引擎中。 - 应用程序从OpenCV VideoCapture获取帧。
- 应用程序执行人脸检测网络的推理。
- 如果指定了命令行选项,应用程序将执行年龄/性别识别、头部姿态估计、情绪识别和面部特征点估计网络的四个同步推理。
- 应用程序显示结果。
新的异步API使用推理请求的新概念,该概念封装输入/输出并分离调度和等待结果。有关异步API以及同步和异步模式性能之间差异的更多信息,请参阅SSD对象检测演示,异步API性能展示。
运行
使用-h选项运行应用程序将显示以下用法消息
./interactive_face_detection_demo -h
InferenceEngine:
    API version ............ <version>
    Build .................. <number>

interactive_face_detection_demo [OPTION]
Options:

  -h                         Print a usage message
  -i "<path>"                Required. Path to a video file. Default value is "cam" to work with camera.
  -m "<path>"                Required. Path to an .xml file with a trained Face Detection model.
  -m_ag "<path>"             Optional. Path to an .xml file with a trained Age/Gender Recognition model.
  -m_hp "<path>"             Optional. Path to an .xml file with a trained Head Pose Estimation model.
  -m_em "<path>"             Optional. Path to an .xml file with a trained Emotions Recognition model.
  -m_lm "<path>"             Optional. Path to an .xml file with a trained Facial Landmarks Estimation model.
    -l "<absolute_path>"     Required for CPU custom layers. Absolute path to a shared library with the kernels implementation.
        Or
    -c "<absolute_path>"     Required for GPU custom kernels. Absolute path to an .xml file with the kernels description.
  -d "<device>"              Target device for Face Detection network (CPU, GPU, FPGA, or MYRIAD). The demo will look for a suitable plugin for a specified device.
  -d_ag "<device>"           Target device for Age/Gender Recognition network (CPU, GPU, FPGA, or MYRIAD). The demo will look for a suitable plugin for a specified device.
  -d_hp "<device>"           Target device for Head Pose Estimation network (CPU, GPU, FPGA, or MYRIAD). The demo will look for a suitable plugin for a specified device.
  -d_em "<device>"           Target device for Emotions Recognition network (CPU, GPU, FPGA, or MYRIAD). The demo will look for a suitable plugin for a specified device.
  -d_lm "<device>"           Target device for Facial Landmarks Estimation network (CPU, GPU, FPGA, or MYRIAD). Demo will look for a suitable plugin for device specified.
  -n_ag "<num>"              Number of maximum simultaneously processed faces for Age/Gender Recognition network (default is 16)
  -n_hp "<num>"              Number of maximum simultaneously processed faces for Head Pose Estimation network (default is 16)
  -n_em "<num>"              Number of maximum simultaneously processed faces for Emotions Recognition network (default is 16)
  -n_lm "<num>"              Number of maximum simultaneously processed faces for Facial Landmarks Estimation network (default is 16)
  -dyn_ag                    Enable dynamic batch size for Age/Gender Recognition network
  -dyn_hp                    Enable dynamic batch size for Head Pose Estimation network
  -dyn_em                    Enable dynamic batch size for Emotions Recognition network
  -dyn_lm                    Enable dynamic batch size for Facial Landmarks Estimation network
  -async                     Enable asynchronous mode
  -no_wait                   Do not wait for key press in the end
  -no_show                   Do not show processed video
  -pc                        Enable per-layer performance report
  -r                         Output inference results as raw values
  -t                         Probability threshold for detections
使用空选项列表运行应用程序将显示上述用法消息和一条错误消息。
要运行此演示,您可以使用公共模型或随程序包提供的预训练和优化模型集
- <INSTALL_DIR>/deployment_tools/intel_models/face-detection-adas-0001
- <INSTALL_DIR>/deployment_tools/intel_models/age-gender-recognition-retail-0013
- <INSTALL_DIR>/deployment_tools/intel_models/head-pose-estimation-adas-0001
- <INSTALL_DIR>/deployment_tools/intel_models/emotions-recognition-retail-0003
- <INSTALL_DIR>/deployment_tools/intel_models/facial-landmarks-35-adas-0001
注意:在运行带训练模型的演示之前,请确保使用模型优化器工具将模型转换为推理引擎格式(*.xml + *.bin)。
例如,要使用Intel Distribution of OpenVINO toolkit预训练模型在GPU上进行推理,请运行以下命令
./interactive_face_detection_demo -i <path_to_video>/inputVideo.mp4 -m <path_to_model>/face-detection-adas-0001.xml -m_ag <path_to_model>/age-gender-recognition-retail-0013.xml -m_hp <path_to_model>/head-pose-estimation-adas-0001.xml -m_em <path_to_model>/emotions-recognition-retail-0003.xml -m_lm <path_to_model>/facial-landmarks-35-adas-0001.xml -d GPU
演示输出
演示使用OpenCV显示结果帧,检测显示为边界框(如果提供标签)。在默认模式下,演示报告
- OpenCV时间:帧解码+渲染边界框、标签和显示结果的时间
- 人脸检测时间:人脸检测网络的推理时间。
如果启用了年龄/性别识别、头部姿态估计、情绪识别或面部特征点估计,则会报告额外信息
- 人脸分析网络时间:同步执行的年龄/性别识别、头部姿态估计、情绪识别或面部特征点估计网络的组合推理时间。
图像分割演示
描述
本主题演示如何运行图像分割演示应用程序,该应用程序使用FCN8等图像分割网络进行推理。
工作原理
启动时,演示应用程序会读取命令行参数,并将网络和图像加载到推理引擎插件中。推理完成后,应用程序会创建一个输出图像。
运行
使用-h选项运行应用程序将显示以下用法消息
./segmentation_demo -h
InferenceEngine:
    API version ............ <version>
    Build .................. <number>

segmentation_demo [OPTION]
Options:

    -h                        Print a usage message.
    -i "<path>"               Required. Path to an .bmp image.
    -m "<path>"               Required. Path to an .xml file with a trained model.
      -l "<absolute_path>"    Required for MKLDNN (CPU)-targeted custom layers. Absolute path to a shared library with the kernels impl.
          Or
      -c "<absolute_path>"    Required for clDNN (GPU)-targeted custom kernels. Absolute path to the xml file with the kernels desc.
    -pp "<path>"              Path to a plugin folder.
    -d "<device>"             Specify the target device to infer on: CPU, GPU, FPGA or MYRIAD is acceptable. The demo will look for a suitable plugin for a specified device (CPU by default).
    -ni "<integer>"           Number of iterations (default 1)
    -pc                       Enables per-layer performance report
使用空选项列表运行应用程序将显示上述用法消息和一条错误消息。
您可以使用以下命令在Intel®处理器上对带训练的FCN8网络执行图像推理
./segmentation_demo -i <path_to_image>/inputImage.bmp -m <path_to_model>/fcn8.xml
注意:在运行带训练模型的演示之前,请确保使用模型优化器工具将模型转换为推理引擎格式(*.xml + *.bin)。
演示输出
应用程序输出是分割后的图像,名为out.bmp。
十字路口摄像头演示
此演示提供了一个用于行人检测、识别和重识别的推理管道。该演示使用行人检测网络,然后在检测结果的基础上应用行人属性识别和行人重识别零售网络。相应的预训练模型随产品一起提供
person-vehicle-bike-detection-crossroad-0078,这是一个用于查找行人(以及其他所需对象)的主要检测网络person-attributes-recognition-crossroad-0200,它在第一个网络的输出之上执行,并报告行人的属性,如性别、是否戴帽子、是否穿长袖衣服person-reidentification-retail-0079,它在第一个网络的输出之上执行,并为每个检测到的行人打印一个特征向量。此向量用于判断该行人是否已检测过。 (即,是否是已经检测到的行人)。
有关模型详细信息,请参阅Intel Distribution of OpenVINO toolkit安装目录中deployment_tools/intel_models文件夹中的描述。
其他演示目标是
- 通过OpenCV*将图像/视频/摄像头作为输入
- 简单的网络流水线示例:行人属性识别和行人重识别网络在行人检测结果之上执行
- 可视化每个检测到的行人的行人属性和行人重识别(REID)信息
工作原理
启动时,应用程序会读取命令行参数并加载指定的网络。必需行人检测网络,其他两个为可选。
从OpenCV VideoCapture获取帧后,应用程序执行行人检测网络的推理,然后执行行人属性识别和行人重识别零售网络(如果它们已在命令行中指定)的另外两次推理,并显示结果。
对于行人重识别零售网络,将为每个检测到的行人生成一个结果向量。此向量将逐一与所有先前检测到的行人的向量进行比较,使用余弦相似度算法。如果比较结果大于指定的(或默认的)阈值,则认为该行人已被检测到,并分配一个已知的REID值。否则,该向量将添加到全局列表中,并分配一个新的REID值。
运行
使用-h选项运行应用程序将显示以下用法消息
./crossroad_camera_demo -h
InferenceEngine:
    API version ............ <version>
    Build .................. <number>

crossroad_camera_demo [OPTION]
Options:

    -h                           Print a usage message.
    -i "<path>"                  Required. Path to a video or image file. Default value is "cam" to work with camera.
    -m "<path>"                  Required. Path to the Person/Vehicle/Bike Detection Crossroad model (.xml) file.
    -m_pa "<path>"               Optional. Path to the Person Attributes Recognition Crossroad model (.xml) file.
    -m_reid "<path>"             Optional. Path to the Person Reidentification Retail model (.xml) file.
      -l "<absolute_path>"       Optional. For MKLDNN (CPU)-targeted custom layers, if any. Absolute path to a shared library with the kernels impl.
          Or
      -c "<absolute_path>"       Optional. For clDNN (GPU)-targeted custom kernels, if any. Absolute path to the xml file with the kernels desc.
    -d "<device>"                Optional. Specify the target device for Person/Vehicle/Bike Detection (CPU, GPU, FPGA, MYRIAD, or HETERO).
    -d_pa "<device>"             Optional. Specify the target device for Person Attributes Recognition (CPU, GPU, FPGA, MYRIAD, or HETERO).
    -d_reid "<device>"           Optional. Specify the target device for Person Reidentification Retail (CPU, GPU, FPGA, MYRIAD, or HETERO).
    -pc                          Optional. Enables per-layer performance statistics.
    -r                           Optional. Output Inference results as raw values.
    -t                           Optional. Probability threshold for person/vehicle/bike crossroad detections.
    -t_reid                      Optional. Cosine similarity threshold between two vectors for person reidentification.
    -no_show                     Optional. No show processed video.
    -auto_resize                 Optional. Enables resizable input with support of ROI crop & auto resize.
使用空选项列表运行应用程序将显示上述用法消息和一条错误消息。
要运行此演示,您可以使用公共模型或随程序包提供的预训练和优化模型集
- <INSTALL_DIR>/deployment_tools/intel_models/person-vehicle-bike-detection-crossroad-0078
- <INSTALL_DIR>/deployment_tools/intel_models/person-attributes-recognition-crossroad-0200
- <INSTALL_DIR>/deployment_tools/intel_models/person-reidentification-retail-0079
例如,要使用Intel Distribution of OpenVINO toolkit预训练模型在GPU上进行推理,请运行以下命令
./crossroad_camera_demo -i <path_to_video>/inputVideo.mp4 -m person-vehicle-bike-detection-crossroad-0078.xml -m_pa person-attributes-recognition-crossroad-0200.xml -m_reid person-reidentification-retail-0079.xml -d GPU
注意:在运行带训练模型的演示之前,请确保使用模型优化器工具将模型转换为推理引擎格式(*.xml + *.bin)。
演示输出
演示使用OpenCV显示结果帧,检测显示为边界框和文本。在默认模式下,演示报告行人检测时间 - 行人/车辆/自行车检测网络的推理时间。
如果启用了行人属性识别或行人重识别零售,还将报告以下额外信息
- 行人属性识别时间 - 行人属性识别的推理时间,按检测到的行人数量平均。
- 行人重识别时间 - 行人重识别的推理时间,按检测到的行人数量平均。
多通道人脸检测演示
此演示提供了一个用于多通道人脸检测的推理管道。该演示使用人脸检测网络。随产品提供的相应预训练模型是face-detection-retail-0004,这是一个用于查找人脸的主要检测网络。
有关模型详细信息,请参阅Intel Distribution of OpenVINO toolkit安装目录中的deployment_tools/intel_models文件夹中的描述。
其他演示目标是
- 多达16个摄像头作为输入,通过OpenCV*
- 在屏幕上可视化所有通道检测到的人脸
工作原理
注意:运行此演示需要连接到您的计算机的至少一个网络摄像头。
启动时,应用程序会读取命令行参数并加载指定的网络。必需人脸检测网络。
运行
使用-h选项运行应用程序将显示以下用法消息
./multi-channel-demo -h

multichannel_face_detection [OPTION]
Options:

    -h                           Print a usage message.
    -m "<path>"                  Required. Path to an .xml file with a trained face detection model.
      -l "<absolute_path>"       Required for MKLDNN (CPU)-targeted custom layers. Absolute path to a shared library with the kernels impl.
          Or
      -c "<absolute_path>"       Required for clDNN (GPU)-targeted custom kernels. Absolute path to the xml file with the kernels desc.
    -d "<device>"                Specify the target device for Face Detection (CPU, GPU, FPGA, or MYRIAD). The demo will look for a suitable plugin for a specified device.
    -nc                          Maximum number of processed camera inputs (web cams)
    -bs                          Processing batch size, number of frames processed per infer request
    -n_ir                        Number of infer requests
    -n_iqs                       Frame queue size for input channels
    -fps_sp                      FPS measurement sampling period. Duration between timepoints, msec
    -n_sp                        Number of sampling periods
    -pc                          Enables per-layer performance report.
    -t                           Probability threshold for detections.
    -no_show                     No show processed video.
    -show_stats                  Enable statictics output
    -duplicate_num               Enable and specify number of channel additionally copied from real sources
    -real_input_fps              Disable input frames caching, for maximum throughput pipeline
    -i                           Specify full path to input video files
例如,要使用FPGA上带训练的人脸检测模型并在CPU上回退来运行演示,并使用一个摄像头,请使用以下命令
./multi-channel-demo -m <INSTALL_DIR>/deployment_tools/intel_models/face-detection-retail-0004/FP32/face-detection-retail-0004.xml
-l <demos_build_folder>/intel64/Release/lib/libcpu_extension.so -d HETERO:FPGA,CPU -nc 1
要使用单个摄像头但多个通道运行,请指定附加参数:-duplicate_num 3。您将看到四个通道:一个真实的,三个复制的。
./multi-channel-sample -m <INSTALL_DIR>/deployment_tools/intel_models/face-detection-retail-0004/FP32/face-detection-retail-0004.xml
-l <samples_build_folder>/intel64/Release/lib/libcpu_extension.so -d HETERO:FPGA,CPU -i /path/to/file1 /path/to/file2
视频文件将被重复处理。
您还可以同时在网络摄像头和视频文件上运行演示,方法是同时指定这两个参数:-nc <number_of_cams> -i <video files_sequentially_separated_by_space>。要使用单个输入源(网络摄像头或视频文件)但多个通道运行演示,请指定附加参数:-duplicate_num 3。您将看到四个通道:一个真实的,三个复制的。对于多个输入源,-duplicate_num参数将复制每个输入源。
注意:在运行带训练模型的演示之前,请确保使用模型优化器工具将模型转换为推理引擎格式(*.xml + *.bin)。
演示输出
演示使用OpenCV显示结果帧,检测显示为边界框。在屏幕顶部,演示报告吞吐量(每秒帧数)。如果需要,它还会报告更详细的统计信息(使用-show_stats选项运行演示以启用它)。
Hello Autoresize Classification Sample
本主题描述如何运行Hello Autoresize Classification示例应用程序。该示例是图像分类示例的简化版本。它演示了如何在应用程序中使用推理引擎的新输入自动调整大小API。有关详细信息,请参阅如何将推理引擎集成到您的应用程序中。
还有一个新的API被引入,用于裁剪ROI对象并将其设置为输入,而无需额外的内存重新分配。为了正确演示此新API,需要流水线运行多个网络,但这超出了本示例的范围。请参阅SSD对象检测演示,异步API性能展示、安全屏障摄像头演示或十字路口摄像头演示,其中包含新的裁剪ROI API示例。
运行
您可以使用以下命令在Intel®处理器上对带训练的AlexNet网络执行图像推理
./hello_autoresize_classification <path_to_model>/alexnet_fp32.xml <path_to_image>/cat.bmp CPU
注意:在运行带训练模型的示例之前,请确保使用模型优化器工具将模型转换为推理引擎格式(*.xml + *.bin)。
示例输出
应用程序输出前10个推理结果。
Hello Shape Infer Sample
本主题演示如何运行Hello Shape Infer SSD应用程序,该应用程序使用SSD-VGG等对象检测网络进行推理。该示例展示了如何使用形状推理功能。
运行
您可以使用以下命令在Intel®处理器上对带训练的SSD网络执行图像推理
./hello_shape_infer_ssd <path_to_model>/ssd_300.xml <path_to_image>/500x500.bmp CPU 3
注意:在运行带训练模型的示例之前,请确保使用模型优化器工具将模型转换为推理引擎格式(*.xml + *.bin)。
示例输出
应用程序渲染一个图像,其中检测到的对象被包含在矩形中。它将检测到的对象的类别列表以及相应的置信度值和矩形坐标输出到标准输出流。
人体姿态估计演示
此演示展示了多人2D姿态估计算法的工作。任务是为输入视频中的每个人员预测姿态:身体骨骼,由关键点和它们之间的连接组成。姿态可能包含多达18个关键点:耳朵、眼睛、鼻子、颈部、肩膀、肘部、手腕、臀部、膝盖和脚踝。该算法的一些潜在用例是动作识别和行为理解。随产品提供以下预训练模型
human-pose-estimation-0001,这是一个人体姿态估计网络,它生成两个特征向量。该算法使用这些特征向量来预测人体姿态。
输入帧高度被缩放到模型高度,帧宽度被按比例缩放到保留原始宽高比,并填充到8的倍数。
其他演示目标是
- 通过OpenCV*将视频/摄像头作为输入
- 可视化所有估计的姿态
工作原理
启动时,应用程序会读取命令行参数并加载人体姿态估计模型。从OpenCV VideoCapture获取帧后,应用程序执行人体姿态估计算法并显示结果。
运行
使用-h选项运行应用程序将显示以下用法消息
./human_pose_estimation_demo -h
InferenceEngine:
    API version ............ <version>
    Build .................. <number>

human_pose_estimation_demo [OPTION]
Options:

    -h                         Print a usage message.
    -i "<path>"                Required. Path to a video. Default value is "cam" to work with camera.
    -m "<path>"                Required. Path to the Human Pose Estimation model (.xml) file.
    -d "<device>"              Optional. Specify the target device for Human Pose Estimation (CPU, GPU, FPGA or MYRIAD is acceptable). Default value is "CPU".
    -pc                        Optional. Enable per-layer performance report.
    -no_show                   Optional. Do not show processed video.
    -r                         Optional. Output inference results as raw values.
使用空选项列表运行应用程序将显示一条错误消息。
要运行此演示,您可以使用随产品提供的预训练和优化模型human-pose-estimation-0001。模型位于<INSTALL_DIR>/deployment_tools/intel_models/。
例如,要在CPU上执行推理,请运行以下命令
./human_pose_estimation_demo -i <path_to_video>/input_video.mp4 -m <path_to_model>/human-pose-estimation-0001.xml -d CPU
注意:在运行带训练模型的演示之前,请确保使用模型优化器工具将模型转换为推理引擎格式(*.xml + *.bin)。
演示输出
演示使用OpenCV显示结果帧,其中包含估计的姿态和FPS文本报告 - 人体姿态估计演示的每秒帧数性能。
YOLO* V3对象检测演示,异步API性能展示
此演示展示了YOLO* V3对象检测和异步API。
要了解更多关于异步API功能的信息,请参阅SSD对象检测演示,异步API性能展示。
其他演示目标是
- 通过OpenCV*支持视频输入
- 可视化结果边界框和文本标签(来自
.labels文件)或类号(如果未提供文件) - OpenCV提供结果边界框、标签和其他信息。您可以复制粘贴此代码,而无需将推理引擎示例助手集成到您的应用程序中
- 演示异步API的实际应用。为此,演示功能提供了两个模式,可通过Tab键切换
- 老式“同步”方式,其中OpenCV捕获的帧与检测背靠背执行
- 真正的“异步”方式,其中检测在当前帧上执行,而OpenCV捕获下一帧
工作原理
启动时,应用程序会读取命令行参数并将网络加载到推理引擎中。从OpenCV VideoCapture获取帧后,它会执行推理并显示结果。
运行
使用-h选项运行应用程序将显示以下用法消息
./object_detection_demo_yolov3_async -h
InferenceEngine:
    API version ............ <version>
    Build .................. <number>

object_detection_demo_yolov3_async [OPTION]
Options:

    -h                        Print a usage message.
    -i "<path>"               Required. Path to a video file (specify "cam" to work with camera).
    -m "<path>"               Required. Path to an .xml file with a trained model.
      -l "<absolute_path>"    Optional. Required for CPU custom layers.Absolute path to a shared library with the layers implementation.
          Or
      -c "<absolute_path>"    Optional. Required for GPU custom kernels.Absolute path to the .xml file with the kernels description.
    -d "<device>"             Optional. Specify a target device to infer on (CPU, GPU). The demo will look for a suitable plugin for the specified device
    -pc                       Optional. Enable per-layer performance report.
    -r                        Optional. Output inference results raw values showing.
    -t                        Optional. Probability threshold for detections.
    -iou_t                    Optional. Filtering intersection over union threshold for overlapping boxes.
    -auto_resize              Optional. Enable resizable input with support of ROI crop and auto resize.
使用空选项列表运行应用程序将显示上述用法消息和一条错误消息。您可以使用以下命令在GPU上使用预训练的对象检测模型进行推理
./object_detection_demo_yolov3_async -i <path_to_video>/inputVideo.mp4 -m <path_to_model>/yolo_v3.xml -d GPU
注意:在运行带训练模型的演示之前,请确保使用模型优化器工具将模型转换为推理引擎格式(*.xml + *.bin)。
唯一的GUI开关是使用Tab键在同步执行和真正的异步模式之间切换。
演示输出
演示使用OpenCV显示结果帧,其中检测(显示为边界框和标签,如果提供)。在默认模式下,演示报告
- OpenCV时间:帧解码+渲染边界框、标签和显示结果的时间
- 检测时间:对象检测网络的推理时间。仅在“同步”模式下报告。
- 挂钟时间:应用程序级别的总性能
行人追踪器演示
此演示展示了行人追踪场景:它逐帧从输入视频序列读取帧,检测帧中的行人,并构建行人的运动轨迹。相应的预训练模型随产品一起提供
person-detection-retail-0013,这是用于查找行人的主要检测网络person-reidentification-retail-0031,它在第一个网络推理结果的基础上执行,并进行行人的重识别
有关拓扑结构的更多详细信息,请参阅Intel Distributions of OpenVINO toolkit安装目录中的deployment_tools/intel_models文件夹中的描述。
工作原理
启动时,应用程序会读取命令行参数并加载指定的网络。
从输入视频序列(视频文件或图像文件夹)获取帧后,应用程序将执行行人检测网络的推理。
之后,描述检测到的行人的边界框被传递给跟踪器类的实例,该实例将行人的外观与已知(即已跟踪)的行人进行匹配。在明显的情况下(当检测到的行人的像素到像素相似度足够接近一个已知轨迹的最新行人图像时),匹配会在不推理重识别网络的情况下完成。在更复杂的情况下,演示使用重识别网络来决定检测到的行人是已知行人的下一个位置还是新跟踪行人的第一个位置。
之后,应用程序在屏幕上显示轨迹和最新的检测结果,然后进入下一帧。
运行
使用-h选项运行应用程序将显示以下用法消息
./pedestrian_tracker_demo -h
InferenceEngine:
    API version ............ <version>
    Build .................. <number>

pedestrian_tracker_demo [OPTION]
Options:

    -h                             Print a usage message.
    -i "<path>"                  Required. Path to a video file or a folder with images (all images should have names 0000000001.jpg, 0000000002.jpg, etc).
    -m_det "<path>"              Required. Path to the Pedestrian Detection Retail model (.xml) file.
    -m_reid "<path>"             Required. Path to the Pedestrian Reidentification Retail model (.xml) file.
    -l "<absolute_path>"         Optional. For CPU custom layers, if any. Absolute path to a shared library with the kernels implementation.
          Or
    -c "<absolute_path>"         Optional. For GPU custom kernels, if any. Absolute path to the .xml file with the kernels description.
    -d_det "<device>"            Optional. Specify the target device for pedestrian detection (CPU, GPU, FPGA, MYRIAD, or HETERO).
    -d_reid "<device>"           Optional. Specify the target device for pedestrian reidentification (CPU, GPU, FPGA, MYRIAD, or HETERO).
    -r                             Optional. Output pedestrian tracking results in a raw format (compatible with MOTChallenge format).
    -pc                            Optional. Enable per-layer performance statistics.
    -no_show                       Optional. Do not show processed video.
    -delay                         Optional. Delay between frames used for visualization. If negative, the visualization is turned off (like with the option 'no_show'). If zero, the visualization is made frame-by-frame.
    -out "<path>"                Optional. The file name to write output log file with results of pedestrian tracking. The format of the log file is compatible with MOTChallenge format.
    -first                         Optional. The index of the first frame of video sequence to process. This has effect only if it is positive and the source video sequence is an image folder.
    -last                          Optional. The index of the last frame of video sequence to process. This has effect only if it is positive and the source video sequence is an image folder.
[ INFO ] Execution successful
要运行此演示,您可以使用公共模型或随程序包提供的以下预训练和优化模型
- <INSTALL_DIR>/deployment_tools/intel_models/person-detection-retail-0013
- <INSTALL_DIR>/deployment_tools/intel_models/person-reidentification-retail-0031
例如,要使用Intel Distribution of OpenVINO toolkit预训练模型运行应用程序,并在GPU上进行行人检测器推理,在CPU上进行行人重识别,请运行以下命令
./pedestrian_tracker_demo -i <path_video_file> \
                          -m_det <path_person-detection-retail-0013>/person-detection-retail-0013.xml \
                          -m_reid <path_person-reidentification-retail-0031>/person-reidentification-retail-0031.xml \
                          -d_det GPU
注意:在运行带训练模型的演示之前,请确保使用模型优化器工具将模型转换为推理引擎格式(*.xml + *.bin)。
演示输出
演示使用OpenCV显示结果帧,检测显示为边界框、曲线(用于显示轨迹)和文本。
智能教室演示
此演示展示了多个神经网络的联合使用示例,用于检测教室环境中的三个基本动作(坐、站、举手)并识别人脸。该演示使用异步API进行动作和人脸检测网络。它允许并行执行人脸识别和检测:当人脸识别在一个加速器上运行时,人脸和动作检测可以在其他加速器上执行。相应的预训练模型随产品一起提供
face-detection-adas-0001,这是一个用于查找人脸的主要检测网络。landmarks-regression-retail-0009,它在第一个网络的输出之上执行,并为每个检测到的人脸输出一个面部特征向量。face-reidentification-retail-0095,它在第一个网络的输出之上执行,并为每个检测到的人脸输出一个特征向量。person-detection-action-recognition-0003,这是一个用于查找人员并同时预测其当前动作的检测网络。
工作原理
启动时,应用程序会读取命令行参数,并根据-m...选项系列将多达四个网络加载到推理引擎中,以在不同设备上执行。从OpenCV VideoCapture获取帧后,它执行人脸检测和动作检测网络的推理。之后,由人脸检测器获得的ROI被输入到面部特征点回归网络。然后,使用面部特征点通过仿射变换对齐人脸,并将其输入到人脸识别网络。
创建人脸识别画廊
为了识别帧中的人脸,演示需要一个参考图像画廊。每张图像应包含人脸的紧密裁剪。您可以从任意图像列表创建画廊
- 将包含正面朝向人脸紧密裁剪的图像放在一个单独的空文件夹中。每个身份可以有多张图像。图像命名为
id_name.0.png, id_name.1.png, ...。 - 运行
create_list.py <path_to_folder_with_images>命令以获取.json格式的文件和身份列表。
运行
使用-h选项运行应用程序将显示以下用法消息
./smart_classroom_demo -h
InferenceEngine:
    API version ............ <version>
    Build .................. <number>

smart_classroom_demo [OPTION]
Options:

    -h                             Print a usage message.
    -i '<path>'                    Required. Path to a video or image file. Default value is "cam" to work with camera.
    -m_act '<path>'                Required. Path to the Person/Action Detection Retail model (.xml) file.
    -m_fd '<path>'                 Required. Path to the Face Detection Retail model (.xml) file.
    -m_lm '<path>'                 Required. Path to the Facial Landmarks Regression Retail model (.xml) file.
    -m_reid '<path>'               Required. Path to the Face Reidentification Retail model (.xml) file.
    -l '<absolute_path>'           Optional. For CPU custom layers, if any. Absolute path to a shared library with the kernels implementation.
          Or
    -c '<absolute_path>'           Optional. For GPU custom kernels, if any. Absolute path to an .xml file with the kernels description.
    -d_act '<device>'              Optional. Specify the target device for Person/Action Detection Retail (CPU, GPU, FPGA, MYRIAD, or HETERO).
    -d_fd '<device>'               Optional. Specify the target device for Face Detection Retail (CPU, GPU, FPGA, MYRIAD, or HETERO).
    -d_lm '<device>'               Optional. Specify the target device for Landmarks Regression Retail (CPU, GPU, FPGA, MYRIAD, or HETERO).
    -d_reid '<device>'             Optional. Specify the target device for Face Reidentification Retail (CPU, GPU, FPGA, MYRIAD, or HETERO).
    -out_v  '<path>'               Optional. File to write output video with visualization to.
    -pc                            Optional. Enables per-layer performance statistics.
    -r                             Optional. Output Inference results as raw values.
    -ad                            Optional. Output file name to save per-person action statistics in.
    -t_act                         Optional. Probability threshold for persons/actions detections.
    -t_fd                          Optional. Probability threshold for face detections.
    -inh_fd                        Optional. Input image height for face detector.
    -inw_fd                        Optional. Input image width for face detector.
    -exp_r_fd                      Optional. Expand ratio for bbox before face recognition.
    -t_reid                        Optional. Cosine distance threshold between two vectors for face reidentification.
    -fg                            Optional. Path to a faces gallery in .json format.
    -no_show                       Optional. Do not show processed video.
    -last_frame                    Optional. Last frame number to handle in demo. If negative, handle all input video.
使用空选项列表运行应用程序将显示上述用法消息和一条错误消息。
要运行此演示,您可以使用公共模型或随程序包提供的以下预训练和优化模型
- <INSTALL_DIR>/deployment_tools/intel_models/face-detection-retail-0004
- <INSTALL_DIR>/deployment_tools/intel_models/landmarks-regression-retail-0009
- <INSTALL_DIR>/deployment_tools/intel_models/face-reidentification-retail-0071
- <INSTALL_DIR>/deployment_tools/intel_models/person-detection-action-recognition-0003
注意:在运行带训练模型的演示之前,请确保使用模型优化器工具将模型转换为推理引擎格式(*.xml + *.bin)。
例如,您可以使用以下命令运行应用程序
./smart_classroom_demo -m_act <path to the person/action detection retail model .xml file> \
                       -m_fd <path to the face detection retail model .xml file> \
                       -m_reid <path to the face reidentification retail model .xml file> \
                       -m_lm <path to the landmarks regression retail model .xml file> \
                       -fg <path to faces_gallery.json> \
                       -i <path to the input video>
演示输出
演示使用OpenCV显示结果帧,其中包含标记的动作和人脸。
超分辨率演示
本主题演示如何运行超分辨率演示应用程序,该应用程序从原始低分辨率图像重建高分辨率图像。
随产品提供相应的预训练模型
single-image-super-resolution-0034,这是执行200x200图像4倍超分辨率升采样的主模型,也是唯一的模型
有关模型的详细信息,请参阅Intel Distribution of OpenVINO toolkit安装目录中的deployment_tools/intel_models文件夹中的描述。
工作原理
启动时,应用程序会读取命令行参数并加载指定的网络。之后,应用程序读取200x200的输入图像并执行4倍超分辨率升采样。
运行
使用-h选项运行应用程序将显示以下用法消息
./super_resolution_demo -h
InferenceEngine:
    API version ............ <version>
    Build .................. <number>

super_resolution_demo [OPTION]
Options:

    -h                      Print a usage message.
    -i "<path>"             Required. Path to an image.
    -m "<path>"             Required. Path to an .xml file with a trained model.
    -pp "<path>"            Path to a plugin folder.
    -d "<device>"           Specify the target device to infer on (CPU, GPU, FPGA, or MYRIAD). The demo will look for a suitable plugin for the specified device.
    -ni "<integer>"         Number of iterations (default value is 1)
    -pc                     Enable per-layer performance report
使用空选项列表运行应用程序将显示上述用法消息和一条错误消息。
要运行此演示,您可以使用公共模型或随程序包提供的预训练和优化模型
<INSTALL_DIR>/deployment_tools/intel_models/single-image-super-resolution-0034
要在CPU上使用带训练的模型进行推理,请运行以下命令
./super_resolution_demo -i <path_to_image>/image.bmp -m <path_to_model>/model.xml
注意:在运行带训练模型的演示之前,请确保使用模型优化器工具将模型转换为推理引擎格式(*.xml + *.bin)。
演示输出
应用程序输出重建的高分辨率图像,并将其保存在当前工作目录中,文件名为*.bmp,前缀为sr。
文本检测演示
该演示展示了使用单个神经网络在各种环境中检测任何角度印刷文本的示例。随产品提供相应的预训练模型
text-detection-0001,这是一个用于查找文本的检测网络。
工作原理
启动时,应用程序会读取命令行参数,并将一个网络加载到推理引擎中执行。获取图像后,它会执行文本检测推理,并为每个文本边界框输出四个点(x1, y1)、(x2, y2)、(x3, y3)、(x4, y4)。
运行
使用-h选项运行应用程序将显示以下用法消息
./text_detection_demo -h

text_detection_demo [OPTION]
Options:

    -h                           Print a usage message.
    -i "<path>"                  Required. Path to an image file.
    -m "<path>"                  Required. Path to the Text Detection model (.xml) file.
    -d "<device>"                Optional. Specify the target device to infer on: CPU, GPU, FPGA, or MYRIAD. The demo will look for a suitable plugin for a specified device.
    -l "<absolute_path>"         Optional. Absolute path to a shared library with the CPU kernels implementation for custom layers.
    -c "<absolute_path>"         Optional. Absolute path to the GPU kernels implementation for custom layers.
    -no_show                     Optional. If it is true, then detected text will not be shown on image frame. By default, it is false.
    -r                           Optional. Output Inference results as raw values.
使用空选项列表运行应用程序将显示上述用法消息和一条错误消息。
要运行此演示,您可以使用随程序包提供的以下预训练和优化模型
<INSTALL_DIR>/deployment_tools/intel_models/text-detection-0001
例如,使用以下命令行命令运行应用程序
./text_detection_demo -m <path_to_model> -i <path_to_image>
演示输出
演示使用OpenCV显示结果帧,检测显示为边界框。
使用Graph Builder API的LeNet数字分类网络
此示例演示如何使用推理引擎Graph Builder API执行推理,以构建LeNet分类网络的示例网络。无需XML文件即可构建网络。推理引擎Graph Builder API允许“即时”从源代码构建网络。该示例使用单通道ubyte图片作为输入。
工作原理
启动时,示例会读取命令行参数,并使用Graph Builder API构建网络和传递权重文件。然后,应用程序将构建的网络和图像加载到推理引擎插件中。
推理完成后,应用程序将推理结果输出到标准输出流。
运行
使用-h选项运行应用程序将显示以下用法消息
./lenet_network_graph_builder -h
InferenceEngine:
    API version ............ <version>
    Build .................. <number>

lenet_network_graph_builder [OPTION]
Options:

    -h                      Print a usage message.
    -m "<path>"             Path to a .bin file with weights for trained model
    -i "<path>"             Required. Path to image or folder with images
    -d "<device>"           Specify the target device to infer on this. Sample will look for a suitable plugin for device specified(default value is CPU)
    -pp "<path>"            Path to a plugin folder
    -pc                     Enables per-layer performance report
    -nt "<integer>"         Number of top results (default 10)
    -ni "<integer>"         Number of iterations (default 1)
使用空选项列表运行应用程序将显示上述用法消息。
例如,要在GPU上对ubyte图像执行推理,请运行以下命令
./lenet_network_graph_builder -i <path_to_image> -m <path_to_weights_file> -d GPU
演示输出
默认情况下,应用程序为每个推理请求输出前10个推理结果。此外,它还提供以每秒帧数为单位测量的吞吐量值。
验证应用程序
推理引擎验证应用程序是一个工具,它允许使用标准的输入和输出配置来推理深度学习模型,并为拓扑收集简单的验证指标。它支持分类网络的top-1和top-5指标,以及对象检测网络11点的mAP指标。
该工具的可能用例
- 检查推理引擎是否能很好地推理公共拓扑(工程团队使用验证应用程序进行常规测试)
- 验证自定义模型是否与默认输入/输出配置兼容,并将其准确性与公共模型进行比较
- 将验证应用程序用作另一个示例:虽然代码比分类和对象检测示例复杂得多,但源代码是开放的,可以重用
验证应用程序选项
验证应用程序提供以下命令行接口(CLI)
Usage: validation_app [OPTION]

Available options:

    -h                        Print a help message
    -t <type>                 Type of an inferred network ("C" by default)
      -t "C" for classification
      -t "OD" for object detection
    -i <path>                 Required. Folder with validation images. Path to a directory with validation images. For Classification models, the directory must contain folders named as labels with images inside or a .txt file with a list of images. For Object Detection models, the dataset must be in VOC format.
    -m <path>                 Required. Path to an .xml file with a trained model
    -lbl <path>               Labels file path. The labels file contains names of the dataset classes
    -l <absolute_path>        Required for CPU custom layers. Absolute path to a shared library with the kernel implementations
    -c <absolute_path>        Required for GPU custom kernels.Absolute path to an .xml file with the kernel descriptions.
    -d <device>               Target device to infer on: CPU (default), GPU, FPGA, or MYRIAD. The application looks for a suitable plugin for the specified device.
    -b N                      Batch size value. If not specified, the batch size value is taken from IR
    -ppType <type>            Preprocessing type. Options: "None", "Resize", "ResizeCrop"
    -ppSize N                 Preprocessing size (used with ppType="ResizeCrop")
    -ppWidth W                Preprocessing width (overrides -ppSize, used with ppType="ResizeCrop")
    -ppHeight H               Preprocessing height (overrides -ppSize, used with ppType="ResizeCrop")
    --dump                    Dump file names and inference results to a .csv file

    Classification-specific options:
      -Czb true               "Zero is a background" flag. Some networks are trained with a modified dataset where the class IDs  are enumerated from 1, but 0 is an undefined "background" class (which is never detected)

    Object detection-specific options:
      -ODkind <kind>          Type of an Object Detection model. Options: SSD
      -ODa <path>             Required for Object Detection models. Path to a directory containing an .xml file with annotations for images.
      -ODc <file>             Required for Object Detection models. Path to a file containing a list of classes
      -ODsubdir <name>        Directory between the path to images (specified with -i) and image name (specified in the .xml file). For VOC2007 dataset, use JPEGImages.
工具选项分为两类
- 通用选项,名称为单个字母或单词,例如
-b或--dump。这些选项在所有验证应用程序模式下都相同。 - 网络类型特定选项,名称为网络类型的首字母缩略词(
C或OD),后跟一个字母或单词。
通用工作流程
执行时,验证应用程序将执行以下步骤
- 将模型加载到推理引擎插件
- 读取验证集(通过
-i选项指定)- 如果您指定了一个目录,应用程序会尝试首先加载标签。为此,它会搜索文件名与模型名称相同但扩展名为
.labels(而不是.xml)的文件。然后,它会搜索指定的文件夹,检测其命名为已知标签的子文件夹,并将这些子文件夹中的所有图像添加到验证集中。当没有这样的子文件夹时,验证集将被视为空。 - 如果您指定了一个
.txt文件,应用程序将读取该文件,并假定每行都符合正确的格式。有关格式的更多信息,请参阅下面的准备数据集部分。
- 如果您指定了一个目录,应用程序会尝试首先加载标签。为此,它会搜索文件名与模型名称相同但扩展名为
- 读取通过
-b选项指定的批处理大小,并将此数量的图像加载到插件中。注意:图像加载时间不计入应用程序报告的推理时间。
- 插件推理模型,验证应用程序收集统计数据。
您还可以通过指定--dump选项来检索推理结果,但它仅为分类模型生成报告。此CLI选项允许创建(如果可能).csv格式的推理报告。
报告的结构是一组行,每行包含分号分隔的值
- 图像路径
- 表示预测正确性的标志
- Top-1类的ID
- 图像属于Top-1类的概率(百分比)
- Top-2类的ID
- 图像属于Top-2类的概率(百分比)
这是该报告中的一行示例
"ILSVRC2012_val_00002138.bmp";1;1;8.5;392;6.875;123;5.875;2;5.5;396;5;
这意味着给定的图像被正确预测。最可能的预测是该图像代表类1,概率为0.085。
下一节将介绍如何使用分类模式下的验证应用程序对一批图像上的分类CNN进行评分。
准备数据集
在运行验证应用程序之前,您必须准备数据集。数据集的格式取决于您要验证的模型类型。确保数据集格式适用于所选的模型类型。
分类数据集格式:文件夹作为类
在这种情况下,数据集的结构如下
|-- <path>/dataset
    |-- apron
        |-- apron1.bmp
        |-- apron2.bmp
    |-- collie
        |-- a_big_dog.jpg
    |-- coral reef
        |-- reef.bmp
    |-- Siamese
        |-- cat3.jpg
此结构意味着数据集目录中的每个文件夹都必须有一个类名,并包含该类的所有图像。在给定的示例中,有两个图像代表apron类,而其他三个类只有一个图像。
注意:数据集可以包含.bmp和.jpg格式的图像。
正确使用此类数据集的方法是指定路径为-i <path>/dataset。
分类数据集格式:图像列表(类ImageNet*)
如果您想使用此数据集格式,请创建一个包含图像列表的单个文件。在这种情况下,正确的文件集必须类似于以下内容
|-- <path>/dataset
    |-- apron1.bmp
    |-- apron2.bmp
    |-- a_big_dog.jpg
    |-- reef.bmp
    |-- cat3.jpg
    |-- labels.txt
其中labels.txt如下所示
apron1.bmp 411
apron2.bmp 411
cat3.jpg 284
reef.bmp 973
a_big_dog.jpg 231
文件中的每行必须包含图像名称和它所属的类的ID,格式为<image_name> 制表符 <class_id>。例如,apron1.bmp代表ID为411的类。
注意:数据集可以包含.bmp和.jpg格式的图像。
正确使用此类数据集的方法是指定路径为-i <path>/dataset/labels.txt。
对象检测数据集格式(VOC类)
SSD对象检测模型可以在模型训练期间用作测试数据集的原始数据集上进行推理。要准备VOC数据集,请按照以下步骤操作
- 从SSD GitHub*存储库下载预训练的SSD-300模型,地址为https://github.com/weiliu89/caffe/tree/ssd。
- 下载VOC2007测试数据集
$wget http://host.robots.ox.ac.uk/pascal/VOC/voc2007/VOCtest_06-Nov-2007.tar tar -xvf VOCtest_06-Nov-2007.tar
- 使用模型优化器转换模型。
- 从原始
labelmap_voc.prototxt创建正确的.txt类文件。新文件必须采用以下格式none_of_the_above 0 aeroplane 1 bicycle 2 bird 3 boat 4 bottle 5 bus 6 car 7 cat 8 chair 9 cow 10 diningtable 11 dog 12 horse 13 motorbike 14 person 15 pottedplant 16 sheep 17 sofa 18 train 19 tvmonitor 20
将此文件另存为
VOC_SSD_Classes.txt。
验证分类模型
准备好数据集后(请参阅上面的准备数据集部分),运行以下命令以在选定的数据集上推理分类模型
./validation_app -t C -i <path_to_images_directory_or_txt_file> -m <path_to_classification_model>/<model_name>.xml -d <CPU|GPU>
验证对象检测模型
注意:验证应用程序已使用SSD CNN进行了验证。任何可以用推理引擎推理且输入和输出格式与其中之一相同的网络也应该得到支持。
准备好数据集后(请参阅上面的准备数据集部分),运行以下命令以在选定的数据集上推理对象检测模型
./validation_app -d CPU -t OD -ODa "<path_to_VOC_dataset>/VOCdevkit/VOC2007/Annotations" -i "<path_to_VOC_dataset>/VOCdevkit" -m "<path_to_model>/vgg_voc0712_ssd_300x300.xml" -ODc "<path_to_classes_file>/VOC_SSD_Classes.txt" -ODsubdir JPEGImages
理解验证应用程序输出
在验证过程中,您可以看到一个交互式进度条,表示当前的验证阶段。当进度条已满时,验证过程结束,您可以分析输出。
输出中的关键数据
- 网络加载时间 - 在ms中花费在拓扑加载上的时间
- 模型 - 所选模型的路径
- 模型精度 - 所选模型的精度
- 批处理大小 - 指定的批处理大小
- 验证数据集 - 验证集的路径
- 验证方法 - 模型类型:分类或对象检测
- 设备 - 设备类型
下面您可以找到分类模型的示例输出,它报告了平均推理时间以及Top-1和Top-5指标值
Average infer time (ms): 588.977 (16.98 images per second with batch size = 10)

Top1 accuracy: 70.00% (7 of 10 images were detected correctly, top class is correct)
Top5 accuracy: 80.00% (8 of 10 images were detected correctly, top five classes contain required class)
下面您可以找到对象检测模型的示例输出
Progress: [....................] 100.00% done
[ INFO ] Processing output blobs
Network load time: 27.70ms
Model: /home/user/models/ssd/withmean/vgg_voc0712_ssd_300x300/vgg_voc0712_ssd_300x300.xml
Model Precision: FP32
Batch size: 1
Validation dataset: /home/user/Data/SSD-data/testonly/VOCdevkit
Validation approach: Object detection network

Average infer time (ms): 166.49 (6.01 images per second with batch size = 1)
Average precision per class table:

Class   AP
1   0.796
2   0.839
3   0.759
4   0.695
5   0.508
6   0.867
7   0.861
8   0.886
9   0.602
10  0.822
11  0.768
12  0.861
13  0.874
14  0.842
15  0.797
16  0.526
17  0.792
18  0.795
19  0.873
20  0.773

Mean Average Precision (mAP): 0.7767
此输出显示了用于准备数据集的SSD300模型的结果mAP指标值。此值与SSD GitHub*存储库和原始arXiv论文中声明的结果相同。
校准工具
推理引擎校准工具会校准给定的FP32模型,以便它可以在低精度8位整数模式下运行,同时保持此模型输入数据的原始精度。
校准工具选项
校准工具的核心命令行选项与验证应用程序相同。但是,校准工具具有以下特定选项:-t、-subset、-output和-threshold。
使用-h选项运行校准工具将显示以下用法消息,其中列出了所有CLI选项
Usage: calibration_tool [OPTION]

Available options:

    -h                        Print a help message
    -t <type>                 Type of an inferred network ("C" by default)
      -t "C" to calibrate Classification network and write the calibrated network to IR
      -t "OD" to calibrate Object Detection network and write the calibrated network to IR
      -t "RawC" to collect only statistics for Classification network and write statistics to IR. With this option, a model is not calibrated. For calibration and statisctics collection, use "-t C" instead.
      -t "RawOD" to collect only statistics for Object Detection network and write statistics to IR. With this option, a model is not calibrated. For calibration and statisctics collection, use "-t OD" instead
    -i <path>                 Required. Path to a directory with validation images. For Classification models, the directory must contain folders named as labels with images inside or a .txt file with a list of images. For Object Detection models, the dataset must be in VOC format.
    -m <path>                 Required. Path to an .xml file with a trained model, including model name and extension.
    -lbl <path>               Labels file path. The labels file contains names of the dataset classes
    -l <absolute_path>        Required for CPU custom layers. Absolute path to a shared library with the kernel implementations.
    -c <absolute_path>        Required for GPU custom kernels. Absolute path to an .xml file with the kernel descriptions.
    -d <device>               Target device to infer on: CPU (default), GPU, FPGA, or MYRIAD. The application looks for a suitable plugin for the specified device.
    -b N                      Batch size value. If not specified, the batch size value is taken from IR
    -ppType <type>            Preprocessing type. Options: "None", "Resize", "ResizeCrop"
    -ppSize N                 Preprocessing size (used with ppType="ResizeCrop")
    -ppWidth W                Preprocessing width (overrides -ppSize, used with ppType="ResizeCrop")
    -ppHeight H               Preprocessing height (overrides -ppSize, used with ppType="ResizeCrop")
    --dump                    Dump file names and inference results to a .csv file
    -subset                  Number of pictures from the whole validation set tocreate the calibration dataset. Default value is 0, which stands forthe whole provided dataset
    -output <output_IR>      Output name for calibrated model. Default is <original_model_name>_i8.xml|bin
    -threshold               Threshold for a maximum accuracy drop of quantized model. Must be an integer number (percents) without a percent sign. Default value is 1, which stands for accepted accuracy drop in 1%
    - stream_output           Flag for printing progress as a plain text. When used, interactive progress bar is replaced with multiline output

    Classification-specific options:
      -Czb true               "Zero is a background" flag. Some networks are trained with a modified dataset where the class IDs  are enumerated from 1, but 0 is an undefined "background" class (which is never detected)

    Object detection-specific options:
      -ODkind <kind>          Type of an Object Detection model. Options: SSD
      -ODa <path>             Required for Object Detection models. Path to a directory containing an .xml file with annotations for images.
      -ODc <file>             Required for Object Detection models. Path to a file with a list of classes
      -ODsubdir <name>        Directory between the path to images (specified with -i) and image name (specified in the .xml file). For VOC2007 dataset, use JPEGImages.
工具选项分为两类
- 通用选项,名称为单个字母或单词,例如
-b或--dump。这些选项在所有校准工具模式下都相同。 - 网络类型特定选项,名称为网络类型的首字母缩略词(
C或OD),后跟一个字母或单词。
校准分类模型
要在给定数据集(通过-i选项指定)的图像子集(前2000张图像)上校准分类卷积神经网络(CNN),请运行以下命令
./calibration_tool -t C -i <path_to_images_directory_or_txt_file> -m <path_to_classification_model>/<model_name>.xml -d <CPU|GPU> -subset 2000
数据集必须具有正确的格式。分类模型支持两种格式:命名为标签的文件夹,其中包含该类的所有图像,以及类ImageNet*格式,其中包含.txt文件,列出图像和类的ID。
有关数据集结构的更多信息,请参阅验证应用程序文档的准备数据集部分。
如果您决定使用给定数据集的子集,请使用类ImageNet*格式而不是文件夹作为类的格式。这能带来更准确的校准,因为您很可能会获得代表不同类的图像。
要运行此示例,您可以使用OpenVINO 模型下载器下载的分类模型或其他图像分类模型。
例如,要校准带训练的Caffe* resnet-50分类模型,请运行以下命令
./calibration_tool -t C -m resnet-50.xml -i ILSVRC2012_val.txt -Czb false -ppType "ResizeCrop" -ppSize 342 -b 1 -d CPU -subset 2000
注意:在对带训练模型运行该工具之前,请确保使用模型优化器工具将模型转换为推理引擎格式(*.xml + *.bin)。
校准对象检测模型
本主题演示如何对一系列图像上的对象检测CNN运行校准工具。请查阅8位推理介绍中用于校准校准工具的对象检测模型列表。任何可以用推理引擎推理且输入和输出格式与SSD CNN相同的网络也应该得到支持。
在VOC数据集上运行SSD网络
在开始校准模型之前,请确保您的数据集格式正确。有关更多信息,请参阅验证应用程序文档的准备数据集部分。
准备好数据集后,可以通过运行以下命令在其上校准模型
./calibration_tool -d CPU -t OD -ODa "<path_to_image_annotations>/VOCdevkit/VOC2007/Annotations" -i "<path_to_image_directory>/VOCdevkit" -m "<path_to_model>/vgg_voc0712_ssd_300x300.xml" -ODc "<path_to_classes_list>/VOC_SSD_Classes.txt" -ODsubdir JPEGImages -subset 500
基准应用程序演示
本主题演示如何使用基准应用程序估算支持设备上的深度学习推理性能。性能可以针对两种推理模式进行测量:同步和异步。
注意:本主题描述的是基准应用程序C++实现的用法。
工作原理
注意:为了获得与官方已发布结果相似的基准测试结果,请将CPU频率设置为2.9GHz,GPU频率设置为1GHz。
启动时,应用程序会读取命令行参数,并将网络和图像加载到推理引擎插件中。推理请求的数量和执行方法取决于由-api命令行参数定义的模式。
同步API
对于同步模式,主要指标是延迟。应用程序创建一个推理请求并执行Infer方法。执行次数由以下两个值之一定义
- 由
-niter命令行参数定义的迭代次数 - 如果跳过
-niter,则预定义的持续时间。预定义的持续时间值取决于设备。
在执行过程中,应用程序收集两种类型的指标
- 使用
Infer方法执行的每个推理请求的延迟 - 所有执行的持续时间
报告的延迟值计算为所有收集到的延迟的平均值。报告的吞吐量值是报告的延迟的导数,并且还取决于批处理大小。
异步API
对于异步模式,主要指标是每秒帧数(FPS)的吞吐量。应用程序创建一定数量的推理请求并执行StartAsync方法。推理次数由-nireq命令行参数指定。执行次数由以下两个值之一定义
- 由
-niter命令行参数定义的迭代次数 - 如果跳过
-niter,则预定义的持续时间。预定义的持续时间值取决于设备。
推理请求异步执行。Wait方法用于等待前一次执行完成。应用程序测量所有推理请求的执行情况,并根据批处理大小和总执行持续时间报告吞吐量指标。
运行
使用-h选项运行应用程序将显示以下用法消息
./benchmark_app -h
InferenceEngine:
        API version ............ <version>
        Build .................. <number>
[ INFO ] Parsing input parameters

benchmark_app [OPTION]
Options:

    -h                      Print a usage message
    -i "<path>"             Required. Path to a folder with images or to image files.
    -m "<path>"             Required. Path to an .xml file with a trained model.
    -pp "<path>"            Path to a plugin folder.
    -api "<sync/async>"     Required. Enable using sync/async API.
    -d "<device>"           Specify a target device to infer on: CPU, GPU, FPGA or MYRIAD. Use "-d HETERO:<comma separated devices list>" format to specify HETERO plugin. The application looks for a suitable plugin for the specified device.
    -niter "<integer>"      Optional. Number of iterations. If not specified, the number of iterations is calculated depending on a device.
    -nireq "<integer>"      Optional. Number of infer requests (default value is 2).
    -l "<absolute_path>"    Required for CPU custom layers. Absolute path to a shared library with the kernels implementations.
          Or
    -c "<absolute_path>"    Required for GPU custom kernels. Absolute path to an .xml file with the kernels description.
    -b "<integer>"          Optional. Batch size value. If not specified, the batch size value is determined from IR.
使用空选项列表运行应用程序将显示上述用法消息和一条错误消息。
您可以运行应用程序以处理支持图像作为输入的四维模型,例如,可以使用OpenVINO Model Downloader下载的公共AlexNet和GoogLeNet模型。
注意:在运行带训练模型的应用程序之前,请确保使用模型优化器工具将模型转换为推理引擎格式(*.xml + *.bin)。
例如,要在同步模式下在CPU上执行推理并获取AlexNet模型的估计性能指标,请运行以下命令
./benchmark_app -i <path_to_image>/inputImage.bmp -m <path_to_model>/alexnet_fp32.xml -d CPU -api sync
对于异步模式
./benchmark_app -i <path_to_image>/inputImage.bmp -m <path_to_model>/alexnet_fp32.xml -d CPU -api async
演示输出
应用程序输出取决于使用的API。对于同步API,应用程序输出延迟和吞吐量
[ INFO ] Start inference synchronously (60000 ms duration)

[ INFO ] Latency: 37.91 ms
[ INFO ] Throughput: 52.7566 FPS
对于异步API,应用程序仅输出吞吐量
[ INFO ] Start inference asynchronously (60000 ms duration, 2 inference requests in parallel)

[ INFO ] Throughput: 48.2031 FPS
法律信息
您不得使用或促成将本文档与任何侵权行为或其他有关本文所述Intel产品的法律分析相关联。您同意授予Intel对之后起草的、包含本文披露的主题的任何专利声明一项非独占的、免版税的许可。
本文档不授予任何知识产权的许可(明示或暗示,禁止反言或以其他方式)。
此处提供的所有信息如有更改,恕不另行通知。请联系您的Intel代表以获取最新的Intel产品规格和路线图。
描述的产品可能包含设计缺陷或称为errata的错误,这些错误可能导致产品偏离已发布的规格。当前已确定特征的errata可根据要求提供。
Intel技术的特性和优势取决于系统配置,并可能需要启用硬件、软件或服务激活。了解更多信息,请访问http://www.intel.com/或联系OEM或零售商。
没有计算机系统可以绝对安全。
Intel、OpenVINO和Intel标志是Intel Corporation在美国和/或其他国家的商标。
*其他名称和品牌可能被声明为他人的财产。
版权所有© 2019 Intel Corporation。保留所有权利。