
通过 Hello World Silverlight 应用程序理解 MVVM
4.69/5 (31投票s)
使用 PRISM 和 Hello World Silverlight 应用程序理解 MVVM。
引言
在这篇文章中,我将尝试使用 PRISM 为我们实现 MVVM 提供的一些不同功能。我将尽力从零开始为新手讲解。我建议您如果真的感兴趣,请在阅读文章的同时尝试开发自己的 MVVM Silverlight 示例应用程序,以便详细理解。
我强烈建议您,如果您对 UI 模式没有基本了解,请先阅读这篇文章。这将帮助您理解 MVVM 的基本概念 Basics_UIDesignPattern.aspx 和其他模式。
在这篇文章中,我将为“Hello world” Silverlight 应用程序开发一个干净的 MVVM 模式架构。我们将使用 Microsoft 的 Unity 和 Prism 库来实现模块化和 依赖注入。我不会探索 PRISM 提供的所有功能,而是解释在开始使用 PRISM 开发 Silverlight 应用程序之前每个人都应该知道的基础知识。
Prism 不仅仅是 MVVM
PRISM 可能对您很有吸引力,因为它不仅仅是一个实现 MVVM 的框架。尽管它的一部分实际上可以被视为一个 MVVM 框架(NotificationObject、EventAggregator 和 **Command 对象**都是其中的例子),但它提供的远不止这些。它允许您创建由多个松耦合的“模块”组成的复合应用程序。它拥有一个非常灵活且可扩展的导航框架(Region Navigation),支持与 IoC 容器(特别是 Unity 和 MEF)的集成,以及大量其他功能。EventAggregator 可用于不同模块之间的通信。

如果您想了解更多关于 PRISM 的信息,请访问此链接:http://www.sparklingclient.com/prism-silverlight/
在这篇文章中,我将使用 Prism 开发一个“Hello World” Silverlight 应用程序。您会发现,使用 Prism 可以提高模块化程度,并改善松耦合和关注点分离,从而以最小的努力提高可测试性、可维护性和可扩展性。所以,这是我将在下面解释的应用程序的 UI 架构。

在这篇文章中,我们将有两个不同的视图。所以我们的想法是开发一个“hello world”应用程序,其中“Hello”文本代表一个视图,“World”代表另一个视图,最后两个视图都将驻留在 Shell(指定的区域内)。我将使这个应用程序非常简单,因为我的目标是让您熟悉 Prism 和 MVVM。
让我们从头开始。
先决条件
- Visual Studio 2010 和 Silverlight 4(您可以在 http://www.silverlight.net/downloads 获取两者)
- 您可以从 http://www.microsoft.com/download/en/details.aspx?displaylang=en&id=4922 下载 PRISM 4 库。
如何安装 PRISM
- 单击下载并运行Prismv4.exe,以便将 PRISM 框架解压到您的计算机上。
- 它会要求您提供保存位置,然后会将所有源文件下载到该文件夹中。
- 您会看到它下载了很多文件,但我们需要几个 DLL 文件到我们的应用程序中。
- 我建议您将“Silverlight”文件夹复制到您的项目位置,并将其重命名为“Lib”。
- 您可以在以下位置找到“Silverlight”文件夹 - {下载文件夹}\Bin\Silverlight

现在,您的项目位置的 Lib 文件夹中就有了 PRISM DLL。
点击 -> Visual Studio 2010 -> 文件 -> 新建项目 -> Silverlight 项目(命名为 PrismSample),然后浏览到您存放“Lib”文件夹的位置。在我的例子中是“D:\SilvelightPrismDemo\”。
点击“确定”并保持以下选项。(这是默认值)

点击“确定”按钮后,您将获得一个名为 PrismSample 的解决方案,其中包含两个项目。一个是 Silverlight 项目(**PrismSample**),另一个是 Web 项目(**PrismSample.Web**)。
下一步是删除 MainPage.xaml,并向您的 Silverlight 项目添加 Shell.xaml(即 Silverlight 用户控件)。

此页面(Shell.xaml)将作为我们应用程序的主页面,我们将在该视图中定义不同的区域,每个区域都将绑定到特定的视图。
Shell.xaml
在 Prism 框架中,整体布局和样式可以在 Shell 中定义。Shell 相当于 ASP.NET 的 MasterPage。两者都允许您定义内容区域作为您定义的视图的占位符。两者都允许您定义将应用于视图并在您定义的content 区域中显示的视觉样式和布局。而 MasterPage 使用 ContentPlaceHolder 对象,**Prism** 使用 **regions**。Region 只是特定 xaml 对象(本文中的 ContentControl)的一个附加属性,您可以在其中注入您的视图以显示它们。
然而,在 Silverlight 中,您只有一个 Shell 页面。您的 Shell 已设置为 Application.Current.RootVisual 的值,因此您只能设置一次,这反过来又迫使我们只能有一个 Shell。然而,在 WPF 中,prism 更灵活,因为它允许我们在应用程序使用多个窗口时声明多个 Shell。
让我们深入代码 " src="https://codeproject.org.cn/script/Forums/Images/smiley_smile.gif" /> 一开始,您的 Shell.xaml 应该看起来像这样。
<UserControl x:

 xmlns="http://schemas.microsoft.com/winfx/2006/xaml/presentation"

 xmlns:x="http://schemas.microsoft.com/winfx/2006/xaml"

 xmlns:d="http://schemas.microsoft.com/expression/blend/2008"

 xmlns:mc="http://schemas.openxmlformats.org/markup-compatibility/2006"

 mc:Ignorable="d"

 d:Design d:Design>

<Grid x:Name="LayoutRoot" Background="White">

</Grid>

</UserControl>
下一步是向我们的项目添加 Prism 引用。从 Lib 文件夹将以下 DLL 添加到您的 Silverlight(**PrismSample**)项目中。

添加这些 DLL 后,我们就可以在 xaml 中引入 **Prism 命名空间**。所以您需要在您的 shell.xaml 中添加以下命名空间。
xmlns:Regions=
"clr-namespace:Microsoft.Practices.Prism.Regions;assembly=Microsoft.Practices.Prism"
添加此命名空间后,您可以定义您的区域控件,它可以处理视图。在此示例中,我使用 **ContentControl** 作为区域容器控件。有时我们也使用 ItemControl 来充当区域。这些 **ContentControl** 将作为我们视图的 **占位符**。为了在我们的 **Shell.xaml** 中获得 Region 功能,我们必须添加以下命名空间。它允许我们在 Content Control 中定义区域。
xmlns:Regions=
"clr-namespace:Microsoft.Practices.Prism.Regions;assembly=Microsoft.Practices.Prism"
这是更新后的 Shell.xaml
<UserControl x:

 xmlns="http://schemas.microsoft.com/winfx/2006/xaml/presentation"

 xmlns:x="http://schemas.microsoft.com/winfx/2006/xaml"

 xmlns:d="http://schemas.microsoft.com/expression/blend/2008"

 xmlns:mc="http://schemas.openxmlformats.org/markup-compatibility/2006"

 xmlns:Regions=
    "clr-namespace:Microsoft.Practices.Prism.Regions;assembly=Microsoft.Practices.Prism"

 mc:Ignorable="d"

 d:Design d:Design>

<Grid x:Name="LayoutRoot" ShowGridLines="True">

<Grid.ColumnDefinitions>

<ColumnDefinition/>

<ColumnDefinition/>

</Grid.ColumnDefinitions>

<Grid.RowDefinitions >

<RowDefinition Height="Auto"/>

<RowDefinition Height="*"/>

</Grid.RowDefinitions>

<TextBlock Text="Sample MVVM Hello World Application"
    FontSize="16" HorizontalAlignment="Center" Grid.Row="0" Grid.ColumnSpan="2"/>

<ContentControl Grid.Row="1" Grid.Column="0" x:Name="HelloRegion"
    Regions:RegionManager.RegionName="HelloRegion" HorizontalAlignment="Center"
    VerticalAlignment="Center"/>

<ContentControl Grid.Row="1" Grid.Column="1" x:Name="WorldRegion"
    Regions:RegionManager.RegionName="WorldRegion" HorizontalAlignment="Center"
    VerticalAlignment="Center"/>

</Grid>

</UserControl>
完成后,我们将添加 **Bootstrapper**。
Bootstrapper
每当我们为 Prism 开发任何应用程序时,Bootstrapper 始终是起点。我们的 Bootstrapper 的基本目的是初始化我们的 Shell 并注册您将用于**依赖注入** (DI) 的所有类型。**Bootstrapper** 将负责加载和启动我们的应用程序。名称本身就解释了它的功能。在创建新的 Boostrapper 时,您通常会执行两个常见任务:
- 创建 Shell
- 设置 ModuleCatalog
让我们创建我们的 Bootstrapper。向 Silverlight 项目添加一个新的 .cs 文件,并将其命名为 Bootstrapper.cs。这是您需要在 Bootstrapper 类中拥有的代码。
public class Bootstrapper : UnityBootstrapper
    {
        protected override DependencyObject CreateShell()
        {
            Shell rootShell = new Shell();
            Application.Current.RootVisual = rootShell;
            return rootShell;
        }

        protected override IModuleCatalog CreateModuleCatalog()
        {
            base.CreateModuleCatalog();
        }

    }
并添加以下命名空间到其中,以便解析 "UnityBoostrapper"
using Microsoft.Practices.Prism.UnityExtensions;
using Microsoft.Practices.Prism.Modularity;
完成后,让我们理解它的代码。CreateShell() 方法负责注册 Shell。CreateModuleCatalog() 方法用于注册需要依赖注入的模块。在这种情况下,我们只有两个模块。每个视图一个模块。模块准备好后,我们将回到此方法。现在,如果您构建解决方案,您将收到错误。因为我们还没有实例化 Bootsrapper,并且我们的 App.xaml.cs 类仍然引用 MainPage.xaml。请按照以下代码修改 App.xaml.cs。
  private void Application_Startup(object sender, StartupEventArgs e)
        {
            Bootstrapper bootStrapper = new Bootstrapper();
            bootStrapper.Run();
        }
现在构建您的解决方案,它应该可以成功构建。如果您运行应用程序,它将运行,您将看到一个空白页面,如下所示。
所以我们的 Shell 已经准备好了,现在我们的下一个任务是创建 **视图、视图模型** 和 **模型**。
右键单击解决方案文件(**PrismSample**),然后添加新项目(Silverlight 类库)。
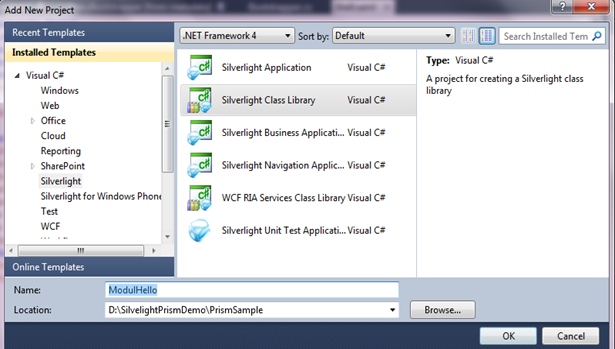
命名为“**ModuleHello**”,同样,添加另一个名为“**ModuleWorld**”的 Silverlight 类库项目。
- 所以我们的解决方案现在有 4 个项目。
- 一个 Silverlight 应用程序项目
- 两个 Silverlight 类库项目(ModuleHello 和 ModuelWorld)
- 一个 Web 项目(在 aspx 页面中托管 silverlight xap 文件)

我们所说的模块是什么意思?
模块可以是**视图**,也可以是**相关组件的集合**,例如功能、视图或业务逻辑。所以,在我们这个例子中,Hello 是一个模块,它进一步拥有特定于“Hello”功能的**视图**、**视图模型**和**模型**。同样,我们有不同的模块用于“World”功能。这些模块准备好后,我们将把它们添加到 Bootstrapper 类中的 catalog 中。我稍后会解释。让我们先完成“Hello”模块。
现在打开您的 **ModuleHello** 项目,并添加 HelloModule.cs 文件。在继续之前,您需要将 Lib 文件夹中的 Prism DLL 添加到引用中。将 Microsoft.Practices.Prism.dll 和 Microsoft.Practices.Unity.Silverlight.dll 作为 Lib 到 **ModuleHello** 项目的引用。
另外,在 **HelloModule** 项目中创建一个名为“**View**”的文件夹,然后添加一个名为“**HelloView**”的 Silverlight 控件。还在同一个文件夹中添加 IHelloView.cs 类。
然后,在 **HelloModule** 项目中创建另一个名为“**ViewModel**”的文件夹,然后添加“HelloViewModel.cs”文件,并在 ViewModel 文件夹中添加 IHelloViewModel.cs 文件。确保 **HelloView** 类实现 **IHelloView** 接口,并且 HelloViewModel 类实现 **IHelloViewModel** 接口。
IHelloView.cs
using ModulHello.ViewModel;
namespace ModulHello.View
{
    public interface IHelloView
    {
        IHelloViewModel Model { get; set; }
    }
}
IHelloViewModel.cs
using ModulHello.View;
namespace ModulHello.ViewModel
{
    public interface IHelloViewModel
    {
        IHelloView View { get; set; }
    }
}
HelloView.xaml.cs
using System.Windows.Controls;
namespace ModulHello.View
{
    public partial class HelloView : UserControl, IHelloView
    {
        public HelloView()
        {
            InitializeComponent();
        }

        #region IHelloView Members

        public ViewModel.IHelloViewModel Model
        {
            get
            {
                return this.DataContext as ViewModel.IHelloViewModel;
            }

            set
            {
                this.DataContext = value;
            }
        }
        #endregion
    }
}
现在将以下代码添加到您的 HelloModule.cs 类中。
using Microsoft.Practices.Prism.Modularity;
using Microsoft.Practices.Prism.Regions;
using Microsoft.Practices.Unity;
using ModulHello.View;
using ModulHello.ViewModel;

namespace ModulHello
{
    public class HelloModule : IModule
    {

        #region IModule Members

        private IRegionManager regionManager;
        IUnityContainer container;
        public void Initialize()
        {
            this.RegisterViewsAndServices();
            if (this.regionManager.Regions.ContainsRegionWithName("HelloRegion"))
            {
                this.regionManager.Regions["HelloRegion"].Add(
                    this.container.Resolve<IHelloViewModel>().View);
            }
        }

        public  HelloModule(IRegionManager regionManager, IUnityContainer container)
        {
            this.container = container;
            this.regionManager = regionManager;
        }

        #endregion
        protected void RegisterViewsAndServices()
        {
            this.container.RegisterType<IHelloView, HelloView>();
            this.container.RegisterType<IHelloViewModel, HelloViewModel>();
        }
    }
}
我们的模块类(ModuleHello)继承自 IModule 接口。这里我们使用**视图**和**视图模型**的接口在区域管理器中注册视图。IModule 接口将告知应用程序将视图注册为一个可以加载到 **MainRegion** 中的模块。
**Region manager** 和 DI **container** 将被传递到 **constructor** 中,Initialize 方法将被调用。首先,我们注册将要使用的模块类型。然后,我们将 Hello 视图模型添加到 Shell 视图中名为“**HelloRegion**”的区域。
让我们来理解这段代码:RegisterViewsAndServices() 这个方法使用接口注册**视图**和**视图模型**,并可用于创建实现类的实例。
这是 HelloView.xaml.cs 的代码
<usercontrol x: ="" xmlns="http://schemas.microsoft.com/winfx/2006/xaml/presentation"

 xmlns:x="http://schemas.microsoft.com/winfx/2006/xaml"

 xmlns:d="http://schemas.microsoft.com/expression/blend/2008"

 xmlns:mc="http://schemas.openxmlformats.org/markup-compatibility/2006"

 mc:ignorable="d" d:design d:design>

<grid x:name="LayoutRoot" background="White">

 <textblock text="{Binding HelloText}" fontsize="26"

 horizontalalignment="Center" verticalalignment="Center" ="">

 </textblock></grid></usercontrol>

 <UserControl x:

 xmlns="http://schemas.microsoft.com/winfx/2006/xaml/presentation"

 xmlns:x="http://schemas.microsoft.com/winfx/2006/xaml"

 xmlns:d="http://schemas.microsoft.com/expression/blend/2008"

 xmlns:mc="http://schemas.openxmlformats.org/markup-compatibility/2006"

 mc:Ignorable="d"

 d:Design d:Design>

<Grid x:Name="LayoutRoot" Background="White" >

<TextBlock Text="{Binding HelloText}" FontSize="26"
    HorizontalAlignment="Center" VerticalAlignment="Center" />

</Grid>

</UserControl>
这是 HelloViewModel.cs 的代码
namespace ModulHello.ViewModel
{
    public class HelloViewModel : IHelloViewModel
    {
        public HelloViewModel(View.IHelloView view)
        {
            this.View = view;
            this.HelloText = "Hello (From hello view)";
            this.View.Model = this;
        }

        public string HelloText { get; set; }

        #region IHelloViewModel Members

        public View.IHelloView View
        {
            get;
            set;
        }

        #endregion
    }
}
在这里,我们将“HelloText”属性绑定到视图的 **TextBlock** 并显示在 UI 上。在这种情况下,我们没有使用单独的模型,但是您可以定义一个单独的模型类,它具有不同的属性,然后将其引用定义为 ViewModel 类中的公共属性,然后 ViewModel 再将模型属性绑定到 UI 视图。
现在我们的 **HelloModule** 已经准备就绪,它拥有自己的**视图**和**视图模型**。但是,**Shell** 和这个**模块**之间没有联系。为此,您必须将“**HelloModule**”和“**WorldModule**”的引用添加到您的 Silverlight 项目(**PrismSimple**)中,然后在 Bootstrapper 类中添加以下代码。
        protected override IModuleCatalog CreateModuleCatalog()
        {
            ModuleCatalog modules = new ModuleCatalog();
            // You can add n number of module here
            modules.AddModule(typeof(ModulHello.HelloModule));
            return modules;
        }
现在,如果您运行您的应用程序,您将看到以下屏幕。在这里,您可以看到 Shell 的第二行第一列显示了“HelloView”。因此,我们应用程序的一半已经完成。

现在您可以感受到使用 Prism 的优势了。它确实帮助我们毫不费力地实现了 **MVVM**。Prism 还支持命令、事件初始化等其他模式,我将在未来的文章中介绍。现在,我们可以让不同的开发人员同时处理不同的模块,并且在**模块**内部也有职责分离。例如,视图可以由 UI 设计师开发,然后获取由不同开发人员开发的 **viewModel** 的数据。所以我们有了良好的解耦,并且可以通过编写 **单元测试** 来测试我们的 **ViewModel** 代码。现在我们认识到 Prism 帮助我们以松耦合和关注点分离的方式开发此应用程序,从而以最小的努力提高了可测试性、可维护性和可扩展性。
让我们完成 **WorldModule**。
与 **HelloModule** 类似,此模块也将拥有相同的文件夹“**View**”和“**ViewModel**”,并且还将拥有相同的文件但名称不同。它在“View”文件夹中有“WorldView”、“**IWorldView**”,在“ViewModel”文件夹中有“**WorldViewModel**”、“IWorldViewModel”。还在 **WorldModule** 项目中添加“WorldModule.cs”文件。
还将 Microsoft.Practices.Prism.dll 和 Microsoft.Practices.Unity.Silverlight.dll(**PRISM** DLL)引用添加到 WorldModule。
添加这些文件后,您的解决方案资源管理器窗口将如下所示。

这是“WorldModule.cs”文件的代码
using Microsoft.Practices.Unity;
using Microsoft.Practices.Prism.Regions;
using ModuleWorld.View;
using ModuleWorld.ViewModel;
using Microsoft.Practices.Prism.Modularity;
namespace ModuleWorld
{
    public class WorldModule :  IModule
    {
         #region IModule Members

        private IRegionManager regionManager;
        IUnityContainer container;
        public void Initialize()
        {
            this.RegisterViewsAndServices();
            if (this.regionManager.Regions.ContainsRegionWithName("WorldRegion"))
            {
                this.regionManager.Regions["WorldRegion"].Add(
                    this.container.Resolve<IWorldViewModel>().View);
            }
        }

        public  WorldModule(IRegionManager regionManager, IUnityContainer container)
        {
            this.container = container;
            this.regionManager = regionManager;
        }

        #endregion
        protected void RegisterViewsAndServices()
        {
            this.container.RegisterType<IWorldView, WorldView>();
            this.container.RegisterType<IWorldViewModel, WorldViewModel>();
        }
    }
}
IworldView.cs
using ModuleWorld.ViewModel;
namespace ModuleWorld.View
{
    public interface IWorldView
    {
        IWorldViewModel Model { get; set; }
    }
}
IWorldViewModel.cs
using ModuleWorld.View;
namespace ModuleWorld.ViewModel
{
    public interface IWorldViewModel
    {
        IWorldView View { get; set; }
    }
}
WorldView.cs
<UserControl x:

 xmlns="http://schemas.microsoft.com/winfx/2006/xaml/presentation"

 xmlns:x="http://schemas.microsoft.com/winfx/2006/xaml"

 xmlns:d="http://schemas.microsoft.com/expression/blend/2008"

 xmlns:mc="http://schemas.openxmlformats.org/markup-compatibility/2006"

 mc:Ignorable="d" >

<Grid x:Name="LayoutRoot" Background="White">

<TextBlock Text="{Binding WorldText}" FontSize="26"
   HorizontalAlignment="Center" VerticalAlignment="Center" />

</Grid>

</UserControl>
WorldView.xaml.cs
using System.Windows.Controls;
namespace ModuleWorld.View
{
    public partial class WorldView : UserControl, IWorldView
    {
        public WorldView()
        {
            InitializeComponent();
        }

        #region IWorldView Members

        public ViewModel.IWorldViewModel Model
        {
            get
            {
                return this.DataContext as ViewModel.IWorldViewModel;
            }

            set
            {
                this.DataContext = value;
            }
        }

        #endregion
    }
}
WorldViewModel.cs
namespace ModuleWorld.ViewModel
{
    public class WorldViewModel : IWorldViewModel
    {

        public WorldViewModel(View.IWorldView view)
        {
            this.View = view;
            this.WorldText = "World (From World view)";
            this.View.Model = this;
        }

        public string WorldText { get; set; }

        #region IWorldViewModel Members

        public View.IWorldView View
        {
            get;
            set;
        }

        #endregion
    }
}
进行这些更改后,构建并运行您的应用程序,您将看到以下输出。

完成 " src="https://codeproject.org.cn/script/Forums/Images/smiley_smile.gif" /> 我们已经使用 PRISM 开发了我们的 hello world 应用程序。
这就是您使用 Prism 和 Unity 构建模块化、可扩展的 Silverlight 应用程序所需的一切。这种架构的可能性是无限的,它是一个非常强大的起点。感谢您的阅读 " src="https://codeproject.org.cn/script/Forums/Images/smiley_smile.gif" /> 希望您喜欢它,如果您喜欢,请给个评分。这会激励我写更多这样的文章
" src="https://codeproject.org.cn/script/Forums/Images/smiley_smile.gif" /> 。
请随时发表评论并分享您的想法。我乐于并愿意讨论任何内容 " src="https://codeproject.org.cn/script/Forums/Images/smiley_smile.gif" />
参考
- Basics_UIDesignPattern.aspx
- http://www.sparklingclient.com/prism-silverlight/
- http://www.silverlight.net
- http://www.microsoft.com/download/en/details.aspx?displaylang=en&id=4922
- http://www.wintellect.com/CS/blogs/jlikness/archive/2009/12/08/mvvm-composition-in-silverlight-3-with-prism.aspx
- http://development-guides.silverbaylabs.org/Video/Silverlight-Prism#videolocation_9