
GPU 上的 Base64 编码
使用 CUDAfy.NET(.NET 中的 CUDA)在图形处理单元上执行 base64 编码。
引言
Base64 用于将图像等二进制数据存储为文本。它可以在网页中使用,但更常见于电子邮件应用程序和 XML 文件中。.NET Framework 在其 Convert 类中包含一个 base64 编码器。由于它涉及大量的位操作并且可以并行执行,那么它是否是一个可以由图形处理单元更好地处理的任务呢?
背景
Base64 使用 64 个字符作为其基数(十进制使用 10,十六进制使用 16)。这 64 个字符是 A-Z、a-z、0-9,以及“+”和“/”。三个字节可以用四个 base64 数字表示。如果总字节数不是三的倍数,则使用填充字符。填充字符是“=”。对于给定字节数 n,base64 字符串的总长度为 4 * (n/3)。每三个字节的块总共有 24 位(3 * 8 位)。64 个不同的值可以用 6 位表示,因此我们总共需要四个 6 位值来包含 24 位。Base64 编码由处理三个字节的块组成,并且由于每个块独立于任何其他块,因此它似乎是 GPU 的合适任务。
尽管它正变得越来越普遍,但将 GPU 用于非图形、通用编程仍然是一个小众领域。典型的业务和网络编程仍然很少使用 GPU,这有许多很好的理由。寻找合适的性能瓶颈,然后移植算法或业务逻辑以利用 GPU 可能非常耗时,并且回报可能不确定。此外,目标硬件平台可能没有合适的 GPU。尽管如此,如果任务得当,GPU 可以带来巨大的性能提升。
NVIDIA 在通用 GPU (GPGPU) 方面仍然处于领先地位。他们的 CUDA 语言以及相关的工具和库使得在 C/C++ 中入门相对容易。在 .NET 中,情况则不同,需要使用 PInvoke 和所谓的 CUDA 驱动程序 API。这相当繁琐。CUDA.NET 稍微简化了一些事情,但编程模型仍然是驱动程序 API 的,并且内核(GPU 设备)代码仍然需要用 CUDA C 编写。CUDAfy.NET 更进一步,隐藏了驱动程序 API 的大部分复杂性,允许内核代码也用 .NET 编写,并使用标准的 .NET 类型(例如,值类型数组)。
配置您的电脑
首先,请确保您有一块相对较新的 NVIDIA 显卡,支持 CUDA。然后您需要访问 NVIDIA CUDA 网站并下载 CUDA 5.5 工具包。将其安装到默认位置。接下来,确保您有最新的 NVIDIA 驱动程序。这些可以通过 NVIDIA 更新或从 NVIDIA 网站获取。这里的项目是使用 Visual Studio 2010 构建的,语言是 C#,尽管 VB 和其他 .NET 语言应该也没有问题。Visual Studio Express 可以毫无问题地使用——请记住只能创建 32 位应用程序。要使其与 Express 一起工作,您需要访问 Visual Studio Express 网站:
- 下载并安装 Visual C++ 2010 Express(NVIDIA 编译器需要此项)
- 下载并安装 Visual C# 2010 Express
- 下载并安装 CUDA 5.5 工具包(32 位和/或 64 位)
- 确保 C++ 编译器 (cl.exe) 在搜索路径中(环境变量)
这个 CUDA 编译器 (NVCC) 的设置实际上是整个过程中最困难的阶段,所以请坚持。仔细阅读您收到的任何错误——最有可能的是它们与找不到 cl.exe 或没有 32 位或 64 位 CUDA 工具包有关。尝试让 NVCC 在没有 CUDAfy 的情况下工作。如果您仍然有问题,请告诉我。
代码
在 .NET 中转换为 base64 的最简单方法是使用 Convert.ToBase64 方法。但是,让我们看看我们如何自己实现这样的方法。下面是一个接受字节数组并转换为 base64 字符串的方法。代码基于 René Nyffenegger 的 C 代码。
public static string base64_encode(byte[] bytes_to_encode)
{
    int i = 0;
    int j = 0;
    int ctr = 0;
    // Initialize StringBuilder to required capacity.
    StringBuilder sb = new StringBuilder((bytes_to_encode.Length * 4) / 3);
    // Local array for group of three bytes
    int[] char_array_3 = new int[3];
    // Local array for output
    int[] char_array_4 = new int[4];
    int in_len = bytes_to_encode.Length;
    // Loop until all bytes have been read
    while (in_len-- > 0)
    {
        // Read bytes into local array
        char_array_3[i++] = bytes_to_encode[ctr++];
        // Once three bytes have been read, begin encoding
        if (i == 3)
        {
            // 1st byte: Mask most significant 6-bits and move 2 bits to the right
            char_array_4[0] = (char_array_3[0] & 0xfc) >> 2;
            // 1st byte: Mask least significant 2-bits and move 4 bits left
            // 2nd byte: Mask most significant 4-bits and move 4 bits right
            // Add values
            char_array_4[1] = ((char_array_3[0] & 0x03) << 4) + ((char_array_3[1] & 0xf0) >> 4);
            // 2nd byte: Mask least significant 4-bits and move 2 bits left
            // 3rd byte: Mask most significant 2-bits and move 6 bits right
            // Add values
            char_array_4[2] = ((char_array_3[1] & 0x0f) << 2) +
                              ((char_array_3[2] & 0xc0) >> 6);
            // 3rd byte: Mask least significant 6-bits
            char_array_4[3] = char_array_3[2] & 0x3f;
            // Select the base64 characters from
            // the base64_chars array and write to output
            for (i = 0; (i < 4); i++)
            {
                char c = base64_chars[char_array_4[i]];
                sb.Append(c);
            }
            i = 0;
        }
    }
    // If the total number of bytes is not
    // a multiple of 3 then handle the last group
    if (i != 0)
    {
        // Set remaining bytes to zero
        for (j = i; j < 3; j++)
            char_array_3[j] = 0;
        // Handle the group as before
        char_array_4[0] = (char_array_3[0] & 0xfc) >> 2;
        char_array_4[1] = ((char_array_3[0] & 0x03) << 4) + ((char_array_3[1] & 0xf0) >> 4);
        char_array_4[2] = ((char_array_3[1] & 0x0f) << 2) + ((char_array_3[2] & 0xc0) >> 6);
        char_array_4[3] = char_array_3[2] & 0x3f;

        for (j = 0; (j < i + 1); j++)
        {
            char c = base64_chars[char_array_4[j]];
            sb.Append(c);
        }
        // Add padding characters
        while ((i++ < 3))
            sb.Append('=');

    }
    // Convert to string and return
    string s = sb.ToString();
    return s;
}
GPU 内核代码
我们将使用此代码作为 GPU 内核的基础。这是实际将在 GPU 上运行的代码。可以在 GPU 上运行的方法必须是静态的,并使用 Cudafy 属性进行修饰。成千上万的设备方法实例可以并行运行,因此我们需要一种从方法内部识别线程的方法。GThread 参数就是实现这一点的途径。另外两个参数是输入和输出数组。Gettid 方法返回线程的唯一 ID。线程在块网格中启动,每个块包含线程。因此,我们通过将块 ID 乘以块大小(维度)并添加块内的线程 ID 来计算 ID。网格和块可以是多维的,但在这里我们只使用一维,由 x 表示。
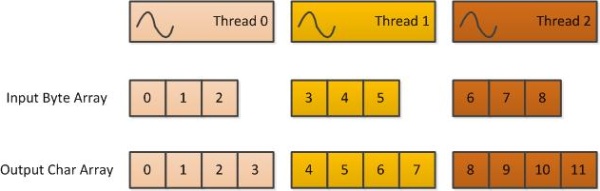
由于每个线程将处理一组三个字节,因此输入数组中的偏移量是线程 ID 的三倍。输出数组中的偏移量是线程 ID 的四倍。接下来是对上面讨论的代码的相当直接的移植。由于内核代码不支持 String,我们只需将字符串作为常量放在代码中。
[Cudafy]
public static void ToBase64String(GThread thread, byte[] input, char[] output)
{
    // Get the id of the current thread.
    int tid = Gettid(thread);
    // Input id is 3 times the thread id.
    int itid = tid * 3;
    // Output id is 4 times the thread id.
    int otid = tid * 4;
    // Since we always launch a fixed number of threads
    // per block we do not want a thread to try
    // accessing an out of range index.
    if (itid + 2 < input.Length)
    {
        byte a0 = 0;
        byte a1 = 0;
        byte a2 = 0;
        byte b0 = 0;
        byte b1 = 0;
        byte b2 = 0;
        byte b3 = 0;

        a0 = input[itid];
        a1 = input[itid + 1];
        a2 = input[itid + 2];

        // Do the bit shuffling that's the core of base64 encoding.
        b0 = (byte)((a0 & 0xfc) >> 2);
        b1 = (byte)(((a0 & 0x03) << 4) + ((a1 & 0xf0) >> 4));
        b2 = (byte)(((a1 & 0x0f) << 2) + ((a2 & 0xc0) >> 6));
        b3 = (byte)(a2 & 0x3f);

        // Set the four output chars by selecting the index based on above four values.
        output[otid] = "ABCDEFGHIJKLMNOPQRSTUVWXYZabcdefghijklmnopqrstuvwxyz0123456789+/"[b0];
        output[otid + 1] = "ABCDEFGHIJKLMNOPQRSTUVWXYZabcdefghijklmnopqrstuvwxyz0123456789+/"[b1];
        output[otid + 2] = "ABCDEFGHIJKLMNOPQRSTUVWXYZabcdefghijklmnopqrstuvwxyz0123456789+/"[b2];
        output[otid + 3] = "ABCDEFGHIJKLMNOPQRSTUVWXYZabcdefghijklmnopqrstuvwxyz0123456789+/"[b3];
    }
}

[Cudafy]
public static int Gettid(GThread thread)
{
    int tid = thread.blockIdx.x * thread.blockDim.x + thread.threadIdx.x;
    return tid;
}
GPU 主机代码
与 GPU 交互的代码在名为 GConvert 的类中实现。
引用了 Cudafy.NET.dll 并包含了以下命名空间
using Cudafy;
using Cudafy.Host;
using Cudafy.Translator;
实现了两种执行转换的方法。两者都做相同的事情,接受要编码的字节数组和用于输出的 Stream。我们将查看最直接的方法。
写入输出流是异步完成的。由于 StreamWriter 不包含用于异步写入的 Begin 和 End 方法,因此使用了委托。类成员 _gpu 指的是 CUDAfy GPGPU 类,代表一个单一的 GPU 设备。它被传递到 GConvert 构造函数中。现在的工作过程如下
- 将输入数据块传输到 GPU 设备。
- 处理数据块(启动)。
- 将结果数据块传回主机。
- 将结果异步写入输出流。
- 如果有更多数据可用,则返回到步骤 1。
- 一旦所有数据块都已处理,检查任何剩余字节并在主机上编码。
public void ToBase64Naive(byte[] inArray, Stream outStream)
{
    int totalBytes = inArray.Length;
    int ctr = 0;
    int chunkIndex = 0;
    int threadsPerBlock = 256;

    StreamWriter sw = new StreamWriter(outStream);
    BeginWriteDelegate beginWrite = new BeginWriteDelegate(BeginWrite);
    IAsyncResult res = null;
    while (totalBytes > 0)
    {
        // Split into chunks
        int chunkSize = Math.Min(totalBytes, MAXCHUNKSIZE);
        int outChunkSize = (chunkSize * 4) / 3;

        // Copy the data to GPU
        _gpu.CopyToDevice(inArray, ctr, _inArrays_dev[chunkIndex], 0, chunkSize);
        // Calculate blocksPerGrid - GPU launches multiple blocks (blocksPerGrid)
        // each consisting of multiple threads (threadsPerBlock).
        // Each thread will handle 3 bytes.
        int blocksPerGrid =
          (chunkSize + (threadsPerBlock * 3) - 1) / (threadsPerBlock * 3);
        // Launch the function ToBase64String asynchronously
        // (same stream id as previous GPU command - they are in same queue).
        _gpu.Launch(blocksPerGrid, threadsPerBlock, "ToBase64String",
                    _inArrays_dev[chunkIndex], _outArrays_dev[chunkIndex]);
        // Copy the data from GPU
        _gpu.CopyFromDevice(_outArrays_dev[chunkIndex], 0,
                            _outArrays[chunkIndex], 0, outChunkSize);

        // End any pending write
        if (res != null)
            beginWrite.EndInvoke(res);
        // Begin writing the managed buffer to the stream asynchronously.
        res = beginWrite.BeginInvoke(sw, _outArrays[chunkIndex], 0,
                                     outChunkSize, null, null);

        // Increment the chunkIndex, decrement totalBytes
        // by chunkSize and increase our offset counter.
        chunkIndex++;
        totalBytes -= chunkSize;
        ctr += chunkSize;
        if (chunkIndex == MAXCHUNKS)
            chunkIndex = 0;
    }
    // Wait for last chunk to be written.
    if (res != null)
        beginWrite.EndInvoke(res);
    // If the total number of bytes converted was not
    // a multiple of 3 then handle the last bytes here.
    int remainder = inArray.Length % 3;
    if (remainder != 0)
    {
        string s = Convert.ToBase64String(inArray,
                           inArray.Length - remainder,
                           remainder).Remove(0, remainder);
        sw.Write(s);
    }
    sw.Flush();
}
这里感兴趣的变量如下:
MAXCHUNKSIZE: 必须是 3 的倍数的常量。MAXCHUNKS: 最大块数。_inArrays_dev: 在 GPU 上,MAXCHUNKS个数组,每个数组包含MAXCHUNKSIZE字节。_outArrays_dev: 在 GPU 上,MAXCHUNKS个数组,每个数组包含MAXCHUNKSIZE* 4/3 个字符。_outArrays: 在主机上,MAXCHUNKS个数组,每个数组包含MAXCHUNKSIZE* 4/3 个字符。
这些数组在 GConvert 构造函数中实例化。Cudafy 的过程在早期的一篇文章中详细介绍过:在 .NET 中使用 Cudafy 进行 GPGPU 编程。基本上,GPU 代码包含在 GPUConvertCUDA 类中,我们创建了一个以该类名称命名的模块。使用 IsModuleLoaded 方法,我们检查模块是否已加载。如果未加载,我们尝试从名为“GPUConvertCUDA.cdfy”的 XML 文件反序列化模块。如果文件不存在或序列化模块是由不同版本的程序集创建的,则我们再次 Cudafy。我们传递自动平台 (x86 或 x64)、CUDA 1.2 架构(最新的 NVIDIA 设备是 2.0)参数以及我们要 Cudafy 的类类型。为了节省时间,下次程序运行时,我们将模块序列化为 XML 文件。
public GConvert(GPGPU gpu)
{
    _gpu = gpu;

    string moduleName = typeof(GPUConvertCUDA).Name;
    // If module is not already loaded try to load from file.
    if (!_gpu.IsModuleLoaded(moduleName))
    {
        var mod = CudafyModule.TryDeserialize(moduleName);
        // If file does not exist or the checksum does not match then re-Cudafy.
        if (mod == null || !mod.TryVerifyChecksums())
        {
            Debug.WriteLine("Cudafying...");
            mod = CudafyTranslator.Cudafy(ePlatform.Auto,
                            eArchitecture.sm_12, typeof(GPUConvertCUDA));
            // Save the module to file for future use.
            mod.Serialize(moduleName);
        }
        _gpu.LoadModule(mod);
    }
    // Instantiate arrays. _dev arrays will ultimately be on the GPU.
    _inArrays_dev = new byte[MAXCHUNKS][];
    _outArrays_dev = new char[MAXCHUNKS][];
    _outArrays = new char[MAXCHUNKS][];
    _inStages = new IntPtr[MAXCHUNKS];
    _outStages = new IntPtr[MAXCHUNKS];

    // Make MAXCHUNKS number of each array. Input is bytes, output is chars.
    // The output array will be 4/3 the size of the input.
    for (int c = 0; c < MAXCHUNKS; c++)
    {
        _inArrays_dev[c] = _gpu.Allocate<byte>(MAXCHUNKSIZE);
        _outArrays_dev[c] = _gpu.Allocate<char>((MAXCHUNKSIZE * 4) / 3);
        _inStages[c] = _gpu.HostAllocate<byte>(MAXCHUNKSIZE);
        _outStages[c] = _gpu.HostAllocate<char>((MAXCHUNKSIZE * 4) / 3);
        _outArrays[c] = new char[(MAXCHUNKSIZE * 4) / 3];
    }
}</char></byte></char></byte>
_inStages 和 _outStages 由 ToBase64Naive 方法的优化版本 ToBase64 使用。此方法利用固定内存实现更快的传输以及执行异步传输和内核启动。使用 HostAllocate 分配固定内存。请记住,固定内存与非固定内存相比是有限的,并且您需要使用 HostFree 手动清理它。使用固定内存进行传输所获得的性能提升约为 50%,但是这被从托管内存传输到固定内存的需要所抵消。最终,与 ToBase64Naive 方法中的常规传输相比,速度提升可能微不足道。但是,它确实带来了另一个好处,即异步传输和内核启动。传输不会彼此并行发生;相反,它们被放置在队列中。传输可以与启动并行发生。需要正确使用流 ID。不要将流 ID 0 用于此目的——流 0 会同步所有流,无论其 ID 如何。同一流 ID 的所有操作都保证按顺序执行。
使用 GConvert 类
使用静态 CudafyHost.GetDevice 方法获取 GPU 设备。该设备被传递给 GConvert 构造函数。转换需要两个参数:字节数组和输出流。
// Get the first CUDA GPGPU
GPGPU gpu = CudafyHost.GetDevice(eGPUType.Cuda);
// Pass the GPGPU to the GConvert constructor
GConvert gc = new GConvert(gpu);
gc.ToBase64(ba, gpuStream);
基准测试
我们想比较几种不同的 base64 编码方式。以下基准测试在配备 NVIDIA GeForce GT 540M GPU 的 Intel Core i5-450M 上运行
- 我们自己的 base64 编码器。
- GPU 朴素实现
- GPU 异步实现
- .NET Convert
| 测试 | 1MByte (ms) | 12MByte (ms) | 24MBytes (ms) | 36MBytes (ms) |
| Base64 编码器 | 52 | 612 | 1232 | 1826 |
| GPU 朴素实现 | 5 | 43 | 85 | 141 |
| GPU 异步实现 | 5 | 39 | 76 | 113 |
| .NET Convert | 3 | 53 | 106 | 349 |
现在用图表表示;越低越好。

讨论
对于少量二进制数据,速度差异相对较小。对于大型数据集,GPU 比我们自己的 base64 实现提供了巨大的性能提升。更简单的朴素 GPU 实现和异步固定内存版本之间的差异很有用,但并非惊天动地。如果您需要从 GPU 中榨取每一丝性能,那么这是值得的。然而,值得注意的是,开箱即用的 .NET 实现取得了出色的结果。对于绝大多数情况,它几乎与 GPU 一样快,只有在处理更大的数组时才会被超越。
如果您运行应用程序时,您的 GPU 运行速度比这里显示的结果慢得多,那么很可能有一个很好的原因。这些基准测试是在 NVIDIA Fermi 架构上运行的。这种最近的设计在访问小而不规则的全局内存块时(正如我们在这里每个线程读取三个独立字节时所做的那样)提供了更好的性能。有办法通过巧妙地使用共享内存来规避这个问题,但与任何编程任务一样,必须对实现所花费的时间进行限制。这里的代码是 CPU 版本的简单移植。
那么,为什么 .NET base64 编码器比我们自己的 CPU 版本快得多呢?嗯,它极不可能像我们一样用简单的 C# 实现。最有可能的是,它利用了特殊的低级 SSE 命令,就像 FFTW(西方最快的傅里叶变换)可以比我们遍历相同长度的数组并对每个元素进行简单乘法更快地执行 FFT。由于 base64 编码的简单、顺序、有序特性,优化的 CPU 版本可以与 GPU 媲美。请注意,.NET 版本很可能通过显式地分解数据并在多个线程中执行(例如每个核心一个线程)来进一步加快速度。还要注意,写入流不会成为瓶颈。如有必要,请删除该步骤以确保真实的比较。使用 StreamWriter 写入不像使用 BinaryWriter 写入那么快。
Base64 编码在 GPU 上仍然有用吗?是的,对于非常大的数据集,并且如果待编码的数据已经在 GPU 上。这将消除首先将数据复制到 GPU 的需要。此外,它将减少宝贵的 CPU 资源的负载。
许可证
Cudafy.NET SDK 包含两个大型示例项目,其中包括光线追踪、波纹效果和分形。它作为双重许可软件库提供。如果您遵守 GNU LGPL version 2.1 中包含的条款和条件,LGPL 版本适用于专有或开源应用程序的开发。访问 Cudafy 网站以获取更多信息。
历史
- 2011 年 11 月 2 日
- 首次提交。
- 2013 年 9 月 17 日
- 更新为使用 CUDAfy V1.26 和 CUDA 5.5