
使用 OpenCVdotNet 在网络摄像头上捕获对象
4.71/5 (10投票s)
该程序使用网络摄像头,当图像发生变化时拍摄物体照片。
介绍
此代码基于博客中的“Webcam Simple Frame Difference”(网络摄像头简单帧差):http://haryoktav.wordpress.com/2009/02/28/webcam-c-simple-frame-difference/。
目标
- 使用网络摄像头监控房间
- 无需保存长时间的视频,只需捕捉显示变化的图像
- 易于查看结果,无需查看整个长时间的视频(可能没有任何变化)
背景
此代码使用 OpenCVdotNet 库来
- 下载并安装 OpenCV 1.0 - http://sourceforge.net/projects/opencv/ (不要安装 1.1)
- 下载并安装 OpenCVDotNet 0.7 - http://code.google.com/p/opencvdotnet/
我使用 Visual Studio 2005 设计了一个如下所示的窗体
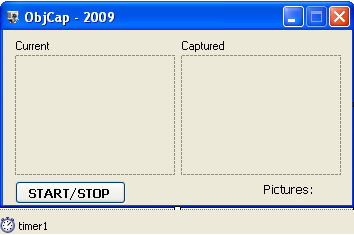
该窗体具有 2 个PictureBox,用于显示当前图像和捕获的图像;1 个 Timer,用于重复检查房间内图像的差异,并在需要时保存到文件;1 个按钮用于激活 Timer,1 个标签用于显示捕获的图像数量。
使用代码
只有一个窗体,代码如下所示:
安装 OpenCVDotnet 库后,将其添加到项目中
using System;
using System.ComponentModel;
using System.Data;
using System.Drawing;
using System.Drawing.Imaging;
using System.Text;
using System.Windows.Forms;
using OpenCVDotNet; 	//don't forget to add opencvdotnel.dll as Reference
声明一些 private 变量
namespace Objcap
{
    public partial class Form1 : Form
    {
        private CVCapture capture;            //buffer for captured image from webcam
        private CVImage backgnd;              //buffer for previous image,
					//subtracts result and captured image
        private byte threshold=30;            //threshold value = 30
        private bool only_first = false;      //flag
        private int filename = 0;             //to make file name change after each save
构建一个 button1_Click 函数:用于激活 Timer:
     public Form1()
        {
            InitializeComponent();
        }
        private void button1_Click(object sender, EventArgs e)
        {
            timer1.Enabled = !(timer1.Enabled); //toggle start/stop
            if (timer1.Enabled)
                capture = new CVCapture(0);     //start camera when timer enabled
            else
                capture.Release();              //stop camera when timer disabled
        }
主要函数在 timer1_tick 中
每次 Timer1 触发(在间隔属性中设置 = 500 -> 500 毫秒),我们需要将上一张图像(保存在 backgnd 中)与当前图像(frame)进行比较。
如果存在差异,则意味着房间内有物体进入或离开。因此,保存该图像。
private void timer1_Tick(object sender, EventArgs e)
{
    using (CVImage frame = capture.QueryFrame())  //get camera frame
    {
        frame.Resize(160, 120);             	//resize image to 160x120 pixel
        if (only_first == false)            	//only first time
        {
            backgnd = new CVImage(frame);   	//copy buffer to get the same size
            only_first = true;              	//disable flag forever
        }
        //gray scale conversion
        for (int row = 0; row < frame.Height; ++row)
        {
            for (int col = 0; col < frame.Width; ++col)
            {
                CVRgbPixel pixel = frame[row, col]; 	//get current pixel
                byte bwValue = pixel.BwValue;   	//get the gray color
                frame[row, col] = new CVRgbPixel(bwValue, bwValue, bwValue);//set current
								// pixel to gray
            }
        }
        int pixelnum = 0; // number of different pixel
        for (int row = 0; row < frame.Height; ++row)
        {
            for (int col = 0; col < frame.Width; ++col)
            {
                if (Math.Abs(frame[row, col].BwValue -
			backgnd[row, col].BwValue) > threshold)
                {
                    pixelnum++;
                }
                backgnd[row, col] = frame[row, col];  	// save current frame to
						// background frame for next time
            }
        }
         pictureBox1.Image = frame.ToBitmap();  //display image
         int objsize = 500;  	// depends on Size of Object to be captured
                             	// if number of different pixels >
				// objsize then save image to hard drive
        if (pixelnum > objsize)
        {
            using (CVImage frame2 = capture.QueryFrame())
            {
                // Capture color image
                filename++;                      	//change file name
                string path = "D:/webcam/";        	// Path to save file
                path += DateTime.Today.Day.ToString()+"."+
                	filename.ToString() + ".jpg";   	// Full path - file name with
						// added day saved
                frame2.ToBitmap().Save(path, ImageFormat.Jpeg);   // Save image file
						// with max resolution of webcam
                frame2.Resize(160, 120);               // Resize image to show on
						// picturebox3
                pictureBox3.Image = frame2.ToBitmap();	//Show captured image
            }
        }
         label5.Text = "Pictures: " + filename.ToString();   	// Show number of
							// captured images
    }
    GC.Collect();
}
关注点
此代码运行良好。您可以运行该程序一个月,如果需要的话。
该程序将仅保存重要的图像,文件名称以保存日期命名。
程序运行时:(请记住创建一个文件夹:D:\Webcam)
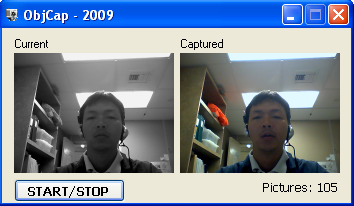
以及结果(保存的文件)

历史
我尝试改进它。现在它不再占用内存了。