
Cinch MVVM 框架代码生成器
4.98/5 (88投票s)
我的Cinch MVVM框架的代码生成器。
目录
介绍
这篇文章讲的到底是什么?嗯,你们中的一些人可能已经知道,而另一些人可能还不知道,我刚刚写完了一系列关于我自己的WPF MVVM框架Cinch的文章。Cinch系列文章共有六篇,Cinch的源代码现已托管在CodePlex上。
以下是原始的Cinch文章,以防你错过并想阅读
- Cinch入门文章
- Cinch及其内部机制的演练 I
- Cinch及其内部机制的演练 II
- 如何使用Cinch开发ViewModels
- 如何使用Cinch对ViewModel进行单元测试,包括如何测试可能在Cinch ViewModel中运行的后台工作线程
- 一个使用Cinch的演示应用程序
你可能想知道还有什么没讲。嗯,就Cinch本身而言,确实没什么了,一切都很好。我真的很满意Cinch的成果,它让我的生活变得如此简单,但我感觉还有进一步帮助的空间,所以我决定创建一个Cinch代码生成器,以进一步简化创建Cinch ViewModel的过程,你知道,让整个过程变得“轻松”(“cinch”)。
这是Cinch代码生成器运行时的截图

这是文本高亮显示的效果,它使用了Daniel Granwald制作的极其出色的AvalonEdit控件,这是一个免费控件,可从https://codeproject.org.cn/KB/edit/AvalonEdit.aspx获取。
这个项目以前使用的是AqiStar控件,这是一个商用控件,非常棒,但下载这篇文章的人无法使用,所以我改用Daniel Grunwald的免费控件,我不得不说它提供了相同的功能。
Daniel的AvalonEdit控件允许通过使用一个名为“CustomHighlighting.xshd”的嵌入式资源文件进行自定义语法高亮显示,该文件看起来像这样
<?xml version="1.0"?>
<SyntaxDefinition name="Custom Highlighting"
         xmlns="http://icsharpcode.net/sharpdevelop/syntaxdefinition/2008">
     <Color name="Comment" foreground="Green" />
     <Color name="String" foreground="Cyan" />

     <!-- This is the main ruleset. -->
     <RuleSet>
          <Span color="Comment" begin="//" />
          <Span color="Comment" multiline="true" begin="/\*" end="\*/" />

          <Span color="String">
               <Begin>"</Begin>
               <End>"</End>
               <RuleSet>
                    <!-- nested span for escape sequences -->
                    <Span begin="\\" end="." />
               </RuleSet>
          </Span>

    <Keywords foreground="White">
      <Word>?</Word>
      <Word>,</Word>
      <Word>.</Word>
      <Word>;</Word>
      <Word>(</Word>
      <Word>)</Word>
      <Word>[</Word>
      <Word>]</Word>
      <Word>{</Word>
      <Word>}</Word>
      <Word>+</Word>
      <Word>-</Word>
      <Word>/</Word>
      <Word>%</Word>
      <Word>*</Word>
      <Word><</Word>
      <Word>></Word>
      <Word>^</Word>
      <Word>=</Word>
      <Word>~</Word>
      <Word>!</Word>
      <Word>|</Word>
      <Word>&</Word>
    </Keywords>

    <Keywords fontWeight="bold" foreground="CornFlowerBlue">
      <Word>this</Word>
      <Word>base</Word>
    </Keywords>

    <Keywords fontWeight="bold" foreground="CornFlowerBlue">
      <Word>as</Word>
      <Word>is</Word>
      <Word>new</Word>
      <Word>sizeof</Word>
      <Word>typeof</Word>
      <Word>true</Word>
      <Word>false</Word>
      <Word>stackalloc</Word>
    </Keywords>

    <Keywords fontWeight="bold" foreground="CornFlowerBlue">
      <Word>else</Word>
      <Word>if</Word>
      <Word>switch</Word>
      <Word>case</Word>
      <Word>default</Word>
    </Keywords>

    <Keywords fontWeight="bold" foreground="CornFlowerBlue">
      <Word>do</Word>
      <Word>for</Word>
      <Word>foreach</Word>
      <Word>in</Word>
      <Word>while</Word>
    </Keywords>

    <Keywords foreground="CornFlowerBlue">
      <Word>break</Word>
      <Word>continue</Word>
      <Word>goto</Word>
      <Word>return</Word>
    </Keywords>

    <Keywords foreground="CornFlowerBlue">
      <Word>yield</Word>
      <Word>partial</Word>
      <Word>global</Word>
      <Word>where</Word>
      <Word>select</Word>
      <Word>group</Word>
      <Word>by</Word>
      <Word>into</Word>
      <Word>from</Word>
      <Word>ascending</Word>
      <Word>descending</Word>
      <Word>orderby</Word>
      <Word>let</Word>
      <Word>join</Word>
      <Word>on</Word>
      <Word>equals</Word>
      <Word>var</Word>
      <Word>dynamic</Word>
    </Keywords>

    <Keywords fontWeight="bold" foreground="CornFlowerBlue">
      <Word>try</Word>
      <Word>throw</Word>
      <Word>catch</Word>
      <Word>finally</Word>
    </Keywords>

    <Keywords fontWeight="bold" foreground="CornFlowerBlue">
      <Word>checked</Word>
      <Word>unchecked</Word>
    </Keywords>

    <Keywords foreground="CornFlowerBlue">
      <Word>fixed</Word>
      <Word>unsafe</Word>
    </Keywords>

    <Keywords fontWeight="bold" foreground="CornFlowerBlue">
      <Word>bool</Word>
      <Word>byte</Word>
      <Word>char</Word>
      <Word>decimal</Word>
      <Word>double</Word>
      <Word>enum</Word>
      <Word>float</Word>
      <Word>int</Word>
      <Word>long</Word>
      <Word>sbyte</Word>
      <Word>short</Word>
      <Word>struct</Word>
      <Word>uint</Word>
      <Word>ushort</Word>
      <Word>ulong</Word>
    </Keywords>

    <Keywords foreground="CornFlowerBlue">
      <Word>class</Word>
      <Word>interface</Word>
      <Word>delegate</Word>
      <Word>object</Word>
      <Word>string</Word>
    </Keywords>

    <Keywords foreground="CornFlowerBlue">
      <Word>void</Word>
    </Keywords>

    <Keywords fontWeight="bold" foreground="CornFlowerBlue">
      <Word>explicit</Word>
      <Word>implicit</Word>
      <Word>operator</Word>
    </Keywords>

    <Keywords fontWeight="bold" foreground="CornFlowerBlue">
      <Word>params</Word>
      <Word>ref</Word>
      <Word>out</Word>
    </Keywords>

    <Keywords foreground="CornFlowerBlue">
      <Word>abstract</Word>
      <Word>const</Word>
      <Word>event</Word>
      <Word>extern</Word>
      <Word>override</Word>
      <Word>readonly</Word>
      <Word>sealed</Word>
      <Word>static</Word>
      <Word>virtual</Word>
      <Word>volatile</Word>
    </Keywords>

    <Keywords fontWeight="bold" foreground="CornFlowerBlue">
      <Word>public</Word>
      <Word>protected</Word>
      <Word>private</Word>
      <Word>internal</Word>
    </Keywords>

    <Keywords fontWeight="bold" foreground="CornFlowerBlue">
      <Word>namespace</Word>
      <Word>using</Word>
    </Keywords>

    <Keywords foreground="CornFlowerBlue">
      <Word>lock</Word>
    </Keywords>

    <Keywords foreground="CornFlowerBlue">
      <Word>get</Word>
      <Word>set</Word>
      <Word>add</Word>
      <Word>remove</Word>
    </Keywords>

    <Keywords fontWeight="bold" foreground="CornFlowerBlue">
      <Word>null</Word>
      <Word>value</Word>
    </Keywords>

          <!-- Digits -->
          <Rule foreground="Cyan">
            \b0[xX][0-9a-fA-F]+  # hex number
        |    \b
            (    \d+(\.[0-9]+)?   #number with optional floating point
            |    \.[0-9]+         #or just starting with floating point
            )
            ([eE][+-]?[0-9]+)? # optional exponent
        </Rule>
     </RuleSet>
</SyntaxDefinition>

本文及附带代码代表了我为创建Cinch代码生成器所做的工作。应用程序本身完全使用Cinch构建,它还创建Cinch ViewModel文件。
以下是它的一些主要功能
- 允许用户保存和重新编辑ViewModel(使用XML持久化)
- 验证以确保用户填写了所需的ViewModel数据
- 允许用户添加自己的属性类型
- 允许用户包含引用的程序集,以获取额外的类型
- 对生成代码进行编译时检查,以确保生成的代码符合最高标准;当然,如果用户认为自己比编译器更懂,仍然可以选择保存一个编译不通过的文件
- 在实际的代码生成器UI中对生成代码进行语法高亮显示
- 只生成所需的代码;例如,如果用户选择一个标准类型ViewModel,则ViewModel代码中不会生成
IsValid逻辑 - 由两部分组成的局部类
- xxx.g.cs:纯粹生成的代码,绝不应该手动编辑
- xxx.cs:一个很好的起点,用于编写ViewModel逻辑的其余部分,并已有一些不错的辅助代码
- 它实际上很好地展示了Cinch本身,并且实际上可以作为第二个Cinch演示应用程序
这里有很多内容,我花了很多心思,所以我希望你会觉得它和我预想的一样有用。
先决条件
没有真正的先决条件,因为Cinch代码生成器包含你需要的一切。
Cinch代码生成器(本文的应用程序)实际上使用了最新版本的Cinch,但如果你想亲自查看Cinch源代码,可能会感兴趣,所以如果你是那种人,我建议你研究Cinch源代码并阅读上面列出的文章。
开始生成代码的步骤
你们中的一些人可能是那种拿起东西就能直接使用,不想知道全部细节的人。我向你们致敬,我做不到,我必须深入研究并立即将其拆解。如果你只是想快速生成一些代码,以下是使用Cinch代码生成器实际生成代码的步骤
- 使用UI中的“新建”按钮创建新的ViewModel。
- 使用提供的文本框为ViewModel命名。
- 使用提供的文本框为ViewModel指定命名空间。
- 使用提供的复选框选择所需的ViewModel类型。
- 添加所有包含其他
Types的引用程序集,你认为可能需要将它们作为属性值从ViewModel中暴露出来。你可以通过“管理引用程序集”按钮来完成此操作,这将打开ReferencedAssembliesPopup窗口,允许你添加/删除全局可用的引用程序集。这些引用程序集将持久化到文件中,以便在当前UI会话关闭后创建的未来ViewModel中可用。 - 使用“管理属性”按钮添加所有你认为可能需要的属性类型,这将打开
PropertyListPopup弹出窗口,允许你添加/删除全局可用的属性。巧妙之处在于,你可以输入一个可能位于你在步骤5中包含的引用程序集中的Type。也就是说,如果你添加了一个包含你想要作为可用属性Type输入的Type的引用程序集。假设你在步骤5中包含了一个PeopleLib.dll,其中包含一个Person类型,在将其作为步骤5中描述的引用程序集添加之前,它无法作为允许的属性Type输入。PropertyListPopup弹出窗口中的所有属性都将持久化到文件中,以便在当前UI会话关闭后创建的未来ViewModel中可用。 - 为ViewModel添加新属性,假设你已拥有步骤6中所有必需的属性
Type。 - 为每个属性命名,并决定是否要在生成的代码中为该属性使用
DataWrapper<T>。DataWrapper<T>对象允许ViewModel控制数据的可编辑性,所以我喜欢它们,但这取决于你。 - 保存ViewModel。
- 使用“生成代码”按钮生成ViewModel,它将编译代码,并在出现错误时提醒你,如果你认为自己比编译器更懂,它还会给你选择无论如何都生成代码的选项。
我将在下面详细介绍所有这些工作原理,所以如果你想了解更多,你来对地方了。亲爱的读者,请继续阅读。
对关心的人来说,它如何运作
阅读本节绝非强制性的,如果你想跳过它,直接去投票,你应该给这篇文章打5分(顺便说一句,这是个玩笑),那没问题。
但是如果你想知道它是如何工作的,以及如果你想自己编辑某些内容应该查看哪个区域,你可能应该阅读以下小节,它们解释了Cinch代码生成器是如何实际工作的。
注意:由于代码生成器是使用Cinch设计和实现的,我将不会涵盖过去Cinch文章中已经涵盖的内容。我将只涵盖我认为重要的部分。
应用程序的结构
我认为解释所有这些如何协同工作的最佳方式是一两个截图。那么,我们来看一些截图,好吗?

当你使用Cinch代码生成器创建第一个ViewModel并添加一两个属性时,你将看到类似上面的图片。这张图片告诉我们代码的结构是什么?嗯,从上面的图片中,我们可以看出代码生成器代码具有以下属性
- 有一个MainWindow.xaml文件,其中包含一个
MainWindowViewModel MainWindowViewModel可以持有一个InMemoryViewModel实例InMemoryViewModel实例持有一个PropertiesViewModel,它用作PropertiesView的DataContext

如果我们检查上面的图片,我们可以看到有三个按钮(右上角,就在最小化/最大化/关闭窗口按钮下方)用户可以点击;这三个按钮中里面那个用于创建一个新属性(添加到正在进行的ViewModel中),下一个按钮(上面图片中带有箭头的那个)用于打开PropertyListPopup弹出窗口。这个弹出窗口是使用之前讨论过的(即在之前的Cinch文章中)Cinch.IUIVisualizerService服务打开的。
从PropertyListPopup弹出窗口,用户还可以打开另一个名为StringEntryPopup的弹出窗口,该窗口同样使用Cinch.IUIVisualizerService服务打开。从StringEntryPopup,用户可以向可用属性列表添加新的属性类型。

使用三个按钮中的最后一个,用户可以打开另一个名为ReferencedAssembliesPopup的弹出窗口,用户可以从该窗口浏览到任何包含他们可能需要作为当前正在处理的代码生成器ViewModel中公开属性的类型的引用程序集。这将在稍后详细讨论,请勿担心。
ViewModel到/从XML的持久化
Cinch代码生成器一个非常方便的部分是它允许将可能尚未完成的ViewModel持久化到XML文件中。这意味着你可以进行到ViewModel工作的一半,将其保存到XML,然后回来加载它并继续工作,或者你可以加载一个以前保存到XML的现有ViewModel并重新加载它,然后将其用作全新ViewModel的基础。
要将当前ViewModel保存为XML,你可以使用“保存”按钮。

InMemoryViewModel中的保存命令如下所示
/// <summary>
/// Executes the SaveVMCommand
/// </summary>
private void ExecuteSaveVMCommand()
{
    ClearCodeWorkSpaces();
    SaveOrGenerateOperation("Xml files (*.xml)|*.xml",
        SaveOrGenerate.Save);
}
这个命令调用了SaveOrGenerateOperation()方法,我在这里就不赘述了。重要的是SaveOrGenerateOperation()内部发生了什么,即调用了Persistence.PersistViewModel()静态方法。这段代码如下所示,可以看出,它使用标准的XML序列化将一个PersistentVM(这是一个从完整的WPF ViewModel创建的轻量级ViewModel,只包含重要内容)持久化到一个XML文件。
/// <summary>
/// Serializes a PesistentVM to disk, in a XML file format
/// </summary>
/// <param name="fileName">The file name of the ViewModel to save</param>
/// <param name="vmToPersist">The actual serializable ViewModel</param>
/// <returns>True if the save operation succeeds</returns>
public static Boolean PersistViewModel(String fileName, PesistentVM vmToPersist)
{
    try
    {
        FileInfo file = new FileInfo(fileName);
        if (!file.Extension.Equals(".xml"))
            throw new NotSupportedException(
                String.Format("The file name {0} you picked is not " +
                "supported\r\n\r\nOnly .xml files are valid",
                file.Name));

        if (vmToPersist == null)
            throw new NotSupportedException("The ViewModel is null");


        //write the file to disk
        XmlSerializer serializer = new XmlSerializer(typeof(PesistentVM));

        using (TextWriter writer = new StreamWriter(file.FullName))
        {
            serializer.Serialize(writer, vmToPersist);
        }
        return true;
    }
    catch (Exception ex)
    {
        throw ex;
    }
}
正如你所想,也有一个OpenCommand用于将PersistentVM重新水化成一个成熟的WPF风格的可绑定INotifyPropertyChanged/基于Cinch的ViewModel。

OpenCommand执行时相关的代码看起来像这样
//open to XML
PesistentVM pesistentVM =
    ViewModelPersistence.HydratePersistedViewModel(openFileService.FileName);
//check we got something, and recreate the full weight InMemoryViewModel from
//the lighter weight XML read PesistentVM
if (pesistentVM != null)
{
    CurrentVM = new InMemoryViewModel();

    //Start out with PropertiesViewModel shown
    PropertiesViewModel propertiesViewModel =
        new PropertiesViewModel();
    propertiesViewModel.IsCloseable = false;
    CurrentVM.PropertiesVM = propertiesViewModel;
    //and now read in other data
    CurrentVM.ViewModelName = pesistentVM.VMName;
    CurrentVM.CurrentViewModelType = pesistentVM.VMType;
    CurrentVM.ViewModelNamespace = pesistentVM.VMNamespace;
    //and add in the individual properties
    foreach (var prop in pesistentVM.VMProperties)
    {
        CurrentVM.PropertiesVM.PropertyVMs.Add(new
        SinglePropertyViewModel
        {
            PropertyType = prop.PropertyType,
            PropName = prop.PropName,
            UseDataWrapper = prop.UseDataWrapper
        });
    }

    HasContent = true;
}
else
{
    messageBoxService.ShowError(String.Format("Could not open the ViewModel {0}",
    openFileService.FileName));
}

}
XML反序列化如下所示
/// <summary>
/// DeSerializes an XML file into a PesistentVM
/// (if the xml is of the correct formatting)
/// </summary>
/// <param name="fileName">The file name of the ViewModel to open</param>
/// <returns>The XML read PesistentVM, or null if it can't be read</returns>
public static PesistentVM HydratePersistedViewModel(String fileName)
{
    try
    {
        FileInfo file = new FileInfo(fileName);
        if (!file.Extension.Equals(".xml"))
            throw new NotSupportedException(
                String.Format("The file name {0} you picked is not supported" +
                "\r\n\r\nOnly .xml files are valid",
                file.Name));

        //read the file from disk
        XmlSerializer serializer = new XmlSerializer(typeof(PesistentVM));
        serializer.UnknownNode += Serializer_UnknownNode;
        serializer.UnknownAttribute += Serializer_UnknownAttribute;
        PesistentVM vmToHydrate = null;

        using (FileStream fs = new FileStream(file.FullName, FileMode.Open))
        {
            vmToHydrate = (PesistentVM)serializer.Deserialize(fs);
        }
        return vmToHydrate;
    }
    catch (Exception ex)
    {
        throw ex;
    }
}
以防你好奇生成的ViewModel XML会是什么样子,这里有一个示例
<?xml version="1.0" encoding="utf-8"?>
<PesistentVM xmlns:xsi="http://www.w3.org/2001/XMLSchema-instance"
    xmlns:xsd="http://www.w3.org/2001/XMLSchema">
  <VMType>ValidatingAndEditable</VMType>
  <VMName>ViewModelA</VMName>
  <VMNamespace>ViewModels</VMNamespace>
  <VMProperties>
    <PesistentVMSingleProperty>
      <PropName>count1</PropName>
      <PropertyType>Decimal</PropertyType>
      <UseDataWrapper>true</UseDataWrapper>
      <ParentViewModelName>ViewModelA</ParentViewModelName>
    </PesistentVMSingleProperty>
    <PesistentVMSingleProperty>
      <PropName>count2</PropName>
      <PropertyType>Decimal</PropertyType>
      <UseDataWrapper>true</UseDataWrapper>
      <ParentViewModelName>ViewModelA</ParentViewModelName>
    </PesistentVMSingleProperty>
  </VMProperties>
</PesistentVM>
这是Cinch代码生成器UI对于此XML文件可能显示的样子

属性管理
你需要涵盖的一个关键领域是向ViewModel代码添加属性。Cinch代码生成器只需点击几下即可实现此功能。实际上只需遵循几个步骤。
点击主UI窗口中的“添加属性”按钮

这将显示PropertyListPopup弹出窗口,允许你管理属性Types(使用右上角的“添加”按钮,或者在列表中选中项目后使用“移除”按钮进行移除),这些Types将随后在主UI窗口中你ViewModel的每个属性的组合框选择中可用。

从这个窗口,你可以执行以下操作
- 使用右上角的“添加”按钮添加新属性,这将打开另一个名为
StringEntryPopup的弹出窗口,该窗口旨在接受单个字符串。 - 使用右侧第二个按钮“移除”删除选定的属性。
- “确定”(左下角按钮)保存你所做的更改,这将创建/更新磁盘上的一个文件,即当前应用程序工作目录 + AvailablePropertyType.txt,这会在你添加第一个属性并按下“确定”后发生。按下“确定”还会更新App.xaml.cs类中一个全局可用的静态属性,所有
SinglePropertyView可用属性组合框都将其用作ItemSource。 - 这是所有独立的ViewModel属性组合框用于其
ItemSource的全局可用的App.xaml.cs属性的样子 - “取消”(左起第二个按钮)仅仅关闭
PropertyListPopup弹出窗口,不保存用户所做的任何更改。

/// <summary>
/// PropertyTypes : The list of global Property Types
/// </summary>
static PropertyChangedEventArgs propertyTypesChangeArgs =
       ObservableHelper.CreateArgs<App>(x => x.PropertyTypes);

public ObservableCollection<String> PropertyTypes
{
    get { return propertyTypes; }
    set
    {
        if (propertyTypes != value)
        {
            propertyTypes = value;
           NotifyPropertyChanged(propertyTypesChangeArgs);
        }
    }
}
对于高级用户,你可以在文件首次出现后选择自行编辑此文件,但我会在代码生成器未运行时进行此操作,然后重新运行它,因为你实际上绕过了所有关于属性持久化的逻辑,所以你应该在Cinch代码生成器运行之外进行此操作。
引用的程序集管理
正如你所想,你可能无法总是添加你想要的属性类型,因为它们可能不是像Int32/Decimal/String等简单类型。如果你需要应用程序使用的单独程序集中包含的某个Type作为ViewModel属性公开怎么办?这听起来像个问题,对吧?
幸运的是,Cinch代码生成器为此提供了一个解决方案。它实际上允许用户选择包含用户想要在当前ViewModel代码中使用的Types的引用程序集。用户只需通过ReferenecedAssembliesPopup弹出窗口中的标准OpenFileDialog来选择这些程序集。这些引用程序集的位置会持久化到磁盘上的一个文本文件中,以便用户下次创建新的ViewModel或打开现有ViewModel时,所有先前选择的引用程序集都会存在。
对于高级用户,此文件将是当前应用程序exe路径 + "ReferencedAssemblies.txt";如前所述,我会在Cinch代码生成器会话之外编辑此文件,然后再运行Cinch代码生成器。
引用程序集有两个目的
- 它们通过将用户选择的引用程序集作为已知引用程序集添加到编译器中,使代码编译阶段能够正常工作。
- 它们通过检查引用程序集中包含的
Type的命名空间,允许在生成的代码中包含所有正确的using语句。
这听起来都不错,但请等一下。那些以前使用过反射的人会意识到,要从程序集中提取一些数据,我们需要加载它,而且用户可能会创建大量包含许多引用程序集的ViewModel。那么,所有这些程序集默认会在哪里加载呢?
答案是,当前的AppDomain,这让我感到非常不舒服。我希望用户选择的引用程序集能够以最小的内存占用量加载,然后卸载。这听起来像是一个独立的AppDomain。这正是所做的,引用程序集被加载到一个独立的AppDomain中进行反射(当然是ReflectionOnly加载),然后,当获取到所需的信息后,AppDomain就被卸载了。
现在,这段代码比我最初想象的要棘手一些,秘密在于使用了一个继承自MarshalByRefObject的加载器对象。
无论如何,废话不多说,这是相关代码
using System;
using System.Collections.Generic;
using System.Linq;
using System.Text;
using System.IO;
using System.Globalization;
using System.Security.Policy;
using System.Reflection;
using System.Diagnostics.CodeAnalysis;

namespace CinchCodeGen
{
    /// <summary>
    /// Loads an assembly into a new AppDomain and obtains all the
    /// namespaces in the loaded Assembly, which are returned as a
    /// List. The new AppDomain is then Unloaded.
    ///
    /// This class creates a new instance of a
    /// <c>AssemblyLoader</c> class
    /// which does the actual ReflectionOnly loading
    /// of the Assembly into
    /// the new AppDomain.
    /// </summary>
    public class SeperateAppDomainAssemblyLoader
    {
        #region Public Methods
        /// <summary>
        /// Loads an assembly into a new AppDomain and obtains all the
        /// namespaces in the loaded Assembly, which are returned as a
        /// List. The new AppDomain is then Unloaded
        /// </summary>
        /// <param name="assemblyLocation">The Assembly file
        /// location</param>
        /// <returns>A list of found namespaces</returns>
        public List<String> LoadAssemblies(List<FileInfo> assemblyLocations)
        {
            List<String> namespaces = new List<String>();

            AppDomain childDomain = BuildChildDomain(
                AppDomain.CurrentDomain);

            try
            {
                Type loaderType = typeof(AssemblyLoader);
                if (loaderType.Assembly != null)
                {
                    AssemblyLoader loader =
                        (AssemblyLoader)childDomain.
                            CreateInstanceFrom(
                            loaderType.Assembly.Location,
                            loaderType.FullName).Unwrap();

                    namespaces = loader.LoadAssemblies(
                        assemblyLocations);
                }
                return namespaces;
            }

            finally
            {

                AppDomain.Unload(childDomain);
            }
        }
        #endregion

        #region Private Methods
        /// <summary>
        /// Creates a new AppDomain based on the parent AppDomains
        /// Evidence and AppDomainSetup
        /// </summary>
        /// <param name="parentDomain">The parent AppDomain</param>
        /// <returns>A newly created AppDomain</returns>
        private AppDomain BuildChildDomain(AppDomain parentDomain)
        {
            Evidence evidence = new Evidence(parentDomain.Evidence);
            AppDomainSetup setup = parentDomain.SetupInformation;
            return AppDomain.CreateDomain("DiscoveryRegion",
                evidence, setup);
        }
        #endregion


        /// <summary>
        /// Remotable AssemblyLoader, this class
        /// inherits from <c>MarshalByRefObject</c>
        /// to allow the CLR to marshall
        /// this object by reference across
        /// AppDomain boundaries
        /// </summary>
        class AssemblyLoader : MarshalByRefObject
        {
            #region Private/Internal Methods
            /// <summary>
            /// ReflectionOnlyLoad of single Assembly based on
            /// the assemblyPath parameter
            /// </summary>
            /// <param name="assemblyPath">The path to the Assembly</param>
            [SuppressMessage("Microsoft.Performance",
                "CA1822:MarkMembersAsStatic")]
            internal List<String> LoadAssemblies(List<FileInfo> assemblyLocations)
            {
                List<String> namespaces = new List<String>();
                try
                {
                    foreach (FileInfo assemblyLocation in assemblyLocations)
                    {
                        Assembly.ReflectionOnlyLoadFrom(assemblyLocation.FullName);
                    }

                    foreach (Assembly reflectionOnlyAssembly in AppDomain.CurrentDomain.
                            ReflectionOnlyGetAssemblies())
                    {
                        foreach (Type type in reflectionOnlyAssembly.GetTypes())
                        {
                            String ns = String.Format("using {0};", type.Namespace);
                            if (!namespaces.Contains(ns))
                                namespaces.Add(ns);
                        }
                    }
                    return namespaces;
                }
                catch (FileNotFoundException)
                {
                    /* Continue loading assemblies even if an assembly
                     * can not be loaded in the new AppDomain. */
                    return namespaces;
                }
            }
            #endregion
        }
    }
}
PropertyListPopup窗口的组合框将包含你选择的所有引用程序集中的所有Type。这是一个有意识的决定,让用户只输入他们需要的那些Type。我本来可以导入所有引用程序集中所有Type的名称,但我认为这是一个糟糕的主意,所以用户仍然必须手动输入PropertyListPopup / StringEntryPop弹出窗口中所需引用程序集Type的名称,才能将其显示为可分配给ViewModel属性的可用属性Type。代码编译
代码生成器的工作方式如下图所示

用文字来说,用户可以创建或修改现有的ViewModel,给它一个名称、命名空间和一些属性,然后他们可以点击“生成”(或者可能先保存,这可能是一个好主意)。当“生成”按钮被点击时,一个完整的WPF ViewModel,类型为InMemoryViewModel,正被用于将视图绑定到ViewModel。因此,当点击“生成”按钮时,这个完整的WPF ViewModel会被转换成一个稍微轻量级的东西,被称为PersistentVM。PersistentVM确实代表了一个完整的WPF InMemoryViewModel类型实例的所有重要部分,但没有额外的WPF负担。然而,它确实有一些额外的属性,这些属性暴露了一系列格式精美的字符串,这些字符串在代码生成阶段被用于创建最终将写入用户选择的文件位置的代码。
一个PersistentVM对象基本上是这样的,所有字符串操作实际上都由单独的PesistentVMSingleProperty对象完成。所以如果你真的想知道代码是如何创建的,那都在PesistentVMSingleProperty对象中。
/// <summary>
/// Represents a light weight persistable ViewModel
/// </summary>
public class PesistentVM
{
    #region Ctor
    public PesistentVM()
    {
        VMProperties = new List<PesistentVMSingleProperty>();
    }
    #endregion

    #region Public Properties

    /// <summary>
    /// ViewModel type
    /// </summary>
    public String InheritenceVMType
    {
        get
        {
            switch (VMType)
            {
                case ViewModelType.Standard:
                    return "ViewModelBase";
                case ViewModelType.Validating:
                    return "ValidatingViewModelBase";
                case ViewModelType.ValidatingAndEditable:
                    return "EditableValidatingViewModelBase";
                default:
                    return "ViewModelBase";
            }
        }
    }

    /// <summary>
    /// ViewModel type
    /// </summary>
    public ViewModelType VMType { get; set; }

    /// <summary>
    /// Viewmodel name
    /// </summary>
    public String VMName { get; set; }

    /// <summary>
    /// ViewModel namespace
    /// </summary>
    public String VMNamespace { get; set; }

    /// <summary>
    /// Nested properties
    /// </summary>
    public List<PesistentVMSingleProperty> VMProperties { get; set; }
    #endregion
}
但在创建/更新代码文件之前,会发生一件很酷的事情,即对即将写入磁盘的代码进行编译,以检查其是否有效。如果无效,用户可以选择忽略警告并无论如何都将文件写入,但这些警告很可能应该被采纳。
那么这一切是如何运作的呢?
什么被编译
Cinch代码生成器的最终目标是创建两个文件
- ViewModelXXXX.g.cs:一个完全生成的文件,局部类的一部分。
- ViewModelXXXX.cs:一个很好的起点,帮助你开始局部类的后半部分。你可以编辑它,但会有一些东西帮助你入门。
现在在内部,Cinch代码生成器使用System.CodeDom.Compiler命名空间来完成此操作,但在我们深入研究之前,我们需要了解有关局部类的一些事情。
假设你有一个Person类的第一部分,它看起来像这样
using System;
using System.Collections.Generic;
using System.Linq;
using System.Text;

namespace ConsoleApplication1
{
    public partial class Person
    {
        public int MyProperty { get; set; }
    }
}
以及Person类的第二部分,它看起来像这样
using System;
using System.Collections.Generic;
using System.Linq;
using System.Text;

namespace ConsoleApplication1
{
    public partial class Person
    {
        public Person()
        {
            this.MyProperty = 15;
        }
    }
}
使用System.CodeDom.Compiler命名空间,我们无法单独编译第二部分,因为我们显然需要知道“MyProperty”属性实际声明的第一部分,这很公平,没有办法绕过。因此,为了编译阶段,我们需要做的是形成一个文件并将其作为String传递给DynamicCompiler。当编译阶段成功或用户选择无论如何都保存文件时,将两个局部类字符串保存为两个单独的文件。
为了你的兴趣,这是DynamicCompiler的完整代码
using System.Reflection;
using System.CodeDom.Compiler;
using System.Linq;
using Microsoft.CSharp;
using System;
using System.Collections.Generic;
using System.Text;

using Cinch;
using System.Windows;
using System.IO;

namespace CinchCodeGen
{
    /// <summary>
    /// Provides a method to attempt to compile the the
    /// generated code string.
    /// Which will verify that the generated code string
    /// is ok to be output as a generated file from this
    /// Cinch code generator
    /// </summary>
    public static class DynamicCompiler
    {
        #region Public Methods
        /// <summary>
        /// Validates the code string that will be generated using
        /// the compiler services available in the
        /// <c>System.CodeDom.Compiler</c> namespace
        /// </summary>
        /// <param name="code">The code to compile as a string</param>
        /// <returns>Boolean if the code string parameter could be
        /// compiled using the CSharpCodeProvider</returns>
        public static Boolean ComplileCodeBlock(String code)
        {
            try
            {
                var provider = new CSharpCodeProvider(
                        new Dictionary<String, String>()
                            { { "CompilerVersion", "v3.5" } });

                CompilerParameters parameters = new CompilerParameters();

                // Start by adding any referenced assemblies
                parameters.ReferencedAssemblies.Add("System.dll");
                parameters.ReferencedAssemblies.Add(
                    typeof(ViewModelBase).Assembly.Location);
                parameters.ReferencedAssemblies.Add(
                    typeof(System.Linq.Enumerable).Assembly.Location);
                parameters.ReferencedAssemblies.Add(
                    typeof(System.Windows.Data.CollectionViewSource).Assembly.Location);
                parameters.ReferencedAssemblies.Add(
                    typeof(System.Collections.Specialized.INotifyCollectionChanged)
                         .Assembly.Location);
                parameters.ReferencedAssemblies.Add(
                    typeof(System.Collections.Generic.List<>).Assembly.Location);
                //add in any referenced assembly locations
                foreach (FileInfo refAssFile in
                    ((App)App.Current).ReferencedAssemblies.ToList())
                         parameters.ReferencedAssemblies.Add(refAssFile.FullName);

                // Load the resulting assembly into memory
                parameters.GenerateInMemory = true;
                // Now compile the whole thing
                //Must create a fully functional assembly as the code string
                CompilerResults compiledCode =
                    provider.CompileAssemblyFromSource(parameters, code);

                if (compiledCode.Errors.HasErrors)
                {
                    String errorMsg = String.Empty;
                    errorMsg = compiledCode.Errors.Count.ToString() +
                        " \n Dynamically generated code threw an error. \n Errors:";

                    for (int x = 0; x < compiledCode.Errors.Count; x++)
                    {
                        errorMsg = errorMsg + "\r\nLine: " +
                                   compiledCode.Errors[x].Line.ToString() + " - " +
                                   compiledCode.Errors[x].ErrorText;
                    }

                    throw new Exception(errorMsg);
                }
                return true;

            }
            catch (Exception ex)
            {
                throw ex;
            }
        }
        #endregion
    }
}
值得特别一提的是,用户选择的任何引用程序集都将作为引用程序集添加到编译器中,以允许代码生成器成功编译用户可能从引用程序集添加的属性类型。你可以在引用程序集管理部分阅读更多相关信息。
我们可能遇到的错误类型
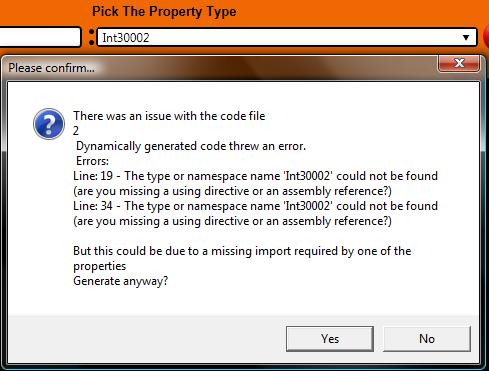
那么,如果用户反正可以选择保存代码,为什么还要费心预编译呢?嗯,这可能会被使用,所以我们需要确保它尽可能好,而且,我们可能真的会捕捉到用户没有想到的东西,比如下面显示的问题。可能还有更多,我想不出来,但可能还有更多。
错误的属性类型(用户打错了属性类型)
请看下面我如何输入Int3002。这意味着我在PropertyListPopup或当前应用程序路径中的AvailablePropertyTypes.txt文件中,将Int32打成了Int30002。这两个我们都在属性管理部分讨论过。
无论如何,长话短说,编译器通过将会在我们将一个糟糕的文件写入磁盘之前捕获到这个错误。
命名不佳的 ViewModel/命名空间(用户将保留字用作 ViewModel 或命名空间名称)
请看下面我如何输入文本“this”,这显然是 C# 中 ViewModel 名称或命名空间的保留字。
与之前一样,编译器通过将会在我们将一个糟糕的文件写入磁盘之前捕获到这个错误。


生成代码的结构
正如代码编译部分之前所暗示的,单个局部类确实有两部分
- ViewModelXXXX.g.cs:一个完全生成的文件,局部类的一部分。
- ViewModelXXXX.cs:一个很好的起点,帮助你开始局部类的后半部分。你可以编辑它,但会有一些东西帮助你入门。
我花了很多心思来思考哪些代码属于哪个部分。有一些通用规则
ViewModelXXXX.g.cs:一个完全生成的文件
- 如果用户选择对属性使用
DataWrapper,则它在ViewModelXXXX.g.cs部分中声明并具有其公共getter/私有setter。 - 如果用户选择使用Editing ViewModel,则
IEditableObject重写将在ViewModelXXXX.g.cs部分。 - ViewModelXXXX.g.cs部分还创建了一个属性回调
Dictionary<String,Action>,ViewModelXXXX.cs部分可以使用它来在ViewModelXXXX.g.cs部分中的属性值发生更改时得到通知。
这是局部类这部分可能的样子示例
using System;
using System.Collections.Generic;
using System.Linq;
using System.ComponentModel;
using System.Collections.ObjectModel;
using System.Windows.Data;
using System.Collections.Specialized;

//Referenced assemblies
using ClassLibrary1;

using Cinch;

namespace ViewModels
{
     /// <summary>
     ///NOTE : This class was auto generated by a tool
     ///Edit this code at your peril!!!!!!
     /// </summary>
     public partial class ViewModelA : Cinch.EditableValidatingViewModelBase
     {
          #region Data
          private Cinch.DataWrapper<Person> someProp;
          //callbacks to allow auto generated part to
          //notify custom part, when property changes
          private Dictionary<String, Action>
               autoPartPropertyCallBacks = new Dictionary<String, Action>();
          #endregion


          #region Public Properties
          #region SomeProp
          /// <summary>
          /// SomeProp
          /// </summary>
          static PropertyChangedEventArgs somePropChangeArgs =
               ObservableHelper.CreateArgs<ViewModelA>(x => x.SomeProp);

          public Cinch.DataWrapper<Person> SomeProp
          {
               get { return someProp; }
               private set
               {
                    someProp = value;
                    NotifyPropertyChanged(somePropChangeArgs);
                    //Use callback to provide non auto generated
                    //part of partial
                    //class with notification, when an auto
                    //generated property value changes
                    Action callback = null;
                    if (autoPartPropertyCallBacks.TryGetValue(
                        somePropChangeArgs.PropertyName, out callback))
                    {
                        callback();
                    }
               }
          }
          #endregion

          #endregion
          #region EditableValidatingObject overrides
          /// <summary>
          /// Override hook which allows us to also put any child
          /// EditableValidatingObject objects into the BeginEdit state
          /// </summary>
          protected override void OnBeginEdit()
          {
              base.OnBeginEdit();
              //Now walk the list of properties in the ViewModel
              //and call BeginEdit() on all Cinch.DataWrapper<T>s.
              //we can use the Cinch.DataWrapperHelper class for this
              DataWrapperHelper.SetBeginEdit(cachedListOfDataWrappers);
          }

          /// <summary>
          /// Override hook which allows us to also put any child
          /// EditableValidatingObject objects into the EndEdit state
          /// </summary>
          protected override void OnEndEdit()
          {
              base.OnEndEdit();
              //Now walk the list of properties in the ViewModel
              //and call CancelEdit() on all Cinch.DataWrapper<T>s.
              //we can use the Cinch.DataWrapperHelper class for this
              DataWrapperHelper.SetEndEdit(cachedListOfDataWrappers);
          }

          /// <summary>
          /// Override hook which allows us to also put any child
          /// EditableValidatingObject objects into the CancelEdit state
          /// </summary>
          protected override void OnCancelEdit()
          {
              base.OnCancelEdit();
              //Now walk the list of properties in the ViewModel
              //and call CancelEdit() on all Cinch.DataWrapper<T>s.
              //we can use the Cinch.DataWrapperHelper class for this
              DataWrapperHelper.SetCancelEdit(cachedListOfDataWrappers);
          }
          #endregion
     }
}
ViewModelXXXX.cs:一个很好的起点,帮助你开始
- 如果用户选择对属性使用任何
DataWrapper<T>,则会创建一个IEnumerable<DataWrapperBase>,用于局部类的两部分。这是一个当前ViewModel拥有的所有DataWrapper<T>属性的缓存,因此当需要时可以快速使用此缓存的IEnumerable<DataWrapperBase>。 - 如果用户选择对属性使用任何
DataWrapper<T>,则实际的DataWrapper<T>属性设置器将在构造函数中完成。 - 如果用户选择对属性使用任何
DataWrapper<T>,则会提供一个CurrentViewMode,可用于设置ViewModel中所有缓存和包含的DataWrapper<T>对象的状态。 - 如果用户选择使用Editing/Validating ViewModel,则提供了一个示例验证规则,但已注释掉,仅为了向用户展示如何添加验证规则(如果他们愿意)。
- 如果用户选择使用Editing/Validating ViewModel,则会提供
IsValid重写。 - ViewModelXXXX.cs部分也可以为
Dictionary<String,Action>创建属性回调,该字典在ViewModelXXXX.g.cs部分中声明,并在ViewModelXXXX.g.cs部分中的属性值发生更改时使用。提供了一个示例回调,请看以下行
Action somePropCallback = new Action(SomePropChanged);
     autoPartPropertyCallBacks.Add(somePropChangeArgs.PropertyName,
          somePropCallback);
...
...
private void SomePropChanged()
{
     ....
}
这是局部类这部分可能的样子示例
using System;
using System.Collections.Generic;
using System.Linq;
using System.ComponentModel;
using System.Collections.ObjectModel;
using System.Windows.Data;
using System.Collections.Specialized;
//Referenced assemblies
using ClassLibrary1;

using Cinch;

namespace ViewModels
{
     /// <summary>
     ///You may edit this code by hand, but there is DataWrapper code
     ///and some boiler plate code provided here, to help you on your way.
     ///A lot of which is actually quite useful, and a lot of thought has been
     ///put into, what code to place in which file parts, and this custom part
     ///does have some excellent starting code, so use it as you wish.
     ///
     ///But please note : One area that will need to be examined closely
     /// if you decide to introduce
     ///New DataWrapper<T> properties in this part, is the IsValid override
     ///Which will need to include the dataWrappers something like:
     ///<pre>
     ///       return base.IsValid &&
     ///          DataWrapperHelper.AllValid(cachedListOfDataWrappers);
     ///</pre>
     /// </summary>
     public partial class ViewModelA
     {
          #region Data
          private IEnumerable<DataWrapperBase> cachedListOfDataWrappers;
          private ViewMode currentViewMode = ViewMode.AddMode;
          //Example rule declaration : YOU WILL NEED TO DO THIS BIT
          //private static SimpleRule quantityRule;
          #endregion

          #region Ctor
          public ViewModelA()
          {
               #region Create DataWrappers
               SomeProp = new Cinch.DataWrapper<Person>(this,somePropChangeArgs);

               //fetch list of all DataWrappers, so they can be used
               //again later without the need for reflection
               cachedListOfDataWrappers =
                   DataWrapperHelper.GetWrapperProperties<ViewModelA>(this);
               #endregion

               #region Create Auto Generated Property Callbacks
               //Create callbacks for auto generated properties in
               //auto generated partial class part Which allows this
               //part to know when a property in the generated part changes
               Action somePropCallback = new Action(SomePropChanged);
               autoPartPropertyCallBacks.Add(somePropChangeArgs.PropertyName,
                    somePropCallback);

               #endregion

               //    #region TODO : You WILL need to create YOUR OWN validation rules
               //    //Here is an example of how to create a validation rule
               //    //you can use this as a guide to create your own validation rules
               //    quantity.AddRule(quantityRule);
               //    #endregion
          }

          static ViewModelA()
          {
               //quantityRule = new SimpleRule("DataValue", "Quantity can not be < 0",
               //          (Object domainObject)=>
               //          {
               //              DataWrapper<Int32> obj = (DataWrapper<Int32>)domainObject;
               //              return obj.DataValue <= 0;
               //          });
          }
          #endregion

          #region Auto Generated Property Changed CallBacks
          //Callbacks which are called whenever an auto generated property in
          //auto generated partial class part changes
          //Which allows this part to know when a property in the generated part changes
          private void SomePropChanged()
          {
                //You can insert code here that needs to run
                //when the SomeProp property changes
          }

          #endregion
          /// <summary>
          /// The current ViewMode, when changed will loop
          /// through all nested DataWrapper objects and change
          /// their state also
          /// </summary>
          static PropertyChangedEventArgs currentViewModeChangeArgs =
              ObservableHelper.CreateArgs<ViewModelA>(x => x.CurrentViewMode);

          public ViewMode CurrentViewMode
          {
              get { return currentViewMode; }
              set
              {
                  currentViewMode = value;
                  //Now change all the cachedListOfDataWrappers
                  //Which sets all the Cinch.DataWrapper<T>s to the correct IsEditable
                  //state based on the new ViewMode applied to the ViewModel
                  //we can use the Cinch.DataWrapperHelper class for this
                  DataWrapperHelper.SetMode(
                      cachedListOfDataWrappers,
                      currentViewMode);

                  NotifyPropertyChanged(currentViewModeChangeArgs);
              }
          }

          #region Overrides
          /// <summary>
          /// Override hook which allows us to also put any child
          /// EditableValidatingObject objects IsValid state into
          /// a combined IsValid state for the whole ViewModel,
          /// should you need to do so
          /// </summary>
          public override bool IsValid
          {
              get
              {
                 //return base.IsValid and use DataWrapperHelper, as you are
                 //using DataWrappers
                 return base.IsValid &&
                    DataWrapperHelper.AllValid(cachedListOfDataWrappers);
              }
          }
          #endregion
     }
}
就是这样,希望你喜欢
这实际上就是我目前想说的全部,但我希望通过这篇文章,你能看到这个代码生成器如何帮助你在几分钟内生成优秀的Cinch ViewModel。
我的后续计划
正如你们中的一些人可能知道的,这一系列文章已经持续了一段时间,并且为了达到现在的程度付出了很多努力,所以我正在享受当之无愧的假期,我要去泰国度过三周美妙的时光。Sawadee真棒,面条,还有大象啤酒,我来了。然而,没有什么能永恒,即使是假期,所以当我回来时,我计划研究以下内容,所以你可以期待一些关于这些主题的文章/博客
- MEF
- n-Route和Cinch
- 为我妻子制作一个漂亮的基于3D导航的医疗应用(当然,从现在开始我做的任何新WPF应用都会使用Cinch)
- 也许还有一些WF 4.0
谢谢
一如既往,欢迎投票/评论。天哪,我甚至会接受一两百亿啤酒/辣妹/豪车/衣服以及任何你认为很酷很棒的东西,所有这些都会被欣然接受,天知道我都需要它们。这个系列投入了巨大的精力。不过,至少它已经完成(暂时)。
我当然是在开玩笑 ;-) 但我确实需要一个小小的休息。
修订
- 初始发布。
- 2009年10月17日:更换了语法高亮,改用Daniel Grunwald的AvalonEdit控件
- 2009年12月05日:添加了代码(已注释),以向用户展示新的规则创建方法