
Ultrabook Development My Way
5.00/5 (2投票s)
In depth details of an Ultrabook
- 下载 UltraKnowHow_sln.zip - 487 B
- 下载 DeskmanGoGreen_sln.zip - 742 B
- 下载 UltraKnowHow.zip - 889.2 KB
- 下载 DeskmanGoGreen5.zip - 1.4 MB
什么是Ultrabook?
Ultrabook并非你平时使用的普通笔记本。它是一款轻巧、高性能、基于i7架构、电池续航长(长达8小时)的先进笔记本,并增加了“Ultra”特性,因此得名ULtrabook。下图展示了Ultrabook(Intel原型)的特性:
描述
I7 Intel Ivy Bridge 处理器。这是英特尔最新系列处理器,速度极快,功耗低,处理能力强,缓存更大(从3MB起)。

Ultrabook的历程

Ultrabook的核心特性
架构支持Intel HD Graphics
支持DX11, Open GL 3.1, Open CL 3.1
完全支持Intel Perceptual SDK 2013(需额外的手势摄像头)和Intel Parallel Computing SDK
Win8全触屏支持(测试Ultrabook性能的最佳操作系统是Windows 8,因为有了它,你可以充分利用各项功能……)
支持的传感器
- 加速度计
- 磁力计
- 陀螺仪
- 方向传感器
- 环境光传感器
- NFC(近场通信)
- GPS
英特尔特殊技术
- Intel Smart Connect
- Rapid Start
- Sensor Hub
为Ultrabook开发
支持的操作系统:就我而言是Windows 8
设计和开发工具:VS 2012
下图展示了可以提交应用的商店:

首先,如何开始开发?
要进入Intel AppUp商店,你需要一个Intel Developer Zone的账户。
1) 如何 在Intel Developer Zone设置账户
下图展示了如何在IDZ注册

填写所有个人信息和所需信息。
下图展示了如何操作。

注册时需要添加组织(尝试以个人身份注册)
填写详细信息等。设置账户后,你需要点击仪表板,然后进入Intel AppUp并申请代码签名证书。
下图展示了步骤。

接下来的两张图展示了如何申请代码签名证书。
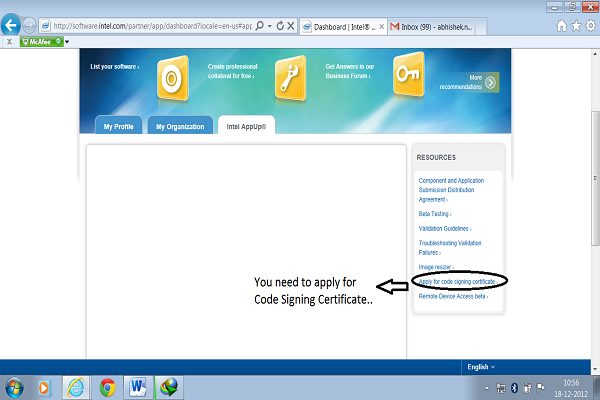
第二张图链接到Comodo。

什么是代码签名证书?
这是一种身份验证方法,通过数字签名软件,表明软件未被篡改且由原始作者编写。这是将任何应用发布到Intel AppUp商店的强制步骤。
注册流程
这个注册过程通常很漫长且繁琐,你需要跟进并尝试联系(Comodo团队),在Comodo创建ID后,与他们的代理商聊天以加快处理。事先,你需要准备好文件:1) 身份证件、地址证明 2) 银行对账单 3) 在他们指定的任何黄页网站注册,他们会通过电话确认。(但如果你在Comodo聊天帮助台不断催促,也可以有更便捷的方法。)
下图展示了在Comodo注册的步骤。

如果你遇到“成员未找到”之类的错误,请尝试在Win XP上操作(起初我也遇到过这个错误,但尝试在Win XP上进行该过程解决了问题)。

已经有一份文档展示了如何获取证书,链接如下。
视频链接展示了如何将应用发布到商店。
获取Windows商店账户
1) 首先,这是一项付费服务。
2) 获取Windows商店账户的链接如下:http://msdn.microsoft.com/en-in/library/windows/apps/hh868187.aspx
请遵循并研究该网页以获取账户。
获取账户的过程非常简单,并且有一些促销优惠,微软提供免费账户。更多现成信息可在此处找到。
为Ultrabook开发
1) 下载Win 8评估版开始(我就是这样完成开发工作的)。这是一个90天的评估版。
2) 获取免费的Visual Studio 2012 express 版本。
下载90天评估版的Ultimate版本。
3) 如果您正在开发Windows商店应用,您需要获取一个开发者许可证(开发者许可证是免费的,过期后可以再次申请……当您打开Windows商店项目模板时,会提示需要开发者许可证)。
4) 我的应用程序是桌面应用程序,所以我从这里开始……如下图所示。从Win 8主屏幕选择VS 2012。
Intel App Up商店验证流程

应用打包
应用打包有3种方法(据我所知):1) InstallShield(我使用的是InstallShield)2) WixToolset 3) Application Installer(使用它的唯一顾虑是您需要使用ORCA编辑不必要的文件)。
在上传应用程序之前,您需要做一些事情。
1) 创建应用图标
2) 应用截图
什么是Intel AppUp SDK?
Intel AppUp SDK(我没用过,但提供相关信息)。
Intel AppUp SDK包含Intel App Up商店中应用的API。在Windows系统上使用它并非必需,但它可以在以下方面提供帮助:
1) 多设备数字管理
2) 崩溃报告
3) 插桩和应用内购买功能。如果您想上传评估版,并且之后需要完整版,升级步骤会很容易。
Intel AppUp SDK服务支持如下:

Intel AppUp SDK的编程语言和平台支持如下:

我的应用开发过程
UltraSensors 1.0
这个应用程序的构思是利用Ultrabook的多功能测试条件。
我考虑在单个条件下测试Ultrabook支持的所有传感器。
涉及循环结构来检查可用传感器。接下来,我想到了检查Ultrabook的电池续航能力(因为它声称Ultrabook电池续航时间长),第三,一个关于个人碳足迹的条件,涉及他们在家居、交通等方面的日常使用。
创建应用程序
我使用winforms作为前端,C#作为后端来开发我的软件。项目初期,我对如何编译和创建打包信息很少,这对我来说是个挑战。首先,Ultrabook的全部功能可以通过Windows 8操作系统进行测试或展示,因为它能够在应用程序中使用传感器。我理所当然地选择了VS2012作为IDE,因为它非常易于使用并能打包应用。Installshield部署打包工具足以轻松地将VS 2012解决方案推送到Intel AppUp商店。
如何从桌面应用程序调用WinRT API
在开始构建表单需求之前
1) 您需要卸载项目
2) 编辑属性
3) 您需要添加一个PropertyGroup,然后更改目标平台。
VS 2012中的核心Windows 8选项卡
它允许访问当前Windows 8平台版本,并使用核心UI进行开发环境。
用于Ultrabook配合Win 8开发的常用命名空间
- System.Runtime
- System.Runtime.InteropServices.WindowsRuntime
- Windows.Device.Sensors(访问传感器的最重要命名空间)
- Windows.UI
您可以通过“添加引用”选项卡,在项目中添加这些引用来访问这些命名空间。
下图展示了如何在Windows 8的主窗口中访问VS 2012。众所周知,当我们在Win 8中安装任何应用程序时,快捷方式会直接显示为Windows 8主屏幕上的一个磁贴,因为它的UI!(新特性)。

下图展示了如何在Visual Studio 2012中启动新项目。

下图展示了用于开发Windows商店应用的默认模板。

下图展示了用于开发桌面应用程序的模板。

由于我的开发目标是.net Forms,我选择了基于.net Framework 4.5的Form应用程序目标。

接下来的几张图展示了如何为您的应用程序添加额外的窗体。

主窗体(启动窗体)
主窗体包含三个按钮,分别访问应用程序的其他窗体,以及一个关闭按钮。根据我与Intel的Praveen的讨论,他说应用程序应该全屏打开,并单击一次即可关闭应用程序(关闭所有窗体)。
通过主窗体的属性,我将窗口设置为最大化状态,以便应用程序全屏打开,并使用System.Environment.Exit按钮关闭应用程序。从主屏幕访问下一个窗体:这很简单,只需在其中一个按钮的后台调用下一个窗体即可。
FormName sv= new FormName();
sv.ShowDialog();
下图展示了使用的按钮控件和第一个窗体UI。后台代码也已更新。

第一个窗体代码
//
using System;
using System.Collections.Generic;
using System.ComponentModel;
using System.Data;
using System.Drawing;
using System.Linq;
using System.Text;
using System.Threading.Tasks;
using System.Windows.Forms;
using System.Runtime;
using System.Runtime.InteropServices.WindowsRuntime;
using Windows.Devices.Sensors;
using Windows.UI;

namespace DeskmanGoGreen5
{
    public partial class Form1 : Form
    {
        private Accelerometer ag;
        private LightSensor la;
        private SimpleOrientationSensor so;
        private OrientationSensor os;
        private Inclinometer ic;
        private Compass cs;
        private Gyrometer gy;
        public Form1()
        {
            InitializeComponent();
        }

        private void button1_Click(object sender, EventArgs e)
        {
            ag = Accelerometer.GetDefault();
            la = LightSensor.GetDefault();
            so = SimpleOrientationSensor.GetDefault();
            os = OrientationSensor.GetDefault();
            ic = Inclinometer.GetDefault();
            cs = Compass.GetDefault();
            gy = Gyrometer.GetDefault();

            if (ag != null)
            {
                MessageBox.Show("Accelerometer found");

            }
            else
            {
                MessageBox.Show("No Accelerometer not found");
            }
            if (la != null)
            {
                MessageBox.Show("Ambient Light Sensor found");
            }
            else
            {
                MessageBox.Show("No Ambient Light Sensor found");
            }
            if (so != null)
            {
                MessageBox.Show("Simple Orientation Sensor found");
            }
            else
            {
                MessageBox.Show("Simple Orientation Sensor not found");
            }
            if (os != null)
            {
                MessageBox.Show("orientation Sensor found");
            }
            else
            {
                MessageBox.Show("orientation Sensor not found");
            }
            if (ic != null)
            {
                MessageBox.Show("Inclinometer Sensor found");
            }
            else
            {
                MessageBox.Show("Inclinometer Sensor not found");
            }
            if (cs != null)
            {
                MessageBox.Show("Compass found");
            }
            else
            {
                MessageBox.Show("Compass not found");
            }
            if (gy != null)
            {
                MessageBox.Show("Gyrometer found");

            }
            else
            {
                MessageBox.Show("Gyrometer not found");
            }

        }

        private void button2_Click(object sender, EventArgs e)
        {
            BatteryMonitorForm bm = new BatteryMonitorForm();
            bm.ShowDialog();
        }

        private void button3_Click(object sender, EventArgs e)
        {
            System.Environment.Exit(0);
        }
    }
}
//
图片如下。
最大化窗口尺寸的方法。

电池监视器窗体
电池监视器窗体包含一个复选框,指示主电源已连接;一个状态栏,显示剩余电量百分比;一个标签控件,用于在环境光传感器低于35%时访问它。窗体还包含一个定时器,用于定期刷新数据。
下图展示了BatteryMonitorForm的UI。

//
using System;
using System.Collections.Generic;
using System.ComponentModel;
using System.Data;
using System.Drawing;
using System.Linq;
using System.Text;
using System.Threading.Tasks;
using System.Windows.Forms;
using System.Runtime;
using System.Runtime.InteropServices;
using Windows.Devices.Sensors;
using Windows.UI;


namespace DeskmanGoGreen5
{
    public partial class BatteryMonitorForm : Form
    {
        private LightSensorReading _lux;
        public BatteryMonitorForm()
        {
            InitializeComponent();
        }
        private void RefreshStatus()
        {
            PowerStatus power = SystemInformation.PowerStatus;

            // Show the main power status
            switch (power.PowerLineStatus)
            {
                case PowerLineStatus.Online:
                    MainsPower.Checked = true;
                    break;

                case PowerLineStatus.Offline:
                    MainsPower.Checked = false;
                    break;

                case PowerLineStatus.Unknown:
                    MainsPower.CheckState = CheckState.Indeterminate;
                    break;
            }
            int powerPercent = (int)(power.BatteryLifePercent * 100);
            if (powerPercent <= 100)
                BatteryIndicator.Value = powerPercent;

            else if (powerPercent <= 35)
            {
                LightSensor ls = LightSensor.GetDefault();
                {
                    if (ls != null)
                    {
                        ls.ReportInterval = 0;
                        ls.ReadingChanged += ls_ReadingChanged;
                        LightLux.Text = _lux.IlluminanceInLux.ToString("0000");


                    }
                }
            }
            else
                BatteryIndicator.Value = 0;
            // Battery Remaining
            int secondsRemaining = power.BatteryLifeRemaining;
            if (secondsRemaining >= 0)
            {
                BatteryLifeRemaining.Text = string.Format("{0} min", secondsRemaining / 60);
            }
            else
            {
                BatteryLifeRemaining.Text = string.Empty;
            }
            // Battery Status
            BatteryStatus.Text = power.BatteryChargeStatus.ToString();
        }

        void ls_ReadingChanged(LightSensor sender, LightSensorReadingChangedEventArgs args)
        {

                MessageBox.Show("Light Sensor enabled");
        }
//
碳足迹计算器窗体
这里我使用了文本框控件和标签来访问数据。选项卡控件用于相应地组织流程。应用程序的计算由EPA提供并用作公式。////
3rd form
using System;
using System.Collections.Generic;
using System.ComponentModel;
using System.Data;
using System.Drawing;
using System.Linq;
using System.Text;
using System.Threading.Tasks;
using System.Windows.Forms;
namespace DeskmanGoGreen5
{
public partial class CarbonFootPrintCalculator : Form
{
double electricitybill;
double priceperkillowatt = .20;
double electricityemissonfactor = 1.37;
int monthsinyear;
int monthsinyr1;
int monthsinyr2;
double co2emissions;
double co2emissions1;
double co2emissions2;
double co2emissions3;
double co2emissions4;
double co2emissions5;
double co2emissions6;
double amountofnaturalgasbill;
double priceperthousandcubicfeet = 14.14;
double naturalgasemissionfactor = 120.61;
double amountoffuelbill;
double pricepergallon = 2.88;
double fueloilemissionfactor = 22.37;
double amountofmilesdrvnweek;
double amountofpropanebill;
double pricepergallonp = 2.76;
double propaneemissionfactor = 12.17;
int weeksinyr;
double pondofco2emtdprgln = 19.4;
double emsnotrco2 = 1.0526;
double fuelefficncyprvcl;
double milestrvlpbprwk;
double pblctrnsprtndemsn = 19.4;
double indrtemsn = 1.052;
double grm2pndcnvrsn = .0022;
int airemisnspermile = 223;
double indwtpf = 1.2;
double iarff = 1.9;
double gram2pc = .0022;
double airmilestravld;
int monthsinyr3;
public CarbonFootPrintCalculator()
{
InitializeComponent();
}
private void button1_Click(object sender, EventArgs e)
{
electricitybill = double.Parse(textBox1.Text);
monthsinyear = int.Parse(textBox2.Text);
co2emissions = (electricitybill / priceperkillowatt) * electricityemissonfactor * monthsinyear;
}
private void button2_Click(object sender, EventArgs e)
{
MessageBox.Show(co2emissions + "Carbon emission in Pounds", "co2emissions");
}
private void button3_Click(object sender, EventArgs e)
{
amountofnaturalgasbill = double.Parse(textBox3.Text);
monthsinyr1 = int.Parse(textBox4.Text);
co2emissions1 = ((amountofnaturalgasbill / priceperthousandcubicfeet) * naturalgasemissionfactor) * monthsinyr1;
}
private void button4_Click(object sender, EventArgs e)
{
MessageBox.Show(co2emissions1 + "Carbon Emission in pounds", "co2emissions1");
}
private void button5_Click(object sender, EventArgs e)
{
amountoffuelbill = double.Parse(textBox5.Text);
monthsinyr2 = int.Parse(textBox6.Text);
co2emissions2 = ((amountoffuelbill / pricepergallon) * fueloilemissionfactor) * monthsinyr2;
}
private void button6_Click(object sender, EventArgs e)
{
MessageBox.Show(co2emissions2 + "Carbon emissions in pounds", "co2emissions2");
}
private void button7_Click(object sender, EventArgs e)
{
amountofpropanebill = double.Parse(textBox7.Text);
monthsinyr2 = int.Parse(textBox8.Text);
co2emissions3 = ((amountofpropanebill / pricepergallonp) * propaneemissionfactor) * monthsinyr2;
}
private void button8_Click(object sender, EventArgs e)
{
MessageBox.Show(co2emissions3 + "Carbon emissions in pounds", "co2emissions3");
}
private void button9_Click(object sender, EventArgs e)
{
amountofmilesdrvnweek = double.Parse(textBox9.Text);
weeksinyr = int.Parse(textBox10.Text);
fuelefficncyprvcl = double.Parse(textBox11.Text);
co2emissions4 = ((amountofmilesdrvnweek * weeksinyr) / fuelefficncyprvcl) * pondofco2emtdprgln * emsnotrco2;
}
private void button10_Click(object sender, EventArgs e)
{
MessageBox.Show(co2emissions4 + "Carbon emissions in pounds", "co2emissions4");
}
private void button11_Click(object sender, EventArgs e)
{
milestrvlpbprwk = double.Parse(textBox12.Text);
co2emissions5 = (milestrvlpbprwk * pblctrnsprtndemsn) + (pblctrnsprtndemsn * indrtemsn * grm2pndcnvrsn);
}
private void button12_Click(object sender, EventArgs e)
{
MessageBox.Show(co2emissions5 + "Carbon emission in pounds", "co2emissions5");
}
private void RefreshTimer_Tick(object sender, EventArgs e)
{
RefreshStatus();
}
private void BatteryMonitorForm_Load(object sender, EventArgs e)
{
RefreshStatus();
RefreshTimer.Enabled = true;
}
图示为截图。

我的下一个应用程序Ultra Knowhow的特性
1) 获取传感器的默认值并使用标签控件显示。我使用了四个传感器值,以及下一个窗体来获取Ultrabook的一些基本知识。例如,主目录、Windows版本、处理器核心数、逻辑驱动器、Windows目录、用户名和计算机名。窗体中使用数组帮助我访问HomeDir、UserName、ComputerName和WinDir。//
using System;
using System.Collections.Generic;
using System.ComponentModel;
using System.Data;
using System.Drawing;
using System.Linq;
using System.Text;
using System.Threading.Tasks;
using System.Windows.Forms;
namespace UltraKnowHow
{
public partial class UltraknowHow : Form
{
public UltraknowHow()
{
InitializeComponent();
}
private void button1_Click(object sender, EventArgs e)
{
string[] variables =
{
"%WINDIR%" ,
"%HOMEDRIVE%",
"%USERNAME%",
"%COMPUTERNAME%"
};
foreach (string v in variables)
{
string result = Environment.ExpandEnvironmentVariables(v);
MessageBox.Show(result);
}
}
private void button2_Click(object sender, EventArgs e)
{
string[] value1 = Environment.GetLogicalDrives();
MessageBox.Show(string.Join(",", value1));
}
private void button3_Click(object sender, EventArgs e)
{
OperatingSystem os = Environment.OSVersion;
MessageBox.Show("OS Version= "+Environment.OSVersion.Version.ToString() +"\n");
}
private void button4_Click(object sender, EventArgs e)
{
MessageBox.Show("No of Cores=" + Environment.ProcessorCount.ToString() + "\n");
}
private void button5_Click(object sender, EventArgs e)
{
MessageBox.Show("CLR Version=" + Environment.Version.ToString() + "\n");
}
private void button6_Click(object sender, EventArgs e)
{
MessageBox.Show("OS Major Minor=" + Environment.OSVersion.Platform);
}
private void button7_Click(object sender, EventArgs e)
{
System.Environment.Exit(0);
}
}
}
接下来的代码利用Label控件访问传感器API。//
using System;
using System.Collections.Generic;
using System.ComponentModel;
using System.Data;
using System.Drawing;
using System.Linq;
using System.Text;
using System.Threading.Tasks;
using System.Windows.Forms;
using System.Runtime;
using System.Runtime.InteropServices.WindowsRuntime;
using Windows.Devices.Sensors;
using Windows.UI;
using Windows.UI.Core;
namespace UltraKnowHow
{
public partial class SensorValues : Form
{
private AccelerometerReading _acc;
private Accelerometer _accelerometer;
private LightSensor _sensor;
private LightSensorReading _senr;
private Gyrometer _gyrometer;
private GyrometerReading _gyro;
private Inclinometer _inclinometer;
private InclinometerReading _inc;
private OrientationSensor _orientationSensor;
private OrientationSensorReading _orient;
//private SensorQuaternion _SQ;
//private SensorRotationMatrix _SR;
public SensorValues()
{
InitializeComponent();
}
private void button1_Click(object sender, EventArgs e)
{
if (_accelerometer != null)
{
// Only change events are fired, so get an initial value.
if (_acc == null)
_acc = _accelerometer.GetCurrentReading();
else
{
AccX.Text = _acc.AccelerationX.ToString("0.000");
AccY.Text = _acc.AccelerationY.ToString("0.000");
AccZ.Text = _acc.AccelerationZ.ToString("0.000");
}
}
}
private void button2_Click(object sender, EventArgs e)
{
if (_gyrometer != null)
{
if (_gyro == null)
_gyro = _gyrometer.GetCurrentReading();
else
{
AngvX.Text = _gyro.AngularVelocityX.ToString("0.00");
AngvY.Text = _gyro.AngularVelocityY.ToString("0.00");
AngvZ.Text = _gyro.AngularVelocityZ.ToString("0.00");
}
}
}
private void button5_Click(object sender, EventArgs e)
{
if (_sensor != null)
{
if (_senr == null)
_senr = _sensor.GetCurrentReading();
else
{
Lux.Text = _senr.IlluminanceInLux.ToString("0.000");
}
}
}
private void SensorValues_Load(object sender, EventArgs e)
{
_accelerometer = Accelerometer.GetDefault();
if (_accelerometer == null)
{
MessageBox.Show("Accelerometer Currently unavailable");
//DisableButton();
}
else
{
MessageBox.Show("Accelerometer Found and Initiated");
}
_sensor = LightSensor.GetDefault();
if (_sensor == null)
{
MessageBox.Show("Ambient Light Sensor unavailable");
}
else
{
MessageBox.Show("Ambient Light Sensor Found and Initiated");
}
_gyrometer = Gyrometer.GetDefault();
if (_gyrometer == null)
{
MessageBox.Show("Gyrometer Currently unavailable");
}
else
{
MessageBox.Show("Gyrometer Found and initiated");
}
_inclinometer = Inclinometer.GetDefault();
if (_inclinometer == null)
{
MessageBox.Show("Inclinometer Currently unavailable");
}
else
{
MessageBox.Show("Inclinometer Sensor Found");
}
_orientationSensor = OrientationSensor.GetDefault();
if(_orientationSensor==null)
{
MessageBox.Show("Orientation Sensor unavailable");
}
else
{
MessageBox.Show("Orientation Sensor Found");
}
}
private void button3_Click(object sender, EventArgs e)
{
if(_inclinometer !=null)
{
if (_inc == null)
{
_inc = _inclinometer.GetCurrentReading();
}
else
{
PD.Text = _inc.PitchDegrees.ToString("0.00");
RD.Text = _inc.RollDegrees.ToString("0.00");
YawD.Text = _inc.YawDegrees.ToString("0.00");
}
}
}
private void button4_Click(object sender, EventArgs e)
{
if (_orientationSensor != null)
{
if (_orient == null)
{
_orient = _orientationSensor.GetCurrentReading();
}
else
{
label14.Text = _orient.Quaternion.W.ToString("0.00");
label15.Text = _orient.Quaternion.X.ToString("0.00");
label16.Text = _orient.Quaternion.Y.ToString("0.00");
label17.Text = _orient.Quaternion.Z.ToString("0.00");
RotM11.Text = _orient.RotationMatrix.M11.ToString("0.00");
RotM12.Text = _orient.RotationMatrix.M12.ToString("0.00");
RotM13.Text = _orient.RotationMatrix.M13.ToString("0.00");
RotM21.Text = _orient.RotationMatrix.M21.ToString("0.00");
RotM22.Text = _orient.RotationMatrix.M22.ToString("0.00");
RotM23.Text = _orient.RotationMatrix.M23.ToString("0.00");
RotM31.Text = _orient.RotationMatrix.M31.ToString("0.00");
RotM32.Text = _orient.RotationMatrix.M32.ToString("0.00");
RotM33.Text = _orient.RotationMatrix.M33.ToString("0.00");
}
}
}
private void button6_Click(object sender, EventArgs e)
{
UltraknowHow un = new UltraknowHow();
un.ShowDialog();
}
private void button7_Click(object sender, EventArgs e)
{
System.Environment.Exit(0);
}
}
}
下图展示了窗体视图。


打包应用程序
我使用Installshield来打包我的应用程序。首次运行项目时,它会创建一个VS解决方案文件。现在您需要使用这个解决方案文件来创建exe或安装程序。您需要点击“新建项目”,然后选择“其他项目类型”、“安装和部署”。点击“InstallShield Limited Edition Project”,输入名称。右键单击解决方案项目。添加现有项目,选择VS解决方案文件以添加项目,并使用项目助手完成向导。指定应用程序信息。下图展示了如何启动InstallShield并进一步打包应用程序。


下图展示了如何使用InstallShield打包选项编译exe。
根据需要指定应用程序的要求。在这里,您可以指定项目依赖项,例如需要哪个框架?目标操作系统等。

添加项目文件和文件夹。将解决方案文件和重要的依赖项文件添加到您的项目中,例如DLL文件,以及安装应用程序时会出现的应用图像等。

下图展示了InstallShield向导的最后阶段。

您可以跳过最后两个步骤,然后构建解决方案。将创建一个setup文件,我使用了exe文件将我的应用程序上传到Intel App Up商店。现在,最重要的事情是您需要对exe文件进行数字签名,然后再上传。这是最重要的一步,因为没有它,您的应用程序将不会被接受。使用MSI Tool实用程序对应用程序进行签名。

下图展示了如何使用MSI Tool对应用程序进行签名。

下图展示了数字签名文件的样子。它是一个*.pfx文件。

需要记住的事情
1) 确保您进行初始设置,使项目文件与使用核心Windows 8文件兼容。
2) 记住Windows 8应用程序的生命周期。应用程序启动非常快,不使用时在后台运行。因此,理想的开发方式是为整个生命周期使用一个线程,使您的应用程序非常稳定(我还没有在开发中使用任何线程,仍在学习中)。
充分利用新的关键字ASYNC和AWAIT。有了它们,生活会更轻松。探索和享受。记住,当您实验时,失败是成功的关键。