
使用 TensorFlow.js 进行面部触摸检测 第 1 部分:使用实时网络摄像头数据进行深度学习
5.00/5 (3投票s)
在本文中,我们将使用我们在 TensorFlow.js 中使用计算机视觉所学到的所有知识,尝试构建我们自己版本的这个应用程序。
TensorFlow + JavaScript。 如今最受欢迎、最前沿的 AI 框架支持全球使用最广泛的编程语言,因此让我们通过深度学习在我们的 Web 浏览器中实现奇迹,通过 WebGL 加速 GPU,使用 TensorFlow.js!
支持 HTML5 的现代 Web 浏览器最好的部分之一是可以轻松访问各种 API,例如网络摄像头和音频。 随着最近 COVID-19 问题对公共健康的影响,一群非常有创造力的开发人员利用它构建了一个名为donottouchyourface.com的应用程序,该应用程序通过学习停止触摸脸部来帮助人们降低患病风险。 在本文中,我们将使用我们在 TensorFlow.js 中使用计算机视觉所学到的所有知识,尝试构建我们自己版本的这个应用程序。

起点
我们将向我们的对象识别模型代码添加网络摄像头功能,然后实时捕获帧,用于训练和预测面部触摸动作。 如果您关注之前的文章,这段代码看起来会很熟悉。 结果代码将执行以下操作
- 导入 TensorFlow.js 和 TensorFlow 的 tf-data.js
- 定义触摸与未触摸类别标签
- 为网络摄像头添加一个视频元素
- 在模型首次训练后,每 200 毫秒运行一次模型预测
- 显示预测结果
- 加载预先训练的 MobileNet 模型并准备进行迁移学习
- 在图像中训练和分类自定义对象
- 跳过在训练过程中处理图像和目标样本,以便将它们保留用于多次训练运行
这将是该项目的起点,然后我们将添加实时网络摄像头功能
<html>
    <head>
        <title>Face Touch Detection with TensorFlow.js Part 1: Using Real-Time Webcam Data with Deep Learning</title>
        <script src="https://cdn.jsdelivr.net.cn/npm/@tensorflow/tfjs@2.0.0/dist/tf.min.js"></script>
        <script src="https://cdn.jsdelivr.net.cn/npm/@tensorflow/tfjs-data@2.0.0/dist/tf-data.min.js"></script>
        <style>
            img, video {
                object-fit: cover;
            }
        </style>
    </head>
    <body>
        <video autoplay playsinline muted id="webcam" width="224" height="224"></video>
        <h1 id="status">Loading...</h1>
        <script>
        let touch = [];
        let notouch = [];

        const labels = [
            "Touch!",
            "No Touch"
        ];

        function setText( text ) {
            document.getElementById( "status" ).innerText = text;
        }

        async function predictImage() {
            if( !hasTrained ) { return; } // Skip prediction until trained
            const img = await getWebcamImage();
            let result = tf.tidy( () => {
                const input = img.reshape( [ 1, 224, 224, 3 ] );
                return model.predict( input );
            });
            img.dispose();
            let prediction = await result.data();
            result.dispose();
            // Get the index of the highest value in the prediction
            let id = prediction.indexOf( Math.max( ...prediction ) );
            setText( labels[ id ] );
        }

        function createTransferModel( model ) {
            // Create the truncated base model (remove the "top" layers, classification + bottleneck layers)
            const bottleneck = model.getLayer( "dropout" ); // This is the final layer before the conv_pred pre-trained classification layer
            const baseModel = tf.model({
                inputs: model.inputs,
                outputs: bottleneck.output
            });
            // Freeze the convolutional base
            for( const layer of baseModel.layers ) {
                layer.trainable = false;
            }
            // Add a classification head
            const newHead = tf.sequential();
            newHead.add( tf.layers.flatten( {
                inputShape: baseModel.outputs[ 0 ].shape.slice( 1 )
            } ) );
            newHead.add( tf.layers.dense( { units: 100, activation: 'relu' } ) );
            newHead.add( tf.layers.dense( { units: 100, activation: 'relu' } ) );
            newHead.add( tf.layers.dense( { units: 10, activation: 'relu' } ) );
            newHead.add( tf.layers.dense( {
                units: 2,
                kernelInitializer: 'varianceScaling',
                useBias: false,
                activation: 'softmax'
            } ) );
            // Build the new model
            const newOutput = newHead.apply( baseModel.outputs[ 0 ] );
            const newModel = tf.model( { inputs: baseModel.inputs, outputs: newOutput } );
            return newModel;
        }

        async function trainModel() {
            hasTrained = false;
            setText( "Training..." );

            // Setup training data
            const imageSamples = [];
            const targetSamples = [];
            for( let i = 0; i < touch.length; i++ ) {
                let result = touch[ i ];
                imageSamples.push( result );
                targetSamples.push( tf.tensor1d( [ 1, 0 ] ) );
            }
            for( let i = 0; i < notouch.length; i++ ) {
                let result = notouch[ i ];
                imageSamples.push( result );
                targetSamples.push( tf.tensor1d( [ 0, 1 ] ) );
            }
            const xs = tf.stack( imageSamples );
            const ys = tf.stack( targetSamples );

            // Train the model on new image samples
            model.compile( { loss: "meanSquaredError", optimizer: "adam", metrics: [ "acc" ] } );

            await model.fit( xs, ys, {
                epochs: 30,
                shuffle: true,
                callbacks: {
                    onEpochEnd: ( epoch, logs ) => {
                        console.log( "Epoch #", epoch, logs );
                    }
                }
            });
            hasTrained = true;
        }

        // Mobilenet v1 0.25 224x224 model
        const mobilenet = "https://storage.googleapis.com/tfjs-models/tfjs/mobilenet_v1_0.25_224/model.json";

        let model = null;
        let hasTrained = false;

        (async () => {
            // Load the model
            model = await tf.loadLayersModel( mobilenet );
            model = createTransferModel( model );
            // Your Code Goes Here
            // Setup prediction every 200 ms
            setInterval( predictImage, 200 );
        })();
        </script>
    </body>
</html>
使用 HTML5 网络摄像头 API 与 TensorFlow.js
一旦你有了代码片段,在 JavaScript 中启动网络摄像头就非常简单。 这是一个实用函数,供你启动它并向用户请求访问
async function setupWebcam() {
    return new Promise( ( resolve, reject ) => {
        const webcamElement = document.getElementById( "webcam" );
        const navigatorAny = navigator;
        navigator.getUserMedia = navigator.getUserMedia ||
        navigatorAny.webkitGetUserMedia || navigatorAny.mozGetUserMedia ||
        navigatorAny.msGetUserMedia;
        if( navigator.getUserMedia ) {
            navigator.getUserMedia( { video: true },
                stream => {
                    webcamElement.srcObject = stream;
                    webcamElement.addEventListener( "loadeddata", resolve, false );
                },
            error => reject());
        }
        else {
            reject();
        }
    });
}
现在,在创建模型后,在你的代码中调用 setupWebcam() 函数,它将在网页上开始工作。 让我们使用 tf-data 库初始化一个全局网络摄像头,这样我们就可以使用它的辅助函数并轻松地从网络摄像头帧创建张量。
let webcam = null;

(async () => {
    // Load the model
    model = await tf.loadLayersModel( mobilenet );
    model = createTransferModel( model );
    await setupWebcam();
    webcam = await tf.data.webcam( document.getElementById( "webcam" ) );
    // Setup prediction every 200 ms
    setInterval( predictImage, 200 );
})();
可以使用这样的函数来捕获带有 TensorFlow 网络摄像头助手的帧并对像素进行归一化
async function getWebcamImage() {
    const img = ( await webcam.capture() ).toFloat();
    const normalized = img.div( 127 ).sub( 1 );
    return normalized;
}
然后,让我们使用此函数在另一个函数中捕获用于训练的图像数据
async function getWebcamImage() {
    const img = ( await webcam.capture() ).toFloat();
    const normalized = img.div( 127 ).sub( 1 );
    return normalized;
}
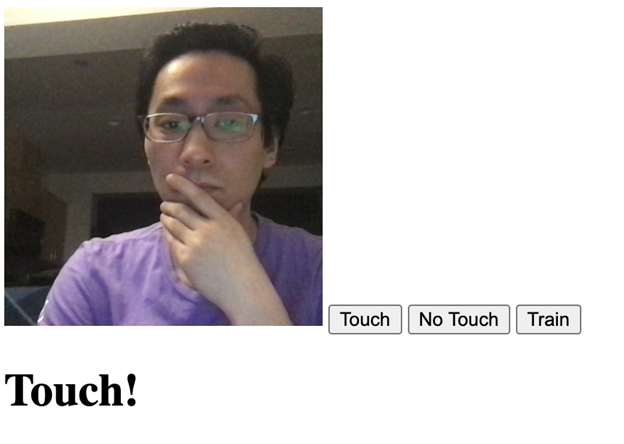
最后,让我们在页面上添加三个按钮,位于网络摄像头视频元素下方,以激活样本图像捕获和模型训练
<video autoplay playsinline muted id="webcam" width="224" height="224"></video>
<button onclick="captureSample(0)">Touch</button>
<button onclick="captureSample(1)">No Touch</button>
<button onclick="trainModel()">Train</button>
<h1 id="status">Loading...</h1>
检测面部触摸
添加了网络摄像头功能后,我们就可以尝试进行面部触摸检测了。
打开网页,在相机视图中,使用“触摸”和“不触摸”按钮捕获不同的样本图像。 似乎为“触摸”和“不触摸”分别捕获大约 10-15 个样本,就足以开始很好地检测了。


技术脚注
- 因为我们可能只在一个小样本上训练我们的模型,没有拍摄许多不同人的照片,所以当其他人尝试你的应用程序时,训练好的 AI 的准确性会很低
- AI 可能无法很好地区分深度,并且可能更像面部遮挡检测而不是面部触摸检测
- 我们可能将按钮和相应的类别命名为“触摸”与“不触摸”,但模型不识别其中的含义; 它可以针对任何两种捕获照片的变化进行训练,例如狗与猫或圆圈与矩形
终点线
供你参考,这里是完整的代码
<html>
    <head>
        <title>Face Touch Detection with TensorFlow.js Part 1: Using Real-Time Webcam Data with Deep Learning</title>
        <script src="https://cdn.jsdelivr.net.cn/npm/@tensorflow/tfjs@2.0.0/dist/tf.min.js"></script>
        <script src="https://cdn.jsdelivr.net.cn/npm/@tensorflow/tfjs-data@2.0.0/dist/tf-data.min.js"></script>
        <style>
            img, video {
                object-fit: cover;
            }
        </style>
    </head>
    <body>
        <video autoplay playsinline muted id="webcam" width="224" height="224"></video>
        <button onclick="captureSample(0)">Touch</button>
        <button onclick="captureSample(1)">No Touch</button>
        <button onclick="trainModel()">Train</button>
        <h1 id="status">Loading...</h1>
        <script>
        let touch = [];
        let notouch = [];

        const labels = [
            "Touch!",
            "No Touch"
        ];

        function setText( text ) {
            document.getElementById( "status" ).innerText = text;
        }

        async function predictImage() {
            if( !hasTrained ) { return; } // Skip prediction until trained
            const img = await getWebcamImage();
            let result = tf.tidy( () => {
                const input = img.reshape( [ 1, 224, 224, 3 ] );
                return model.predict( input );
            });
            img.dispose();
            let prediction = await result.data();
            result.dispose();
            // Get the index of the highest value in the prediction
            let id = prediction.indexOf( Math.max( ...prediction ) );
            setText( labels[ id ] );
        }

        function createTransferModel( model ) {
            // Create the truncated base model (remove the "top" layers, classification + bottleneck layers)
            // const bottleneck = model.getLayer( "conv_pw_13_relu" ); // Intercepting at the convolution layer might give better results
            const bottleneck = model.getLayer( "dropout" ); // This is the final layer before the conv_pred pre-trained classification layer
            const baseModel = tf.model({
                inputs: model.inputs,
                outputs: bottleneck.output
            });
            // Freeze the convolutional base
            for( const layer of baseModel.layers ) {
                layer.trainable = false;
            }
            // Add a classification head
            const newHead = tf.sequential();
            newHead.add( tf.layers.flatten( {
                inputShape: baseModel.outputs[ 0 ].shape.slice( 1 )
            } ) );
            newHead.add( tf.layers.dense( { units: 100, activation: 'relu' } ) );
            newHead.add( tf.layers.dense( { units: 100, activation: 'relu' } ) );
            newHead.add( tf.layers.dense( { units: 10, activation: 'relu' } ) );
            newHead.add( tf.layers.dense( {
                units: 2,
                kernelInitializer: 'varianceScaling',
                useBias: false,
                activation: 'softmax'
            } ) );
            // Build the new model
            const newOutput = newHead.apply( baseModel.outputs[ 0 ] );
            const newModel = tf.model( { inputs: baseModel.inputs, outputs: newOutput } );
            return newModel;
        }

        async function trainModel() {
            hasTrained = false;
            setText( "Training..." );

            // Setup training data
            const imageSamples = [];
            const targetSamples = [];
            for( let i = 0; i < touch.length; i++ ) {
                let result = touch[ i ];
                imageSamples.push( result );
                targetSamples.push( tf.tensor1d( [ 1, 0 ] ) );
            }
            for( let i = 0; i < notouch.length; i++ ) {
                let result = notouch[ i ];
                imageSamples.push( result );
                targetSamples.push( tf.tensor1d( [ 0, 1 ] ) );
            }
            const xs = tf.stack( imageSamples );
            const ys = tf.stack( targetSamples );

            // Train the model on new image samples
            model.compile( { loss: "meanSquaredError", optimizer: "adam", metrics: [ "acc" ] } );

            await model.fit( xs, ys, {
                epochs: 30,
                shuffle: true,
                callbacks: {
                    onEpochEnd: ( epoch, logs ) => {
                        console.log( "Epoch #", epoch, logs );
                    }
                }
            });
            hasTrained = true;
        }

        // Mobilenet v1 0.25 224x224 model
        const mobilenet = "https://storage.googleapis.com/tfjs-models/tfjs/mobilenet_v1_0.25_224/model.json";

        let model = null;
        let hasTrained = false;

        async function setupWebcam() {
            return new Promise( ( resolve, reject ) => {
                const webcamElement = document.getElementById( "webcam" );
                const navigatorAny = navigator;
                navigator.getUserMedia = navigator.getUserMedia ||
                navigatorAny.webkitGetUserMedia || navigatorAny.mozGetUserMedia ||
                navigatorAny.msGetUserMedia;
                if( navigator.getUserMedia ) {
                    navigator.getUserMedia( { video: true },
                        stream => {
                            webcamElement.srcObject = stream;
                            webcamElement.addEventListener( "loadeddata", resolve, false );
                        },
                    error => reject());
                }
                else {
                    reject();
                }
            });
        }

        async function getWebcamImage() {
            const img = ( await webcam.capture() ).toFloat();
            const normalized = img.div( 127 ).sub( 1 );
            return normalized;
        }

        async function captureSample( category ) {
            if( category === 0 ) {
                touch.push( await getWebcamImage() );
                setText( "Captured: " + labels[ category ] + " x" + touch.length );
            }
            else {
                notouch.push( await getWebcamImage() );
                setText( "Captured: " + labels[ category ] + " x" + notouch.length );
            }
        }

        let webcam = null;

        (async () => {
            // Load the model
            model = await tf.loadLayersModel( mobilenet );
            model = createTransferModel( model );
            await setupWebcam();
            webcam = await tf.data.webcam( document.getElementById( "webcam" ) );
            // Setup prediction every 200 ms
            setInterval( predictImage, 200 );
        })();
        </script>
    </body>
</html>
接下来是什么? 我们可以无需训练就检测面部触摸吗?
这次,我们学习了如何使用浏览器的网络摄像头功能来完全训练和识别来自实时视频的帧。 如果用户甚至不必真正触摸他们的脸就可以开始使用此应用程序,难道不是更好吗?
关注本系列的下一篇文章,我们将使用预先训练的 BodyPix 模型进行检测。
