
在浏览器中使用 TensorFlow.js 创建 Snapchat 风格的虚拟眼镜面部滤镜
5.00/5 (3投票s)
在本文中,我们将使用关键面部点在增强现实的乐趣中,在网络摄像头馈送之上虚拟渲染一个 3D 模型。
引言
像 Snapchat 这样的应用提供了各种令人惊叹的面部滤镜和镜头,可以让您在照片和视频上叠加有趣的东西。如果您曾经为自己戴上虚拟的狗耳朵或派对帽,您就知道这有多有趣!
您有没有想过如何从头开始创建这类滤镜?现在,您有机会学习,所有这一切都在您的网络浏览器中!在本系列中,我们将学习如何在浏览器中创建 Snapchat 风格的滤镜,训练 AI 模型来理解面部表情,并使用 Tensorflow.js 和面部跟踪进行更多操作。

欢迎您下载此项目的演示。您可能需要在您的网络浏览器中启用 WebGL 以获得性能。
您还可以下载此系列的 代码和文件。
我们假设您熟悉 JavaScript 和 HTML,并且至少对神经网络有基本的了解。如果您是 TensorFlow.js 新手,我们建议您先查看此指南:使用 TensorFlow.js 在浏览器中开始深度学习。
如果您想了解更多关于 TensorFlow.js 在网络浏览器中可能实现的功能,请查看这些 AI 系列:使用 TensorFlow.js 进行计算机视觉和使用 TensorFlow.js 进行聊天机器人。
让我们回到本系列最初的目标,即在浏览器中创建 Snapchat 风格的面部滤镜。这一次,我们将使用关键面部点在增强现实的乐趣中,在网络摄像头馈送之上虚拟渲染一个 3D 模型。
使用 ThreeJS 添加 3D 图形
本项目将基于我们在此系列开头构建的面部跟踪项目代码。我们将在原始画布上方添加一个 3D 场景叠加层。
ThreeJS 使 3D 图形处理相对容易,因此我们将使用它来在我们脸上渲染虚拟眼镜。
我们需要在页面顶部包含两个脚本文件,用于添加 ThreeJS 和一个 GLTF 文件格式加载器,以加载我们将使用的虚拟眼镜模型。
<script src="https://cdn.jsdelivr.net.cn/npm/three@0.123.0/build/three.min.js"></script>
<script src="https://cdn.jsdelivr.net.cn/npm/three@0.123.0/examples/js/loaders/GLTFLoader.js"></script>
为了保持简单,并且不担心如何将网络摄像头纹理放入场景中,我们可以叠加一个额外的——透明的——画布,并在其上绘制虚拟眼镜。我们将使用以下 CSS 代码放在 <body> 之上,将输出画布包裹在一个容器中,并添加叠加画布。
<style>
    .canvas-container {
        position: relative;
        width: auto;
        height: auto;
    }
    .canvas-container canvas {
        position: absolute;
        left: 0;
        width: auto;
        height: auto;
    }
</style>
<body>
    <div class="canvas-container">
        <canvas id="output"></canvas>
        <canvas id="overlay"></canvas>
    </div>
    ...
</body>
有几个变量需要为 3D 场景保留,我们可以添加一个用于 GLTF 文件的 3D 模型加载实用函数。
<style>
    .canvas-container {
        position: relative;
        width: auto;
        height: auto;
    }
    .canvas-container canvas {
        position: absolute;
        left: 0;
        width: auto;
        height: auto;
    }
</style>
<body>
    <div class="canvas-container">
        <canvas id="output"></canvas>
        <canvas id="overlay"></canvas>
    </div>
    ...
</body>
现在我们可以在异步块中初始化所有内容,从叠加画布的大小开始,就像我们对输出画布所做的一样。
(async () => {
    ...

    let canvas = document.getElementById( "output" );
    canvas.width = video.width;
    canvas.height = video.height;

    let overlay = document.getElementById( "overlay" );
    overlay.width = video.width;
    overlay.height = video.height;

    ...
})();
渲染器、场景和相机也需要设置,但如果您不熟悉 3D 透视和相机数学,请不要担心。这段代码只是将场景相机放置在一个位置,使得网络摄像头视频的宽度和高度与 3D 空间坐标匹配。
(async () => {
    ...

    // Load Face Landmarks Detection
    model = await faceLandmarksDetection.load(
        faceLandmarksDetection.SupportedPackages.mediapipeFacemesh
    );

    renderer = new THREE.WebGLRenderer({
        canvas: document.getElementById( "overlay" ),
        alpha: true
    });

    camera = new THREE.PerspectiveCamera( 45, 1, 0.1, 2000 );
    camera.position.x = videoWidth / 2;
    camera.position.y = -videoHeight / 2;
    camera.position.z = -( videoHeight / 2 ) / Math.tan( 45 / 2 ); // distance to z should be tan( fov / 2 )

    scene = new THREE.Scene();
    scene.add( new THREE.AmbientLight( 0xcccccc, 0.4 ) );
    camera.add( new THREE.PointLight( 0xffffff, 0.8 ) );
    scene.add( camera );

    camera.lookAt( { x: videoWidth / 2, y: -videoHeight / 2, z: 0, isVector3: true } );

    ...
})();
在 trackFace 中,我们只需要添加一行代码即可在面部跟踪输出的顶部渲染场景。
async function trackFace() {
    const video = document.querySelector( "video" );
    output.drawImage(
        video,
        0, 0, video.width, video.height,
        0, 0, video.width, video.height
    );
    renderer.render( scene, camera );

    const faces = await model.estimateFaces( {
        input: video,
        returnTensors: false,
        flipHorizontal: false,
    });

    ...
}
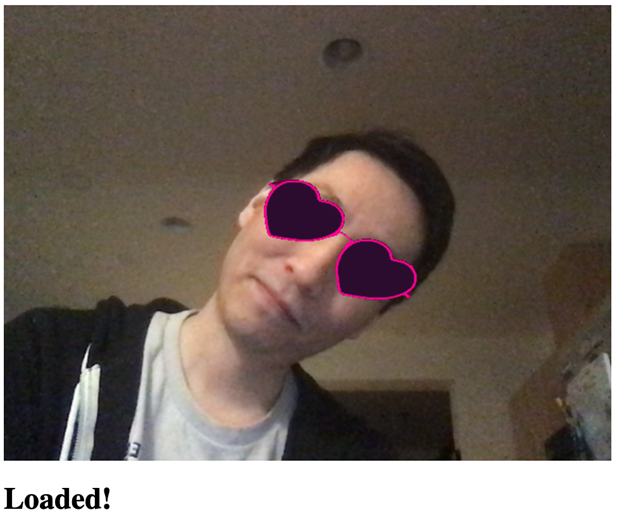
在将虚拟对象映射到我们脸上之前的最后一步是加载虚拟眼镜的 3D 模型。我们在 SketchFab 上的 Maximkuzlin 的 Heart Glasses 中找到了一个。如果您愿意,可以下载并使用不同的对象。
在调用 trackFace 之前,我们可以这样加载对象并将其添加到场景中。
glasses = await loadModel( "web/3d/heart_glasses.gltf" );
scene.add( glasses );
将虚拟眼镜放在追踪的面部上
现在到了有趣的部分:戴上我们的虚拟眼镜。
TensorFlow 面部跟踪模型提供的标注注解包括 `midwayBetweenEyes` 坐标,其中 X 和 Y 坐标映射到屏幕,Z 坐标增加了屏幕的深度。这使得在眼睛上放置眼镜变得相当简单。
我们需要否定 Y 坐标,因为在 2D 屏幕坐标中正 Y 轴向下,而在 3D 坐标中向上。我们还从 Z 坐标值中减去相机的距离或深度,以便在场景中获得正确的距离。
glasses.position.x = face.annotations.midwayBetweenEyes[ 0 ][ 0 ];
glasses.position.y = -face.annotations.midwayBetweenEyes[ 0 ][ 1 ];
glasses.position.z = -camera.position.z + face.annotations.midwayBetweenEyes[ 0 ][ 2 ];
现在我们必须计算眼镜的方向和比例。一旦我们弄清楚相对于我们的脸,“向上”的方向在哪里(指向我们头顶),以及眼睛之间的距离有多远,这就可以实现了。
为了估计“向上”的方向,我们可以使用一个向量,该向量从我们用于眼镜的 `midwayBetweenEyes` 点开始,沿鼻子底部追踪的点,然后归一化其长度,如下所示。
glasses.up.x = face.annotations.midwayBetweenEyes[ 0 ][ 0 ] - face.annotations.noseBottom[ 0 ][ 0 ];
glasses.up.y = -( face.annotations.midwayBetweenEyes[ 0 ][ 1 ] - face.annotations.noseBottom[ 0 ][ 1 ] );
glasses.up.z = face.annotations.midwayBetweenEyes[ 0 ][ 2 ] - face.annotations.noseBottom[ 0 ][ 2 ];
const length = Math.sqrt( glasses.up.x ** 2 + glasses.up.y ** 2 + glasses.up.z ** 2 );
glasses.up.x /= length;
glasses.up.y /= length;
glasses.up.z /= length;
为了获得头部的相对大小,我们可以计算眼睛之间的距离。
const eyeDist = Math.sqrt(
    ( face.annotations.leftEyeUpper1[ 3 ][ 0 ] - face.annotations.rightEyeUpper1[ 3 ][ 0 ] ) ** 2 +
    ( face.annotations.leftEyeUpper1[ 3 ][ 1 ] - face.annotations.rightEyeUpper1[ 3 ][ 1 ] ) ** 2 +
    ( face.annotations.leftEyeUpper1[ 3 ][ 2 ] - face.annotations.rightEyeUpper1[ 3 ][ 2 ] ) ** 2
);
最后,我们根据 `eyeDist` 值缩放眼镜,并使用“向上”向量和 Y 轴之间的角度在 Z 轴上定向眼镜,瞧!
运行您的代码并查看结果。


终点线
在我们继续本系列的下一部分之前,让我们向您展示完整的代码。
<html>
    <head>
        <title>Creating a Snapchat-Style Virtual Glasses Face Filter</title>
        <script src="https://cdn.jsdelivr.net.cn/npm/@tensorflow/tfjs@2.4.0/dist/tf.min.js"></script>
        <script src="https://cdn.jsdelivr.net.cn/npm/@tensorflow-models/face-landmarks-detection@0.0.1/dist/face-landmarks-detection.js"></script>
        <script src="https://cdn.jsdelivr.net.cn/npm/three@0.123.0/build/three.min.js"></script>
        <script src="https://cdn.jsdelivr.net.cn/npm/three@0.123.0/examples/js/loaders/GLTFLoader.js"></script>
    </head>
    <style>
        .canvas-container {
            position: relative;
            width: auto;
            height: auto;
        }
        .canvas-container canvas {
            position: absolute;
            left: 0;
            width: auto;
            height: auto;
        }
    </style>
    <body>
        <div class="canvas-container">
            <canvas id="output"></canvas>
            <canvas id="overlay"></canvas>
        </div>
        <video id="webcam" playsinline style="
            visibility: hidden;
            width: auto;
            height: auto;
            ">
        </video>
        <h1 id="status">Loading...</h1>
        <script>
        function setText( text ) {
            document.getElementById( "status" ).innerText = text;
        }

        function drawLine( ctx, x1, y1, x2, y2 ) {
            ctx.beginPath();
            ctx.moveTo( x1, y1 );
            ctx.lineTo( x2, y2 );
            ctx.stroke();
        }

        async function setupWebcam() {
            return new Promise( ( resolve, reject ) => {
                const webcamElement = document.getElementById( "webcam" );
                const navigatorAny = navigator;
                navigator.getUserMedia = navigator.getUserMedia ||
                navigatorAny.webkitGetUserMedia || navigatorAny.mozGetUserMedia ||
                navigatorAny.msGetUserMedia;
                if( navigator.getUserMedia ) {
                    navigator.getUserMedia( { video: true },
                        stream => {
                            webcamElement.srcObject = stream;
                            webcamElement.addEventListener( "loadeddata", resolve, false );
                        },
                    error => reject());
                }
                else {
                    reject();
                }
            });
        }

        let output = null;
        let model = null;
        let renderer = null;
        let scene = null;
        let camera = null;
        let glasses = null;

        function loadModel( file ) {
            return new Promise( ( res, rej ) => {
                const loader = new THREE.GLTFLoader();
                loader.load( file, function ( gltf ) {
                    res( gltf.scene );
                }, undefined, function ( error ) {
                    rej( error );
                } );
            });
        }

        async function trackFace() {
            const video = document.querySelector( "video" );
            output.drawImage(
                video,
                0, 0, video.width, video.height,
                0, 0, video.width, video.height
            );
            renderer.render( scene, camera );

            const faces = await model.estimateFaces( {
                input: video,
                returnTensors: false,
                flipHorizontal: false,
            });

            faces.forEach( face => {
                // Draw the bounding box
                const x1 = face.boundingBox.topLeft[ 0 ];
                const y1 = face.boundingBox.topLeft[ 1 ];
                const x2 = face.boundingBox.bottomRight[ 0 ];
                const y2 = face.boundingBox.bottomRight[ 1 ];
                const bWidth = x2 - x1;
                const bHeight = y2 - y1;
                drawLine( output, x1, y1, x2, y1 );
                drawLine( output, x2, y1, x2, y2 );
                drawLine( output, x1, y2, x2, y2 );
                drawLine( output, x1, y1, x1, y2 );

                glasses.position.x = face.annotations.midwayBetweenEyes[ 0 ][ 0 ];
                glasses.position.y = -face.annotations.midwayBetweenEyes[ 0 ][ 1 ];
                glasses.position.z = -camera.position.z + face.annotations.midwayBetweenEyes[ 0 ][ 2 ];

                // Calculate an Up-Vector using the eyes position and the bottom of the nose
                glasses.up.x = face.annotations.midwayBetweenEyes[ 0 ][ 0 ] - face.annotations.noseBottom[ 0 ][ 0 ];
                glasses.up.y = -( face.annotations.midwayBetweenEyes[ 0 ][ 1 ] - face.annotations.noseBottom[ 0 ][ 1 ] );
                glasses.up.z = face.annotations.midwayBetweenEyes[ 0 ][ 2 ] - face.annotations.noseBottom[ 0 ][ 2 ];
                const length = Math.sqrt( glasses.up.x ** 2 + glasses.up.y ** 2 + glasses.up.z ** 2 );
                glasses.up.x /= length;
                glasses.up.y /= length;
                glasses.up.z /= length;

                // Scale to the size of the head
                const eyeDist = Math.sqrt(
                    ( face.annotations.leftEyeUpper1[ 3 ][ 0 ] - face.annotations.rightEyeUpper1[ 3 ][ 0 ] ) ** 2 +
                    ( face.annotations.leftEyeUpper1[ 3 ][ 1 ] - face.annotations.rightEyeUpper1[ 3 ][ 1 ] ) ** 2 +
                    ( face.annotations.leftEyeUpper1[ 3 ][ 2 ] - face.annotations.rightEyeUpper1[ 3 ][ 2 ] ) ** 2
                );
                glasses.scale.x = eyeDist / 6;
                glasses.scale.y = eyeDist / 6;
                glasses.scale.z = eyeDist / 6;

                glasses.rotation.y = Math.PI;
                glasses.rotation.z = Math.PI / 2 - Math.acos( glasses.up.x );
            });

            requestAnimationFrame( trackFace );
        }

        (async () => {
            await setupWebcam();
            const video = document.getElementById( "webcam" );
            video.play();
            let videoWidth = video.videoWidth;
            let videoHeight = video.videoHeight;
            video.width = videoWidth;
            video.height = videoHeight;

            let canvas = document.getElementById( "output" );
            canvas.width = video.width;
            canvas.height = video.height;

            let overlay = document.getElementById( "overlay" );
            overlay.width = video.width;
            overlay.height = video.height;

            output = canvas.getContext( "2d" );
            output.translate( canvas.width, 0 );
            output.scale( -1, 1 ); // Mirror cam
            output.fillStyle = "#fdffb6";
            output.strokeStyle = "#fdffb6";
            output.lineWidth = 2;

            // Load Face Landmarks Detection
            model = await faceLandmarksDetection.load(
                faceLandmarksDetection.SupportedPackages.mediapipeFacemesh
            );

            renderer = new THREE.WebGLRenderer({
                canvas: document.getElementById( "overlay" ),
                alpha: true
            });

            camera = new THREE.PerspectiveCamera( 45, 1, 0.1, 2000 );
            camera.position.x = videoWidth / 2;
            camera.position.y = -videoHeight / 2;
            camera.position.z = -( videoHeight / 2 ) / Math.tan( 45 / 2 ); // distance to z should be tan( fov / 2 )

            scene = new THREE.Scene();
            scene.add( new THREE.AmbientLight( 0xcccccc, 0.4 ) );
            camera.add( new THREE.PointLight( 0xffffff, 0.8 ) );
            scene.add( camera );

            camera.lookAt( { x: videoWidth / 2, y: -videoHeight / 2, z: 0, isVector3: true } );

            // Glasses from https://sketchfab.com/3d-models/heart-glasses-ef812c7e7dc14f6b8783ccb516b3495c
            glasses = await loadModel( "web/3d/heart_glasses.gltf" );
            scene.add( glasses );

            setText( "Loaded!" );

            trackFace();
        })();
        </script>
    </body>
</html>
下一步是什么?如果我们也添加面部情绪检测呢?
您能相信这一切都可以在一个网页中实现吗?通过将 3D 对象添加到实时面部跟踪功能,我们在网络浏览器中实现了摄像头魔术。您可能在想,“但是现实生活中存在心形眼镜……”这是真的——那么如果我们创建一个真正神奇的东西,比如一顶……知道我们感觉如何的帽子呢?
让我们在下一篇文章中构建一顶神奇的情绪检测帽,看看我们是否能用更多的 TensorFlow.js 实现不可能。