C# 中的矩阵乘法 - 对图像应用变换
4.76/5 (11投票s)
C# 中的矩阵乘法及其在基本图像变换中的应用。
引言
今天,我将向您展示我的 C# 矩阵乘法实现,以及如何使用它对图像应用旋转、拉伸、翻转和修改颜色密度等基本变换。
请注意,这不是一个图像处理课程。相反,本文在 C# 中演示了三个核心线性代数概念:矩阵乘法、点积和变换矩阵。
源代码
本文的源代码可在 GitHub 上找到,地址为: https://github.com/elsheimy/Elsheimy.Samples.LinearTransformations
此实现也包含在线性代数问题组件 Elsheimy.Components.Linears 中,可在
- GitHub: https://github.com/elsheimy/Elsheimy.Components.Linears
- NuGet: https://nuget.net.cn/packages/Elsheimy.Components.Linears
矩阵乘法
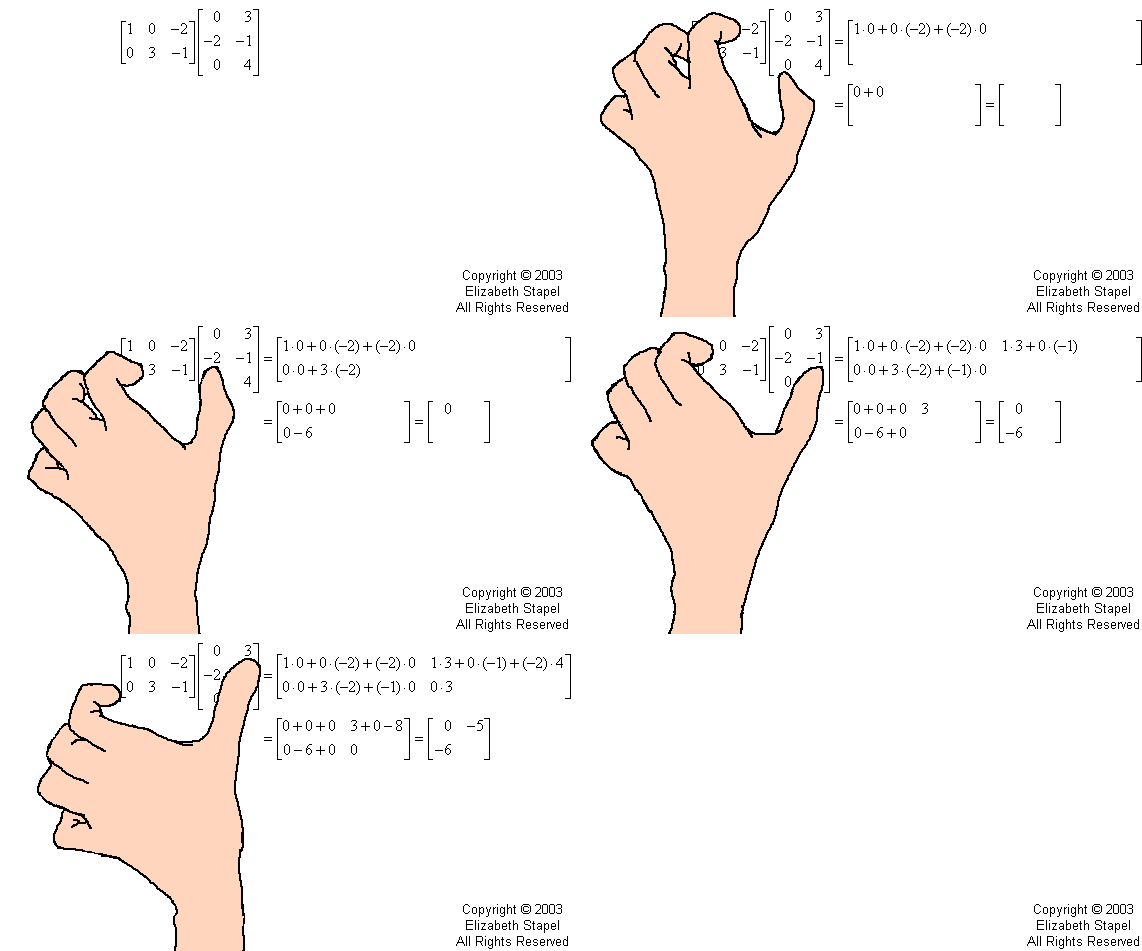
矩阵乘法背后的数学原理非常简单。您可以在 这里 和 这里 找到非常简单的解释。
让我们直接进入代码,从我们的主函数开始
public static double[,] Multiply(double[,] matrix1, double[,] matrix2) {
  // cahing matrix lengths for better performance
  var matrix1Rows = matrix1.GetLength(0);
  var matrix1Cols = matrix1.GetLength(1);
  var matrix2Rows = matrix2.GetLength(0);
  var matrix2Cols = matrix2.GetLength(1);

  // checking if product is defined
  if (matrix1Cols != matrix2Rows)
    throw new InvalidOperationException
      ("Product is undefined. n columns of first matrix must equal to n rows of second matrix");

  // creating the final product matrix
  double[,] product = new double[matrix1Rows, matrix2Cols];

  // looping through matrix 1 rows
  for (int matrix1_row = 0; matrix1_row < matrix1Rows; matrix1_row++) {
    // for each matrix 1 row, loop through matrix 2 columns
    for (int matrix2_col = 0; matrix2_col < matrix2Cols; matrix2_col++) {
      // loop through matrix 1 columns to calculate the dot product
      for (int matrix1_col = 0; matrix1_col < matrix1Cols; matrix1_col++) {
        product[matrix1_row, matrix2_col] +=
          matrix1[matrix1_row, matrix1_col] *
          matrix2[matrix1_col, matrix2_col];
      }
    }
  }

  return product;
}
我们首先使用 Array.GetLength() 获取矩阵的行数和列数,并将它们存储在变量中以备后用。调用 Array.GetLength() 会有性能开销,因此我们将结果存储在变量中,而不是多次调用该函数。本文后面将涵盖此代码的性能部分。
接下来,我们通过比较 matrix1 的列数和 matrix2 的行数来确保乘积是定义的。如果乘积未定义,则会抛出异常。

照片来源: MathwareHouse
然后,我们使用原始矩阵的行数和列数创建最终的乘积矩阵。
之后,我们使用三个循环来遍历矩阵向量并计算点积。

照片来源: PurpleMath
转换
现在我们可以使用我们的乘法算法来创建图像变换矩阵,这些矩阵可以应用于任何点 (X, Y) 或颜色 (ARGB) 来修改它。我们将首先定义我们的抽象 IImageTransformation 接口,该接口有两个成员:CreateTransformationMatrix() 和 IsColorTransformation。第一个返回相关的变换矩阵,第二个指示此变换是否可以应用于颜色(true)或点(false)。
public interface IImageTransformation {
  double[,] CreateTransformationMatrix();

  bool IsColorTransformation { get; }
}
旋转变换
二维旋转矩阵定义为

照片来源: Academo
我们的代码非常清晰
public class RotationImageTransformation : IImageTransformation {
  public double AngleDegrees { get; set; }
  public double AngleRadians {
    get { return DegreesToRadians(AngleDegrees); }
    set { AngleDegrees = RadiansToDegrees(value); }
  }
  public bool IsColorTransformation { get { return false; } }

  public static double DegreesToRadians(double degree)
      { return degree * Math.PI / 180; }
  public static double RadiansToDegrees(double radians)
      { return radians / Math.PI * 180; }

  public double[,] CreateTransformationMatrix() {
    double[,] matrix = new double[2, 2];

    matrix[0, 0] = Math.Cos(AngleRadians);
    matrix[1, 0] = Math.Sin(AngleRadians);
    matrix[0, 1] = -1 * Math.Sin(AngleRadians);
    matrix[1, 1] = Math.Cos(AngleRadians);

    return matrix;
  }

  public RotationImageTransformation() { }
  public RotationImageTransformation(double angleDegree) {
    this.AngleDegrees = angleDegree;
  }
}
如您在此代码中所示,Sin() 和 Cos() 接受弧度角的输入,因此我们使用了两个额外的函数在弧度和度之间进行转换,以使用户更容易理解。
此处提供了关于二维旋转矩阵的非常有用的解释和示例: 这里。
拉伸/缩放变换
我们的第二个变换是因子缩放变换。它通过将 X/Y 按所需因子进行缩放来实现。它定义为
public class StretchImageTransformation : IImageTransformation {
  public double HorizontalStretch { get; set; }
  public double VerticalStretch { get; set; }

  public bool IsColorTransformation { get { return false; } }

  public double[,] CreateTransformationMatrix() {
    double[,] matrix = Matrices.CreateIdentityMatrix(2);

    matrix[0, 0] += HorizontalStretch;
    matrix[1, 1] += VerticalStretch;

    return matrix;
  }

  public StretchImageTransformation() { }
  public StretchImageTransformation(double horizStretch, double vertStretch) {
    this.HorizontalStretch = horizStretch;
    this.VerticalStretch = vertStretch;
  }
}
单位矩阵
之前的代码需要使用单位矩阵。以下是定义 CreateIdentityMatrix() 的代码,
public static double[,] CreateIdentityMatrix(int length) {
  double[,] matrix = new double[length, length];

  for (int i = 0, j = 0; i < length; i++, j++)
    matrix[i, j] = 1;

  return matrix;
}
翻转变换
我们的第三个变换是翻转变换。它通过否定 X 和 Y 分量分别翻转向量使其关于垂直轴和水平轴对称。
public class FlipImageTransformation : IImageTransformation {
  public bool FlipHorizontally { get; set; }
  public bool FlipVertically { get; set; }
  public bool IsColorTransformation { get { return false; } }

  public double[,] CreateTransformationMatrix() {
    // identity matrix
    double[,] matrix = Matrices.CreateIdentityMatrix(2);

    if (FlipHorizontally)
      matrix[0, 0] *= -1;
    if (FlipVertically)
      matrix[1, 1] *= -1;

    return matrix;
  }

  public FlipImageTransformation() { }
  public FlipImageTransformation(bool flipHoriz, bool flipVert) {
    this.FlipHorizontally = flipHoriz;
    this.FlipVertically = flipVert;
  }
}
颜色密度变换
我们的最后一个变换是颜色密度变换。它通过为颜色分量(Alpha、Red、Green 和 Blue)定义不同的缩放因子来实现。例如,如果您想使颜色透明度为 50%,我们将 Alpha 缩放到 0.5。如果您想完全移除红色,可以将其缩放到 0。依此类推。
public class DensityImageTransformation : IImageTransformation {
  public double AlphaDensity { get; set; }
  public double RedDensity { get; set; }
  public double GreenDensity { get; set; }
  public double BlueDensity { get; set; }
  public bool IsColorTransformation { get { return true; } }

  public double[,] CreateTransformationMatrix() {
    // identity matrix
    double[,] matrix = new double[,]{
      { AlphaDensity, 0, 0, 0},
      { 0, RedDensity, 0, 0},
      { 0, 0, GreenDensity, 0},
      { 0, 0, 0, BlueDensity},
    };

    return matrix;
  }

  public DensityImageTransformation() { }
  public DensityImageTransformation(double alphaDensity,
    double redDensity,
    double greenDensity,
    double blueDensity) {
    this.AlphaDensity = alphaDensity;
    this.RedDensity = redDensity;
    this.GreenDensity = greenDensity;
    this.BlueDensity = blueDensity;
  }
}
连接各项
现在是时候定义连接各项的流程和过程了。这是完整的代码。后面附有解释。
/// <summary>
/// Applies image transformations to an image file
/// </summary>
public static Bitmap Apply(string file, IImageTransformation[] transformations) {
  using (Bitmap bmp = (Bitmap)Bitmap.FromFile(file)) {
    return Apply(bmp, transformations);
  }
}

/// <summary>
/// Applies image transformations bitmap object
/// </summary>
public static Bitmap Apply(Bitmap bmp, IImageTransformation[] transformations) {
  // defining an array to store new image data
  PointColor[] points = new PointColor[bmp.Width * bmp.Height];

  // filtering transformations
  var pointTransformations =
    transformations.Where(s => s.IsColorTransformation == false).ToArray();
  var colorTransformations =
    transformations.Where(s => s.IsColorTransformation == true).ToArray();

  double[,] pointTransMatrix =
    CreateTransformationMatrix(pointTransformations, 2); // x, y
  double[,] colorTransMatrix =
    CreateTransformationMatrix(colorTransformations, 4); // a, r, g, b

  // saving some stats to adjust the image later
  int minX = 0, minY = 0;
  int maxX = 0, maxY = 0;

  // scanning points and applying transformations
  int idx = 0;
  for (int x = 0; x < bmp.Width; x++) { // row by row
    for (int y = 0; y < bmp.Height; y++) { // column by column

      // applying the point transformations
      var product =
        Matrices.Multiply(pointTransMatrix, new double[,] { { x }, { y } });

      var newX = (int)product[0, 0];
      var newY = (int)product[1, 0];

      // saving stats
      minX = Math.Min(minX, newX);
      minY = Math.Min(minY, newY);
      maxX = Math.Max(maxX, newX);
      maxY = Math.Max(maxY, newY);

      // applying color transformations
      Color clr = bmp.GetPixel(x, y); // current color
      var colorProduct = Matrices.Multiply(
        colorTransMatrix,
        new double[,] { { clr.A }, { clr.R }, { clr.G }, { clr.B } });
      clr = Color.FromArgb(
        GetValidColorComponent(colorProduct[0, 0]),
        GetValidColorComponent(colorProduct[1, 0]),
        GetValidColorComponent(colorProduct[2, 0]),
        GetValidColorComponent(colorProduct[3, 0])
        ); // new color

      // storing new data
      points[idx] = new PointColor() {
        X = newX,
        Y = newY,
        Color = clr
      };

      idx++;
    }
  }

  // new bitmap width and height
  var width = maxX - minX + 1;
  var height = maxY - minY + 1;

  // new image
  var img = new Bitmap(width, height);
  foreach (var pnt in points)
    img.SetPixel(
      pnt.X - minX,
      pnt.Y - minY,
      pnt.Color);

  return img;
}

/// <summary>
/// Returns color component between 0 and 255
/// </summary>
private static byte GetValidColorComponent(double c) {
  c = Math.Max(byte.MinValue, c);
  c = Math.Min(byte.MaxValue, c);
  return (byte)c;
}

/// <summary>
/// Combines transformations to create single transformation matrix
/// </summary>
private static double[,] CreateTransformationMatrix
  (IImageTransformation[] vectorTransformations, int dimensions) {
  double[,] vectorTransMatrix =
    Matrices.CreateIdentityMatrix(dimensions);

  // combining transformations works by multiplying them
  foreach (var trans in vectorTransformations)
    vectorTransMatrix =
      Matrices.Multiply(vectorTransMatrix, trans.CreateTransformationMatrix());

  return vectorTransMatrix;
}
我们首先定义了 Apply() 函数的两个重载。一个接受图像文件名和变换列表,另一个接受 Bitmap 对象和要应用于该图像的变换列表。
在 Apply() 函数内部,我们将变换分为两类:作用于点位置 (X 和 Y) 的变换和作用于颜色的变换。我们还为每个组使用了 CreateTransformationMatrix() 函数,将变换合并为一个单一的变换矩阵。
之后,我们开始扫描图像并将变换分别应用于点和颜色。请注意,我们必须确保变换后的颜色分量是字节大小的。应用变换后,我们将数据保存在数组中以备后用。
在扫描过程中,我们记录了最小和最大 X 和 Y 值。这将有助于设置新图像的大小并根据需要移动点。某些变换(如拉伸)可能会增加或减小图像大小。
最后,我们创建了新的 Bitmap 对象并在移动它们之后设置了点数据。
创建客户端
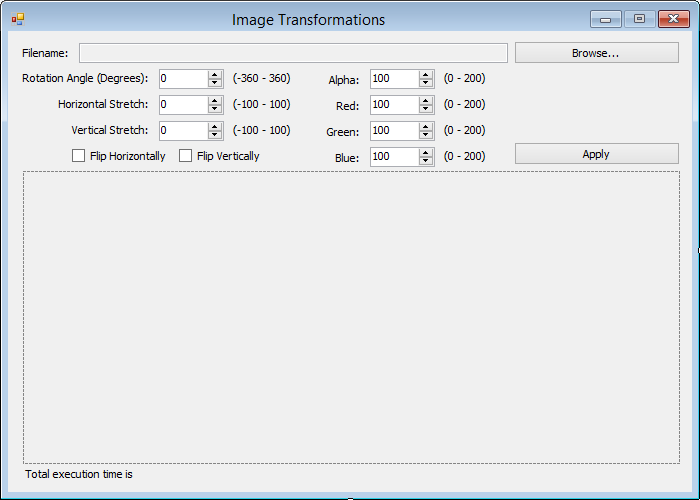
我们的客户端应用程序很简单。这是我们窗体的屏幕截图,

让我们看一下它背后的代码
private string _file;
private Stopwatch _stopwatch;


public ImageTransformationsForm() {
  InitializeComponent();
}

private void BrowseButton_Click(object sender, EventArgs e) {
  string file = OpenFile();
  if (file != null) {
    this.FileTextBox.Text = file;

    _file = file;
  }
}

public static string OpenFile() {
  OpenFileDialog dlg = new OpenFileDialog();
  dlg.CheckFileExists = true;

  if (dlg.ShowDialog() == DialogResult.OK)
    return dlg.FileName;

  return null;
}

private void ApplyButton_Click(object sender, EventArgs e) {
  if (_file == null)
    return;

  DisposePreviousImage();

  RotationImageTransformation rotation =
    new RotationImageTransformation((double)this.AngleNumericUpDown.Value);
  StretchImageTransformation stretch =
    new StretchImageTransformation(
      (double)this.HorizStretchNumericUpDown.Value / 100,
      (double)this.VertStretchNumericUpDown.Value / 100);
  FlipImageTransformation flip =
    new FlipImageTransformation(this.FlipHorizontalCheckBox.Checked, this.FlipVerticalCheckBox.Checked);

  DensityImageTransformation density =
    new DensityImageTransformation(
      (double)this.AlphaNumericUpDown.Value / 100,
      (double)this.RedNumericUpDown.Value / 100,
      (double)this.GreenNumericUpDown.Value / 100,
      (double)this.BlueNumericUpDown.Value / 100
    );

  StartStopwatch();
  var bmp = ImageTransformer.Apply(_file,
    new IImageTransformation[] { rotation, stretch, flip, density });
  StopStopwatch();

  this.ImagePictureBox.Image = bmp;
}


private void StartStopwatch() {
  if (_stopwatch == null)
    _stopwatch = new Stopwatch();
  else
    _stopwatch.Reset();

  _stopwatch.Start();
}


private void StopStopwatch() {
  _stopwatch.Stop();
  this.ExecutionTimeLabel.Text = $"Total execution time is {_stopwatch.ElapsedMilliseconds} milliseconds";
}

private void DisposePreviousImage() {
  if (this.ImagePictureBox.Image != null) {
    var tmpImg = this.ImagePictureBox.Image;
    this.ImagePictureBox.Image = null;
    tmpImg.Dispose();
  }
}
代码非常简单。唯一需要提到的是,始终调用可处置对象的 Dispose() 以确保最佳性能是一个好习惯。
性能说明
在我们的核心 Multiply() 方法中,我们提到调用 Array.GetLength() 会带来巨大的性能影响。我曾尝试检查 Array.GetLength() 背后的逻辑,但没有成功。该方法是本地实现的,我无法使用常见的反汇编工具查看其代码。但是,通过对两种场景进行基准测试(一种包含大量 Array.GetLength() 调用,另一种仅包含一次对同一函数的调用),我发现单次调用代码的速度比另一种快 2 倍。
改进 Multiply() 方法性能的另一种方法是使用不安全代码。通过直接访问数组内容,您可以获得卓越的处理性能。
这是我们新的、更新的不安全代码
public static double[,] MultiplyUnsafe(double[,] matrix1, double[,] matrix2) {
  // cahing matrix lengths for better performance
  var matrix1Rows = matrix1.GetLength(0);
  var matrix1Cols = matrix1.GetLength(1);
  var matrix2Rows = matrix2.GetLength(0);
  var matrix2Cols = matrix2.GetLength(1);

  // checking if product is defined
  if (matrix1Cols != matrix2Rows)
    throw new InvalidOperationException
      ("Product is undefined. n columns of first matrix must equal to n rows of second matrix");

  // creating the final product matrix
  double[,] product = new double[matrix1Rows, matrix2Cols];

  unsafe
  {
    // fixing pointers to matrices
    fixed (
      double* pProduct = product,
      pMatrix1 = matrix1,
      pMatrix2 = matrix2) {

      int i = 0;
      // looping through matrix 1 rows
      for (int matrix1_row = 0; matrix1_row < matrix1Rows; matrix1_row++) {
        // for each matrix 1 row, loop through matrix 2 columns
        for (int matrix2_col = 0; matrix2_col < matrix2Cols; matrix2_col++) {
          // loop through matrix 1 columns to calculate the dot product
          for (int matrix1_col = 0; matrix1_col < matrix1Cols; matrix1_col++) {

            var val1 = *(pMatrix1 + (matrix1Rows * matrix1_row) + matrix1_col);
            var val2 = *(pMatrix2 + (matrix2Cols * matrix1_col) + matrix2_col);

            *(pProduct + i) += val1 * val2;

          }

          i++;

        }
      }

    }
  }

  return product;
}
不安全代码将无法编译,除非您在项目设置页面的“生成”选项卡中启用它。
下图显示了在将 1000x1000 矩阵与其自身相乘时,三种 Multiply() 场景之间的差异。测试是在我垂死的 Core i5-2430M@2.4GHz 6GB RAM 1GB Intel Graphics 笔记本上运行的。
 我没有涵盖客户端或 Apply() 方法中的任何性能改进,因为它们不是本文的核心焦点。
结论
这就是我对矩阵乘法的实现。请随时就代码向我发送您的反馈和评论,并根据需要进行更新。
