
部署到 Azure Arc 通过 Azure Application Services(第二部分):在任意位置运行 Azure Functions
5.00/5 (1投票)
在本文中,我们将创建 Java 或 Python 版本的 Azure Functions,展示将其部署到我们托管在 Arc 上的 Kubernetes 集群与直接部署到 Azure 的函数一样简单,并演示我们的 Azure Functions 实际上正在云中运行,但不在 Azure 本身之上。
本文将介绍将 Azure Functions 部署到托管在其他云服务中的 Arc 托管 Kubernetes 集群的步骤。
它演示了如何
- 配置 App Service Kubernetes 环境
- 将 Python Functions 部署到 Google Cloud 上的 Arc 启用集群
最后,它演示了 Azure Functions 正在云中运行,但不在 Azure 本身之上。
以下步骤针对 Windows 上的 PowerShell,但在 Bash 中也易于重现。此外,它们被细分以便更好地理解过程。在生产环境中,它们可以合并成一个简洁的脚本。
必备组件
本系列的第一篇文章回顾了如何将 Azure Arc 连接到 Google Cloud 上的 Kubernetes。在部署 Azure Functions 之前,让我们运行一些检查以确保一切都已正确就位。请记住纳入您之前使用的任何命名选择。
首先,确认您的 Azure 订阅中存在一个名为 arc-rg 的资源组。
注意:在预览期间,Azure Arc 的资源组必须位于 West Europe 或 East US。
接下来,确认 Kubernetes 提供程序的注册
az provider show -n Microsoft.Kubernetes --query registrationState -tsv

az provider show --namespace Microsoft.KubernetesConfiguration --query registrationState -o tsv
然后确认名为 k8s-gke 的已连接 Azure Arc 资源存在于资源组中。
此外,请确保您有一个 kubeconfig 条目以进行 GKE 集群身份验证。
接下来,检查 azure-arc 是否设置为 Active
kubectl get namespace
验证 Azure Arc Kubernetes 代理是否已部署。它们都应该是正在运行的
kubectl get pods -n azure-arc
之后,使用以下命令验证连接
az connectedk8s show --resource-group arc-rg --name k8s-gke
这应该会显示 provisioningState 属性为 Succeeded。
最后,检查已连接的 Kubernetes 集群是否是 Azure 门户中的资源组

步骤 1:配置 App Services Kubernetes 环境
您可以根据自己的喜好为 SQL Server 使用任何名称。(您还需要设置您的 Azure 订阅 ID。)但是,为了简单起见,本文使用了以下名称:
k8s-gke— Azure Arc 资源arc-rg— Azure Arc 的 Azure 资源组arc-app-service— Kubernetes App Service 扩展arc-ns— App 命名空间arc-app-custom-location— 自定义位置
登录 Azure
对于部署管道,使用具有有限权限的角色分配的服务主体将 Kubernetes 集群连接到 Azure Arc 可能很有帮助。您可以在此处找到相关说明。
对于本次演示,我们登录到我们的 Azure 帐户
az login
az account set -s "<SUBSCRIPTION_ID>"
添加或更新自定义位置的先决条件
按以下方式添加或更新自定义位置的先决条件
az provider register --namespace Microsoft.ExtendedLocation --wait
az extension add --upgrade -n customlocation
在集群上启用功能
按以下方式启用自定义位置功能
az connectedk8s enable-features -n k8s-gke -g arc-rg --features custom-locations
这也会启用集群连接功能。
按以下方式在 Azure Arc 连接的集群中安装 App Service 扩展
az k8s-extension create -g "arc-rg" --name "arc-app-service"
    --cluster-type connectedClusters -c "k8s-gke" `
    --extension-type 'Microsoft.Web.Appservice' --release-train stable --auto-upgrade-minor-version true `
    --scope cluster --release-namespace "arc-ns" `
    --configuration-settings "Microsoft.CustomLocation.ServiceAccount=default" `
    --configuration-settings "appsNamespace=arc-ns" `
    --configuration-settings "clusterName=arc-app-service" `
    --configuration-settings "keda.enabled=true" `
    --configuration-settings "buildService.storageClassName=standard" `
    --configuration-settings "buildService.storageAccessMode=ReadWriteOnce" `
    --configuration-settings "customConfigMap=arc-ns/kube-environment-config"
如果要在生产环境中启用 Log Analytics,我们必须立即按照此处显示的附加配置进行操作。我们稍后将无法进行此操作。
持久存储有两个需要仔细考虑的参数。您可以访问所有可用访问模式的详细信息,包括所有主要云服务提供商提供的存储资源,以及在官方 Kubernetes 文档中了解有关 Kubernetes 持久卷的更多信息。在本次演示中,我们正在 Google Cloud Engine (GCE) 中托管我们的集群,它提供了 GCEPersistentDisk。这支持 Kubernetes 的以下 PersistentVolume (PV) 类型:
ReadWriteOnceReadOnlyMany
AppService 扩展支持
ReadWriteOnceReadWriteMany
如果我们没有显式将 AppService 扩展设置为 ReadWriteOnce。在这种情况下,它默认为 ReadWriteMany。AppService 扩展的 PersistentVolumeClaim (PVC) 请求与 GCE 中可用的 PV 之间将存在不匹配。
我们还必须为 GCP 上的持久存储配置正确的类名。

该命令可能需要几分钟。如果在该过程中出现任何错误,请检查故障排除文档。
命令完成后,导航到 Azure 门户中的 Kubernetes Azure Arc 资源,然后单击边栏上的扩展。您应该会看到 arc-app-service 扩展列为已安装。

创建自定义位置
我们必须设置自定义位置才能将 Azure Functions 部署到 Arc 启用的 Kubernetes 集群。我们在上一篇文章中讨论了这些。
首先,获取 App Service 扩展的 id 属性
$extensionId=(az k8s-extension show --name arc-app-service --cluster-type connectedClusters -c k8s-gke -g arc-rg --query id -o tsv)
然后,获取 Azure Arc 连接的集群的 id 属性
$connectedClusterId=(az connectedk8s show -n k8s-gke -g arc-rg --query id -o tsv)
使用这些值创建自定义位置
az customlocation create `
    --resource-group arc-rg `
    --name arc-app-custom-location `
    --host-resource-id $connectedClusterId `
    --namespace arc-ns `
    --cluster-extension-ids $extensionId
完成后,使用以下命令进行验证
az customlocation show --resource-group arc-rg --name arc-app-custom-location --query privisioingState -o tsv
输出应显示为 Succeeded。如果不是,请等待一分钟然后再次运行。
创建 App Service Kubernetes 环境
首先,获取自定义位置 id 属性
$customLocationId=$(az customlocation show `
    --resource-group arc-rg `
    --name arc-app-custom-location `
    --query id `
    --output tsv)
使用此 id 创建 App Service Kubernetes 环境
az appservice kube create `
    --resource-group arc-rg `
    --name k8s-gke `
    --custom-location $customLocationId
然后,检查 provisioningState 是否设置为 Succeeded
az appservice kube show --resource-group arc-rg --name k8s-gke
步骤 2:部署 Python Azure Function App
现在我们将部署两个 Python 函数:Blob 存储触发器和 HTTP 触发器。
Blob 存储触发器
当将新文件(blob)上传到 Azure 上的 blob 容器时,我们的函数(托管在 Google Cloud 上)会将新上传的文件与文件夹中已有的文件进行 MD5 哈希比较。也就是说,它会查找重复项。然后删除新文件的任何副本。接下来,我们将通过检查 blob 存储审核日志来证明函数正在 Google Cloud 上运行。
HTTP 触发器
这个简单的函数显示了它运行的主机的 IP 地址,以便我们证明它正在 Google Cloud 上运行。
如果您还不熟悉使用 Python 创建 Azure Functions,请阅读官方文档中的指南。这些指南包含安装和更新 Python Azure Function 开发的所有先决条件的说明,包括 Azure Function Core Tools。它们还提供了有关在本地测试函数的指南。
设置 Azure 存储帐户
为了保持简单,我们在与函数相同的存储帐户中创建我们要监视新文件的容器。第一件事是创建一个存储帐户
az storage account create --name arcdemofunctionstorage --location westeurope --resource-group arc-rg --sku Standard_LRS
现在,我们在名为 demo-container 的存储帐户中创建一个容器。
创建 Function App Python 项目
如果您需要确保您已创建新的 Python 项目,请遵循官方文档中的指南,并将源代码从本演示的GitHub 存储库复制到项目中。
安装 requirements.txt 中的模块。
然后将存储帐户的连接字符串复制到 AzureWebJobsStorage 的 local.settings.json 条目中。这会在本地运行函数应用程序。
在 Azure 中创建 Function App
我们现在将使用 Azure 门户创建一个新的函数应用程序。这将使我们能够连接到我们的存储帐户。
我们必须对我们的常规函数构建过程进行的唯一修改与区域有关。我们必须选择自定义位置选项而不是常规区域名称。

然后我们切换到托管选项卡以选择我们之前创建的存储帐户。当 Azure 完成配置后,我们转到新的函数应用程序并在配置下添加一个名为 CONTAINER_NAME 的新应用程序设置,并为其分配任意值。我们将我们的容器命名为 Arc。
注意:在撰写本文时,存在影响 Python 库的 bug。解决方法是添加一个名为 CONTAINER_NAME 的应用程序设置并为其分配任意值。此 bug 还要求我们在部署函数应用程序时添加 –build-native-deps 参数。
部署我们的函数
部署到我们的 Google Cloud Kubernetes 集群与部署到原生 Azure Function 没有区别。这里我们使用 Azure Function Core Tools
func azure functionapp publish arc-demo-python-function-app --build-native-deps
唯一的区别是,目前,我们必须使用 --build-native-deps 参数。
在这个阶段,尚不确定此问题是否仅限于 Python 和 GKE,但在撰写本文时,存在一个 bug,意味着我们每次必须重新部署应用程序时都必须在 Azure 中删除并重新创建函数应用程序。
项目摘要
当我们访问我们的函数应用程序 URL https://{BASE_URL}/api/arc-function-demo-httptrigger 时,我们的 HTTP 触发函数将被执行
def main(req: func.HttpRequest) -> func.HttpResponse:
    ip = get('https://api.ipify.org').text
    return func.HttpResponse(f"IP address as seen by ipify.org:, {ip}.")
这会调用 ipify.org 来获取函数主机的 IP 地址并将其返回到我们的浏览器

触发我们的 blob 函数
- 将文件上传到我们存储帐户中名为
demo-container的容器。 - 将该文件的另一个完全相同的副本上传到容器。
我们的函数会自动删除第一个文件。
def main(myblob: func.InputStream):
    connection_string = os.getenv("AzureWebJobsStorage")
    service_client = BlobServiceClient.from_connection_string(connection_string)
    client = service_client.get_container_client("demo-container")
    for blob in client.list_blobs():
        existing_md5 = blob.content_settings.content_md5
        newfile_md5 = base64.b64decode(myblob.blob_properties.get('ContentMD5'))
        if f"{blob.container}/{blob.name}" != myblob.name and existing_md5 == newfile_md5:
            logging.info(f"Blob {myblob.name} already exists as {blob.name}. Deleting  {blob.name}.")
            client.delete_blob(blob.name)
            return
然后,如果我们检查 Azure 门户中的审核日志,我们可以看到删除操作

该操作使用与 HTTP 触发器相同的 IP 地址。
然后,我们可以查找该 IP 地址
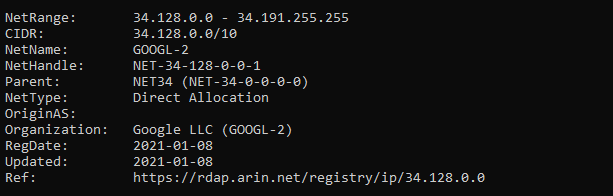
这有力地证明了我们的函数都在 Google Cloud 中运行!
后续步骤
继续阅读本系列的下一篇文章,了解如何将用 Java 编写的 Azure App Service Web 应用程序部署到托管在其他云服务中的 Arc 托管 Kubernetes 集群。
要了解如何使用 Azure Arc 预览版跨本地、边缘和云环境管理、治理和保护您的 Kubernetes 集群,请查看Microsoft 免费网络研讨会系列“使用 Azure Arc 预览版在任意位置管理 Kubernetes”。