
Azure Arc 启用的 Kubernetes(第三部分):部署容器
0/5 (0投票)
本文演示了如何通过 GitHub Actions 管道将容器部署到我们的 Arc Kubernetes 集群。
在本系列的第三部分也是最后一部分中,我们将探讨如何将容器部署到我们已启用 Azure Arc 的 Kubernetes 集群上。
必备组件
本教程需要以下内容:
- 一个活跃的 Azure 订阅
- 一个已部署到 Azure Arc 订阅的 Azure Arc 启用 Kubernetes 集群(如本系列第一篇文章中所述)
- 一个活跃的 GitHub 帐户
- 一个用于修改代码并将其提交到 GitHub 的代码编辑器,例如 Visual Studio Code
Azure 设置
在前面的文章中,我们设置了我们的 Kubernetes 集群。我们添加了安全和监控。现在我们已准备好将应用程序部署到我们的集群。现在我们需要一个可以在 GitHub 中配置的服务主体,以及一个与我们的集群通信并将应用程序从容器注册表部署到 Kubernetes 集群的 Azure 容器注册表。
为了简化设置,我们将在本文中使用一些变量。首先,设置以下变量
SERVICE_PRINCIPLE="K8ARCSP"
SUBSCRIPTION_ID="<Your Subscription ID>"
RESOURCE_GROUP="AzureARCRG"
ACR_NAME="arckubeacr"
CLUSTER_NAME="do-ams3-azure-arc"
服务主体
现在,我们需要创建一个新的服务主体,我们使用以下代码来验证到 Azure
az ad sp create-for-rbac --name $SERVICE_PRINCIPLE --role contributor --scopes /subscriptions/$SUBSCRIPTION_ID --sdk-auth
请务必保存输出中的详细信息以备后用。

Azure 容器注册表
要创建我们的 Azure 容器注册表,我们在 Azure CLI 或本地终端上运行以下命令
az acr create --resource-group $RESOURCE_GROUP --name $ACR_NAME --sku Basic

此命令在与我们的 Kubernetes 集群相同的资源组下注册一个新的 Azure 容器注册表。我们使用基本 SKU,因为它针对开发目的进行了成本优化。
验证 Azure Arc 服务
在设置部署之前,我们必须通过在终端中运行以下命令来确保我们的 Azure Arc 服务正在运行
kubectl get pods -n azure-arc

启用集群连接
要部署到我们的 Kubernetes 集群,我们需要启用集群连接,以便它使用我们之前创建的服务主体接受外部连接。要启用集群连接功能,请运行此命令
az connectedk8s enable-features --features cluster-connect -n $CLUSTER_NAME -g $RESOURCE_GROUP
我们需要等待操作完成,因为这需要一些时间。一旦集群连接功能启用,您将收到确认。

授予服务主体权限
接下来,我们需要向我们之前创建的服务主体授予权限,以便我们可以将其部署到我们的 Kubernetes 集群。为此,我们需要用户 ID,我们可以使用服务主体中的 `ClientId` 检索它。
让我们将客户端 ID 分配给变量 `CLIENT_ID`,然后将其用于我们的查询以检索 `USER_ID`
CLIENT_ID=<YourClientId>
USER_ID=$(az ad sp show --id $CLIENT_ID --query objectId -o tsv)

务必使用 `echo $USER_ID` 检查保存的用户 ID 的值。
然后,使用以下命令创建角色绑定
kubectl create clusterrolebinding admin-user-binding --clusterrole cluster-admin --user=$_USERID

Web 应用程序
容器的创建超出了本文的范围,因此在本演示中,我们将使用现有的 GitHub 存储库 gh-arc-app-deploy,您可以将其分支并克隆到您的本地环境。此存储库包含一个用 Python 开发的投票应用程序,其中包含后端和前端的部署清单,以及一个我们将使用我们的详细信息编辑的 GitHub 操作工作流文件。
设置变量
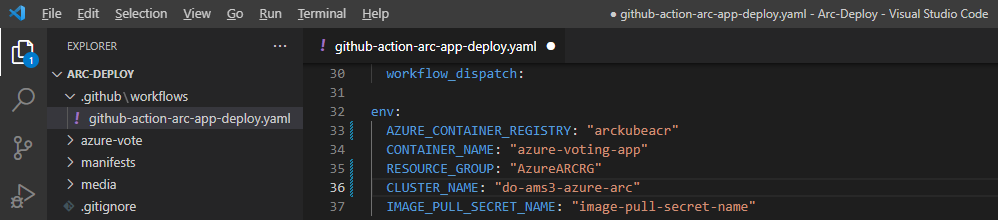
在存储库中,在 `.github\workflows\github-action-arc-app-deploy.yaml` 位置下,我们分配以下变量
env:
  AZURE_CONTAINER_REGISTRY: "<ACR_NAME>"
  CONTAINER_NAME: "azure-voting-app"
  RESOURCE_GROUP: "<RESOURCE_GROUP>"
  CLUSTER_NAME: "<CLUSTER_NAME>"
  IMAGE_PULL_SECRET_NAME: "image-pull-secret-name"
请务必在变量 `ACR_NAME`、`RESOURCE_GROUP` 和 `CLUSTER_NAME` 中使用相同的值。
我们需要使用 Azure 容器注册表名称更新 `/manifest/azure-vote-frontend-deployment.yaml` 文件,该名称与 `ACR_NAME` 变量的值相同
spec:
      containers:
        - name: azure-vote-front
          image: <ACR_NAME>.azurecr.io/azure-voting-app
          ports:
            - containerPort: 80
          env:
            - name: REDIS
              value: "azure-vote-back"

代码已准备好部署!
对于您的应用程序,当您向代码添加 GitHub Actions 时,您将添加工作流。工作流的步骤保持不变,但清单会根据您的要求而有所不同。
创建 GitHub Actions 管道
现在我们可以将代码推送到我们的存储库。如果您正在使用自己的代码,您可以将代码推送到 GitHub。我们不会在本文中介绍这一点,但您可以找到有关如何提交代码的说明。
推送代码后,我们导航到我们的 GitHub 存储库。
GitHub 秘密
我们使用 GitHub 秘密通过我们绑定到 Azure 容器注册表的服务主体从 GitHub 验证 Azure。
让我们将服务主体的详细信息添加为 GitHub 秘密。要从您的存储库中检索它,请选择设置。在选项下,然后选择秘密以打开 Actions 秘密页面。

在 Actions 秘密页面上,选择新建存储库秘密。
在新秘密页面上,我们必须指定名称和值。我们将秘密命名为 `AZURE_CREDENTIALS`,对于值,我们提供我们之前创建的服务主体格式的 JSON 提取
{
    "clientId": "<GUID>",
    "clientSecret": "<GUID>",
    "subscriptionId": "<GUID>",
    "tenantId": "<GUID>",
    (...)
  }
将服务主体复制到值字段中,然后选择添加秘密。

我们新创建的秘密位于操作秘密下。

设置工作流
从这里,我们可以导航到操作。如果您克隆了演示存储库,则可以跳过此步骤。

使用您的代码时,您将创建新的工作流并使用与 YAML 文件相同的步骤。

请务必选择自行设置工作流。

为您的工作流命名,并将样板代码替换为部署 YAML。务必根据您的要求编辑该部分。
# This workflow will build and push an application to a Azure Arc-enabled Kubernetes (Connected Cluster) Service cluster when you push your code
#
# This workflow assumes you have already created the target Connected cluster and have created an Azure Container Registry (ACR)
# For instructions see:
#   - https://docs.microsoft.com/en-us/azure/aks/kubernetes-walkthrough-portal
#   - https://docs.microsoft.com/en-us/azure/container-registry/container-registry-get-started-portal
#   - https://github.com/Azure/aks-create-action
#
# To configure this workflow:
#
# 1. Set the following secrets in your repository
#    - AZURE_CREDENTIALS
#
#
# 2. Set the following environment variables (or replace the values below):
#    - AZURE_CONTAINER_REGISTRY (name of your container registry / ACR)
#    - RESOURCE_GROUP (where your Arc-enabled cluster is deployed)
#    - CLUSTER_NAME (name of your Arc-enabled cluster)
#    - CONTAINER_NAME (name of the container image you would like to push up to your ACR)
#    - SECRET_NAME (name of the secret associated with pulling your ACR image)
#    - DEPLOYMENT_MANIFEST_PATH (path to the manifest yaml for your deployment)
#
# For more information on GitHub Actions for Azure, refer to https://github.com/Azure/Actions
# For more samples to get started with GitHub Action workflows to deploy to Azure, refer to https://github.com/Azure/actions-workflow-samples
# For more options with the actions used below please refer to https://github.com/Azure/login

name: Deploy to Connected Cluster

on:
  workflow_dispatch:

env:
  AZURE_CONTAINER_REGISTRY: "arckubeacr"
  CONTAINER_NAME: "azure-voting-app"
  RESOURCE_GROUP: "AzureARCRG"
  CLUSTER_NAME: "do-ams3-azure-arc"
  IMAGE_PULL_SECRET_NAME: "image-pull-secret-name"

jobs:
  build:
    permissions:
      actions: read
      contents: read
      id-token: write

    runs-on: ubuntu-latest
    steps:
      # Checks out the repository this file is in
      - uses: actions/checkout@master

      # Logs in with your Azure credentials
      - name: Azure login
        uses: azure/login@v1
        with:
          creds: ${{ secrets.AZURE_CREDENTIALS }}

      # Builds and pushes an image up to your Azure Container Registry
      - name: Build and push image to ACR
        run: |
          az acr build --image ${{ env.CONTAINER_NAME }}:${{ github.sha }} --registry ${{ env.AZURE_CONTAINER_REGISTRY }} -g ${{ env.RESOURCE_GROUP }} ./azure-vote

      # Retrieves your Azure Kubernetes Service cluster's kubeconfig file
      - name: Get K8s context
        uses: azure/k8s-set-context@v2
        with:
          method: service-principal
          cluster-type: arc
          cluster-name: ${{ env.CLUSTER_NAME }}
          resource-group: ${{ env.RESOURCE_GROUP }}


      # Retrieves the credentials for pulling images from your Azure Container Registry
      - name: Get ACR credentials
        run: |
          az acr update -n ${{ env.AZURE_CONTAINER_REGISTRY }} -g ${{ env.RESOURCE_GROUP }} --admin-enabled true
          ACR_USERNAME=$(az acr credential show -g ${{ env.RESOURCE_GROUP }} -n ${{ env.AZURE_CONTAINER_REGISTRY }} --query username -o tsv)
          ACR_PASSWORD=$(az acr credential show -g ${{ env.RESOURCE_GROUP }} -n ${{ env.AZURE_CONTAINER_REGISTRY }} --query passwords[0].value -o tsv)
          echo "::add-mask::${ACR_USERNAME}"
          echo "::set-output name=username::${ACR_USERNAME}"
          echo "::add-mask::${ACR_PASSWORD}"
          echo "::set-output name=password::${ACR_PASSWORD}"
        id: get-acr-creds

      # Creates a kubernetes secret on your Azure Kubernetes Service cluster that matches up to the credentials from the last step
      - name: Create K8s secret for pulling image from ACR
        uses: Azure/k8s-create-secret@v1.1
        with:
          container-registry-url: ${{ env.AZURE_CONTAINER_REGISTRY }}.azurecr.io
          container-registry-username: ${{ steps.get-acr-creds.outputs.username }}
          container-registry-password: ${{ steps.get-acr-creds.outputs.password }}
          secret-name: ${{ env.IMAGE_PULL_SECRET_NAME }}

      # Deploys application based on given manifest file
      - name: Deploys application
        uses: Azure/k8s-deploy@v3.0
        with:
          action: deploy
          manifests: |
            manifests/azure-vote-backend-deployment.yaml
            manifests/azure-vote-backend-service.yaml
            manifests/azure-vote-frontend-deployment.yaml
            manifests/azure-vote-frontend-service.yaml
          images: |
            ${{ env.AZURE_CONTAINER_REGISTRY }}.azurecr.io/${{ env.CONTAINER_NAME }}:${{ github.sha }}
          imagepullsecrets: |
            ${{ env.IMAGE_PULL_SECRET_NAME }}

选择开始提交,提供您的注释,然后选择提交新文件。
运行工作流
工作流提交后,我们可以通过转到操作、选择我们在上一步中创建的工作流,然后选择运行工作流来手动运行工作流。

这会显示您要运行工作流的分支。在本演示中,我们将其运行在主分支上。

一旦开始运行,我们将看到状态为进行中。我们可以选择正在运行的工作流以查看详细信息。


这会显示构建详细信息,我们可以选择它以逐步查看进度。

我们可以进一步展开这些步骤,以准确查看正在执行的内容。

工作流需要一段时间才能运行所有步骤,因此请耐心等待,如果需要一些时间,请不要惊慌。如果失败,您将收到详细的准确错误消息,以便您可以继续排除故障。

请注意,在此示例中,Kubernetes 集群没有足够的资源来创建应用程序的副本。请务必查看您的 Kubernetes 仪表板以获取有关部署的更多详细信息。如果出现此类错误,您将看到类似上面图片的内容。
我们最终想要的是关于我们的工作流的绿色成功通知,如下图所示

在 Azure Arc Kubernetes 中运行和验证
成功部署后,我们可以使用以下命令从终端验证 Pod 和服务
kubectl get po
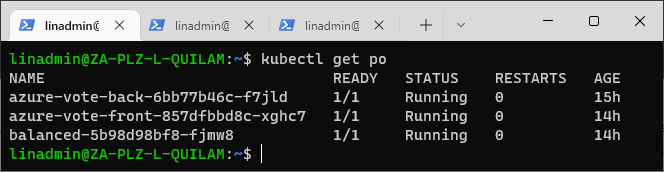
kubectltl get svc

第二个命令为我们提供了应用程序的外部 IP 和端口。根据您的 Kubernetes 集群,您可能需要转发端口或创建隧道才能访问应用程序。
现在,我们只需在浏览器中输入外部 IP 和端口即可访问应用程序。

如果按照步骤正确操作,您可以访问应用程序并与应用程序交互以测试功能。
结论
在本系列中,我们亲身实践了如何通过 Azure Arc 设置和管理非 Azure 托管的 Kubernetes 集群。在本文中,我们介绍了如何创建 GitHub Actions 管道,该管道可以将镜像部署到我们现有的 Arc 启用 Kubernetes 集群上,如何运行管道,然后确保我们选择的容器镜像已在我们的集群中按预期运行。这标志着这个由三部分组成的系列的最后一篇文章!
有关如何部署到 Azure Arc 启用 Kubernetes 集群的更多信息,请务必查看文章使用集群连接和 GitHub Actions 将应用程序部署到 Azure Arc 启用 Kubernetes 集群。
要了解有关如何开始使用 Azure Arc 启用 Kubernetes 或 Azure Arc 启用 Kubernetes 如何允许您连接和配置在任何地方运行的 Kubernetes 集群的更多信息,请查看我们的Azure Arc 启用 Kubernetes 资源页面。