
一个 SVG 模拟时钟
4.78/5 (6投票s)
一个用可伸缩矢量图形渲染的简单模拟时钟
目录
引言
在我之前的文章 SVG 网格 中,我介绍了一些简单的可缩放矢量图形概念:正方形、三角形和六边形网格、滚动、简单动画和对象拖动。在这篇文章中,我们将创建一个模拟时钟
此处提供的代码建立在我之前文章中的演示代码之上,因此我将不再赘述“基本应用程序设置”,您可以阅读之前的文章来了解它。
这篇文章有点类似于我在 2004 年写的一篇文章 矢量图形渲染的动画时钟,但它不包含 VG.net,也没有炫酷的时钟指针或表盘样式。本文侧重于最基本的内容。此外,读者可能会发现这里的一些内容重复了我 2018 年写的一篇文章 使用 SVG 和 Javascript 构建原型 Web 绘图应用程序,然而,本系列文章的目的是做更有趣的事情,并使用 TypeScript 而不是 JavaScript。
线端
首先,线端在 svg defs 部分定义为 marker 元素
<svg id="svg" width="400" height="400" xmlns="http://www.w3.org/2000/svg">
  <defs>
    <marker id="boxstart" viewBox="0 0 10 10" refX="0" refY="5"
     markerWidth="8" markerHeight="8" orient="auto">
      <path d="M 10 0 L 0 0 L 0 10 L 10 10 z" />
    </marker>
    <marker id="trianglestart" viewBox="0 0 10 10" refX="0"
     refY="5" markerWidth="8" markerHeight="8" orient="auto">
      <!-- path looks like < but closed -->
      <path d="M 10 0 L 0 5 L 10 10 z" />
    </marker>
    <marker id="triangleend" viewBox="0 0 10 10" refX="10"
     refY="5" markerWidth="8" markerHeight="8" orient="auto">
      <!-- path looks like > but closed -->
      <path d="M 0 0 L 10 5 L 0 10 z" />
    </marker>
  </defs>
</svg>
我已经定义了三个标记
- 一个盒子
- 一个三角形起点,它将连接到线的“起点”
- 一个三角形终点,它将连接到线的“终点”
我们可以创建几条线,演示如何使用 marker-start 和 marker-end 标签应用标记
SvgElementController.appendChild(group, "line", {
  x1: x1, y1: y1, x2: x2, y2: y2,
  fill: "#FFFFFF", stroke: "black", "stroke-width": 1,
  "marker-end": "url(#triangleend)"
});
和
SvgElementController.appendChild(group, "line", {
  x1: x1, y1: y1, x2: x2, y2: y2,
  fill: "#FFFFFF", stroke: "black", "stroke-width": 1,
  "marker-start": "url(#boxstart)",
  "marker-end": "url(#triangleend)"
});
渲染效果如下

顺便说一下,为了在画布上拖动这些线,我们需要一个更宽的不可见线作为“选择器”对象,这需要我们创建一个组来包含不可见的“选择器”和线本身。因此,完整的函数如下所示
private createLine(x1: number, y1: number, x2: number, y2: number,
        id: string, additionalProps: {} = null): void {
  // We create a group with a wider "selector" to make dragging the line easier.
  const group = SvgElementController.createElement("g", {}, id);
  SvgElementController.appendChild(group, "line",
  { x1: x1, y1: y1, x2: x2, y2: y2, stroke: "black",
  "stroke-width": 10, "stroke-opacity": "0", "fill-opacity": "0" });
  let props = { x1: x1, y1: y1, x2: x2, y2: y2, fill: "#FFFFFF",
                stroke: "black", "stroke-width": 1 };
  props = Object.assign(props, additionalProps ?? {});
  SvgElementController.appendChild(group, "line", props);
  const ctrl = Controllers.appController.registerSvgElementController
               (id, new GroupController());
  ctrl.init(group);
  Controllers.mouseController.wireUpEvents(id);
}
屏幕截图中的两条线是通过调用 createLine 并提供一些起始坐标创建的
this.createLine(10, 10, 100, 10, "line1", { "marker-end": "url(#triangleend)" });
this.createLine(10, 20, 100, 120, "line2",
     { "marker-start": "url(#boxstart)", "marker-end": "url(#triangleend)"});
现在我们有了几条“尖尖”的线,可以用作时钟的模板。
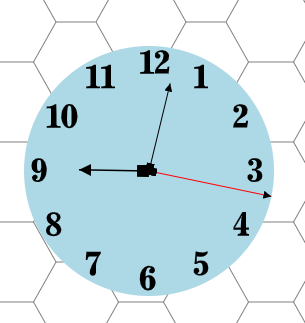
时钟
创建时钟并为其设置动画涉及三个函数调用
const clockGroup = this.createClock(100, 100, 350, 350, "clock");
this.showTime(clockGroup);
this.startClock();
时钟表盘
我们将从时钟表盘开始,一个非常普通的浅蓝色圆

private createClock(x1: number, y1: number, x2: number,
                    y2: number, id: string): HTMLElement {
  // We create a group as the container for the clock.
  const group = SvgElementController.createElement("g", {}, "clockGroup");
  group.setAttribute("transform", `translate(0, 0)`);
  const cx = (x1 + x2) / 2;
  const cy = (y1 + y2) / 2;
  const r = (x2 - x1) / 2;
  SvgElementController.appendChild(group, "circle",
  { r: `${r}`, fill: `lightblue`, stroke: "none", "stroke-width": 1,
    cx: `${cx}`, cy: `${cy}` }, id);
  const ctrl = Controllers.appController.registerSvgElementController
               (id, new GroupController());
  Controllers.appController.registerSvgElementController
              ("clockGroup", new GroupController());
  ctrl.x1 = x1;
  ctrl.y1 = y1;
  ctrl.x2 = x2;
  ctrl.y2 = y2;
  ctrl.init(group);
  Controllers.mouseController.wireUpEvents("clockGroup");

  return group;
}
在这里,我们看到我们将时钟的所有元素分组,以便整个时钟,作为一个圆、线和数字的组合,可以在网格上移动。
时钟数字

数字是通过在 return 语句之前继续代码来添加的,并且使用了一些“魔术数字”来定位圆内的数字
  // numbers:
  const innerr = r - 17;
  const xoffset = 10;
  const yoffset = -12;

  // We subtract the y coord from the center because SVG coordinates
  // are from bottom to top.

  for (let n = 1; n <= 12; ++n) {
    if (n >= 10) {
      // First digit
      let el = SvgElementController.appendChild
               (group, "path", { d: this.svgNumbers[1] });
      let x = cx + Math.sin(Math.PI * 2 * n / 12) * innerr - xoffset;
      let y = cy - Math.cos(Math.PI * 2 * n / 12) * innerr - yoffset;
      el.setAttribute("transform", `translate(${x},
                       ${y}) scale(0.002, -0.002) rotate(0)`);

      // Second digit
      el = SvgElementController.appendChild(group, "path",
           { d: this.svgNumbers[n - 10] });
      x = cx + Math.sin(Math.PI * 2 * n / 12) * innerr + 15 - xoffset;
      y = cy - Math.cos(Math.PI * 2 * n / 12) * innerr - yoffset;
      el.setAttribute("transform", `translate(${x},${y})
                       scale(0.002, -0.002) rotate(0)`);
    } else {
      let el = SvgElementController.appendChild
               (group, "path", { d: this.svgNumbers[n] });
      let x = cx + Math.sin(Math.PI * 2 * n / 12) * innerr - xoffset;
      let y = cy - Math.cos(Math.PI * 2 * n / 12) * innerr - yoffset;
      el.setAttribute("transform", `translate(${x},${y})
                       scale(0.002, -0.002) rotate(0)`);
    }
  }
数字以 SVG 路径的形式表示,这些数字是从 https://svgsilh.com/tag/number-1.html 获取的,并且正如该网站所述,“免费 SVG 图片和图标。所有内容均根据知识共享 CC0 发布”(阅读 CC0)以及 SVG 文件中的注释表明它们是由 potrace 1.15 创建的,该软件由 Peter Selinger 于 2001-2017 年编写。
每个数字的路径是一个字典查找,这里显示的是数字“1”的条目
private svgNumbers = {
1: 'M4495 12298 c-604 -535 -1486 -866 -2660 -998 -331 -37 -854 -70 \
-1104 -70 l-101 0 -2 -415 -3 -416 30 -29 30 -29 735 -4 c620 -3 753 -7 850 \
-21 149 -22 254 -50 316 -86 82 -46 123 -142 161 -372 16 -95 18 -371 21 \
-3663 2 -2593 0 -3591 -8 -3675 -44 -446 -177 -714 -416 -838 -279 -144 -663 \
-202 -1350 -202 l-330 0 -27 -28 -27 -28 0 -389 0 -389 27 -28 27 -28 3386 0 \
3386 0 27 28 27 28 0 390 0 390 -27 26 -28 26 -390 5 c-415 5 -557 17 -779 62 \
-212 43 -367 103 -480 187 -156 115 -260 347 -312 693 -17 114 -18 350 -21 \
5005 l-3 4884 -27 28 -27 28 -410 -1 -411 0 -80 -71z',
...etc...
时针、分针和秒针

时针是一条较短较粗的线,分针较细较长,秒针是红色的,到达表盘的边缘,这三根指针的创建如下
private showTime(clockGroup: HTMLElement): void {
  const handPositions = this.getHandPositions();

  const hourHand = SvgElementController.appendChild(clockGroup, "line", {
    x1: handPositions.cx, y1: handPositions.cy,
    x2: handPositions.hrx, y2: handPositions.hry,
    fill: "#FFFFFF", stroke: "black", "stroke-width": 1.5,
    "marker-start": "url(#boxstart)",
    "marker-end": "url(#triangleend)"
  }, "hourHand");

  Controllers.appController.registerSvgElementController
              (hourHand.id, new LineController());

  const minuteHand = SvgElementController.appendChild(clockGroup, "line", {
    x1: handPositions.cx, y1: handPositions.cy,
    x2: handPositions.mx, y2: handPositions.my,
    fill: "#FFFFFF", stroke: "black", "stroke-width": 1,
    "marker-start": "url(#boxstart)",
    "marker-end": "url(#triangleend)"
  }, "minuteHand");

  Controllers.appController.registerSvgElementController
              (minuteHand.id, new LineController());

  const secondHand = SvgElementController.appendChild(clockGroup, "line", {
    x1: handPositions.cx, y1: handPositions.cy, x2: handPositions.sx,
                          y2: handPositions.sy,
    fill: "#FFFFFF", stroke: "red", "stroke-width": 1,
    "marker-start": "url(#boxstart)",
    "marker-end": "url(#triangleend)"
  }, "secondHand");

  Controllers.appController.registerSvgElementController
                            (secondHand.id, new LineController());
}
我们不允许时钟指针在表面上被拖动,因此不使用之前的 createLine 函数,也不需要更宽的“选择器”线。此外,为了能够重新计算指针的坐标,因为时钟会“滴答”作响,我们有这个支持性的 interface 和函数
interface ITime {
  cx: number;
  cy: number;
  hrx: number;
  hry: number;
  mx: number;
  my: number;
  sx: number;
  sy: number;
}
interface 仅仅是为了指针的起始坐标以及时针、分针和秒针的结束坐标提供智能提示的定义。函数本身涉及一些基本的三角学计算和半径的调整,以改变每根指针的长度
private getHandPositions(): ITime {
  const clock = this.getController("clock");
  const x1 = clock.x1;
  const y1 = clock.y1;
  const x2 = clock.x2;
  const y2 = clock.y2;

  const cx = (x1 + x2) / 2;
  const cy = (y1 + y2) / 2;
  const r = (x2 - x1) / 2;

  const date = new Date();
  const hours = date.getHours() % 12;
  const minutes = date.getMinutes();
  const seconds = date.getSeconds();
  const millseconds = date.getMilliseconds();

  const hinnerr = r - 55;
  const minnerr = r - 35;
  const sinnerr = r;

  const n12 = hours * 60 + minutes;
  const hrx = cx + Math.sin(Math.PI * 2 * n12 / (60 * 12)) * hinnerr;
  const hry = cy - Math.cos(Math.PI * 2 * n12 / (60 * 12)) * hinnerr;

  const mx = cx + Math.sin(Math.PI * 2 * (minutes / 60 + seconds / (60 * 60))) * minnerr;
  const my = cy - Math.cos(Math.PI * 2 * (minutes / 60 + seconds / (60 * 60))) * minnerr;

  // Smooth second hand
  const sx = cx + Math.sin(Math.PI * 2 * (seconds + millseconds / 1000) / 60 ) * sinnerr;
  const sy = cy - Math.cos(Math.PI * 2 * (seconds + millseconds / 1000) / 60) * sinnerr;

  // "ticking" second hand:
  //const sx = cx + Math.sin(Math.PI * 2 * seconds / 60) * sinnerr;
  //const sy = cy - Math.cos(Math.PI * 2 * seconds / 60) * sinnerr;

  return { cx: cx, cy: cy, hrx: hrx, hry: hry, mx: mx, my: my, sx: sx, sy: sy };
}
请注意注释——可以使用平滑移动的秒针渲染时钟,或者使用每秒“滴答”一次的旧式风格。更有趣的是将小数分钟作为时针的一部分,以便时针渲染在小时“之间”。同样,分针将秒作为小数部分,以便分针在每分钟的秒之间平滑移动。最后,秒针为了平滑移动,包含了每秒的小数毫秒。
启动时钟
此函数启动时钟并每 10 毫秒更新一次,永不停止
private startClock(): void {
  new Interval(10, () => {
    const handPositions = this.getHandPositions();

    const hourHand = this.getController("hourHand");
    hourHand.setx2(handPositions.hrx);
    hourHand.sety2(handPositions.hry);

    const minuteHand = this.getController("minuteHand");
    minuteHand.setx2(handPositions.mx);
    minuteHand.sety2(handPositions.my);

    const secondHand = this.getController("secondHand");
    secondHand.setx2(handPositions.sx);
    secondHand.sety2(handPositions.sy);
  }).start();
}
如果您更改了秒针的计算方式为“滴答”模式,请将此处的时间间隔更改为 1000 毫秒(1 秒),因为没有必要以 10 毫秒运行计时器。
SvgElementController 类实现了“set”方法
public setx2(x: number) {
  const svgObject = document.getElementById(this.elementID);
  this.x2 = x;
  svgObject.setAttribute("x2", x.toString());
}

public sety2(y: number) {
  const svgObject = document.getElementById(this.elementID);
  this.y2 = y;
  svgObject.setAttribute("y2", y.toString());
}
Interval 类
这是与上一篇文章中描述的相同的类,我在此处显示代码是为了完整性
export class Interval {
  public counter = 0;
  private id: number;
  private ms: number;
  private callback: () => void;
  private stopCount?: number;

  constructor(ms: number, callback: () => void, stopCount?: number) {
    this.ms = ms;
    this.callback = callback;
    this.stopCount = stopCount;
  }

  public start(): Interval {
    this.id = setInterval(() => {
      ++this.counter;
      this.callback();

      if (this.stopCount && this.stopCount == this.counter) {
        this.stop();
    }
    }, this.ms);

    return this;
  }

  public stop(): Interval {
    clearInterval(this.id);

    return this;
  }
}
结论
本文演示了在可缩放矢量图形 (SVG) 中渲染时钟的基本知识。代码并非设计用于渲染多个时钟,但如果需要,可以轻松调整代码。目前,我必须承认,其中很多是原型代码,将在后续文章中进行清理。
历史
- 2023 年 3 月 8 日:初版