
学习 JavaScript 第 2 部分 - 太空侵略者
在学习 JavaScript 系列的第二部分中,我们将创建经典的太空侵略者游戏。
引言
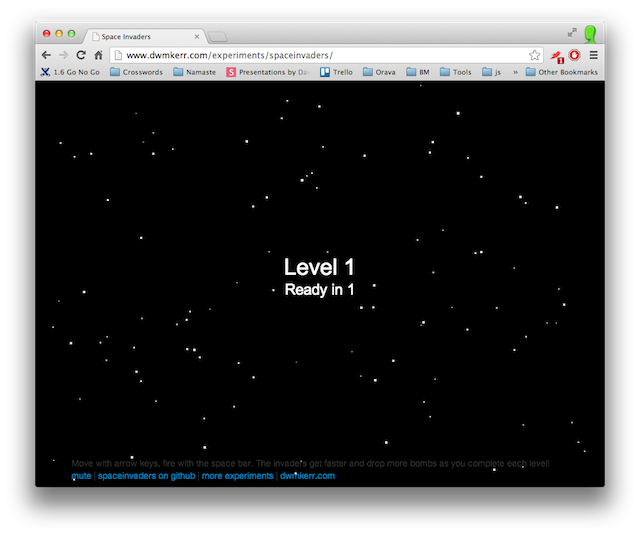
欢迎来到我的 JavaScript 学习系列第二部分。在本文中,我们将一步一步地创建经典的太空侵略者游戏。目前我们保持它非常简单 - 没有框架,只有纯 JavaScript 和 HTML。这是我们将要制作的东西的截图。点击它可以在 您的浏览器中尝试。

JavaScript 学习系列
这是我的 JavaScript 学习系列第二部分
学习 JavaScript 第一部分 - 创建一个 星空背景
学习 JavaScript 第 2 部分 - 太空侵略者
学习 JavaScript 第 3 部分 - AngularJS 和 Langton's Ant
该系列 all about learning JavaScript and the HTML5 tech stack with hands on projects.
步骤 1 - 文件夹结构
由于我们从头开始学习 JavaScript 开发,让我们简要谈谈典型网页的文件夹结构。这是我们通常会设置的:
spaceinvaders
- js
- css
- img
- lib
这非常精简且标准。我们有一个“js”文件夹用于 JavaScript 文件,一个“css”文件夹用于层叠样式表,一个“lib”文件夹用于第三方库(如 Bootstrap),以及一个“img”文件夹用于图像。
按照所示方式组合文件夹结构 - 我们将来也会使用相同的布局。
步骤 2 - HTML
与上一篇教程一样,我们将为我们的游戏创建一个非常简单的网页 - 它主要包含一些 JavaScript 并启动游戏。
这是我们将如何开始。
<!DOCTYPE html>
<html>
	<head>
		<title>Space Invaders</title>
		<link rel="stylesheet" type="text/css" href="css/core.css">
		<link rel="stylesheet" type="text/css" href="css/typeography.css">
		<style>

			/* Styling needed for a fullscreen canvas and no scrollbars. */
			body, html {
		    width: 100%;
		    height: 100%;
		    margin: 0;
		    padding: 0;
		    overflow: hidden;
			}

			/* Here's where we'll put Space Invader styles... */
		</style>
	</head>
	<body>
		<!-- this is where the Space Invaders HTML will go... */ -->
		<script src="js/starfield.js"></script>
		<script src="js/spaceinvaders.js"></script>
		<script>

			/* And this is where we'll put our JS. */
		</script>
	</body>
</html>
我们从 html doctype 开始 - 这是一个 HTML5 页面。然后我们设置标题并包含两个样式表。这些样式表我经常用于简单的教程,它们只是清理了一些默认的浏览器样式,它们非常简单,您可以在 github.com/dwmkerr/html5base 获取它们,或者您可以从下载中获取它们。
接下来,我们为 body 和 html 元素添加了一些小的 CSS - 我们在这里做的是确保我们不会有任何滚动条,因为这个游戏将填满整个窗口。我们还有一个占位符用于稍后添加的样式。
在此之后,有一个 HTML 注释显示我们将放置游戏元素的位置。
最后,我们包含了上一篇的星空背景脚本(这将是游戏的背景)和一个“spaceinvaders.js”文件,我们将在稍后创建它。然后有一个脚本块用于我们需要的任何其他内容。现在我们可以开始工作了!
步骤 3 - 星空背景
看这些教程多么有用?我们已经找到了第一个教程的用途。我们将开始添加一个星空背景,就是我们在 上一篇教程 中制作的那个。(如果您没有 mengikuti 那个教程,您可以在 github.com/dwmkerr/starfield 获取星空背景)。
我们将添加一个 div 来容纳星空背景。将以下 HTML 添加到页面:
<!-- this is where the Space Invaders HTML will go...  -->

<!-- Here's a starfield for the background. -->
<div id="starfield"></div>
这个 div 将包含星空背景。现在我们可以在标题的 style 元素中为其设置样式。
 #starfield {
    width:100%;
    height:100%;
    z-index: -1;
    position: absolute;
    left: 0px;
    top: 0px;
}
最后,在脚本块中,我们可以实际创建星空背景。
/* And this is where we'll put our JS. */

//  Create the starfield.
var container = document.getElementById('starfield');
var starfield = new Starfield();
starfield.initialise(container);
starfield.start();
由于我们在上一篇教程中详细讲解了星空背景,所以这里不再赘述。
此时,我们已经有一个简单的动画星空背景。现在开始制作游戏。
步骤 4 - 游戏引擎
现在我们来到有趣的部分。我们需要在游戏中做几件事情 - 显示欢迎屏幕,显示游戏结束屏幕,运行游戏,处理输入等等。
当我们编写代码时,我们首先应该尝试做的是确保我们可以将游戏分成不同的“状态”,并有一个简单的游戏引擎可以从一个状态过渡到另一个状态,将用户输入委托给一个状态,并运行绘制和更新循环。这正是我们要做的。
为了保持简单,我将其制作成一个太空侵略者游戏引擎,而不是一个通用、可重用的游戏引擎,这没关系,因为我们在学习,重写代码很好,尝试不同的方法也很好。
所以让我们考虑一下游戏引擎需要什么
- 我们应该能够有多个状态。
- 我们应该能够从一个状态移动到另一个状态(例如,“欢迎”屏幕到“播放”屏幕)。
- 一个状态应该能够自行绘制。
- 一个状态应该能够自行更新(例如,在某个任意的 tick 上我们推进侵略者等)。
- 一个状态应该能够被“推送” - 例如,暂停屏幕是位于其下方任何状态之上的一个状态。取消暂停只是弹出状态。
// Creates an instance of the Game class.
function Game() {

 // Set the initial config.
 this.config = {
    gameWidth: 400,
    gameHeight: 300,
    fps: 50
};

// All state is in the variables below.
this.lives = 3;
this.width = 0;
this.height = 0;
this.gameBound = {left: 0, top: 0, right: 0, bottom: 0};

//  The state stack.
this.stateStack = [];

//  Input/output
this.pressedKeys = {};
this.gameCanvas =  null;
}
这个类目前只是数据。我们有一些配置(我们将在其中添加)。配置是游戏设置 - 侵略者移动的速度等等。整个游戏的实际状态紧随其后(视口的大小等)。
最后但同样重要的是,我们有一个数组,我们将用它作为游戏状态的堆栈,还有一个对象来保存当前按下的键,以及一个用于渲染游戏的画布。
我们现在可以创建一个初始化游戏的函数。我们只需要一个画布作为输入来渲染。
//  Initialis the Game with a canvas.
Game.prototype.initialise = function(gameCanvas) {

    //  Set the game canvas.
    this.gameCanvas = gameCanvas;

    //  Set the game width and height.
    this.width = gameCanvas.width;
    this.height = gameCanvas.height;

    //  Set the state game bounds.
    this.gameBounds = {
        left: gameCanvas.width / 2 - this.config.gameWidth / 2,
        right: gameCanvas.width / 2 + this.config.gameWidth / 2,
        top: gameCanvas.height / 2 - this.config.gameHeight / 2,
        bottom: gameCanvas.height / 2 + this.config.gameHeight / 2,
    };
};
在 initialize 函数中,我们存储了游戏画布(因为我们稍后会用到它),并设置了游戏的宽度和高度。我们还创建了游戏的“边界” - 将它们想象成游戏进行的矩形。我们在配置中设置了游戏尺寸,然后我们相对于游戏边界进行绘制。
好了 - 我们的游戏类需要能够返回它的状态。让我们创建一个 currentState 函数
//  Returns the current state.
Game.prototype.currentState = function() {
    return this.stateStack.length > 0 ? this.stateStack[this.stateStack.length - 1] : null;
如果我们堆栈中有任何东西(它实际上是一个数组,但 JavaScript 中的数组足够灵活,可以勉强用作堆栈),我们返回顶部项(即数组中的最后一项)。否则,我们返回 null。
我们得到了一个状态对象,现在我们希望能够移动到另一个状态。
Game.prototype.moveToState = function(state) {

    //  Are we already in a state?
    if(this.currentState()) {

        //  Before we pop the current state, see if the
        //  state has a leave function. If it does we can call it.
        if(this.currentState().leave) {
           this.currentState().leave(game);
        }

        this.stateStack.pop();
    }

    //  If there's an enter function for the new state, call it.
    if(state.enter) {
        state.enter(game);
    }

    //  Set the current state.
    this.stateStack.push(state);
};
这就是事情变得更智能的地方。这是移动到状态所做的事情
- 如果我们已经在一个状态中,我们检查状态对象是否有一个名为“leave”的函数。如果有,我们就调用它。这意味着我们的状态对象可以选择在即将退出时收到通知。
- 如果我们已经在一个状态中,就将其从状态堆栈中弹出。
- 如果新状态有一个名为“enter”的函数,就调用它。这意味着状态可以选择在即将进入时收到通知。
- 现在我们将新状态推到堆栈上。
我们可以使用完全相同的原则来快速连接 pushState 和 popState 函数。
Game.prototype.pushState = function(state) {

    //  If there's an enter function for the new state, call it.
    if(state.enter) {
        state.enter(game);
    }
    //  Set the current state.
    this.stateStack.push(state);
};

Game.prototype.popState = function() {

    //  Leave and pop the state.
    if(this.currentState()) {
        if(this.currentState().leave) {
            this.currentState().leave(game);
        }

        //  Set the current state.
        this.stateStack.pop();
    }
};
这些函数与 moveToState 函数的原理相同。
为了让我们的游戏执行任何操作,我们需要一个正在运行的循环,告诉活动状态它需要绘制等等。所以让我们 put together 一个全局 gameLoop 函数来完成这一切。
// The main loop.
function gameLoop(game) {
    var currentState = game.currentState();
    if(currentState) {

        //  Delta t is the time to update/draw.
        var dt = 1 / game.config.fps;

        //  Get the drawing context.
        var ctx = game.gameCanvas.getContext("2d");

        //  Update if we have an update function. Also draw
        //  if we have a draw function.
        if(currentState.update) {
            currentState.update(game, dt);
        }
        if(currentState.draw) {
            currentState.draw(game, dt, ctx);
        }
    }
}
这个函数是关键。
- 首先,获取当前游戏状态。
- 现在计算循环的“tick”中有多少时间。这是 FPS 的倒数 - 如果我们每秒循环十次,每个 tick 就是 100 毫秒。
- 从画布获取绘图上下文(这在第一部分中有解释)。
- 如果状态中有一个名为“update”的函数,就调用它,并将游戏对象和经过的时间量传递进去。
- 如果状态中有一个名为“draw”的函数,就调用它,并将游戏对象、经过的时间量和绘图上下文传递进去。
//  Start the Game.
Game.prototype.start = function() {

    //  Move into the 'welcome' state.
    this.moveToState(new WelcomeState());

    //  Set the game variables.
    this.lives = 3;
    this.config.debugMode = /debug=true/.test(window.location.href);

    //  Start the game loop.
    var game = this;
    this.intervalId = setInterval(function () { gameLoop(game);}, 1000 / this.config.fps);

}; 现在,凭借我们对状态的了解,我们可以看到这是如何进行的。我们通过移动到一个新实例的“WelcomeState”类(我们将在下一步创建!)来启动游戏,将生命值设置为三,然后设置一个定时器,根据 FPS 配置设置来调用 gameLoop。让我们看看 Welcome State 的样子。
步骤 5 - 欢迎状态
第一个状态是最简单的之一,因为它只显示游戏标题。我们通过创建一个状态类来开始。
function WelcomeState() {

}
Welcome State 非常简单,它甚至没有任何数据成员。现在我们可以创建一个 draw 函数。
WelcomeState.prototype.draw = function(game, dt, ctx) {

    //  Clear the background.
    ctx.clearRect(0, 0, game.width, game.height);

    ctx.font="30px Arial";
    ctx.fillStyle = '#ffffff';
    ctx.textBaseline="center";
    ctx.textAlign="center";
    ctx.fillText("Space Invaders", game.width / 2, game.height/2 - 40);
    ctx.font="16px Arial";

    ctx.fillText("Press 'Space' to start.", game.width / 2, game.height/2);
};
同样,我们可以参考第一部分了解画布上下文的更多细节,但这里没什么复杂的 - 我们清除绘图表面,写出“Space Invaders”并要求用户按空格键。
WelcomeState.prototype.keyDown = function(game, keyCode) {
    if(keyCode == 32) /*space*/ {
        //  Space starts the game.
        game.moveToState(new LevelIntroState(game.level));
    }
};
现在我们可以为这个状态创建一个 keyDown 函数 - 如果键码是空格,我们就移动到 LevelIntroState。
这里唯一的问题是 keyDown 永远不会被调用,因为它不在游戏引擎中。现在我们可以添加这个。
 //  Inform the game a key is down.
Game.prototype.keyDown = function(keyCode) {
    this.pressedKeys[keyCode] = true;
    //  Delegate to the current state too.
    if(this.currentState() && this.currentState().keyDown) {
        this.currentState().keyDown(this, keyCode);
    }
};

//  Inform the game a key is up.
Game.prototype.keyUp = function(keyCode) {
    delete this.pressedKeys[keyCode];
    //  Delegate to the current state too.
    if(this.currentState() && this.currentState().keyUp) {
        this.currentState().keyUp(this, keyCode);
    }
};
GameEngine 可以被通知一个键已被按下或释放。一旦发生这种情况,我们就看看当前状态是否有一个 keyDown 或 keyUp 函数 - 如果有,我们就调用它。我们还会在一个对象中跟踪每个按下的键,这样如果用户按了多个键,状态就可以查看 game.pressedKeys 对象并查看哪些键被按下。
JavaScript 提示: “delete”关键字可以用来从对象中删除属性。
我们已经创建了欢迎状态,并且有一个游戏启动函数,所以让我们回到 index 并实际添加游戏。
这是 HTML(新增部分用粗体显示)。
<div id="starfield"></div>
<div id="gamecontainer">
    <canvas id="gameCanvas"></canvas>
</div>
这是 CSS
#gamecontainer {
    width: 800px;
    margin-left: auto;
    margin-right: auto;
}
最后,这是 JavaScript。
//  Create the starfield.
var container = document.getElementById('starfield');
var starfield = new Starfield();
starfield.initialise(container);
starfield.start();

//  Setup the canvas.
var canvas = document.getElementById("gameCanvas");
canvas.width = 800;
canvas.height = 600;

//  Create the game.
var game = new Game();

//  Initialise it with the game canvas.
game.initialise(canvas);

//  Start the game.
game.start();

//  Listen for keyboard events.
window.addEventListener("keydown", function keydown(e) {
    var keycode = e.which || window.event.keycode;
    //  Supress further processing of left/right/space (37/29/32)
    if(keycode == 37 || keycode == 39 || keycode == 32) {
        e.preventDefault();
    }
    game.keyDown(keycode);
});
window.addEventListener("keyup", function keydown(e) {
    var keycode = e.which || window.event.keycode;
    game.keyUp(keycode);
});
这并不像看起来那么复杂。我们创建 Game 对象,用画布初始化它,启动游戏并告诉它何时按下按键。我们不允许窗口处理空格、左或右键,否则它会尝试移动视口,而我们不希望那样。
我们的游戏现在有一个欢迎屏幕 - 我们正在取得进展!

步骤 6 - 关卡介绍
欢迎状态是微不足道的 - 它不需要 update 函数或 enter 或 leave。现在我们将创建一个状态,用于在关卡开始前显示三秒倒计时。同样,我们可以为状态创建一个类。
/*
    Level Intro State

    The Level Intro state shows a 'Level X' message and
    a countdown for the level.
*/
function LevelIntroState(level) {
    this.level = level;
    this.countdownMessage = "3";
}
这个状态实际上有它自己的状态,它知道它正在为哪个关卡倒计时以及它正在显示的消息。我们接下来可以创建一个 draw 函数。
LevelIntroState.prototype.draw = function(game, dt, ctx) {

    //  Clear the background.
    ctx.clearRect(0, 0, game.width, game.height);

    ctx.font="36px Arial";
    ctx.fillStyle = '#ffffff';
    ctx.textBaseline="middle";
    ctx.textAlign="center";
    ctx.fillText("Level " + this.level, game.width / 2, game.height/2);
    ctx.font="24px Arial";
    ctx.fillText("Ready in " + this.countdownMessage, game.width / 2, game.height/2 + 36);
};
这很简单 - 我们只显示一条消息“准备在 X”其中 X 是倒计时消息。
现在我们可以创建一个 update 函数。
游戏提示: update 函数是什么?Update 就像 Draw 一样在循环中被调用,但它不绘制任何东西 - 它更新游戏的状态。我们可以在 draw 中做到这一点,但 draw 应该忠实地渲染当前状态而不进行修改。为什么?嗯,我们可以以不同的频率调用 draw 和 update - 例如,如果绘制成本很高,我们可以比 update 调用少十倍 - 但仍然使系统状态以更规则的间隔更新。
LevelIntroState.prototype.update = function(game, dt) {

    //  Update the countdown.
    if(this.countdown === undefined) {
        this.countdown = 3; // countdown from 3 secs
    }
    this.countdown -= dt;

    if(this.countdown < 2) {
        this.countdownMessage = "2";
    }
    if(this.countdown < 1) {
        this.countdownMessage = "1";
    }
    if(this.countdown <= 0) {
        //  Move to the next level, popping this state.
        game.moveToState(new PlayState(game.config, this.level));
    }

};
如果我们没有倒计时数字,就将其设置为三(秒)。现在减去经过的时间(dt 以秒为单位)。每次倒计时数字低于 2 或 1 时,我们都可以更新倒计时消息。当它达到零时,我们可以进入 Play State - 实际游戏,并将我们被告知正在倒计时的关卡传递过去。
就是这样 - 关卡介绍状态完成了。由于我们在欢迎状态下按下空格键时已经过渡到它,我们可以滚动到页面顶部,按下空格键,然后看到它在工作。
步骤 7 - 游戏状态
这是重头戏。游戏状态在创建时知道它是什么关卡,仅此而已。我们必须确保创建侵略者,定位它们,创建飞船,定位它,响应鼠标移动,响应时间流逝,处理来自侵略者的炸弹,来自飞船的火箭以及分数。但嘿 - 这是 JavaScript,快速搭建东西是这个语言擅长的事情之一。
首先 - 谎言。当我们制作游戏状态时,我没有展示 Game 配置中的一些属性。这些用于调整事物的移动速度、加速度或变化等等。当时不需要,但现在我们最好看一下,因为从 Play State 构造函数我们可以看到我们复制了 Game 配置的引用,因为它用了很多。
//  Create a PlayState with the game config and the level you are on.
function PlayState(config, level) {
    this.config = config;
    this.level = level;

    //  Game state.
    this.invaderCurrentVelocity =  10;
    this.invaderCurrentDropDistance =  0;
    this.invadersAreDropping =  false;
    this.lastRocketTime = null;

    //  Game entities.
    this.ship = null;
    this.invaders = [];
    this.rockets = [];
    this.bombs = [];
}
实际的构造函数还不错 - 我们复制了游戏配置引用,设置了侵略者的当前速度,当前的下落距离(这是它们在屏幕边缘时向下移动的距离),一个指示它们是否在下落的标志,最后一个火箭发射的时间(所以我们可以限制每秒的火箭数量),然后创建一个飞船,一组侵略者,一组火箭和一组炸弹。
作为参考,这里是实际的游戏配置 - 我们将随着教程的进行看到其中大部分的用途,但基本上我们可以通过它们来调整游戏的某些方面:
//  Creates an instance of the Game class.
function Game() {

    //  Set the initial config.
    this.config = {
        bombRate: 0.05,
        bombMinVelocity: 50,
        bombMaxVelocity: 50,
        invaderInitialVelocity: 25,
        invaderAcceleration: 0,
        invaderDropDistance: 20,
        rocketVelocity: 120,
        rocketMaxFireRate: 2,
        gameWidth: 400,
        gameHeight: 300,
        fps: 50,
        debugMode: false,
        invaderRanks: 5,
        invaderFiles: 10,
        shipSpeed: 120,
        levelDifficultyMultiplier: 0.2,
        pointsPerInvader: 5
    };
}
我们将处理飞船、火箭、炸弹和侵略者。从静态背景来看,这让我想要它们的类型,所以我就这样做了。
/*

  The ship has a position and that's about it.

*/
function Ship(x, y) {
    this.x = x;
    this.y = y;
    this.width = 20;
    this.height = 16;
}

/*
    Fired by the ship, they've got a position and velocity.

    */
function Rocket(x, y, velocity) {
    this.x = x;
    this.y = y;
    this.velocity = velocity;
}

/*
    Dropped by invaders, they've got position and velocity.
*/
function Bomb(x, y, velocity) {
    this.x = x;
    this.y = y;
    this.velocity = velocity;
}

/*
    Invaders have position, type, rank/file and that's about it.
*/

function Invader(x, y, rank, file, type) {
    this.x = x;
    this.y = y;
    this.rank = rank;
    this.file = file;
    this.type = type;
    this.width = 18;
    this.height = 14;
}
所以每个实体都有一个位置,较大的实体有大小。侵略者还知道它的行和列(它在网格中的位置)。
现在我们将进入状态的第一个主要函数,enter。这个函数在每个关卡开始时被调用。
PlayState.prototype.enter = function(game) {

    //  Create the ship.
    this.ship = new Ship(game.width / 2, game.gameBounds.bottom);
我们将飞船放置在游戏边界的底部中心。
下面的代码看起来很复杂但并不复杂 - 它确保侵略者速度和炸弹速度等事物会随着关卡的进行而加快,但仅此而已。
    //  Set the ship speed for this level, as well as invader params.
    var levelMultiplier = this.level * this.config.levelDifficultyMultiplier;
    this.shipSpeed = this.config.shipSpeed;
    this.invaderInitialVelocity = this.config.invaderInitialVelocity + (levelMultiplier * this.config.invaderInitialVelocity);
    this.bombRate = this.config.bombRate + (levelMultiplier * this.config.bombRate);
    this.bombMinVelocity = this.config.bombMinVelocity + (levelMultiplier * this.config.bombMinVelocity);
    this.bombMaxVelocity = this.config.bombMaxVelocity + (levelMultiplier * this.config.bombMaxVelocity);
由于像这样的代码,游戏实际上具有很高的可配置性 - 它是必须的,以便我能够找到合理的值和乘数来获得良好的感觉和难度递增,因为关卡在进行。
//  Create the invaders.
    var ranks = this.config.invaderRanks;
    var files = this.config.invaderFiles;
    var invaders = [];
    for(var rank = 0; rank < ranks; rank++){
        for(var file = 0; file < files; file++) {
            invaders.push(new Invader(
                (game.width / 2) + ((files/2 - file) * 200 / files),
                (game.gameBounds.top + rank * 20),
                rank, file, 'Invader'));
        }
    }
    this.invaders = invaders;
    this.invaderCurrentVelocity = this.invaderInitialVelocity;
    this.invaderVelocity = {x: -this.invaderInitialVelocity, y:0};
    this.invaderNextVelocity = null;
};
我们通过在每个行和列处创建侵略者来完成 enter 函数。有一些算术可以很好地定位和间隔它们。我们还存储了侵略者的当前速度。还有一个“下一个速度” - 当我们向下移动它们并需要决定之后如何移动时,我们使用它。
现在来 update。这是状态的所有状态更新的地方。
 PlayState.prototype.update = function(game, dt) {

    //  If the left or right arrow keys are pressed, move
    //  the ship. Check this on ticks rather than via a keydown
    //  event for smooth movement, otherwise the ship would move
    //  more like a text editor caret.
    if(game.pressedKeys[37]) {
        this.ship.x -= this.shipSpeed * dt;
    }
    if(game.pressedKeys[39]) {
        this.ship.x += this.shipSpeed * dt;
    }
    if(game.pressedKeys[32]) {
        this.fireRocket();
    }

    //  Keep the ship in bounds.
    if(this.ship.x < game.gameBounds.left) {
        this.ship.x = game.gameBounds.left;
    }
    if(this.ship.x > game.gameBounds.right) {
        this.ship.x = game.gameBounds.right;
    }
我们首先检查左键或右键是否被按下。如果是,我们就轻微移动飞船。如果按下空格键,我们就调用 fireRocket 函数,我们稍后会讲到。我们还确保永远不会将飞船移出游戏边界。
现在我们可以将每个炸弹向下移动(除非它已经超出边界,在这种情况下我们将其移除)。我们还可以将每个火箭向上移动(同样,除非它超出边界,那时我们可以将其移除)。
//  Move each bomb.
    for(var i=0; i<this.bombs.length; i++) {
        var bomb = this.bombs[i];
        bomb.y += dt * bomb.velocity;

        //  If the bomb has gone off the screen remove it.
        if(bomb.y > this.height) {
            this.bombs.splice(i--, 1);
        }
    }

    //  Move each rocket.
    for(i=0; i<this.rockets.length; i++) {
        var rocket = this.rockets[i];
        rocket.y -= dt * rocket.velocity;

        //  If the rocket has gone off the screen remove it.
        if(rocket.y < 0) {
            this.rockets.splice(i--, 1);
        }
    }
所以我们已经处理了飞船移动以及炸弹和火箭的移动。
现在是真正丑陋的部分 - 移动侵略者。
 //  Move the invaders.
    var hitLeft = false, hitRight = false, hitBottom = false;
    for(i=0; i<this.invaders.length; i++) {
        var invader = this.invaders[i];
        var newx = invader.x + this.invaderVelocity.x * dt;
        var newy = invader.y + this.invaderVelocity.y * dt;
        if(hitLeft === false && newx < game.gameBounds.left) {
            hitLeft = true;
        }
        else if(hitRight === false && newx > game.gameBounds.right) {
            hitRight = true;
        }
        else if(hitBottom === false && newy > game.gameBounds.bottom) {
            hitBottom = true;
        }

        if(!hitLeft && !hitRight && !hitBottom) {
            invader.x = newx;
            invader.y = newy;
        }
    }

    //  Update invader velocities.
    if(this.invadersAreDropping) {
        this.invaderCurrentDropDistance += this.invaderVelocity.y * dt;
        if(this.invaderCurrentDropDistance >= this.config.invaderDropDistance) {
            this.invadersAreDropping = false;
            this.invaderVelocity = this.invaderNextVelocity;
            this.invaderCurrentDropDistance = 0;
        }
    }
    //  If we've hit the left, move down then right.
    if(hitLeft) {
        this.invaderCurrentVelocity += this.config.invaderAcceleration;
        this.invaderVelocity = {x: 0, y:this.invaderCurrentVelocity };
        this.invadersAreDropping = true;
        this.invaderNextVelocity = {x: this.invaderCurrentVelocity , y:0};
    }
    //  If we've hit the right, move down then left.
    if(hitRight) {
        this.invaderCurrentVelocity += this.config.invaderAcceleration;
        this.invaderVelocity = {x: 0, y:this.invaderCurrentVelocity };
        this.invadersAreDropping = true;
        this.invaderNextVelocity = {x: -this.invaderCurrentVelocity , y:0};
    }
    //  If we've hit the bottom, it's game over.
    if(hitBottom) {
        this.lives = 0;
    }
我很抱歉!这真的相当丑陋,我敢肯定可以做得更好。我们将每个侵略者按当前速度移动,检查是否撞到了左、右或底部边界。如果是左边或右边,我们就开始向下移动侵略者,并告诉它们之后要移动到哪里。如果它们撞到底部,我们就死定了。这看起来复杂但实际上并不复杂,只是有些棘手。但我敢肯定可以做得更干净。
现在我们可以做一些经典的碰撞检测。
//  Check for rocket/invader collisions.
    for(i=0; i<this.invaders.length; i++) {
        var invader = this.invaders[i];
        var bang = false;

        for(var j=0; j<this.rockets.length; j++){
            var rocket = this.rockets[j];

            if(rocket.x >= (invader.x - invader.width/2) && rocket.x <= (invader.x + invader.width/2) &&
                rocket.y >= (invader.y - invader.height/2) && rocket.y <= (invader.y + invader.height/2)) {

                //  Remove the rocket, set 'bang' so we don't process
                //  this rocket again.
                this.rockets.splice(j--, 1);
                bang = true;
                game.score += this.config.pointsPerInvader;
                break;
            }
        }
        if(bang) {
            this.invaders.splice(i--, 1);
        }
    }
我们遍历每个侵略者,看看它是否被火箭击中。如果是,我们就移除火箭和侵略者,然后更新分数。
由于我们对侵略者有点残忍,我们接下来会找到每个前排侵略者,并给它一次投掷炸弹的机会。
//  Find all of the front rank invaders.
    var frontRankInvaders = {};
    for(var i=0; i<this.invaders.length; i++) {
        var invader = this.invaders[i];
        //  If we have no invader for game file, or the invader
        //  for game file is futher behind, set the front
        //  rank invader to game one.
        if(!frontRankInvaders[invader.file] || frontRankInvaders[invader.file].rank < invader.rank) {
            frontRankInvaders[invader.file] = invader;
        }
    }

    //  Give each front rank invader a chance to drop a bomb.
    for(var i=0; i<this.config.invaderFiles; i++) {
        var invader = frontRankInvaders[i];
        if(!invader) continue;
        var chance = this.bombRate * dt;
        if(chance > Math.random()) {
            //  Fire!
            this.bombs.push(new Bomb(invader.x, invader.y + invader.height / 2,
                this.bombMinVelocity + Math.random()*(this.bombMaxVelocity - this.bombMinVelocity)));
        }
    }
同样,游戏设置在这里起作用,因为随着每个关卡的进行,炸弹的掉落率会增加。
我们已经检查了火箭和侵略者,现在我们可以检查炸弹和飞船。
//  Check for bomb/ship collisions.
    for(var i=0; i<this.bombs.length; i++) {
        var bomb = this.bombs[i];
        if(bomb.x >= (this.ship.x - this.ship.width/2) && bomb.x <= (this.ship.x + this.ship.width/2) &&
                bomb.y >= (this.ship.y - this.ship.height/2) && bomb.y <= (this.ship.y + this.ship.height/2)) {
            this.bombs.splice(i--, 1);
            game.lives--;
        }

    }
同时,让我们确保如果侵略者碰到了飞船,那也是游戏结束。
//  Check for invader/ship collisions.
    for(var i=0; i<this.invaders.length; i++) {
        var invader = this.invaders[i];
        if((invader.x + invader.width/2) > (this.ship.x - this.ship.width/2) &&
            (invader.x - invader.width/2) < (this.ship.x + this.ship.width/2) &&
            (invader.y + invader.height/2) > (this.ship.y - this.ship.height/2) &&
            (invader.y - invader.height/2) < (this.ship.y + this.ship.height/2)) {
            //  Dead by collision!
            game.lives = 0;
            game.sounds.playSound('explosion');
        }
}编程提示:在这段代码中,我反复遍历集合。可以通过将更多逻辑塞进更少的循环中(这称为循环塞入)来大大改进它,但这会使教程更难阅读。但始终要对上面的代码持怀疑态度 - 对于大量的侵略者或炸弹,我们循环了太多次。始终留意冗余循环。
我们差不多完成了,最后要做的是看看我们是否用完了生命,如果用完了就结束游戏,或者看看我们是否用完了侵略者,然后倒计时下一关。
//  Check for failure
    if(game.lives <= 0) {
        game.moveToState(new GameOverState());
    }

    //  Check for victory
    if(this.invaders.length === 0) {
        game.score += this.level * 50;
        game.level += 1;
        game.moveToState(new LevelIntroState(game.level));
    }
};
这就是我们的 update 函数。我承诺也会展示 'fireRocket' 函数。
 PlayState.prototype.fireRocket = function() {
    //  If we have no last rocket time, or the last rocket time
    //  is older than the max rocket rate, we can fire.
    if(this.lastRocketTime === null || ((new Date()).valueOf() - this.lastRocketTime) > (1000 / this.config.rocketMaxFireRate))
    {
        //  Add a rocket.
        this.rockets.push(new Rocket(this.ship.x, this.ship.y - 12, this.config.rocketVelocity));
        this.lastRocketTime = (new Date()).valueOf();
    }
};
令人惊讶地笨拙 - 我们需要确保用户不能仅仅按住空格键并随意发射火箭,所以我们在这个函数中限制了发射速率。
好的,我们有了太空侵略者,但仅限于内存中的系统,现在我们需要渲染它。由于我们只是循环遍历游戏实体并绘制基本图形,所以我不会一一详细讲解。
PlayState.prototype.draw = function(game, dt, ctx) {

    //  Clear the background.
    ctx.clearRect(0, 0, game.width, game.height);

    //  Draw ship.
    ctx.fillStyle = '#999999';
    ctx.fillRect(this.ship.x - (this.ship.width / 2), this.ship.y - (this.ship.height / 2), this.ship.width, this.ship.height);

    //  Draw invaders.
    ctx.fillStyle = '#006600';
    for(var i=0; i<this.invaders.length; i++) {
        var invader = this.invaders[i];
        ctx.fillRect(invader.x - invader.width/2, invader.y - invader.height/2, invader.width, invader.height);
    }

    //  Draw bombs.
    ctx.fillStyle = '#ff5555';
    for(var i=0; i<this.bombs.length; i++) {
        var bomb = this.bombs[i];
        ctx.fillRect(bomb.x - 2, bomb.y - 2, 4, 4);
    }

    //  Draw rockets.
    ctx.fillStyle = '#ff0000';
    for(var i=0; i<this.rockets.length; i++) {
        var rocket = this.rockets[i];
        ctx.fillRect(rocket.x, rocket.y - 2, 1, 4);
    }

};
现在我们有了游戏的核心部分;
步骤 8 - 其他东西
还有一些零碎的东西我们不需要深入研究。有一个游戏结束状态和一个暂停状态,还有一些播放声音的代码,但我们确实看到了核心内容 - 任何更多内容都肯定会过头。
代码在 GitHub 上 - fork 它,玩它,玩得开心。在下一篇教程中,我们将使用画布,但也会引入更多 HTML 元素,并使用我们的第一个框架 - AngularJS。
一如既往,非常欢迎提问和评论!