
单元测试入门:MS Tests、NUnit 和 Fluent Assertions。
实现项目单元测试的不同方法
以上文件均使用 VS 2013 构建,目标平台为 .Net 4.5。较大的文件还包含我们将使用的 NuGet 包。
关于 NUnit 3 的注意事项
- 截至 2016 年 4 月中旬,新的外部 NUnit Gui 运行器尚未发布。似乎仍处于 Alpha 版本。您可以在此处找到 GitHub 项目。
- 看起来 TestCase 中的“
Result = ...”语法已更改为“ExpectedResult =...”。请牢记这一点。
引言
本文将向您展示如何使用 **MS Unit Test**、**NUnit 和 Fluent Assertions** 的基本知识。我无意涵盖所有内容,而是展示一些选项,以便您可以选择最适合您的。
快速参考
我们的主项目
由于没有人关心一个没人关心的项目,我花时间查看了谷歌上全球的趋势,我们将使用它,因为(统计学上讲)它也必须引起您的兴趣。
我们的主项目只是一个控制台项目,带有一个方法,它所做的就是打印出谷歌趋势页面的前 3 个热门结果。代码如下
public class TrendingRunner
{
    static void Main(string[] args)
    {

       Console.Out.WriteLine("This will show what's trending according to {0}"
           , "http://www.google.com.au/trends/topcharts" );
       Console.Out.WriteLine("Hit any key to see the next result.");
       Console.Out.WriteLine("");

       for (int iteration = 1; iteration < 5; iteration++)
       {
           Console.Out.WriteLine("What's trending top list number {0}: {1}."
               , iteration
               , WhatsTrending(iteration)
               );

             Console.ReadKey(true); // wait for a key press
         }
    }

    /// <summary>
    /// Will return the top 3 from : http://www.google.com.au/trends/topcharts
    /// </summary>
    /// <param name="anIndex">Which index to return</param>
    /// <returns>A string holding the interest @ index "anInedx"</returns>
    public static string WhatsTrending(int anIndex)
    {
     string answer;
     switch (anIndex)
     {
        case 1:
            answer= "Paul Walker";
            break;
        case 2:
            answer= "Cory Monteith";
            break;
        case 3:
            answer= "RoyalBaby";
            break;
        default:
            answer = "Choose an index between 1 or 3, or go and search it yourself.";
            break;
     }
     return answer;
    }
}
MS Unit Tests
现在,我们将向解决方案中添加一个新项目。右键单击解决方案,然后:-> **添加**-> **添加新项目**,选择 **Visual C#**,然后选择 **Test**,再选择 **Unit Test Project**。

接下来,右键单击新项目下的 **references**,单击 **add reference**,选择 **solution**,然后添加您的控制台项目,以便轻松访问和测试它。

好的……您应该会看到类似这样的内容
using System;
using Microsoft.VisualStudio.TestTools.UnitTesting;
using Trending;

namespace MSTest
{
    [TestClass]                    // Defines a testing class
    public class MSTestExample     // name, like any other class
    {
        [TestMethod]                          // this mark the method as a test
        public void Test_Trending_MSTest_OK() // method name, like any other
        {
            /*
             * your test goes here.
             */
        }
    }
}
(如果您缺少“using Trending;”,请随时添加它,这可以为您节省很多麻烦。)
我们将把我们(非常基本的)测试添加到 Test_Trending() 方法中。我的约定是使用 **Test_** 开始测试方法,然后跟上要测试的方法(UpperCamelCase)。在此示例中,我还添加了正在使用的框架(MS Test、NUnit)以及它是 Fluent 还是非 Fluent(稍后将详细介绍)。
现在我们的测试看起来像这样
[TestMethod]
public void

Test_Trending_MSTest_OK()
{
    var result = TrendingRunner.WhatsTrending(1);
    Assert.AreEqual("Paul Walker", result);
}
现在,选择 **Test**-> **Run**-> **All Tests**,或按 **CTRL+R , A** 来运行所有测试。(在我们的情况下,只有一个。)

您现在应该看到

如果您输入了错误,或者假设您有实际的逻辑且结果不如您预期的那样,您将看到

注意:在 MS Test 失败的情况下,额外信息不多。
恭喜。您已成为认证的单元测试员(可能需要遵守条款和条件)。
另一个选项:NUnit
(**注意**:原文写于 NUnit 2.6x 发布时。目前已发布 3.2 版本,因此我将其更新得更具相关性。)
在努力获得我的私人单元测试认证之后,您为什么还要继续呢?这取决于您。根据传说,欧几里得会给您一枚硬币*,但我已经没有硬币了。
我认为使用 NUnit 的好处是可以将多个测试放在同一个 Test 方法下。让我们探讨一下这个想法。假设我们想确保我们的单元测试涵盖所有执行路径,我们可能会向测试方法添加条件,因此它可能看起来像
[TestMethod]
public void Test_Trending()
{
    var result = TrendingRunner.WhatsTrending(1);
    Assert.AreEqual("Paul Walker", result);

    result = TrendingRunner.WhatsTrending(2);
    Assert.AreEqual("Cory Monteith", result);

    result = TrendingRunner.WhatsTrending(3);
    Assert.AreEqual("RoyalBaby", result);
}
这样可以,它也会通过,但一些纯粹主义者会皱眉头,说每个测试只应该有一个断言。因此,我们可以忽略它们,或者将我们的测试分成三个方法,而这时事情就开始变得难看了,重复(以及复制粘贴代码而不可避免的错误)会开始拖累您。
对于 NUnit 2.6.x
我们将 NUnit 添加到我们的项目中(我为这个目的创建了另一个项目,但您可以重复使用之前的项目)。转到 **Tools** -> **Nuget Package Manager** -> **Manage NuGet Packages for Solution**,选择左侧的“**Online**”选项,在右上角键入“**NUnit**”,第一个结果就是您想要的。您可能还想安装 Test adapters,以便您可以在 Visual Studio 内部运行测试。否则,您需要使用 NUnit 外部应用程序运行它们(这有其自身的优点,但我们将留待另一篇文章讨论)。

对于 NUnit 3.2
过程非常相似。使用 VS 2015,NuGet 管理器有所改变(有些人会认为这并非更好)。首先为您的测试项目安装新的 NUnit
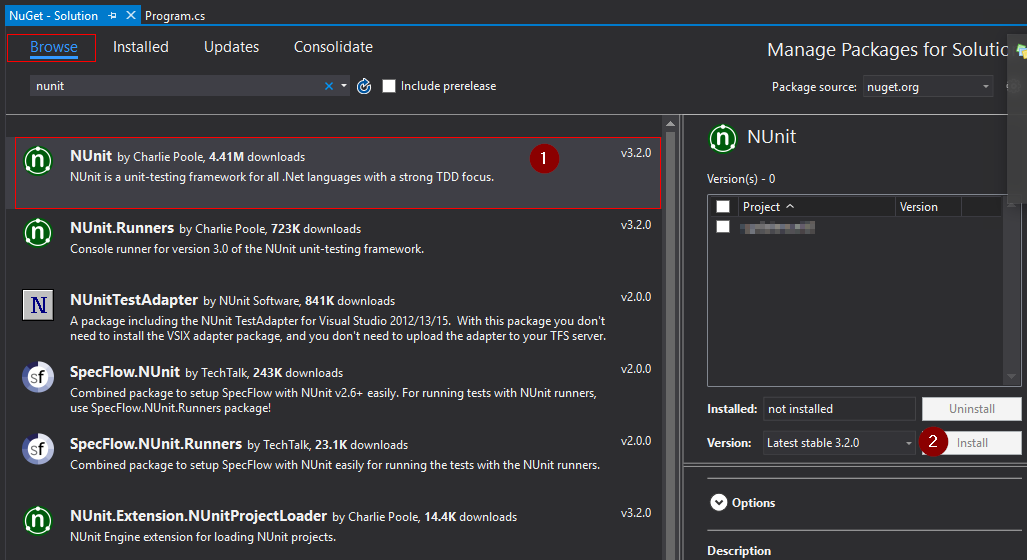
其次,您必须安装 NUnit 3 Test adapter。您可以从 **Tools** -> **Extensions and Updates** 窗口进行安装

回到我们的 NUnit 教程
注意:当询问要将 NUnit 添加到哪些项目时,请仅选择您需要的测试项目(例如,没有必要将 dll 添加到控制台项目)。
语法上的差异并不大,您的新测试将如下所示
public class NUnitTest
{
    [TestCase]                  // this mark the method as a test in Nunit
    public void Test_Trending()
    {
        var result = TrendingRunner.WhatsTrending(1);
        Assert.AreEqual("Paul Walker", result);
    }
}
到目前为止,没有什么突破性的。上述内容将(假设您已安装 adapter)像普通测试一样从 VS 运行。
NUnit 的额外功能在这里发挥作用。我们将修改返回值,从 void 改为我们的方法返回的类型,我们将向测试方法添加一个参数,现在我们可以将多个测试定义为方法上方的装饰器。例如
//  --------------------      NUnit 2.6.x     --------------------
[TestCase(1, Result = "Paul Walker")]
[TestCase(2, Result = "Cory Monteith")]
[TestCase(3, Result = "RoyalBaby")]
public string Test_Trending(int anIndex)
{
    return TrendingRunner.WhatsTrending(anIndex);
}

//  --------------------     NUnit 3.2     --------------------
[TestCase(1, ExpectedResult = "Paul Walker")]
[TestCase(2, ExpectedResult = "Cory Monteith")]
[TestCase(3, ExpectedResult = "RoyalBaby")]
public string Test_Trending(int anIndex)
{
    return TrendingRunner.WhatsTrending(anIndex);
}
注意:语法似乎有所改变。下载仍然是正确的,因为它们使用 2.6.x,如果您按照说明操作,请确保将 Result 更改为 ExpectedResult。
现在,我们的测试被调用三次,使用不同的参数,并且很容易看到预期的结果。请注意,您现在不使用 **Assert**,而是 **return**,让 **NUnit** 来处理其余的。
如果您的测试通过了,您将看到

如果失败了

注意:这里比 MS tests 获得的额外信息要多,这很好,有助于您找出问题所在。
我个人喜欢在我的测试中添加 **Console.Out.WriteLine**。原因是我喜欢除了绿色(通过)/红色(失败)结果之外,还能获得视觉反馈。
[TestCase]
[TestCase(1, Result = "Paul Walker")]
//...
public string Test_Trending(int anIndex)
{
    var result = TrendingRunner.WhatsTrending(anIndex);
    Console.Out.WriteLine("Call \t-> \tresult :\r\n  {0} \t-> \t\"{1}\""
                        , anIndex
                        , result );
    return result;
}
单击测试下的“output”将显示写入控制台的内容:在这种情况下

Fluent Assertions
最后但同样重要的是,我想谈谈 fluent assertions。
其理念是使用 BDD** 的流畅句子断言。它对眼睛更友好,并且更有意义,如果您对前面选项的语法有强烈意见。
我创建了第三个测试项目,名为 **MSFluent**,但您可以直接使用原来的 MS test 项目。转到 NuGet 包管理器,搜索“**fluent assertions**”(如果您不记得如何操作,它与上面 NUnit 的步骤相同,但只需在线搜索 fluent assertions)。
注意:您也可以将其添加到 NUnit。我在这里使用 MS tests,因为我在 NUnit 中使用了带有返回值 的多个用例。
现在我们的测试方法如下所示
[TestMethod]
public void Test_MSTest_Fluent_OK()
{
var result = TrendingRunner.WhatsTrending(1);
result.Should().Be("Paul Walker");
// another fluid assertion
result.Should().NotBeEmpty("because it should have a value");
}
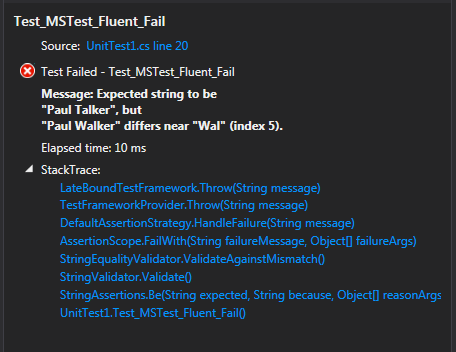
[TestMethod]
public void Test_MSTest_Fluent_Fail()
{
var result = TrendingRunner.WhatsTrending(1);
result.Should().Contain("Paul); // Will pass
result.Should().Be("Paul Talker"); // Will fail because of typo
}
有关更多示例和酷炫内容,请访问 fluent assertions 主页 他们的新 GitHub 主页。以下是您可以使用字符串进行的一些示例
string theString = "";
theString.Should().NotBeNull();
theString.Should().BeNull();
theString.Should().BeEmpty();
theString.Should().NotBeEmpty("because the string is not empty");
theString.Should().HaveLength(0);
theString.Should().BeBlank(); // either null, empty or whitespace only
theString.Should().NotBeBlank();
theString = "This is a String";
theString.Should().Be("This is a String");
theString.Should().NotBe("This is another String");
theString.Should().BeEquivalentTo("THIS IS A STRING");
theString.Should().EndWith("a String");
theString.Should().EndWithEquivalent("a string");
theString.Should().Contain("is a");
theString.Should().NotContain("is a");
theString.Should().ContainEquivalentOf("WE DONT CARE ABOUT THE CASING");
theString.Should().NotContainEquivalentOf("HeRe ThE CaSiNg Is IgNoReD As WeLl");
theString.Should().StartWith("This");
theString.Should().StartWithEquivalent("this");
这里没什么可补充的,但事实是,当测试失败时,您将再次获得更多信息。
额外学分
您可以通过多种方式运行不同的测试。
Test Explorer
默认情况下,您可以使用 Visual Studio 自带的 Test Runner。只需转到 **Test → Run→ All Tests**(或按 CTRL+R,A),它就会弹出(默认情况下,卡在 VS 窗口的左侧)。它看起来像这样

Resharper Unit Test
如果您安装了 resharper,您可以转到 **Resharper → Unit Tests → Run Unit Tests**(默认情况下为 CTRL+U,R)。这将打开 resharper unit test,我觉得它更好一些,因为它提供了更多详细信息和选项。这是截图

NUnit GUI for 2.6.x
您可以下载 NUnit GUI 并将其作为独立应用程序运行。请注意,目前 **NUnit 3.x** 不支持此功能,请参阅顶部的注释。如果您想了解更多信息,可以关注此帖子。目前,只有在使用 **NUnit 2.6.x** 时,这才是可行的选项。
这有一些优点和缺点。
优点
- 如果您想测试您的方法,则无需打开并运行 VS。
- 快速
- 许多选项可供调整
缺点
- 需要运行第二个程序
- 切换到它可能会很麻烦(取决于您的习惯)。
- 如果您从未用过它,或者没有读过我的文章,您可能会想它到底是如何工作的。
说了这么多,一旦您运行了外部应用程序,最简单的入门方法就是将 NUnit 测试 dll 拖放到其中(请记住,单元测试实际上是一个 dll 项目,如果您进入项目文件夹,在 **bin** 文件夹下(在 **debug** 或 **release** 目录下,取决于您构建的内容),您会找到我所说的 project_name.dll。另一种选择是通过 GUI 的“Open project”并浏览到该位置。
完成之后,**F5** 默认用于运行所有测试,**F6** 用于仅运行选定的测试,**F7** 用于仅运行失败的测试。
这是强制截图

唯一需要记住的是,您不能使用此选项运行 MS Tests,只能运行 NUnit 测试(想想看,这很合理 :))。
总结
我们已经看到了三种实现代码测试的方法
- **MS Tests**:随 Visual Studio 一起提供。有人爱它们,有人恨它们。
- **NUnit Tests**:您需要安装 NuGet 包,然后可以通过 VS adapter 或外部程序运行它们。
- **Fluent Assertions**:用于句子式断言的 BDD 语法(可在 MS tests 或 NUnit 中使用)。
如果您不测试您的代码,那就等于没写(在某些情况下是好事,但我们不希望有人对我们的代码这么说,对吧?)。
测试您的代码可以使您在几个月后进行更改,而无需担心更改会中断什么以及是否会中断,因为如果有什么东西中断了,您将确切地知道在哪里、为什么中断了。
这,再加上良好的注释和良好的版本控制系统,应该可以为您节省未来的时间和麻烦。
如果您觉得这篇文章有帮助,请为您投票,留下评论,并随时在此文章中回复 
历史
- 2016 年 4 月 13 日:文章更新了 NUnit 3。
- 2014 年 10 月 30 日:添加了运行器、快速链接到各个部分和屏幕截图。
- 2014 年 6 月 11 日:初次发布。
* 根据传说,当一个学生要求知道证明一个定理能给他带来什么时,欧几里得命令一个奴隶给他一枚硬币,“因为他必须从他所学到的东西中获利。”