
Windows Embedded with Galileo 预览
4.58/5 (5投票s)
Windows Embedded with Intel Galileo 的简单示例(第二阶段:Windows Embedded)
引言
本文将重点介绍使用 Intel Galileo 板与 Windows Embedded 的设置。整个概念在于从外部 SD 卡设置 Intel Galileo 与 Windows Embedded,然后进行必要的安排。这将逐步分析如何开始使用 Windows Embedded OS 和 Intel Galileo 板。
背景
这篇文章将构成后续工作的基础。它将重点介绍一个简单的示例,使用 Visual Studio 2013 并在 Intel Galileo 板上运行该草图。假设对 C++ Visual Studio Processing 语言有少许了解。
Windows Embedded 的开发环境
让我们开始吧
设置 Intel Galileo 板
提示:-
目前,Windows Embedded 仅支持 Intel Galileo Gen1 板。Windows Embedded 的镜像操作系统仅兼容 Gen 1 板。
让我们使用 PC 设置 Intel Galileo 板
您首先需要的东西
Intel Galileo 板
2 根 USB 数据线
用于连接电路板的 PC 或笔记本电脑。
您需要从以下链接下载 Intel Galileo 板软件。
https://communities.intel.com/docs/DOC-22226
您需要解压缩该软件,并为您将保留它的文件夹命名。
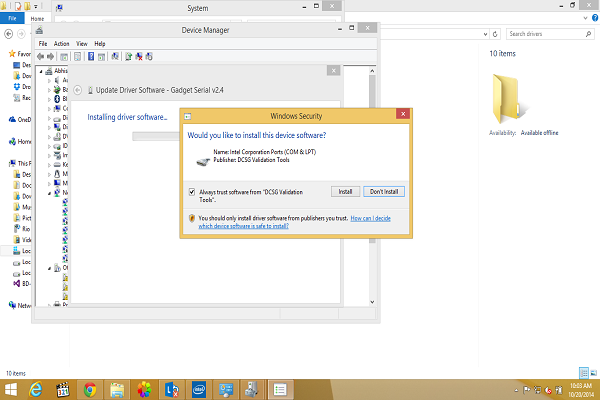
您需要打开 Gen1 板的电源,然后将两条 USB 数据线连接到您的 PC,以便识别 Intel Galileo,您需要转到设备管理器,然后在其他设备下,您将找到一个名为 Gadget Serial v2.4 的设备。右键单击它,然后单击更新软件

浏览软件驱动程序

您将可以在以下位置找到它
C:\<Adruino_folder>\arduino-1.5.3-Intel.1.0.4\drivers
它将要求安装设备软件,您需要单击是
您将收到一条消息,提示软件已成功安装
您可以在端口(COM 和 LPT)中找到它
设置 Windows Embedded
要开始,您需要在以下链接注册自己
https://www.windowsondevices.com/signup.aspx
在那里进行注册,以便您可以访问 Windows Embedded 所需的实用程序软件
注册后,下一步是获取软件
https://connect.microsoft.com/windowsembeddedIoT/Downloads
由于我的朋友是幸运者之一,获得了预先镜像的 Windows Embedded 镜像以及 Intel Galileo 板,因此我的工作只是下载适用于 IOT MSI 安装程序的 Windows 开发人员程序
我将 MSI 复制到我的计算机

双击并安装它

通过它,您会看到一个非常好的实用程序程序安装在您的计算机上 Galileo Watcher。它跟踪连接到您的网络的 Galileo。
您需要在您的计算机上设置 Telnet 客户端
为此,您需要转到控制面板

转到程序和功能,然后打开和关闭 Windows 功能

现在我们需要安装 Telnet 客户端,勾选 Telnet 客户端,因为它安装了重启您的计算机。

现在,当您重新启动计算机时,您将看到 Galileo Watcher 正在运行

由于您尚未将 Intel Galileo 板配置到 PC,您将什么也看不到
您需要做的事情
获取一根 LAN 数据线
将其连接到 Galileo 端口并直接连接到 PC 或笔记本电脑
将预先镜像的 SD 卡(随 Windows Embedded 一起提供)放入 Galileo 卡槽
打开 Galileo 电源
现在以管理员模式运行 Galileo Watcher 应用程序

Galileo Watcher 现在将显示 Intel Galileo 板

它将显示 MAC 地址和 IP 地址
右键单击 Galileo Watcher,然后在 Web 浏览器中打开它

如果一切正常,您将看到 Intel Galileo 的网页

启动 Visual Studio
您将看到已为 Galileo 安装了 MSI 软件包,即 IOT 模板
在 Visual C++ 应用程序下

我们将应用程序命名为 Galileo Wiring App1,现在单击“确定”
当您单击“确定”时,将弹出一个屏幕,您需要按“是”来定位 Galileo v1

查看项目文件

单击以远程 Windows 调试器构建
现在,随着构建过程的继续,它将要求 Intel Galileo 的管理员权限,即预配置
用户名是:-administrator 密码:-admin
然后它将把代码推送到 Galileo,如果一切顺利,您将看到 Intel Galileo 板中的 LED 闪烁
Main.cpp 文件的代码
#include "stdafx.h"
#include "arduino.h"

int _tmain(int argc, _TCHAR* argv[])
{
    return RunArduinoSketch();
}

int led = 13;  // This is the pin the LED is attached to.

void setup()
{
    // TODO: Add your code here

    pinMode(led, OUTPUT);       // Configure the pin for OUTPUT so you can turn on the LED.
}

// the loop routine runs over and over again forever:
void loop()
{
    // TODO: Add your code here

    digitalWrite(led, LOW);    // turn the LED off by making the voltage LOW
    Log(L"LED OFF\n");
    delay(1000);               // wait for a second
    digitalWrite(led, HIGH);   // turn the LED on by making the voltage HIGH
    Log(L"LED ON\n");
    delay(1000);               // wait for a second
}
您已使用 Windows Embedded OS 成功运行了 Intel Galileo 上的第一个程序
参考文献
https://dev.windows.com/en-us/featured/windows-developer-program-for-iot
历史
文章的第一个版本