
在线图片存储
在线图片存储是一个基于网络的图片存储系统,您可以通过它上传、预览、下载和删除图片。
引言
在线图片存储是一个基于网络的图片存储系统,您可以通过它将图片存储在上传文件夹中。在这个项目中,我创建了两个页面:一个是图片上传页面,另一个是图片库页面。
在“图片上传”页面中,您可以通过表单提交上传图片,并使用 JavaScript 客户端验证(图片扩展名和图片大小)。验证图片后,它将通过 Ajax-PHP 提交上传。
在“图片库”页面中,所有图片都将从上传文件夹中获取,并且图片将通过 jQuery-CSS Lightbox 图片库显示,其中每张图片都有删除和下载按钮。
项目概述
在这个项目中,我展示了两个页面;一个是“图片上传”页面,另一个是“图片库”页面。现在我想逐一讨论这两个页面。
1. “图片上传”页面

“图片上传”页面的源代码位于 ImageUpload.php 中。
在 ImageUpload.php 页面中,我创建了一个表单,其中包含两个字段:一个是用于文件上传的输入字段,另一个是用于将图片存储在上传文件夹中的提交按钮。默认情况下,提交按钮的可见性是隐藏的。
<form action="upload.php" enctype="multipart/form-data" id="ImageForm" method="post">
  <input id="filUpload" name="filUpload" />
  <input id="submit-image" name="submit" style="visibility: hidden;" type="submit" value="Upload Image" />
</form>
当您点击文件上传输入按钮时,onchange 事件会调用 JavaScript 的 Displayimagepreview 函数来预览您正在选择的图片。
但在预览之前,它会验证图片扩展名。如果图片扩展名不在 jpeg/jpg/png/gif/bmp 中,则错误文本将显示在 image-details div 中。
var filerdr = new FileReader();
var FileName = input.files[0].name;
var allowedExtension = ['jpeg', 'jpg', 'png', 'gif', 'bmp'];
var fileExtension = FileName.split('.').pop().toLowerCase();
var isValidFile = false;

        for(var index in allowedExtension) {
            if(fileExtension === allowedExtension[index]) {
                isValidFile = true;
                break;
            }//End of if
        }//End of for

        //When file extension is not valid
        if(!isValidFile) {
            document.getElementById("image-details").innerHTML =
		"This file extension is not valid";
        }
接下来,它会检查图片大小是否大于最大文件大小 1MB。如果文件大小大于最大文件大小,则错误文本将显示在 image-details div 中。
var filerdr = new FileReader();
var FileSize = Math.round(parseFloat(input.files[0].size)/1024);
var Max_FileSize = 1024;

if(FileSize>Max_FileSize){
   document.getElementById("image-details").innerHTML =
	"This file size is greater than 1MB";
}
如果以上两个客户端验证(图片文件扩展名和图片文件大小)都正常,那么选择的图片将被预览。
filerdr.onload = function(e) {
	$('#image-preview').attr('src', e.target.result);
}//End of function onload
filerdr.readAsDataURL(input.files[0]);
并且 HTML 图片预览的 image-preview div 如下所示:
![Image Preview]()
当图片被预览时,上传按钮将出现。
document.getElementById("submit-image").style.visibility="visible";
并且图片名称和大小将显示在 image-details div 中。
document.getElementById("image-details").innerHTML =
	"Name: "+FileName+"
 Size: "+FileSize+"KB";
现在是点击上传按钮的时候了。当您点击上传按钮时,图片将通过 Ajax 调用提交,如下所示:
$(document).ready(function (e) {
	$("#ImageForm").on('submit',(function(e) {
		e.preventDefault();
		$.ajax({
        	url: "upload.php",
			type: "POST",
			data: new FormData(this),
			contentType: false,
    	    cache: false,
			processData: false,
			success: function(data)
		    {
				document.getElementById("UploadSuccess").innerHTML="The image has been uploaded";

				window.setTimeout(function() {
				    window.location.href = 'ImageGallery.php';
				}, 1000);
		    },
		  	error: function()
	    	{
	    	}
	   });
	}));
});
通过 Ajax POST 方法,图片将通过 PHP 代码 (upload.php) 执行上传到上传文件夹中。
if(is_array($_FILES)) {
if(is_uploaded_file($_FILES['filUpload']['tmp_name'])) {
$sourcePath = $_FILES['filUpload']['tmp_name'];
$targetPath = "uploads/".$_FILES['filUpload']['name'];
if(move_uploaded_file($sourcePath,$targetPath)) {
echo " ";
}
}
}
";
}
}
}
如果图片上传成功,则文本“The image has been uploaded”(图片已上传)将显示在 UploadSuccess div 中。
document.getElementById("UploadSuccess").innerHTML="The image has been uploaded";
并且在接下来的 1000 毫秒后,页面将重定向到“ImageGallery.php”页面。
window.setTimeout(function() {
	window.location.href = 'ImageGallery.php';
}, 1000);
2. “图片库”页面
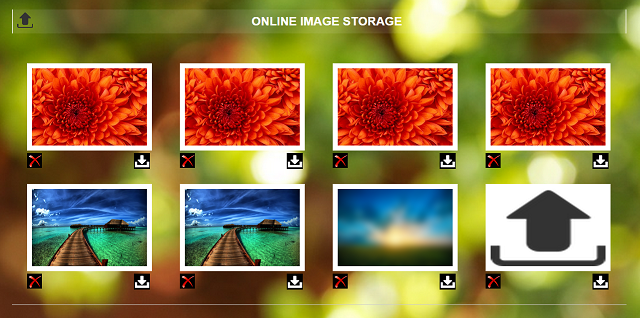
在“图片库”页面源代码 ImageGallery.php 中,调用 images 从上传文件夹中获取,如果您的鼠标悬停在图片上,则会显示每个图片名称。
$directory = "uploads/";
$images = glob($directory . "*");
//print each file name
foreach($images as $image)
{
$inv_image_name = strrev($image);
$pos_dot = strpos($inv_image_name,".");
$pos_slash = strpos($inv_image_name,"/");
$image_name_length = $pos_slash-$pos_dot;
$image_name = strrev(substr($inv_image_name,$pos_dot+1,$image_name_length-1));
echo "";
echo "";
echo " ";
echo "";
echo "
";
echo "";
echo "".$image_name."
";
echo "";
echo “”;
在这里,每张图片都有一个下载和删除按钮。
对于删除按钮,我使用了以下 HTML:
<input type="button" value="" class="delete" id="">
点击删除按钮,delete.php 通过 Ajax POST 方法调用。
$(function() {
$(".delete").click(function() {
$('#load').fadeIn();
var commentContainer = $(this).parent();
var id = $(this).attr("id");
var string = 'id='+ id ;

$.ajax({
   type: "POST",
   url: "delete.php",
   data: string,
   cache: false,
   success: function(){
	commentContainer.slideUp('slow', function() {$(this).remove();});
	$('#load').fadeOut();
  }

 });

return false;
	});
});
调用 delete.php 后,图片只是通过图片 POST ID 解除链接。
unlink($_POST['id']);
对于下载按钮,通过 GET 方法将图片相对路径发送到 download.php 页面。为此:
并且 download.php 包含以下内容:-
$file = $_GET['file'];

download_file($file);

function download_file( $fullPath ){

  // Must be fresh start
  if( headers_sent() )
    die('Headers Sent');

  // Required for some browsers
  if(ini_get('zlib.output_compression'))
    ini_set('zlib.output_compression', 'Off');

  // File Exists?
  if( file_exists($fullPath) ){

    // Parse Info / Get Extension
    $fsize = filesize($fullPath);
    $path_parts = pathinfo($fullPath);
    $ext = strtolower($path_parts["extension"]);

    // Determine Content Type
    switch ($ext) {
      case "tiff": $ctype="image/tiff"; break;
      case "bmp": $ctype="image/bmp"; break;
      case "gif": $ctype="image/gif"; break;
      case "png": $ctype="image/png"; break;
      case "jpeg":  $ctype="image/jpeg"; break;
      case "jpg": $ctype="image/jpg"; break;
      default: $ctype="application/force-download";
    }

    header("Pragma: public"); // required
    header("Expires: 0");
    header("Cache-Control: must-revalidate, post-check=0, pre-check=0");
    header("Cache-Control: private",false); // required for certain browsers
    header("Content-Type: $ctype");
    header("Content-Disposition: attachment; filename=\"".basename($fullPath)."\";" );
    header("Content-Transfer-Encoding: binary");
    header("Content-Length: ".$fsize);
    ob_clean();
    flush();
    readfile( $fullPath );

  } else
    die('File Not Found');
}
如果您单击图片,它将出现在灯箱窗口中以显示图片。为此,我使用了 Gallery.js

两个页面之间的链接
完成“ImageUpload.php”和“ImageGallery.php”两个页面后,可以通过以下方式链接到其他页面。
要从“ImageUpload.php”页面链接到“ImageGallery.php”页面,您可以在“ImageUpload.php”页面中使用以下行。
要从“ImageGallery.php”页面链接到“ImageUpload.php”页面,您可以在“ImageGallery.php”页面中使用以下行。