
在 JQuery Mobile 应用中上传和显示图片
0/5 (0投票)
演示了 input:file、FileReader、Listview 缩略图、图片控件以及表格图片和自定义图标。
引言
本文旨在演示如何使用 input: file 控件选择图片文件,然后使用 FileReader 方法读取文件内容,通过 PHP 将文件上传到服务器,并将其显示在 image/picture 控件中进行预览。保存的图片随后将用于在 listview 中显示缩略图。当用户选择图片文件时,该文件将被上传到服务器,并使用保存路径的链接来引用缩略图和预览图片。
为此,我们将使用 PHP 创建一个简单的图书数据库,在 Web 服务器上存储每本书的单个 JSON 记录。我之前在 这里 讨论过这种 CRUD 功能的方法。
一些基本假设:您熟悉 JQuery Mobile、Javascript、PHP,并且您已经阅读了我关于《使用 JQuery Mobile 和 PHP Ajax 调用创建 CRUD Web 应用》的文章。
本文的 JQuery Mobile 应用中有以下值得注意之处::
1. 左侧菜单/面板图标对齐到左侧。每个按钮都使用了 listview,并通过 class 属性定义了每个按钮。
2. 在标题右侧按钮上使用了控件组,以添加额外的按钮到标题栏。这是图书报告表中的导出按钮。
3. 添加了右侧菜单/面板,以便轻松访问已添加的记录。选择每条记录都会打开数据库中保存的记录。
背景
我想要一个功能,让用户可以选择一个图片文件,然后这个图片文件可以上传并存储在服务器上,Web 应用会引用它并在 listview 中将其显示为缩略图和预览图。我还想将其显示在 image/picture 框中。由于这个 Web 应用使用 PHP 将图片文件存储在服务器上,我选择了之前写过的单 JSON 记录方法。此方法也可用于其他后端,如 WebSQL、IndexedDB、LocalStorage,但您仍然需要 PHP 来将图片文件上传到服务器。
我们将定义一个简单的图书目录应用来存储我们图书的详细信息。每本书都有一些简单的字段,例如,标题、作者、ISBN、状况(差、一般、好)、价格,以及图书图片。我们将使用 input: file 来允许用户从设备中选择图片文件,并使用 image 来预览。让我们看看下面的最终输出。下面的图片中带有红色标记。
图 1:创建图书(向图书集合中添加图书)

此屏幕用于向集合中添加新图书。用户可以指定图书标题、作者、ISBN、状况、价格,并可以从设备上可用的图片文件中选择文件。在 Apple 设备上,这基本上会转到图库。图片预览功能允许用户在保存所有内容之前预览所选的图片文件。屏幕右上角的“选择记录”可以访问右侧面板以查看可用图书列表。
图 1.1 选择文件(选择“选择文件”提示时弹出)

这是选择“选择文件”后出现的选择器,允许用户选择他们想要的图片。这就是它在我的笔记本电脑上的 Chrome 浏览器中运行的效果。在不同设备上可能会有所不同。
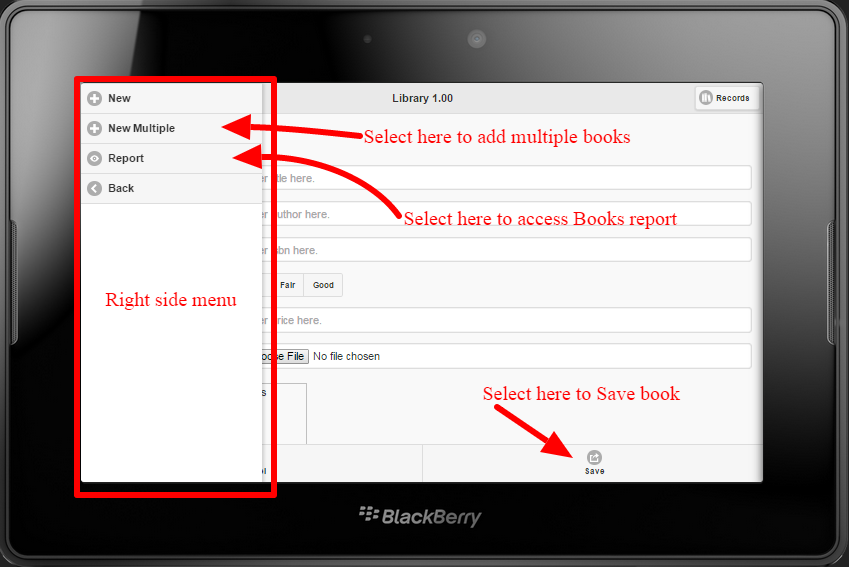
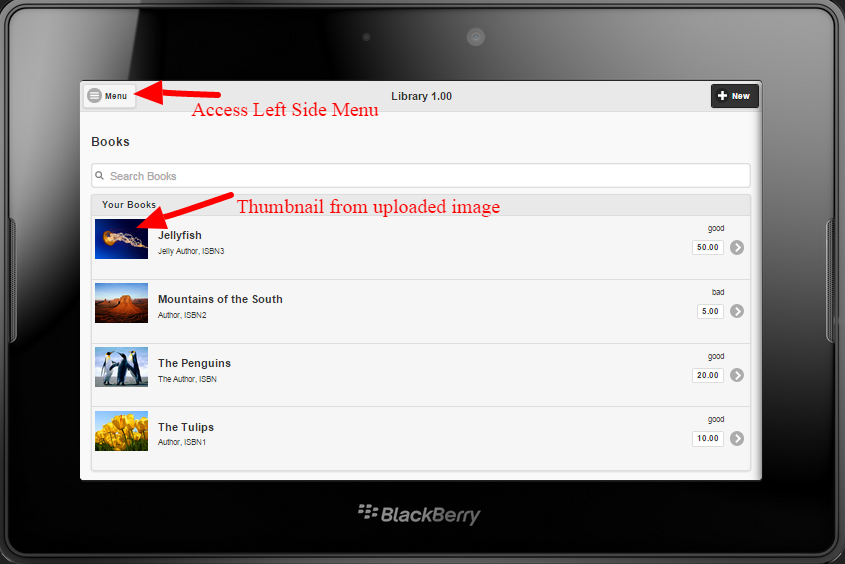

图 5:图书报告(包含缩略图的可导出图书表格报告)

我还想在我的报告中显示图书封面,因此将其包含在表格的每个单元格中。当前预览图和此列表的宽度和高度都基于 100px。导出按钮已使用 control-group 类添加到标题栏中。我也会向您展示如何做到这一点。
图 6. 添加多本图书
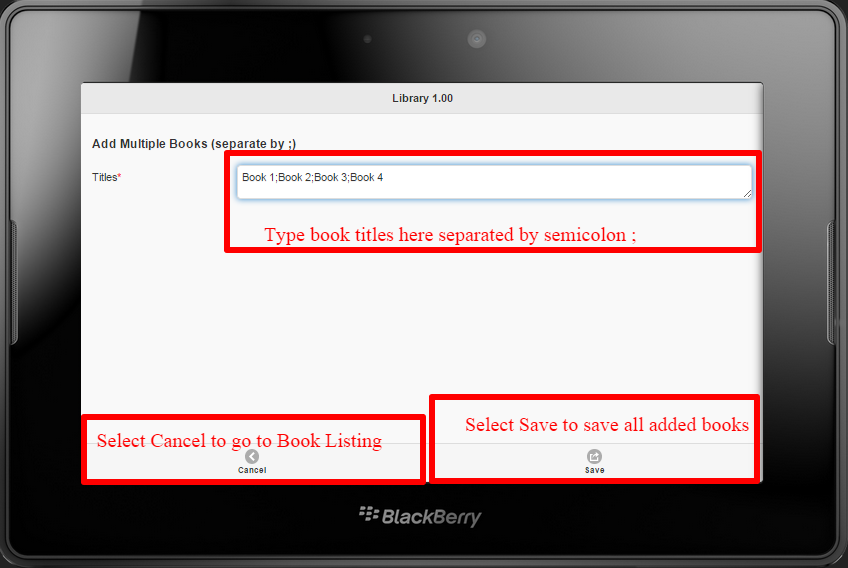
我创建了这个屏幕用于批量输入图书标题。例如,如果用户有多个记录,尤其是元数据,可以使用此类屏幕进行输入。图书标题应以分号分隔,以便应用程序能够识别该屏幕上的每个图书标题。例如,从上面的屏幕中,将添加 4 本图书,稍后将更新其内容。我使用过此类屏幕,需要在其中定义动态下拉列表/选择菜单项,然后将这些详细信息引用到使用它们的屏幕。
每本书的主键是图书标题,因此遵循了此方法。现在让我们详细看一下这些屏幕的源代码。
使用代码
1. 创建图书
要创建此类应用,您将遵循创建 JQuery Mobile 应用的常规模板方法,首先定义主 index.html 文件,并链接相应的 CSS 文件、JS 文件和图片文件。在我们的库中,每本书都作为单个 JSON 文件记录存储在服务器的 Book 文件夹中。此文件夹会在添加图书后立即创建。应确保服务器具有使用 PHP 进行读写的权限。我们将使用几个 PHP 文件来实现此应用程序的目标。
1.1 创建图书 - HTML 定义
    <div id="pgAddBook" data-role="page">
      <div data-position="left" data-display="overlay" data-position-fixed="true" id="pgAddBookLeftPnl" data-role="panel">
        <ul data-role="listview" id="pgAddBookLeftPnlLV">
          <li>
            <a data-transition="slide" href="#pgAddBook" class="ui-btn ui-icon-plus ui-btn-icon-left">New</a>
          </li>
          <li>
            <a data-transition="slide" href="#pgAddMultBook" class="ui-btn ui-icon-plus ui-btn-icon-left">New Multiple</a>
          </li>
          <li>
            <a data-transition="slide" href="#pgRptBook" class="ui-btn ui-icon-eye ui-btn-icon-left">Report</a>
          </li>
          <li>
            <a data-transition="slide" href="#pgBook" class="ui-btn ui-icon-carat-l ui-btn-icon-left">Back</a>
          </li>
        </ul>
      </div>
      <div data-position="right" data-display="overlay" data-position-fixed="true" id="pgAddBookRightPnl" data-role="panel">
        <ul data-role="listview" id="pgAddBookRightPnlLV"></ul>
      </div>
      <header id="pgAddBookHdr" data-role="header" data-position="fixed" data-tap-toggle="false">
      <h1>Library 1.00</h1>
      <a data-role="button" id="pgAddBookMenu" data-icon="bars" href="#pgAddBookLeftPnl" class="ui-btn-left">Menu</a>
      <a data-role="button" id="pgAddBookRightMenu" data-icon="records" href="#pgAddBookRightPnl"
      class="ui-btn-right">Records</a></header>
      <div id="pgAddBookCnt" data-role="content">
        <h3>Add Book</h3>
        <div id="pgAddBookForm">
          <div data-role="fieldcontain">
          <label for="pgAddBookTitle">Title
          <span class='red'>*</span></label>
          <input required="" name="pgAddBookTitle" title="Enter title here." type="text" id="pgAddBookTitle"
          placeholder="Enter title here." autocomplete="off" data-clear-btn="true" /></div>
          <div data-role="fieldcontain">
          <label for="pgAddBookAuthor">Author
          <span class='red'>*</span></label>
          <input required="" name="pgAddBookAuthor" title="Enter author here." type="text" id="pgAddBookAuthor"
          placeholder="Enter author here." autocomplete="off" data-clear-btn="true" /></div>
          <div data-role="fieldcontain">
          <label for="pgAddBookISBN">ISBN
          <span class='red'>*</span></label>
          <input required="" name="pgAddBookISBN" title="Enter isbn here." type="text" id="pgAddBookISBN"
          placeholder="Enter isbn here." autocomplete="off" data-clear-btn="true" /></div>
          <div data-role="fieldcontain">
            <fieldset id="fspgAddBookCondition" data-role="controlgroup" data-type="horizontal" data-mini="true">
              <legend>Condition
              <span class='red'>*</span></legend>
              <div id="fsDivpgAddBookCondition" class="borderdv">
              <input type="radio" id="pgAddBookConditionbad" name="pgAddBookCondition" autocomplete="off" value="bad" />
              <label for="pgAddBookConditionbad">Bad</label>
              <input type="radio" id="pgAddBookConditionfair" name="pgAddBookCondition" autocomplete="off" value="fair" />
              <label for="pgAddBookConditionfair">Fair</label>
              <input type="radio" id="pgAddBookConditiongood" name="pgAddBookCondition" autocomplete="off" value="good" />
              <label for="pgAddBookConditiongood">Good</label></div>
            </fieldset>
          </div>
          <div data-role="fieldcontain">
          <label for="pgAddBookPrice">Price
          <span class='red'>*</span></label>
          <input required="" name="pgAddBookPrice" title="Enter price here." type="number" id="pgAddBookPrice"
          placeholder="Enter price here." autocomplete="off" data-clear-btn="true" /></div>
          <div data-role="fieldcontain">
          <label for="pgAddBookBookImage">Book Image
          <span class='red'>*</span></label>
          <input required="" name="pgAddBookBookImage" title="Enter book image here." type="file" id="pgAddBookBookImage"
          placeholder="Enter book image here." autocomplete="off" data-clear-btn="true" /></div>
          <div data-role="fieldcontain">
          <label for="pgAddBookImagePreview">Image Preview</label>
          <img name="pgAddBookImagePreview" id="pgAddBookImagePreview" height="100px" width="100px" src="apps.png"
          alt="Apps" /></div>
        </div>
      </div>
      <footer id="pgAddBookFtr" data-role="footer" data-position="fixed" data-tap-toggle="false">
        <div id="pgAddBookFtrNavBar" data-role="navbar">
          <ul>
            <li>
              <a id="pgAddBookBack" data-icon="carat-l">Cancel</a>
            </li>
            <li>
              <a type="submit" id="pgAddBookSave" data-icon="action">Save</a>
            </li>
          </ul>
        </div>
      </footer>
    </div>
上面是添加每本图书的屏幕定义。我们已指出此屏幕具有左侧面板和右侧面板,并且这些面板具有引用特定操作的 listview。
左侧面板
    <div data-position="left" data-display="overlay" data-position-fixed="true" id="pgAddBookLeftPnl" data-role="panel">
      <ul data-role="listview" id="pgAddBookLeftPnlLV">
        <li>
          <a data-transition="slide" href="#pgAddBook" class="ui-btn ui-icon-plus ui-btn-icon-left">New</a>
        </li>
        <li>
          <a data-transition="slide" href="#pgAddMultBook" class="ui-btn ui-icon-plus ui-btn-icon-left">New Multiple</a>
        </li>
        <li>
          <a data-transition="slide" href="#pgRptBook" class="ui-btn ui-icon-eye ui-btn-icon-left">Report</a>
        </li>
        <li>
          <a data-transition="slide" href="#pgBook" class="ui-btn ui-icon-carat-l ui-btn-icon-left">Back</a>
        </li>
      </ul>
    </div>
我们已将此面板定义为覆盖显示属性。内部有一个 listview,其中包含按钮:新建、批量新建、报告和返回,如前所述。我们没有使用 listview 中的大多数 data- 属性来定义按钮,而是使用了一个 class 来定义按钮,因为我们希望按钮具有左侧图标。通过指定 data-position="left",面板将放置在页面的左侧。
<li><a data-transition="slide" href="#pgAddBook" class="ui-btn ui-icon-plus ui-btn-icon-left">New</a></li>
我们通过添加一个具有以下属性的 class 来实现此目的:“ui-btn ui-icon-plus ui-btn-icon-left”,以便图标出现在文本的左侧,并定义我们的 anchor 为一个按钮。
右侧面板
我们在此页面中还定义了一个右侧面板,用于列出所有可用的图书记录。
    <div data-position="right" data-display="overlay" data-position-fixed="true" id="pgAddBookRightPnl" data-role="panel">
      <ul data-role="listview" id="pgAddBookRightPnlLV"></ul>
    </div>
在此面板内,我们还添加了一个名为“pgAddBookRightPnlLV”的 listview。如您所见,此面板最初是空的,但一旦您添加越来越多的图书,它就会通过代码加载。我稍后会解释这一点。
水平单选按钮组
我们在表单中还定义了一个水平单选按钮组,供用户选择图书的状况。定义如下。
   <div data-role="fieldcontain">
      <fieldset id="fspgAddBookCondition" data-role="controlgroup" data-type="horizontal" data-mini="true">
        <legend>Condition<span class='red'>*</span></legend>
        <div id="fsDivpgAddBookCondition" class="borderdv">
         <input type="radio" id="pgAddBookConditionbad" name="pgAddBookCondition" autocomplete="off" value="bad" />
         <label for="pgAddBookConditionbad">Bad</label>
         <input type="radio" id="pgAddBookConditionfair" name="pgAddBookCondition" autocomplete="off" value="fair" />
         <label for="pgAddBookConditionfair">Fair</label>
         <input type="radio" id="pgAddBookConditiongood" name="pgAddBookCondition" autocomplete="off" value="good" />
         <label for="pgAddBookConditiongood">Good</label>
        </div>
      </fieldset>
    </div>
出于某些原因,控件组比其他控件大,因此我决定为它们添加 data-mini="true" 以获得更好的外观。
文件输入
为了能够为每本图书选择图片文件,我们需要一个文件输入控件。我们定义如下。
<div data-role="fieldcontain">
    <label for="pgAddBookBookImage">Book Image<span class='red'>*</span></label>
    <input required="" name="pgAddBookBookImage" title="Enter book image here." type="file" id="pgAddBookBookImage"
    placeholder="Enter book image here." autocomplete="off" data-clear-btn="true" />
</div>
为了能够预览我们的图片,我们添加了一个 image 控件,如下所示。
<div data-role="fieldcontain">
   <label for="pgAddBookImagePreview">Image Preview</label>
   <img name="pgAddBookImagePreview" id="pgAddBookImagePreview" height="100px" width="100px" src="apps.png" alt="Apps"></img>
</div>
这完成了我们的图书创建屏幕定义的要点。
添加新图书时,用户将输入图书的详细信息,选择图书的图片,然后该图片将在 image 控件中加载并预览。图片加载和预览发生在文件控件的“pgAddBookBookImage_onchange”事件中。使用以下 JS 定义:
文件 OnChange 事件
//upload a file to server once onchange is detected
$('#pgAddBookBookImage').on('change', function () {
    $.mobile.loading("show", {
        text : "Loading file...",
        textVisible : true
    });
    //check to see if we have a file
    var fName = document.getElementById('pgAddBookBookImage').files[0];
    if (typeof(fName) === 'undefined')
        fName = '';
    if (Len(fName) > 0) {
        //get the file name
        var ofName = fName.name;
        //get the file extension
        var ofExt = Mid(ofName, InStrRev(ofName, '.'));
        // open a file reader to upload the file to the server
        var reader = new FileReader();
        // once the file reader has loaded the file contents
        reader.onload = function () {
            // get the dataURL of the file, a base 64 decoded string
            var dataURL = reader.result;
            //save the file to the server
            var req = Ajax("savepng.php", "POST", "file=" + ofName + "&content=" + dataURL);
            if (req.status == 200) {
                // return the full path of the saved file
                fName = req.responseText;
                $('#pgAddBookImagePreview').attr('src', dataURL);
                //show a toast message that the file has been uploaded
                toastr.success(ofName + ' file uploaded.', 'Library');
            } else {
                // return a blank file name
                fName = '';
                //show a toast message that the file has not been uploaded
                toastr.error(ofName + ' file NOT uploaded.', 'Library');
            }
            //set the file name to store later
            $('#pgAddBookBookImage').data('file', fName);
        };
        // start reading the file contents
        reader.readAsDataURL(fName);
    } else {}
    $.mobile.loading("hide");
});
用户选择文件后,将触发 onchange 事件。选定的文件详细信息将分配给 fName 变量。将创建一个 FileReader 变量来读取文件内容,并调用 reader.onload 函数以及 reader.readAsDataURL。完成后,文件内容将从 reader.result 分配给 dataURL。然后将其传递给 savepnp.php 保存到服务器。上传到服务器后,使用已保存的图片文件的文件路径显示图片预览,并向用户显示文件是否已保存的通知。
您应该注意到,预览图片接收的是文件的实际 base64 字符串内容,并为其分配了一个 data-file 属性,值为文件名。
savepng.php
此 PHP 脚本接收文件名和文件内容进行处理。让我们看一下。
<?php
    //create the parent folder
    if (!is_dir('./Files/')) {
        mkdir('./Files/');
    }
    //get the file name
    $file = basename($_REQUEST['file']);
    $file = 'Files/'. $file;
    //get the file contents
    $content = $_REQUEST['content'];
    //clean the file contents
    $content = str_replace('data:image/png;base64,', '', $content);
    $content = str_replace('data:image/jpeg;base64,', '', $content);
    $content = str_replace('data:image/gif;base64,', '', $content);
    $content = str_replace(' ', '+', $content);
    $content = base64_decode($content);
    // save the file
    $success = file_put_contents($file, $content);
    echo $file;
?>
从上面可以看出,在 Web 服务器的应用文件夹的根目录下创建了一个名为 Files 的文件夹。请确保为此设置了正确的权限。提取传递的文件名和文件内容。由于目前是文本,我们需要进行一些清理。我们假设文件可以是 png、jpeg 和 gif,我们通过从内容中删除这些来清理 base64 图片字符串。然后我们使用 base64_decode 解码清理后的图片,并使用图片文件名将其保存。
使用实际的图片文件名,可以确保服务器上不会存储重复的图片。
所有这些都发生在保存图书记录之前。目前我们假设所有选定的图片都将用于将要保存的图书。
1.2. 创建图书 - Javascript
将图书保存到后端 JSON 文件是在用户单击“保存”后发生的。如上所述,图片文件已上传并保存了其链接。上面的 savepng.php 回显了服务器上文件的完整文件路径,因此我们使用该路径来保存图片文件的引用。为了演示如何保存 base64 图片字符串,我们还将预览图片 src 属性保存到 JSON 文件中,仅用于演示(该文件在应用程序中未被使用,因为图片文件引用用于引用我们的缩略图和报告中显示的图片)。
// Save click event on Add page
$('#pgAddBookSave').on('click', function (e) {
    e.preventDefault();
    e.stopImmediatePropagation();
    //get form contents into an object
    var BookRec = pgAddBookGetRec();
    //save object to JSON
    app.addBook(BookRec);
});
当用户在“添加图书”屏幕上单击“保存”时,将从控件中读取图书记录,并将其存储在一个对象中,当下面的代码运行时。
//get form contents into an object
var BookRec = pgAddBookGetRec();
然后将此对象传递给 app.addBook 以确保完成将此添加到后端的最终过程。让我们看一下这些。
//read contents of each form input
function pgAddBookGetRec() {
    //define the new record
    var BookRec = {};
    BookRec.Title = $('#pgAddBookTitle').val().trim();
    BookRec.Author = $('#pgAddBookAuthor').val().trim();
    BookRec.ISBN = $('#pgAddBookISBN').val().trim();
    BookRec.Condition = $('input:radio[name=pgAddBookCondition]:checked').val();
    BookRec.Price = $('#pgAddBookPrice').val().trim();
    BookRec.BookImage = $('#pgAddBookBookImage').data('file');
    BookRec.ImagePreview = $('#pgAddBookImagePreview').attr('src');
    return BookRec;
}
读取了所有输入控件的内容。包含 base64 图片字符串的 src 属性也会被读取并存储。
// add a new record to server storage.
app.addBook = function (BookRec) {
    $.mobile.loading("show", {
        text : "Creating record...",
        textVisible : true
    });
    // define a record object to store the current details
    var Title = BookRec.Title;
    // cleanse the record key of spaces.
    Title = Title.split(' ').join('-');
    BookRec.Title = Title;
    //convert record to json to write to server
    var recordJSON = JSON.stringify(BookRec);
    // save the data to a server file, use the post method as it has 8MB minimum data limitation
    var req = Ajax("jsonSaveBook.php", "POST", recordJSON);
    if (req.status == 200) {
        //show a toast message that the record has been saved
        toastr.success('Book record saved.', 'Library');
        //find which page are we coming from, if from sign in go back to it
        var pgFrom = $('#pgAddBook').data('from');
        switch (pgFrom) {
        case "pgSignIn":
            $.mobile.changePage('#pgSignIn', {
                transition : pgtransition
            });
            break;
        default:
            // clear the edit page form fields
            pgAddBookClear();
            //stay in the same page to add more records
        }
    } else {
        //show a toast message that the record has not been saved
        toastr.error('Book record not saved. Please try again.', 'Library');
    }
    $.mobile.loading("hide");
};
从上面可以看出,app.addBook 接收包含图书记录的对象。主键被清理空格,然后对象转换为 JSON 字符串。然后使用 jsonSaveBook.php 将其发布到服务器。
1.3. 创建图书 - PHP
<?php
    // Get the data from the client.
    $record = file_get_contents('php://input');
    // convert file contents to json object
    $jsonrec = json_decode($record);
    // read the primary key
    $Title = $jsonrec->Title;
    //write the data out to a file on the server
    //make sure permissions are all OK!
    //create the parent folder
    if (!is_dir('./Book/')) {
        mkdir('./Book/');
    }
    //define the file
    $jsonFile = "Book/" . $Title . ".json";
    $f = fopen($jsonFile, 'w') or die("Error: Can't open file. Got write permission?");
    fwrite($f, $record);
    fclose($f);
?>
jsonSaveBook.php 然后接收图书 JSON 字符串,读取它,解码以获取图书标题,如果服务器上不存在“Book”目录则创建它,然后将图书内容写入 JSON 文件,结果如下...
图书 JSON 记录
{"Title":"Jellyfish",
    "Author":"Jelly Author",
    "ISBN":"ISBN3",
    "Condition":"good",
    "Price":"50.00",
    "BookImage":"Files/Jellyfish.jpg",
    "ImagePreview":"data:image/jpeg;base64,/9j/4AAQSkZJRgABAgEAYABgAAD/4QwtRXhpZgAATU0AKgAAAAgABwEyAAIAAAAUAAAAYkdGAAMAAAABAAUAAEdJAAMAAAABAFgAAIKYAAIAAAAWAAAAdpydAAEAAAAUAAAAAOocAAcAAAfSAAAAAIdpAAQAAAABAAAAjAAAAPYyMDA5OjAzOjEyIDEzOjQ4OjIzAE1pY3Jvc29mdCBDb3Jwb3JhdGlvbgAABZADAAIAAAAUAAAAzpAEAAIAAAAUAAAA4pKRAAIAAAADMDgAAJKSAAIAAAADMDgAAOocAAcAAAe0AAAAAAAAAAAyMDA4OjAyOjExIDExOjMyOjI0ADIwMDg6MDI6MTEgMTE6MzI6MjQAAAUBAwADAAAAAQAGAAABGgAFAAAAAQAAATgBGwAFAAAAAQAAAUACAQAEAAAAAQAAAUgCAgAEAAAAAQAACt0AAAAAAAAASAAAAAEAAABIAAAAAf/Y/+AAEEpGSUYAAQEAAAEAAQAA/9sAQwAQCwwODAoQDg0OEhEQExgoGhgWFhgxIyUdKDozPTw5Mzg3QEhcTkBEV0U3OFBtUVdfYmdoZz5NcXlwZHhcZWdj/9sAQwEREhIYFRgvGhovY0I4QmNjY2NjY2NjY2NjY2NjY2NjY2NjY2NjY2NjY2NjY2NjY2NjY2NjY2Nj...
上面是水母图书的文件记录。
2. 添加多本图书
2.1 添加多本图书 - HTML 定义
    <div id="pgAddMultBook" data-role="page">
      <header id="pgAddMultBookHdr" data-role="header" data-position="fixed" data-tap-toggle="false">
        <h1>Library 1.00</h1>
      </header>
      <div id="pgAddMultBookCnt" data-role="content">
        <h3>Add Multiple Books (separate by ;)</h3>
        <div id="pgAddMultBookForm">
          <div data-role="fieldcontain">
          <label for="pgAddMultBookTitle">Titles
          <span class='red'>*</span></label>
          <textarea required="" name="pgAddMultBookTitle" id="pgAddMultBookTitle" placeholder="Enter Titles here."
          title="Enter Titles here."></textarea></div>
        </div>
      </div>
      <footer id="pgAddMultBookFtr" data-role="footer" data-position="fixed" data-tap-toggle="false">
        <div id="pgAddMultBookFtrNavBar" data-role="navbar">
          <ul>
            <li>
              <a id="pgAddMultBookBack" data-icon="carat-l">Cancel</a>
            </li>
            <li>
              <a type="submit" id="pgAddMultBookSave" data-icon="action">Save</a>
            </li>
          </ul>
        </div>
      </footer>
    </div>
此屏幕非常简单。只有一个标签和一个文本区域控件,用户必须在其中输入多个以分号分隔的图书标题,然后单击“保存”。其底部导航器还有一个取消按钮,可将用户带回上一屏幕。
2.1 添加多本图书 - Javascript
当用户单击此屏幕上的“保存”按钮时,将执行以下操作...
// Save click event on Add Multiple page
$('#pgAddMultBookSave').on('click', function (e) {
    e.preventDefault();
    e.stopImmediatePropagation();
    //get form contents of multi entries
    var multiTitle = $('#pgAddMultBookTitle').val().trim();
    //save multi Title to JSON
    app.addMultBook(multiTitle);
});
以分号分隔的已输入图书标题被读取并存储在名为 multiTitle 的变量中。此变量被传递给 app.addMultBook 进行处理。让我们看看它做了什么。
// add new records to server storage.
app.addMultBook = function (multiTitle) {
    $.mobile.loading("show", {
        text : "Creating records...",
        textVisible : true
    });
    // define a record object to store the current details
    //loop through each record and add it to the database
    var TitleCnt,
    TitleTot,
    TitleItems,
    TitleItem,
    Title,
    BookRec;
    //split the items as they are delimited by ;
    TitleItems = Split(multiTitle, ";");
    TitleTot = TitleItems.length - 1;
    for (TitleCnt = 0; TitleCnt <= TitleTot; TitleCnt++) {
        //get each record being added
        TitleItem = TitleItems[TitleCnt];
        TitleItem = TitleItem.trim();
        if (Len(TitleItem) > 0) {
            // cleanse the record key of spaces.
            TitleItem = TitleItem.split(' ').join('-');
            Title = TitleItem;
            BookRec = {};
            BookRec.Title = TitleItem;
            // update JSON object with new record.
            //convert record to json to write to server
            var recordJSON = JSON.stringify(BookRec);
            // save the data to a server file, use the post method as it has 8MB minimum data limitation
            var req = Ajax("jsonSaveBook.php", "POST", recordJSON);
        }
    }
    $('#pgAddMultBookTitle').val('');
    $.mobile.changePage('#pgBook', {
        transition : pgtransition
    });
    $.mobile.loading("hide");
};
此方法接收分隔的图书标题。然后将它们拆分成一个数组。使用循环方法,每个图书标题都被清理,分配给一个对象,然后使用上面解释的 jsonSaveBook.php 进行保存。正如您注意到的,保存图书是相同的,但这现在是在一个循环中。完成后,将显示图书列表。对于这里添加的每本书,像价格、图片等其他详细信息仍然需要更新。我发现任何标题不以字母字符开头的图书标题在图书列表中表现不佳。
3. 图书列表
此功能提供图书库应用中所有已捕获图书的列表。对于每本已保存的图书,它都会从服务器读取并列出。
3.1 图书列表 - HTML 定义
    <div id="pgBook" data-role="page">
      <div data-position="left" data-display="overlay" data-position-fixed="true" id="pgBookLeftPnl" data-role="panel">
        <ul data-role="listview" id="pgBookLeftPnlLV">
          <li>
            <a data-transition="slide" href="#pgAddMultBook" class="ui-btn ui-icon-plus ui-btn-icon-left">New Multiple</a>
          </li>
          <li>
            <a data-transition="slide" href="#pgRptBook" class="ui-btn ui-icon-eye ui-btn-icon-left">Report</a>
          </li>
          <li>
            <a data-transition="slide" href="#pgMenu" class="ui-btn ui-icon-carat-l ui-btn-icon-left">Back</a>
          </li>
        </ul>
      </div>
      <header id="pgBookHdr" data-role="header" data-position="fixed" data-tap-toggle="false">
      <h1>Library 1.00</h1>
      <a data-role="button" id="pgBookMenu" data-icon="bars" data-transition="slide" href="#pgBookLeftPnl"
      class="ui-btn-left">Menu</a>
      <a data-role="button" id="pgBookNew" data-icon="plus" data-theme="b" class="ui-btn-right">New</a></header>
      <div id="pgBookCnt" data-role="content">
        <h3>Books</h3>
        <ul data-role="listview" data-inset="true" id="pgBookList" data-filter="true" data-filter-placeholder="Search Books">
          <li data-role="list-divider">Your Books</li>
          <li id="noBook">You have no books</li>
        </ul>
      </div>
    </div>
此页面本质上是空白的,仅在应用程序显示它之前动态更新。此页面有一个左侧面板,与上面讨论的“添加图书”面板类似,然后有一个名为 pgBookList 的 listview,将在运行时更新。几个 JS 函数使这成为可能。它们是 app.checkForBookStorage, app.getBook 和 app.displayBook.
// define events to be fired during app execution.
app.BookBindings = function () {
    // code to run before showing the page that lists the records.
    //run before the page is shown
    $(document).on('pagebeforechange', function (e, data) {
        //get page to go to
        var toPage = data.toPage[0].id;
        switch (toPage) {
        case 'pgBook':
            $('#pgRptBookBack').data('from', 'pgBook');
            // restart the storage check
            app.checkForBookStorage();
            break;
上面的代码演示了在显示图书列表页面(名为 pgBook)之前发生的事情。调用 app.checkForBookStorage 函数。这些将在下面进行解释。
3.2 图书列表 - Javascript
app.checkForBookStorage
//display records if they exist or tell user no records exist.
app.checkForBookStorage = function () {
    $.mobile.loading("show", {
        text : "Checking storage...",
        textVisible : true
    });
    //get records from JSON.
    var BookObj = app.getBook();
    // are there existing Book records?
    if (!$.isEmptyObject(BookObj)) {
        // yes there are. pass them off to be displayed
        app.displayBook(BookObj);
    } else {
        // nope, just show the placeholder
        $('#pgBookList').html(BookHdr + noBook).listview('refresh');
    }
    $.mobile.loading("hide");
};
app.checkStorage 在列表页面显示之前执行。它调用 app.getBook,后者转到服务器读取所有可用图书的记录,并将它们存储在一个对象中。这个对象包含每本图书,然后传递给 app.displayBook 以生成最终的 listview 内容。
app.getBook
//get all existing records from JSON
app.getBook = function () {
    $.mobile.loading("show", {
        text : "Getting records...",
        textVisible : true
    });
    // get Book records
    var BookObj = {};
    var icnt,
    itot;
    //get the list of files under directory
    var req = Ajax("jsonGetBook.php");
    if (req.status == 200) {
        var recFiles = req.responseText;
        recFiles = recFiles.split('\n');
        itot = recFiles.length - 1;
        for (icnt = 0; icnt <= itot; icnt++) {
            var recFile = recFiles[icnt];
            if (recFile.length > 0) {
                // read the file contents and display them
                var req = Ajax("jsonGetBook.php?file=" + encodeURIComponent(recFile));
                if (req.status == 200) {
                    // parse string to json object
                    var record = JSON.parse(req.responseText);
                    var Title = record.Title;
                    record.Title = record.Title.split('-').join(' ');
                    BookObj[Title] = record;
                }
            }
        }
        //sort the objects
        var keys = Object.keys(BookObj);
        keys.sort();
        var sortedObject = Object();
        var i;
        for (i in keys) {
            key = keys[i];
            sortedObject[key] = BookObj[key];
        }
        BookObj = sortedObject;
        return BookObj;
    }
    $.mobile.loading("hide");
};
app.getBook 运行 ajax 并调用 jsonGetBook.php 文件。这会返回服务器 Book 文件夹中的文件名列表。对于返回的每本图书,现在都会调用相同的方法来返回实际图书内容,其中包含图书标题、作者、ISBN 和图片链接。这些都将保存到一个包含所有图书的对象中,然后传递给 app.displayBook。请参见下面的 jsonGetBook.php。
app.displayBook
//display records in listview during runtime.
app.displayBook = function (BookObj) {
    $.mobile.loading("show", {
        text : "Displaying records...",
        textVisible : true
    });
    // create an empty string to contain html
    var html = '';
    // make sure your iterators are properly scoped
    var n;
    // loop over records and create a new list item for each
    //append the html to store the listitems.
    for (n in BookObj) {
        //get the record details
        var BookRec = BookObj[n];
        // clean the primary key
        var pkey = BookRec.Title;
        pkey = pkey.split('-').join(' ');
        BookRec.Title = pkey;
        //define a new line from what we have defined
        var nItem = BookLi;
        nItem = nItem.replace(/Z2/g, n);
        //update the title to display, this might be multi fields
        var nTitle = '';
        //assign cleaned title
        nTitle = n.split('-').join(' ');
        //replace the title;
        nItem = nItem.replace(/Z1/g, nTitle);
        //there is a count bubble, update list item
        var nCountBubble = '';
        nCountBubble += BookRec.Price;
        //replace the countbubble
        nItem = nItem.replace(/COUNTBUBBLE/g, nCountBubble);
        //there is a description, update the list item
        var nDescription = '';
        nDescription += BookRec.Author;
        nDescription += ', ';
        nDescription += BookRec.ISBN;
        //replace the description;
        nItem = nItem.replace(/DESCRIPTION/g, nDescription);
        //there is side content, update the list item
        var nSideContent = '';
        nSideContent += BookRec.Condition;
        //replace the description;
        nItem = nItem.replace(/SIDECONTENT/g, nSideContent);
        //there is a thumbnail for the list item, update the list item
        var nThumbNail = '';
        nThumbNail += BookRec.BookImage;
        //replace the thumbnail;
        nItem = nItem.replace(/THUMBNAIL/g, nThumbNail);
        html += nItem;
    }
    //update the listview with the newly defined html structure.
    $('#pgBookList').html(BookHdr + html).listview('refresh');
    $.mobile.loading("hide");
};
app.DisplayBook 接收所有已读取图书的对象,循环遍历每个对象并相应地更新 listview。有一些变量最初被定义为定义每个图书列表。
var BookLi = '<li><a data-id="Z2"><img src="THUMBNAIL" alt=""></img><h2>Z1</h2><p>DESCRIPTION</p><p><span class="ui-li-aside">SIDECONTENT</span></p><p><span class="ui-li-count">COUNTBUBBLE</span></p></a></li>';
var BookHdr = '<li data-role="list-divider">Your Books</li>';
var noBook = '<li id="noBook">You have no books</li>';
这些变量用于确保在上面的 app.displayBook 循环中正确显示每条图书记录。如上所示,计数气泡接收每本书的价格,描述/副标题接收作者和 ISBN,侧边内容接收图书的状况。缩略图接收服务器上的图片路径。
3.3 图书列表 - PHP
jsonGetBook.php
<?php
    //get the file contents from the server
    If (isset($_REQUEST['file'])) {
        $file = basename($_REQUEST['file']);
        echo file_get_contents('./Book/'.$file);
    } Else {
        If (is_dir('./Book') && $handle = opendir('./Book/')) {
            While (False !== ($entry = readdir($handle))) {
                If (!is_dir($entry)) {
                    echo basename($entry)."\n";
                }
            }
            closedir($handle);
        } Else {
            header("HTTP/1.0 404 Not Found");
        }
    }
?>
//listview item click eventt.
$(document).on('click', '#pgBookList a', function (e) {
    e.preventDefault();
    e.stopImmediatePropagation();
    //get href of selected listview item and cleanse it
    var href = $(this).data('id');
    href = href.split(' ').join('-');
    //save id of record to edit;
    $('#pgEditBook').data('id', href);
    //change page to edit page.
    $.mobile.changePage('#pgEditBook', {
        transition : pgtransition
    });
});
var BookLiRi = '<li><a data-id="Z2">Z1</a></li>';
与更新图书列表的适用方法类似,它们是以下几种:
app.pgAddBookcheckForBookStorageR 和 app.pgAddBookdisplayBookR.
注意每个名称末尾的 R。
注意:这些遵循与上面讨论的相同的方法,因此将是相同内容的重述。请浏览源代码以获取更多详细信息。
您可能已经注意到,“记录”图标是一个自定义图标,而不是 JQuery Mobile 的普通图标。这是通过如下定义来实现的:
.ui-icon-records:after {background-image: url("records.png");background-size: 14px 14px;}
使用了用户定义的 png,并在 HTML 定义中添加了 CSS 样式。
5. 图书报告
图书报告最初是一个空白的表格,在报告屏幕显示之前会被更新。
5.1 图书报告 - HTML 定义
<div id="pgRptBook" data-role="page">
<header id="pgRptBookHdr" data-role="header" data-position="fixed" data-tap-toggle="false">
<h1>Library 1.00</h1>
<a data-role="button" id="pgRptBookBack" data-icon="carat-l" class="ui-btn-left">Back</a>
<div data-role="controlgroup" data-type="horizontal" class="ui-btn-right" style="margin-top:0;border-top:0;">
<a data-role="button" download="Book.xls" onclick="return ExcellentExport.excel(this, 'RptBook', 'Book');"
id="pgRptBookExport" data-icon="exportexcel" href="#">Export</a>
<a data-role="button" id="pgRptBookNew" data-icon="plus" data-theme="b" data-transition="slide"
href="#pgAddBook">New</a></div>
</header>
<div id="pgRptBookCnt" data-role="content">
<table id="RptBook" data-column-btn-text="Columns To Display" data-column-btn-theme="b" data-role="table"
data-mode="columntoggle" data-column-popup-theme="a" class="ui-responsive table-stroke table-stripe ui-shadow">
<caption>Books Report</caption>
<thead>
<tr class="ui-bar-a">
<th class="ui-bar-a ui-body-c">Title</th>
<th data-priority="2" class="ui-bar-a ui-body-c">Author</th>
<th data-priority="3" class="ui-bar-a ui-body-c">ISBN</th>
<th data-priority="4" class="ui-bar-a ui-body-c">Condition</th>
<th data-priority="5" class="ui-bar-a ui-body-c">Price</th>
<th data-priority="6" class="ui-bar-a ui-body-c">Image Preview</th>
</tr>
</thead>
<tfoot>
<tr>
<td></td>
</tr>
<tr>
<td class='ui-body-c' colspan="6">Powered by JQM.Show -
https://play.google.com/store/apps/details?id=com.b4a.JQMShow</td>
</tr>
</tfoot>
</table>
</div>
</div>
此屏幕的标题栏上有三个按钮:返回、导出到 Excel 和添加新图书。为了实现右侧的两个按钮,我使用了如下所示的 controlgroup:
<div data-role="controlgroup" data-type="horizontal" class="ui-btn-right" style="margin-top:0;border-top:0;">
    <a data-role="button" download="Book.xls" onclick="return ExcellentExport.excel(this, 'RptBook', 'Book');" id="pgRptBookExport" data-icon="exportexcel" href="#">Export</a>
    <a data-role="button" id="pgRptBookNew" data-icon="plus" data-theme="b" data-transition="slide" href="#pgAddBook">New</a>
</div>
从上面可以看出,在这个 div controlgroup 中有一个导出按钮和一个新建按钮。导出按钮的 data icon 也是自定义的,如下所示,使用了自定义图标。
.ui-icon-exportexcel:after {background-image: url("exportexcel.png");background-size: 14px 14px;}
表格定义了与图书相关的所有列。在图片预览中,我们希望显示每个图书的封面。
5.2 图书报告 - Javascript
如前所述,在显示图书报告之前,会生成图书报告。这是通过调用
app.BookRpt();
您可以在此函数中看到这一点。
$(document).on('pagebeforechange', function (e, data) {
app.BookRpt
//display records in table during runtime.
app.BookRpt = function () {
    $.mobile.loading("show", {
        text : "Loading report...",
        textVisible : true
    });
    //clear the table and leave the header
    $('#RptBook tbody tr').remove();
    // get Book records.
    var BookObj = app.getBook();
    // create an empty string to contain all rows of the table
    var newrows = '';
    // make sure your iterators are properly scoped
    var n;
    // loop over records and create a new row for each
    // and append the newrows with each table row.
    for (n in BookObj) {
        //get the record details
        var BookRec = BookObj[n];
        //clean primary keys
        n = n.split('-').join(' ');
        //create each row
        var eachrow = '<tr>';
        eachrow += '<td class="ui-body-c">' + n + '</td>';
        eachrow += '<td class="ui-body-c">' + BookRec.Author + '</td>';
        eachrow += '<td class="ui-body-c">' + BookRec.ISBN + '</td>';
        eachrow += '<td class="ui-body-c">' + BookRec.Condition + '</td>';
        eachrow += '<td class="ui-body-c">' + BookRec.Price + '</td>';
        eachrow += '<td class="ui-body-c"><img src=' + BookRec.BookImage + ' alt="" height=100px width=100px></img>' + '</td>';
        eachrow += '</tr>';
        //append each row to the newrows variable;
        newrows += eachrow;
    }
    // update the table
    $('#RptBook').append(newrows);
    // refresh the table with new details
    $('#RptBook').table('refresh');
    $.mobile.loading("hide");
};
此方法首先清除显示图书的表格,执行上面讨论的 **app.getBook** 方法,循环遍历每条图书记录,并提取标题、作者、ISBN、状况、价格和图书封面的链接。
下面展示了实现显示每个图书封面的定义:
eachrow += '<td class="ui-body-c"><img src=' + BookRec.BookImage + ' alt="" height=100px width=100px></img>' + '</td>';
此处定义的宽度和高度与“添加图书”页面相同。
关注点
对我来说,令人愉悦的部分和从中学习到的东西是...
1. 左侧面板 listview 按钮图标左对齐
2. 按钮的自定义图标
3. 右侧面板
4. 文件输入 OnChange 事件和 FileReader 将图片上传到服务器
5. 解码 base64 字符串以将图片保存到服务器。
6. 在表格和 listview 缩略图中显示图片。
历史
这是我关于 JQuery Mobile CRUD 功能的文章的延续,增加了一些功能,例如将图片存储在服务器上、标题栏上的多个按钮、自定义图标、右侧面板和 PHP。作为参考,Create a CRUD Web App using JQuery Mobile and PHP Ajax Calls 文章对于本文未提及的其他内容将有所帮助。
就这些了,各位,尽情享用!