
[教程 6] 线条拖放与线条选择
4.71/5 (7投票s)
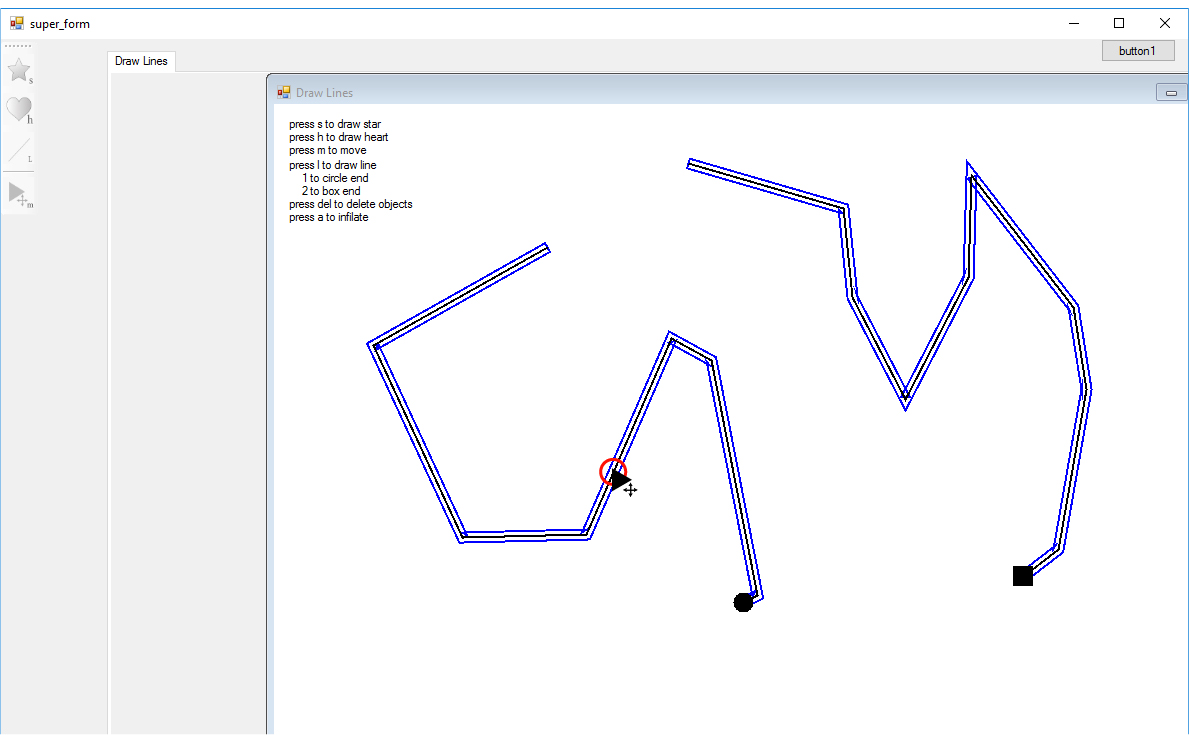
我们将为绘制的线条周围构建一个轮廓线,这样我们就可以测试鼠标单击此轮廓线以知道选择了哪条线。在接下来的更新中,我们将在移动工具内构建一个选择功能。
引言
这是系列教程中的第六篇教程,讲解如何使用 C# 在 Windows 窗体中构建一个图形程序,该程序可以将艺术作品导出为矢量格式。
- 教程1---https://codeproject.org.cn/Tips/1082353/tut-GDIplus-Artwork-from-svg
- 教程2---https://codeproject.org.cn/Tips/1082633/interactivaly-add-multiple-shapes-using-linked-lis
- 教程3---https://codeproject.org.cn/Tips/1084073/tut-graphics-program-using-Csharp-Drag-Drop-Delete
- 教程4---https://codeproject.org.cn/Tips/1105143/tut-Draw-Lines-with-Circle-and-Rectangle-End
- 教程5---https://codeproject.org.cn/Tips/1105495/tut-form-communication-multi-tab-program-custom-cu
……此外,您还将了解如何移动、删除、Ctrl+Z您的矢量图,并将其保存为特殊格式,以便您的程序再次读取。
此外,我们将学习如何保存 XML 文件... 如何导出为 Verilog 格式... 如何使用星形算法... 如何使用手形工具... 如何手动创建撤销技术。
您将能够构建什么
- https://drive.google.com/folderview?id=0B739QmcCMLMHVU1DbHhIQlZ3MTA&usp=sharing
- https://www.youtube.com/watch?v=6hXJ1EoAYc0
我们将为绘制的线条构建一个轮廓线(用户绘制完箭头线;完成线条绘制后),以便我们测试鼠标单击此轮廓线以知道选择了哪条线。
更新
在移动工具内构建了一个选择功能,以便用户无需移动对象和线条即可选择对象和线条。
背景
- 教程1---https://codeproject.org.cn/Tips/1082353/tut-GDIplus-Artwork-from-svg
- 教程2---https://codeproject.org.cn/Tips/1082633/interactivaly-add-multiple-shapes-using-linked-lis
- 教程3---https://codeproject.org.cn/Tips/1084073/tut-graphics-program-using-Csharp-Drag-Drop-Delete
- 教程4---https://codeproject.org.cn/Tips/1105143/tut-Draw-Lines-with-Circle-and-Rectangle-End
- 教程5---https://codeproject.org.cn/Tips/1105495/tut-form-communication-multi-tab-program-custom-cu
教程地图
轮廓线
- 编辑
line 类(以添加轮廓线) - 编辑
move 函数以确定选定的线条 - 编辑
move 函数以移动线条和轮廓 - 编辑
onPaint()函数以绘制线条和轮廓 - 仅在选择移动工具时使轮廓可见
将选择功能添加到移动工具
1-在 Form1 函数的 Form1_MouseClick 中,在 move tool 的 if 块内进行操作,并复制代码段来知道哪个被选中
2- 取消选择功能
3-编辑 super_form 中的 tabControl1_KeyDown 的删除条件
轮廓线
1-编辑 line 类(以添加轮廓线)
我们将编辑 line 类,使其具有轮廓(轮廓将是一个图形路径),
public GraphicsPath outline = new GraphicsPath();
当用户结束绘制线条时,我们将创建此轮廓(从之前的教程中,我们创建了一个函数,在用户完成绘制后会被调用,这个函数是 draw_arrow() 函数),
因此,我们将编辑 draw_arrow() 函数。
轮廓将是线条本身的副本,我们将使用 clone 函数(我们将使用 clone 函数,由于 C# 本身的概念)在 C# 中,每个对象都是一个指针,因此当您将一个指针(称为 b)复制到一个指针(称为 a)时,
object b;

object a = b;
指针 a 并不是真正独立于 b 的指针,所以对象 a 的更改不会独立于对象 b。因此,我们将使用 Clone() 函数,但必须定义对象本身的类型。
object b;

object a = (object) b.Clone();
现在在我们的代码中
outline =(GraphicsPath) path_line.Clone();
然后我们需要使用 Widen() 函数,该函数会在线条周围创建描边(以服务于线条选择的概念)。
而 Widen() 函数需要一个 pen 对象,该对象创建一个带有颜色和宽度的笔,以用于由 Widen() 函数创建的路径。
            Pen pen = new Pen(Brushes.Red, 10);
            outline.Widen(pen);
所以,总而言之,线条函数将是
   public GraphicsPath outline = new GraphicsPath();


   public void draw_arrow()
        {
           .//old code

           .

            //new code
            outline =(GraphicsPath) path_line.Clone();

            Pen pen = new Pen(Brushes.Red, 10);
            outline.Widen(pen);
            //new code

            .

            .//old code

        }
2-编辑 move 函数 以确定选定的线条
从之前的教程中,我们在 move 函数 中进行了操作,在移动对象之前,我们首先处理了如何知道用户选择了哪个对象,我们将做类似的事情来知道选择了哪条线,但如果用户选择了对象而不是线条,那么就没有必要测试线条,所以我们将使用一个布尔变量来知道是否选择了对象,这样就无需测试线条。
public bool skip_checking_lines = false;
我们将使用一个字符串来告诉选择了哪种类型。
public string selected_type = "";
在 move 函数 中, 粗体 是添加到 move 函数 的新代码。
 private void Form1_MouseMove(object sender, MouseEventArgs e)
        {

         //new
       skip_checking_lines = false; //always reset the bool to false
       //new

          if (first == true && e.Button == m && super_form.action.Equals("move"))
            {
                int counter = 0;

                foreach (shapes sh in shape_list)
                {
                    if (sh.draw_svg().Path(render).IsVisible(e.Location))
                    {
                        selected_recatngle = sh.draw_svg().Path(render).GetBounds();
                        selected = counter;
                        is_selected = true;

                        //new
                    skip_checking_lines = true;
                    selected_type = "shape";
                    //new

                        break;
                    }

                    else
                    {
                        is_selected = false;
                    }
                    counter++;

                }
                if (!skip_checking_lines)
                {
                   //know which line is selected
                }
             }

.

.//old code of moving objects and new code of moving lines

.

}
现在我们将处理确定选择哪条线的代码段。
首先,我们将使用一个整数来保存选定的线条。
public int selected_line;
在这里,我们将在 if (!skip_checking_lines) 中编写代码来确定选择哪条线,只需添加一个 foreach 循环来遍历所有线条列表,
if (!skip_checking_lines)
                {
                    int line_move_counter = 0;
                    foreach (lines Line in lines_list)
                    {

                       line_move_counter ++;
                    }

                }
然后设置一个 if 条件来测试鼠标点击是否在轮廓内。
- 使用
IsVisible函数。 - 将选定类型设为“line”。
- 如果测试成功,则让
is_selected布尔值为true。 - 如果测试失败,则让
is_selected布尔值为true。 - 如果测试成功,则使用
break停止进一步测试,但在之前,使用整数selected_line来保存line_move_counter。
if (!skip_checking_lines)
                {
                    int line_move_counter = 0;
                    foreach (lines Line in lines_list)
                    {
                        if (Line.outline.IsVisible(e.Location) ||
                            Line.arrow_path_line.IsVisible(e.Location))
                        {
                            selected_type = "line";
                            is_selected = true;
                            continous_select = true;// will discuss why it is used
                            selected_line = line_move_counter;
                            break;
                        }

                        else
                        {
                            is_selected = false;
                        }
                        line_move_counter++;
                    }

                }
有一个重要的概念需要讨论。
无需测试鼠标是否在轮廓内,一旦您进行了第一次测试,也就是说,您只需要测试一次,然后用户就可以继续移动线条,因此在第一次测试后,无需持续测试鼠标是否在轮廓内。
所以我们将使用一个名为 continous_select 的布尔变量,并将其初始化为 false。
public bool continous_select = false;
所以现在使用这个概念,代码将是
 if (!skip_checking_lines)
                {
                    int line_move_counter = 0;
                    Point with_offset = new Point(e.X - 10, e.Y - 10);//will discuss it
                    foreach (lines Line in lines_list)
                    {
                        if (continous_select == true)
                        {
                            selected_type = "line";
                            is_selected = true;
                        }

                        else if (continous_select != true
                            &&( Line.outline.IsVisible(with_offset) ||
                                Line.arrow_path_line.IsVisible(with_offset)))
                        {
                            selected_type = "line";
                            is_selected = true;
                            continous_select = true;
                            selected_line = line_move_counter;
                            break;
                        }

                        else
                        {
                            is_selected = false;
                        }
                        line_move_counter++;
                    }

                }
但是我们仍然需要重置 continous_select 布尔值。
mouse_move 的一般概念是,我们将重置放在最后一个 else 块中。
 private void Form1_MouseMove(object sender, MouseEventArgs e)
        {

            if (first == true && e.Button == m && super_form.action.Equals("move"))
             {
             //determining which shape or line is selected
             //which we has edited
             }

            if (is_selected == true && e.Button == m && super_form.action.Equals("move") )
            {
             //move the objects and lines
            }

            else
            {
              //reset First flag
             continous_select = false;
             }

}
您可以看到我使用了一个偏移点进行测试,我们只是使用了 e.X -10 和 e.Y -10 的偏移量。
Point with_offset = new Point(e.X - 10, e.Y - 10);
这是因为在使用具有默认中心热点的自定义光标的概念。

因此,我们需要通过简单的偏移来更改热点。

3-编辑 move 函数 以移动线条和轮廓
现在我们将编辑 move_function 来移动线条,我们将编辑 if (is_selected == true && e.Button == m && super_form.action.Equals("move") ) 下面的部分,它处理移动对象和移动线条,但在那之前,我们将使用 2 个整数进行移动。
public int oldX, oldY;
所以我们的代码将是,不要忘记更新 oldx 和 oldy,我们将使用一个 Matrix 来移动所有
- 线条列表本身。
- 箭头
- outline
private void Form1_MouseMove(object sender, MouseEventArgs e)
{
        if (first == true && e.Button == m && super_form.action.Equals("move"))
        {
        //determining which shape or line is selected
        //which we has edited
        }

        if (is_selected == true && e.Button == m && super_form.action.Equals("move") )
        {
                if (selected_type.Equals("shape"))
                {
                 //move the objects like in previous code
                }

                if (selected_type.Equals("line"))
                {
                    Matrix ma = new Matrix();
                    ma.Translate(e.X - oldX, e.Y - oldY);

                    lines_list[selected_line].path_line.Transform(ma);
                    lines_list[selected_line].arrow_path_line.Transform(ma);
                    lines_list[selected_line].outline.Transform(ma);
                }

        }

        else
        {
        //reset First flag
          continous_select = false;
        }
            Invalidate();

               //new
            oldX = e.X;
            oldY = e.Y;
            //new
}
4-编辑 onPaint() 函数以绘制线条和轮廓
现在我们需要绘制轮廓本身,以便用户知道单击何处来选择线条。
所以编辑 onPaint() 函数为
 foreach (lines l in lines_list)
            {
                //new
                Pen selection_pen_line = new Pen(Brushes.Blue, 2);
                e.Graphics.DrawPath(selection_pen_line, l.outline);
                //new

                e.Graphics.DrawPath(l.pen, l.path_line);
                e.Graphics.FillPath(Brushes.Black, l.arrow_path_line);

            }
5-仅在选择移动工具时使轮廓可见
只需编辑 onPaint() 函数,以便仅在选择了 action tool 时绘制线条的描边。
 foreach (lines l in lines_list)
            {
                //new
                if (super_form.super_action.Equals(action.move))
                {
                    Pen selection_pen_line = new Pen(Brushes.Blue, 2);
                    g.DrawPath(selection_pen_line, l.outline);
                }
                //new

                g.DrawPath(l.pen, l.path_line);
                g.FillPath(Brushes.Black, l.arrow_path_line);

            }
将选择功能添加到移动工具
1-在 Form1 函数的 Form1_MouseClick 中,在 move tool 的 if 块内进行操作,并复制代码段来知道哪个被选中
在 Form1 的 Form1_MouseClick 中。
 private void Form1_MouseClick(object sender, MouseEventArgs e)
        {

if (super_form.super_action.Equals(action.star))
            { //old code }

 else if (super_form.super_action.Equals(action.heart))
            { //old code }

else if (super_form.super_action.Equals(action.line))
            { //old code }

//new code
 else if (super_form.super_action.Equals(action.move))
            {
                skip_checking_lines = false;

                int counter = 0;

                foreach (shapes sh in shape_list)
                {
                    if (sh.draw_svg().Path(render).IsVisible(e.Location))
                    {
                        selected_recatngle = sh.draw_svg().Path(render).GetBounds();
                        selected = counter;
                        is_selected = true;

                        //new
                        skip_checking_lines = true;
                        selected_type = "shape";
                        //new

                        break;
                    }

                    else
                    {
                        is_selected = false;
                    }
                    counter++;
                }
                first = false;
            }
//new code

}
2- 取消选择功能
在这里我们将解决 2 个问题。
-
仅当移动形状或选择形状时才显示选择矩形。
- 选择白色背景中的形状时取消选择。
只需修改 Form1 中的 Form1_MouseClick 函数,在未成功选择形状的 else 条件中进行操作。
  private void Form1_MouseClick(object sender, MouseEventArgs e)
        {
            if (super_form.super_action.Equals(action.star))
            {   }

            else if (super_form.super_action.Equals(action.heart))
            {  }


            else if (super_form.super_action.Equals(action.line))
            {   }

           else if (super_form.super_action.Equals(action.move))
            {
                skip_checking_lines = false;

                int counter = 0;

                foreach (shapes sh in shape_list)
                {
                    if (sh.draw_svg().Path(render).IsVisible(e.Location))
                    {
                        selected_recatngle = sh.draw_svg().Path(render).GetBounds();
                        selected = counter;
                        is_selected = true;

                        skip_checking_lines = true;
                        selected_type = "shape";
                        break;
                    }

                    else
                    {

                         //new
                        RectangleF null_rectangle = new RectangleF();
                        selected_recatngle = null_rectangle;

                        //new

                        is_selected = false;
                    }
                    counter++;
                }
                first = false;
            }

        }
3-编辑 super_form 中的 delete 条件 tabControl1_KeyDown。
编辑 delete 的条件,以将测试 selected 布尔值替换为检查 selected rectangle 是否为 null。
private void tabControl1_KeyDown(object sender, KeyEventArgs e)
        {

            .

            .//old code

            .

            else if (e.KeyData == Keys.Delete && selected_form.selected_recatngle!=null )
            {
                if (selected_form.selected_type == "shape")
                {
                    selected_form.shape_list.RemoveAt(selected_form.selected);

                    RectangleF null_rectangle = new RectangleF();
                    selected_form.selected_recatngle = null_rectangle;

                    selected_form.is_selected = false;
                }
                selected_form.Invalidate();
            }
        }