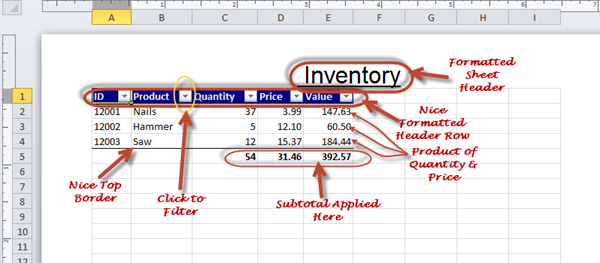
插入/访问/格式/筛选/设...
4.87/5 (10投票s)
导出高级 Excel 2007 报表
目录
- 引言
- 创建新的工作簿
- 创建新的工作表
- 按行索引和列索引访问单元格
- 按地址访问单元格
- 在单元格中插入值
- 设置相对公式引用
- 添加 Excel 函数 SUBTOTAL()
- 设置单元格区域的样式
- 设置单元格区域的数字格式
- 启用 MS Excel 的筛选功能
- 启用单元格的“自动调整大小”
- 设置工作表的页眉和页脚
- 设置打印机属性
- 设置页面布局
- 设置自定义属性
- 最终输出
- 声明
- 历史
引言
这是文章 使用 EPPlus 在 C#.NET 中创建/读取/编辑高级 Excel 2007/2010 报表 的扩展。废话不多说,直接开始吧。:)
快速入门
创建新的工作簿
System.IO.FileInfo newFile = new FileInfo(@"E:\Sample1.xlsx");
ExcelPackage package = new ExcelPackage(newFile);
创建新的工作表
创建一个“库存”工作表。
// Add a worksheet to the empty workbook
ExcelWorksheet worksheet = package.Workbook.Worksheets.Add("Inventry");
按行索引和列索引访问单元格
要打印第一行第一个单元格(即 A1)的值,请看下面的代码。Cells 数组的第一个索引是要访问的单元格的行索引,第二个索引是列索引。
Console.WriteLine(worksheet.Cells[1, 1].Value.ToString());
按地址访问单元格
你知道的,这很简单,如果你想访问 Excel 单元格 'A1',只需像下面这样放置地址
Console.WriteLine(worksheet.Cells["A1"].Value.ToString());
在单元格中插入值
让我们先按行和列索引插入值
// Inserting values in the first row...
worksheet.Cells[1, 1].Value = "ID";
worksheet.Cells[1, 2].Value = "Product";
worksheet.Cells[1, 3].Value = "Quantity";
worksheet.Cells[1, 4].Value = "Price";
worksheet.Cells[1, 5].Value = "Value";
现在我将按单元格地址插入值
// Add some items...
// Inserting values in the first row for: ID, Product, Quantity & Price respectively
worksheet.Cells["A2"].Value = 12001;
worksheet.Cells["B2"].Value = "Nails";
worksheet.Cells["C2"].Value = 37;
worksheet.Cells["D2"].Value = 3.99;
设置相对公式引用
如果你不知道 Microsoft Excel 的 '相对公式引用' 功能,请先阅读它,因为我们现在要利用这个功能。你有没有注意到我对“Value”列(即 Cells[1, 5] 或 Cells["E2"])没有任何操作,哦,我真的忘了。好吧,好吧……现在我要将“Quantity”和“Price”的乘积结果放入“Value”列下的单元格中。我们来看看怎么做
worksheet.Cells["E2:E4"].Formula = "C2*D2";
完成!!!哦……这真的太简单了。:)
添加 Excel 函数 SUBTOTAL()
如果你不知道 Microsoft Excel 的 SUBTOTAL() 函数,请先查看它,在这里我们还需要使用 '相对公式引用' 功能。现在,我们将显示“Quantity”、“Price”和“Value”列值的页脚行的汇总值
worksheet.Cells[5, 3, 5, 5].Formula = string.Format
("SUBTOTAL(9, {0})", new ExcelAddress(2, 3, 4, 3).Address);
设置单元格区域的样式
现在,我们将看到如何设置第一行前 5 个单元格的字体样式、背景颜色、填充类型和字体颜色
// Formatting style of the header
using (var range = worksheet.Cells[1, 1, 1, 5])
{
	// Setting bold font
	range.Style.Font.Bold = true;
	// Setting fill type solid
	range.Style.Fill.PatternType = OfficeOpenXml.Style.ExcelFillStyle.Solid;
	// Setting background color dark blue
	range.Style.Fill.BackgroundColor.SetColor(Color.DarkBlue);
	// Setting font color
	range.Style.Font.Color.SetColor(Color.White);
}
设置单元格区域的数字格式
现在我们需要格式化值,因为 Excel 表中的值,有些是 string,有些是 double,有些是 int。首先,你需要了解 Microsoft Excel 数字格式。所以如果你不知道,请先查看它。
- 为“
Quantity”列设置整数格式worksheet.Cells["C2:C5"].Style.Numberformat.Format = "#,##0";
- 为“
Price”和“Value”列设置小数格式worksheet.Cells["D2:E5"].Style.Numberformat.Format = "#,##0.00";
- 为“
Product”列设置文本格式worksheet.Cells["A2:A4"].Style.Numberformat.Format = "@";
启用 Microsoft Excel 的筛选功能
如果你真的不知道 Microsoft Excel 的 '筛选' 功能,请先阅读它。让我们为所有单元格应用筛选
worksheet.Cells["A1:E4"].AutoFilter = true;
启用单元格的“自动调整大小”
让我们为所有单元格应用自动调整大小,这太简单了,看看就行了
worksheet.Cells.AutoFitColumns(0);
设置工作表的页眉和页脚
- 让我们先为这个表添加页眉文本
worksheet.HeaderFooter.OddHeader.CenteredText = "&24&U&\"Arial,Regular Bold\" Inventry";
你有没有注意到我分配在“
CenteredText”中的string,不仅包含纯文本,还包含格式化文本,即字体大小、字体类型等。 - 让我们在页脚右侧添加页码+总页数
worksheet.HeaderFooter.OddFooter.RightAlignedText = string.Format("Page {0} of {1}", ExcelHeaderFooter.PageNumber, ExcelHeaderFooter.NumberOfPages); - 让我们在页脚中间添加工作表名称
worksheet.HeaderFooter.OddFooter.CenteredText = ExcelHeaderFooter.SheetName;
- 让我们在页脚左侧添加文件路径
worksheet.HeaderFooter.OddFooter.LeftAlignedText =
	ExcelHeaderFooter.FilePath + ExcelHeaderFooter.FileName;
设置打印机属性
设置打印属性将在打印时为您提供帮助。例如,当分页时,页眉将在下一页自动可用,方法是启用这些设置
worksheet.PrinterSettings.RepeatRows = worksheet.Cells["1:1"];
worksheet.PrinterSettings.RepeatColumns = worksheet.Cells["A:E"];
设置页面布局
通过此设置,我们可以以页面布局模式查看工作表,让我们应用
worksheet.View.PageLayoutView = true;
设置自定义属性
package.Workbook.Properties.SetCustomPropertyValue
	("Checked by", "Debopam Pal");
package.Workbook.Properties.SetCustomPropertyValue
	("AssemblyName", "EPPlus");
最终输出

页脚图片

声明
请下载源代码了解详情。我希望你能理解,因为源代码已经记录在案。如果有什么疑问,请在下方发布您的评论。谢谢。
历史
- 首次发布:使用 EPPlus 在 C#.NET 中创建/读取/编辑高级 Excel 2007/2010 报表
- 这只是首次发布的扩展。
- 我将在下一个版本中带来 Excel 图表、加密 Excel 文件、Excel 数据透视表等等。谢谢。
